sdreef

Well-Known Member
View Badges
Joined
Dec 24, 2015
Messages
849
Reaction score
3,323
Rating - 0%
0   0   0
December 2020
IMG_2721.jpeg


One Year
1639710676439.png


Two Years Old
1673126078691.png


Three years old
1709871218922.png


Since 2015, I've been keeping a 60 cube tank. I used dry rock and the system took some time to mature and eventually evolved into an acropora dominant mixed reef. I enjoy seeing larger colonies, but space was getting tight and with my wife's encouragement decided it was time for a larger system.

Here are the basics for the new set up.

Tank
Crystal Dynamics 84x34x27
Modular Marine External Overflow
1" Returns

Lighting
Halides, T5, and LED
Giesmann Spectra 72".
- 250 Watt Radiums x3 powered by IceCap Selectable Ballast running at 250 HQI
- Year 0-1 ATI Blue Plus x 4, Year 1-2 ATI blue plus x 3, purple plus x 1, Year 2-3 ATI B+ x 3, KZ Fiji Purple x 1
- Current T5s 3x ATI Blue Plus, 1x ATI coral plus
- Reef Brite XHO Blue 72" x 2
Photoperiod: Halides: 6 hrs, T5 10 hrs, LED 12 hrs

Sump
Geo 66x20x15
Drain | Mechanical Filtration | Skimmer | Dual Return | Refugium

Filtration
Dual Clarisea SK-5000
Skimmer: Bubble King Deluxe 200
Geo Media reactors x 2, RowaPhos changed every two weeks, ROX Carbon 2/3 cup x 1 week/ month

UV: Lifegard Promax 90 Watt (Offline January 2024)
Refugium: Lit by Reefbrite Lumilite Plantlyte 18", Added Tunze Eco Chic December 2022

Flow
MP40 x 2
MP60 x 4

Controller
- Neptune Apex

Chemistry
-Calcium Reactor: Deltec Twin Tech 1500 (Running TBD)
-Red Sea Dosing pump (Red Sea Foundation Alkalinity, Calcium, Magnesium)
-Avast K1 Kalk Stirrer (added August 2021, Offline September 2022)

Neptune Trident


Water
- Accounting for displacement approximately 260 gallons of water in system
- Salt: TM Pro, Changed to Aqua Forest Reef Salt September 2022

-Daily AWC with Neptune DOS, Volume 2021 10 L / day Increased to 20 L / day 2022 (2% / day).
- Mixing Station located in Garage
- ATO reservoir located in garage 90 feet from Tank
- ATO Tunze Osmolator with Spectrapure WXM Pump (Gen 7) located under tank by sump

IMG_2525.jpg


I never did a build thread for my prior tank so I'll post some progression shots

2015
IMG_2882.JPG


2016
IMG_3526.jpg


2017
IMG_5740.JPG


2019
IMG_9425.jpg

IMG_8749.jpeg

2020
 
Last edited:
OP
OP
sdreef

sdreef

Well-Known Member
View Badges
Joined
Dec 24, 2015
Messages
849
Reaction score
3,323
Rating - 0%
0   0   0
Regarding the structure of my aquascape, I want to try to keep it more open in order to allow more water flow without cranking the pumps.

I previously cycled my rock in my tank after setting it up and used dry Marco rock. I've been successful in avoiding some pests such as aptasia for 5 years, but introduced others like vermetids. The tanks was also very slow to mature.

This time with a four month lead time, I wanted to cycle my rocks in advance. I also built individual structures using Marco E-400 cement. This allowed me to build different types of structures and to have tiers off of the sand bed.

I used a piece of plywood 84" x 34" as my footprint although painters tape could have worked, this worked better for me in keeping the cement off the surface of my workspace. I was able to get established and dried "live rock". The established rock had known issues like aptasia and so I started by drying it out. I know this could have a detrimental microbiological effect, but didn't feel I had a choice due to the other hitchhikers. Hopefully some of the good bacteria can survive in dormancy until the tank is running.

I found the flat foundation rocks to be very useful as a base piece for stability. I created multiple individual rock structures. I used aragonite sand to cover many of the concrete seams.


IMG_1334.jpg


IMG_1335.jpg


IMG_1488.jpg


IMG_1486.jpg


IMG_1661.jpg
IMG_1679.jpg
 
Last edited:
OP
OP
sdreef

sdreef

Well-Known Member
View Badges
Joined
Dec 24, 2015
Messages
849
Reaction score
3,323
Rating - 0%
0   0   0
I combined the structures on the plywood footprint to get ideas for my final aquascape and photographed multiple configurations for reference to help with set up when the tank arrives.

The structures went into bins filled with filtered ocean water from Scripps and powerheads. I performed two water changes the first month. After that I added Fritz Turbo start and nitrocycle. After a month, one more water change, and I added hermit crabs, 5280 copepods from algae barn from my LFS that were nearly expired and added one round of phytoplanton to help boost the pod population. The bins were periodically fed with flakes. No more water changes, but the bins were topped off with fresh water once a week.

I dried the rock. and one of the downsides is the reduction in microbial diversity. In an effort to increase the diversity, I obtained live mud and placed it in plastic container that I rotated periodically between the bins.
I decided to use this approach based on some data presented in this thread.


I used the mud tested in the thread above.
https://floridapets.com/epages/047c...ategories/Live_Products/Live_MudSand/Live_Mud

The structures and aquascape took me some time to figure out. The rocks cycled for three months before the tank arrived.

IMG_2484.jpg
IMG_1685.jpg
 
Last edited:
OP
OP
sdreef

sdreef

Well-Known Member
View Badges
Joined
Dec 24, 2015
Messages
849
Reaction score
3,323
Rating - 0%
0   0   0
For the lighting, I decided to go with a combination of halides / T5s / LEDs. I have a hybrid LED / T5 for my current system and it has worked well. I've never owned halides, but have alway loved the color and quality of the light they produce. I was able to find a Giesmann Spectra T5/ Halide Hybrid. I integrates two 72" Reefbrite XHO strips using black mending plates.

To keep things looking clean I located a passthrough behind the fixture. I have a closet that will house many of the electronics for the tank. The cables from the fixture pass through to the closet behind the tank. There is also two gang passthrough located down low that will be concealed by the stand that I will use to pass the cables from sump to the closet.

IMG_2308.jpg
IMG_2656.jpg
IMG_2309.jpg


Amazon links:
2 gang pass through
1 gang pass through
black mending plates
 
Last edited:
OP
OP
sdreef

sdreef

Well-Known Member
View Badges
Joined
Dec 24, 2015
Messages
849
Reaction score
3,323
Rating - 0%
0   0   0
Some photos of the plumbing to the sump and overflow. The drains from the overflow are each 1.5". There will be two return pumps. Each has a 1" output going to 1" plumbing.
20201115_135438.jpg

20201115_135453.jpg

20201115_135534.jpg


There will be a bypass system with ball valves off the returns in order to allow both return lines to run off of a single pump in the event that one pump goes down for any reason or just maintenance.
image000000.jpg


Each pump will supply water to one of the returns. The return lines are 1". I will have a Y adapter on each return splitting from 1" modular hose to two 3/4" loc line returns on each side of the tank.

20201115_135257.jpg
 
Last edited:
OP
OP
sdreef

sdreef

Well-Known Member
View Badges
Joined
Dec 24, 2015
Messages
849
Reaction score
3,323
Rating - 0%
0   0   0
This looks like it's going to be amazing! Can't wait to see where you go from here. Do you have any idea what you will stock yet?
Thanks! In terms of coral, will have mainly acropora up higher. I'm going to do my best to select location based on the form of the colony. I will have a mix of LPS on the sand. Eventually will transfer from my current system once I have a feel for the new set up and have stability.

Regarding fish, early on I'm planning on adding some Zebrasoma tangs and a group of threadfin cardinalfish with the hope of seeing a school of fish. Next up, will likely be a group of anthias and possibly some other more timid fish. From there I'll be transferring some of the fish from the other system. I would like to try Quoyi parrotfish, but I've seen success has been limited. I'm trying to the timing of when to add one early vs more mature tank that might give me the best chance of success. I love wrasses and will add once I've got a tight fitting lid. That's the current plan, but I'm still working on it.

C1225EE9-CFD2-4C93-9CCF-933652589962_1_105_c.jpeg
 
Last edited:
OP
OP
sdreef

sdreef

Well-Known Member
View Badges
Joined
Dec 24, 2015
Messages
849
Reaction score
3,323
Rating - 0%
0   0   0
One of the things I wish were better about my 60 cube tank is working in the stand. The tank's footprint is 24"x24" and so it is cramped any time I need to do maintenance. Unfortunately any time something becomes a hassle, I am more likely to put it off.

My goal for the new set up is to have everything laid out so that I can have access making maintenance less cramped and more organized. I put together this diagram while trying to plan out the sump dimensions and layout. I initially was planning on having the drain lines on the left side of the sump and flow to right, but this would block access from the cabinet doors on the left of the stand. For that reason, I moved the drain lines to the right, in order to keep access more open. I also deleted my originally planned electronics cabinet which also allows access to behind the tank on the right side through the cabinet door on the stand.
image.jpg


It was difficult to decide where to place the UV sterilizer. One thing about the external overflow box is that it creates about 5" space behind the tank. I hope to place the UV sterilizer and trident behind the stand ultimately.

IMG_2492.jpg
IMG_2494.jpg
 
Last edited:
OP
OP
sdreef

sdreef

Well-Known Member
View Badges
Joined
Dec 24, 2015
Messages
849
Reaction score
3,323
Rating - 0%
0   0   0
In preparation for the build, I built a salt water mixing station in the garage. Some of this will be a repost from my separate mixing station and ATO threads, and were the early stages of this build. I used two 110 gallon cone bottom full drain tanks with steel stands.


58AAC544-7FFA-4384-A27C-8890EE9ED3CC_1_105_c.jpeg
597D060E-FCC8-4ACD-9DE5-AA66351EA804_1_105_c.jpeg

New batch of saltwater mixing with whirlpool

I live in a single story home on a slab, so I routed 1/4" tubing from the garage to the location of the tank through some attic space and a soffit to the location of my tank. My display is located in a living area, and reducing the noise was important for me. For that reason I located the DOS in the garage to use for continuous water changes. The apex is located next to the tank, so I also routed a 125' aquabus cable from the tank to the garage to control the DOS and an EB-8.

Starting point in garage
F70595D1-695E-488C-8127-6C0E35E83CF3_1_105_c.jpeg


End point Before, During, and After
9D7036DD-C113-4454-BBDF-9315E4C2FC82_1_105_c.jpeg
C1F2EBD8-FB24-4DFF-9114-36F16D8DCEEC_1_105_c.jpeg
FD28C035-A75C-4519-8B94-2E0CAEC14A59_1_105_c.jpeg


The set up has been in use for approximately 9 months. I have been very happy with the mixing station, continuous water change, and my final ATO set up. Having the ATO reservoir located remotely was important for me in order to gain space in the new stand. There were a couple iterations of the ATO set up. In the end a spectrapure water exchange module was spliced into the Tunze Osmolator. The unit is located in the stand and has been able to effectively pull water 90 feet from the reservoir in the garage.
 
Last edited:
OP
OP
sdreef

sdreef

Well-Known Member
View Badges
Joined
Dec 24, 2015
Messages
849
Reaction score
3,323
Rating - 0%
0   0   0
Tank Arrives!
IMG_2523.jpeg


Took four of us to get the tank positioned and centered
IMG_2526.jpeg


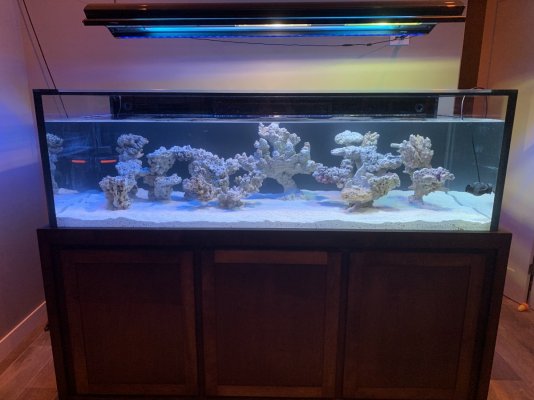
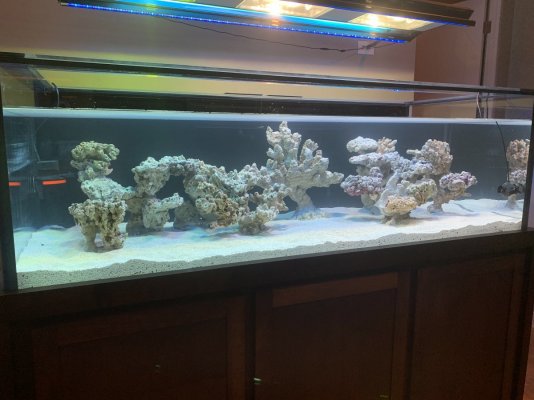
In the past, I have always aquascaped as I go. This time I had a layout in mind from when I built the structures. The reference photos were key. I got into the tank and a friend handed me the pieces. They were heavy and I was careful to hold them from the bottom. The process took about one hour for getting all of the structures into the tank and layed out.

IMG_2527.jpeg


I filled to just below the overflow, and after 24 hours, the first glimpses of the reef's skeleton.
IMG_2550.jpeg IMG_2551.jpeg

The new system filled with water circulating through the sump.
IMG_2712 (1).jpeg


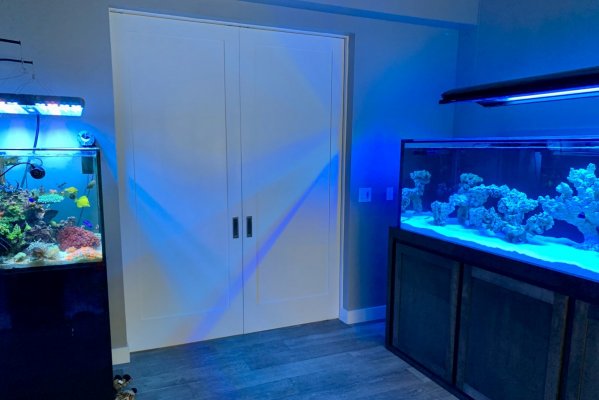
My other tank was relocated to the other side of the room. Eventually most things will get transferred to the new tank as the system matures.
IMG_2736.jpeg
 
Last edited:
OP
OP
sdreef

sdreef

Well-Known Member
View Badges
Joined
Dec 24, 2015
Messages
849
Reaction score
3,323
Rating - 0%
0   0   0
First life in the tank! The glass is loaded with copepods. I added a couple of nearly expired bottles of eco pods from my LFS to the bins after about a month of cycling the rock. I also threw in a bottle of oceanmagik live phyto over the course of a week. I wasn't sure how effective the strategy would be, but I'm really happy to see this number of pods so early into getting the tank set up.. Difficult to video, but you can see them scooting around on the glass.

 
Last edited:
OP
OP
sdreef

sdreef

Well-Known Member
View Badges
Joined
Dec 24, 2015
Messages
849
Reaction score
3,323
Rating - 0%
0   0   0
I added a pair of 1" purple tangs
IMG_2809.jpg


I got a 3-4" Gem tang from NY Aquatic, he arrived in great shape
IMG_2910.jpeg

IMG_2931.jpeg


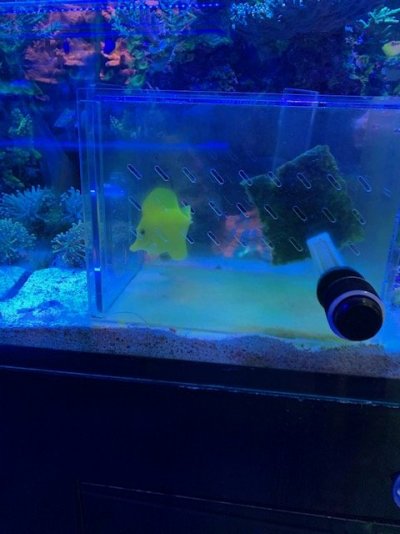
I'm trying to add my Yellow tang too, but somehow he knows not to swim into the fish trap. No success for the past two days. I'm going to hold off on feeding the tank for a couple days and see if I have more success.

IMG_2839.jpg
 

AlgaeBarn

Marine Aquariums Made Easy!
View Badges
Joined
Oct 14, 2013
Messages
2,416
Reaction score
3,510
Location
Denver, Colorado
Rating - 100%
1   0   0
First life in the tank! The glass is loaded with copepods. I added a couple of nearly expired bottles of eco pods from my LFS to the bins after about a month of cycling the rock. I also threw in a bottle of oceanmagik live phyto over the course of a week. I wasn't sure how effective the strategy would be, but I'm really happy to see this number of pods so early into getting the tank set up.. Difficult to video, but you can see them scooting around on the glass.


Love to see it and great tank thread! ~Shaun K.
 
OP
OP
sdreef

sdreef

Well-Known Member
View Badges
Joined
Dec 24, 2015
Messages
849
Reaction score
3,323
Rating - 0%
0   0   0
Love to see it and great tank thread! ~Shaun K.
Thanks, I was excited to see them less than a week into having water in the display.

Adding the pods to my cycling bins and giving them a couple months to establish without any predators was really helpful for me. I imagine they helped clean organic material from my rock too which I'm hoping will be beneficial for the system.
 
OP
OP
sdreef

sdreef

Well-Known Member
View Badges
Joined
Dec 24, 2015
Messages
849
Reaction score
3,323
Rating - 0%
0   0   0
A few new additions. I added 15 threadfin cardinalfish. They're currently in 2 schools on opposite ends of the tank. I love the schools.

IMG_2967.jpg


I've been running the T5s and Reefbrites. So far no algae issues, but will see how things go as I increase the bioload. I've added some tester corals: a monti cap, setosa, and a frag of my red goniopora from the other system. I'm trying to build some confidence to transfer more corals to the new system. Looking forward to getting the calcium reactor on line.

IMG_2968.jpg
 
Last edited:
OP
OP
sdreef

sdreef

Well-Known Member
View Badges
Joined
Dec 24, 2015
Messages
849
Reaction score
3,323
Rating - 0%
0   0   0
I transferred my large goniopora colony to the new tank. I also grabbed my pair of clowns with the net in about 10 seconds to transfer over. Still no success with my yellow tank or tahitian hawk. They're next in line. I'm trying to increase the bioload gradually so I can get my refugium on line.
IMG_2992.jpg


I also just received a shipment of live mysid shrimp. I'm linking a video.

I'm curious if anyone has had success keeping them in a refugium. I've read they are extremely canabilistic. I also added amphipods. I'm trying to give all these critters a little time to get a little estabilished before I start adding wrasses and other more active hunters to the system.
 
OP
OP
sdreef

sdreef

Well-Known Member
View Badges
Joined
Dec 24, 2015
Messages
849
Reaction score
3,323
Rating - 0%
0   0   0
A few LPS additions to the tank. These pictures are from right after everything went in the tank so things still need to open up. Still no acros in my acro-dominated reef, but hopefully can start adding some over the next couple months. I have a couple tester frags healing up on my rack.


IMG_3031.jpg
IMG_3033.jpg


IMG_3032.jpg
IMG_3041.jpg


IMG_3009.jpg
 

Being sticky and staying connected: Have you used any reef-safe glue?

  • I have used reef safe glue.

    Votes: 62 84.9%
  • I haven’t used reef safe glue, but plan to in the future.

    Votes: 5 6.8%
  • I have no interest in using reef safe glue.

    Votes: 3 4.1%
  • Other.

    Votes: 3 4.1%
Back
Top