Senator's Waterbox Frag 105.4 Shallow Lagoon

OP
OP
SenatorPOPS

SenatorPOPS

Community Member
View Badges
Joined
Dec 23, 2018
Messages
70
Reaction score
98
Rating - 0%
0   0   0
What a cool tank! My last was similar to this but not near as sweet looking!

What are your fish stocking plans?
Oh man, I've been going through this since I bought the tank and it keeps changing haha.

Current Fish Stock is:
Ocellaris Clownfish
Female Lyretail Anthias
Royal Gramma
Lawnmower Blenny


My thoughts right now are:
Yellow Eye Kole Tang
2 more Lyretail's
Ambon Damsel
5 Black Axil Chromis (Maybe, I would love a small school of something, especially in a lagoon style where they can dart around different islands, but undecided)
Female Blue Star Leopard Wrasse (I've always wanted this fish, but I will wait a while until I can get a refugium with good pod population up, plus I want to make sure it would be eating well at my LFS before purchasing.)
 

Fishboy9227

Active Member
View Badges
Joined
Oct 15, 2010
Messages
167
Reaction score
109
Location
OKC
Rating - 0%
0   0   0
That sounds cool!

Leopard wrasses are neat fish but I have never gotten one to even survive quarantine.

I'm along for the ride-can't wait to see more progress!
 

Coach_M

Community Member
View Badges
Joined
Jun 30, 2018
Messages
45
Reaction score
40
Rating - 0%
0   0   0
I successfully kept a leopard wrasse but ensured it ate frozen at the LFS before I brought it home. Beautiful fish, don’t forget they need a bit of sand to bury in at night. I’ve been bouncing between a IM 75 or 100 but the value of the WB with the sump and these awesome dimensions is hard to pass...
 

Coach_M

Community Member
View Badges
Joined
Jun 30, 2018
Messages
45
Reaction score
40
Rating - 0%
0   0   0
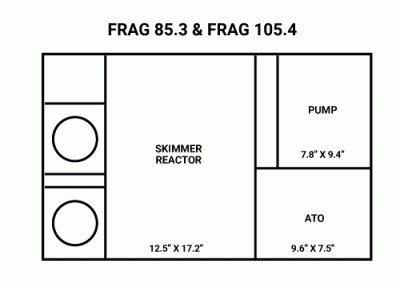
Out of curiosity, do you know the dimensions of the sump side of the cabinet? Im curious if I would be able to stick in my trigger 34 if I went this direction, or maybe I could remove the middle divider
 

Cdeg

Active Member
View Badges
Joined
May 10, 2019
Messages
292
Reaction score
99
Rating - 0%
0   0   0
Out of curiosity, do you know the dimensions of the sump side of the cabinet? Im curious if I would be able to stick in my trigger 34 if I went this direction, or maybe I could remove the middle divider

frag-85.3-105.4-sump.gif
 
OP
OP
SenatorPOPS

SenatorPOPS

Community Member
View Badges
Joined
Dec 23, 2018
Messages
70
Reaction score
98
Rating - 0%
0   0   0
Yeah I had seen that on the website but didn’t account for the sock area. Looks like it’d be maybe 25-30” max, doubt a 34” sump could squeeze in there
I do actually as I just cut some laminate planks for the backing.

Width is 31 3/8” so unfortunately 34” is out of the question.
 
OP
OP
SenatorPOPS

SenatorPOPS

Community Member
View Badges
Joined
Dec 23, 2018
Messages
70
Reaction score
98
Rating - 0%
0   0   0
Update time!

Work kept me from doing just about anything last week, but I started back up this weekend and was able to get a couple things finished once the family was asleep (its really the only time I can get stuff done).

plumbing installed along with a 1” to 3/4” conversion on my Vectra M2. Here the parts I used in case anyone needed some help.
75889938-C7CD-4F50-B6A3-51C4163305DB.jpeg
E1617E9D-2492-4678-B72C-B588D99187FE.jpeg
BD7A3F22-02C5-4C30-A4EE-7626242BDFDC.jpeg


Black vinyl backing on the sump for a cleaner look and to hide cords coming out the back.

7A8ABDF5-7202-418C-90FB-1D3768E15306.jpeg
A97E8CB3-1907-4AB7-A749-94DFFE9B34C1.jpeg


Some laminate flooring planks I had are attached to the back wall to help protect my outlets and also for aesthetics.

FA6DA087-E865-406A-8D83-4A88B8AB48BC.jpeg


I should have some more time this week to get stuff done. On the list is:

Build controller board for side cabinet. I’ll probably use some wood and add more laminate planks to match sump cabinet.

Fill with RODI and add salt.

Rinse sand and add to tank.

Aquascape.
 

GtiKyle

Community Member
View Badges
Joined
Oct 20, 2018
Messages
45
Reaction score
68
Rating - 0%
0   0   0
Dang...really loving the dimensions of that tank. You got me thinking of picking one of these up. Can't wait to see more progress.
 

Jimbo662

2500 Club Member
View Badges
Joined
Oct 1, 2013
Messages
4,748
Reaction score
2,146
Location
Austin, Tx
Rating - 0%
0   0   0
Dang...really loving the dimensions of that tank. You got me thinking of picking one of these up. Can't wait to see more progress.
I ordered mine last week! :cool:

I may have to steal the idea of adding the vinyl to the back of the sump. Where did you get it?
 
OP
OP
SenatorPOPS

SenatorPOPS

Community Member
View Badges
Joined
Dec 23, 2018
Messages
70
Reaction score
98
Rating - 0%
0   0   0
I ordered mine last week! :cool:

I may have to steal the idea of adding the vinyl to the back of the sump. Where did you get it?
Bought it off Amazon, went with 18”x60” Matte Black so I didn’t have to do multiple cuts. It’s super easy to work off, just make sure you cut all the bubbles out and take a razor to the edges.
 
OP
OP
SenatorPOPS

SenatorPOPS

Community Member
View Badges
Joined
Dec 23, 2018
Messages
70
Reaction score
98
Rating - 0%
0   0   0
Finally a long overdue update. Life seems to always get busy when there are things I want to get done!

Anyways, I was able to get most everything done except the controller board finished, but’s it’s coming along.

I’ve never been able to get my aquascape quite right when it all goes in the tank, but I switched some things around and like where it’s at. I think I’m going to try and get some more height out of the front rock on the left. Maybe more of a tower with a shelf on top? I’m leaving plenty of room for some acropora to grow out so it feels pretty empty right now, but its necessary.

19D538B2-1F4A-4586-9DB4-F149F00FBA0C.jpeg
F9C2A00C-52F9-461C-8830-50ADDC99AF8E.jpeg
F6C6C255-B79B-4FA6-AD55-58EBA4935C25.jpeg
BD1DCD20-F5C9-42F5-BDE5-3B3F93CD9139.jpeg


I also decided to go with an Ecotech Versa for my ATO. While it takes some effort to determine my current evaporation rate and that it will change during the seasons, I see a lot of positives with using a peristaltic pump vs a float switch/sensor to determine water level. To start, I took out 500ml at a time and marked where the water level was all the way up to 1500ml. I noted the time and then came back later to determine roughly what my evaporation rate was.

DC40D73D-D28B-43E8-BECC-8216B1CDDAB0.jpeg

6FFE4FAD-F262-4278-AF3C-CED8348A08E2.jpeg

This was about 7ish hours, but I waited until it got down to 1500ml which was closer to 10 hours. I converted the hours into minutes (600 min) and divided that by the amount that had evaporated (1500ml). This got me to 2.5ml of evaporation per minute. I was then able to set that on my Versa and away it goes, dripping water in constantly at a rate of 2.5ml/min. I’m unsure if it actually does 2.5 or it rounds up or down, but really it doesn’t have to be too exact. I know where my water level should be so if it’s slightly off I can adjust it with my weekly water change.

I originally had hoped for using hard acrylic tubes as shown, but the Versa cannot be set in reverse (or at least I couldn’t find that option) so back to the drawing board!

A0F8B7D0-119B-4DC2-B74D-34CA9A32A2E2.jpeg

I then tried using some leftover RODI tubing I had, but from the bend and my not so flush cutting, it would pull air in and cause the water to eventually stop flowing. The placement is temporary so I’m sure if it was mounted in a way that the tubing didn’t bend so much near the connection and if the cut on the tubing was cleaner, it would work out much better.

27448EAD-073E-4718-9880-495F218E3308.jpeg


Being as determined as I am to make something work, I created a 1/4” bulkhead holder with my 3D printer and used the Versa barbs with some soft tubing as well as the acrylic rods. It’s the best of all worlds!

0D3C4723-65AC-4DF1-96AA-EEAB3F96E0D8.jpeg
2C563CD5-AB63-4049-854E-194DF2C60444.jpeg
1866768F-9175-48A9-B84C-74FAEA565245.jpeg
48099079-6137-463A-9A95-D4A95EADA839.jpeg


I also decided to make some diffusers for my Hydra 32HDs. I made similar ones for my Prime HDs in the past, but this was much easier to design due to the rectangular shape.

4A34275B-8A1D-4FAB-B384-D81C87F3F099.jpeg
1F02A09A-9C19-4252-AD8A-E006FB028A0F.jpeg


I’ve gotten most of my fish transferred out of the other tank and added some LR to assist with bioload. I’m sure the rock that was cycling in my brute could handle it no problem, but you can never be too safe! And I also added 2 female lyretails to bring my total to 3.

A4E64900-47D1-4795-B9DA-9C4D939160BD.jpeg
C5D36A6C-013B-40EA-BF5E-E8845097332F.jpeg


I’m breaking in the Red Sea RSK 300 skimmer as well, but it’s still overflowing after a few days. I’ve left the drain hose open for now and will let it run for a few more days. If it stays that way, I might make a taller stand for it. It’s sitting right on the water level marker right now, but one more inch should bring the bubbles down enough for now. The side cabinet is also still a mess, but I’m starting to tackle some wiring before the board goes up and everything is mounted.

0CDEE70A-74F3-4502-8B4B-3B0E6811E847.jpeg
A597312E-A371-4597-BD16-EBA29400259F.jpeg


If anyone has any tips or advice I would definitely appreciate it! I’m gonna try to take some better photos of the tank as well as it’s current inhabitants.
 

infinite0180

Valuable Member
View Badges
Joined
Apr 25, 2018
Messages
1,821
Reaction score
1,096
Rating - 100%
1   0   0
Finally a long overdue update. Life seems to always get busy when there are things I want to get done!

Anyways, I was able to get most everything done except the controller board finished, but’s it’s coming along.

I’ve never been able to get my aquascape quite right when it all goes in the tank, but I switched some things around and like where it’s at. I think I’m going to try and get some more height out of the front rock on the left. Maybe more of a tower with a shelf on top? I’m leaving plenty of room for some acropora to grow out so it feels pretty empty right now, but its necessary.

19D538B2-1F4A-4586-9DB4-F149F00FBA0C.jpeg
F9C2A00C-52F9-461C-8830-50ADDC99AF8E.jpeg
F6C6C255-B79B-4FA6-AD55-58EBA4935C25.jpeg
BD1DCD20-F5C9-42F5-BDE5-3B3F93CD9139.jpeg


I also decided to go with an Ecotech Versa for my ATO. While it takes some effort to determine my current evaporation rate and that it will change during the seasons, I see a lot of positives with using a peristaltic pump vs a float switch/sensor to determine water level. To start, I took out 500ml at a time and marked where the water level was all the way up to 1500ml. I noted the time and then came back later to determine roughly what my evaporation rate was.

DC40D73D-D28B-43E8-BECC-8216B1CDDAB0.jpeg

6FFE4FAD-F262-4278-AF3C-CED8348A08E2.jpeg

This was about 7ish hours, but I waited until it got down to 1500ml which was closer to 10 hours. I converted the hours into minutes (600 min) and divided that by the amount that had evaporated (1500ml). This got me to 2.5ml of evaporation per minute. I was then able to set that on my Versa and away it goes, dripping water in constantly at a rate of 2.5ml/min. I’m unsure if it actually does 2.5 or it rounds up or down, but really it doesn’t have to be too exact. I know where my water level should be so if it’s slightly off I can adjust it with my weekly water change.

I originally had hoped for using hard acrylic tubes as shown, but the Versa cannot be set in reverse (or at least I couldn’t find that option) so back to the drawing board!

A0F8B7D0-119B-4DC2-B74D-34CA9A32A2E2.jpeg

I then tried using some leftover RODI tubing I had, but from the bend and my not so flush cutting, it would pull air in and cause the water to eventually stop flowing. The placement is temporary so I’m sure if it was mounted in a way that the tubing didn’t bend so much near the connection and if the cut on the tubing was cleaner, it would work out much better.

27448EAD-073E-4718-9880-495F218E3308.jpeg


Being as determined as I am to make something work, I created a 1/4” bulkhead holder with my 3D printer and used the Versa barbs with some soft tubing as well as the acrylic rods. It’s the best of all worlds!

0D3C4723-65AC-4DF1-96AA-EEAB3F96E0D8.jpeg
2C563CD5-AB63-4049-854E-194DF2C60444.jpeg
1866768F-9175-48A9-B84C-74FAEA565245.jpeg
48099079-6137-463A-9A95-D4A95EADA839.jpeg


I also decided to make some diffusers for my Hydra 32HDs. I made similar ones for my Prime HDs in the past, but this was much easier to design due to the rectangular shape.

4A34275B-8A1D-4FAB-B384-D81C87F3F099.jpeg
1F02A09A-9C19-4252-AD8A-E006FB028A0F.jpeg


I’ve gotten most of my fish transferred out of the other tank and added some LR to assist with bioload. I’m sure the rock that was cycling in my brute could handle it no problem, but you can never be too safe! And I also added 2 female lyretails to bring my total to 3.

A4E64900-47D1-4795-B9DA-9C4D939160BD.jpeg
C5D36A6C-013B-40EA-BF5E-E8845097332F.jpeg


I’m breaking in the Red Sea RSK 300 skimmer as well, but it’s still overflowing after a few days. I’ve left the drain hose open for now and will let it run for a few more days. If it stays that way, I might make a taller stand for it. It’s sitting right on the water level marker right now, but one more inch should bring the bubbles down enough for now. The side cabinet is also still a mess, but I’m starting to tackle some wiring before the board goes up and everything is mounted.

0CDEE70A-74F3-4502-8B4B-3B0E6811E847.jpeg
A597312E-A371-4597-BD16-EBA29400259F.jpeg


If anyone has any tips or advice I would definitely appreciate it! I’m gonna try to take some better photos of the tank as well as it’s current inhabitants.
Wow nice job with the ATO. I too want to use a Versa as an ATO pump. Im holding out to see if ETM comes out with a solution. If not ill set it to constant mode and have my ATO power it on and off.
 

GtiKyle

Community Member
View Badges
Joined
Oct 20, 2018
Messages
45
Reaction score
68
Rating - 0%
0   0   0
Wow nice job with the ATO. I too want to use a Versa as an ATO pump. Im holding out to see if ETM comes out with a solution. If not ill set it to constant mode and have my ATO power it on and off.

I'm using a really cheap Jebao doser as my auto top off. I did similar to OP idea:calculate the daily evaporation and program it to dose once an hour to meet daily demand. I went this route because i wanted to use Kalk in my top-off water, but didn't want to ruin pumps in the process. So far it's been very successful for me.
 
OP
OP
SenatorPOPS

SenatorPOPS

Community Member
View Badges
Joined
Dec 23, 2018
Messages
70
Reaction score
98
Rating - 0%
0   0   0
Wow nice job with the ATO. I too want to use a Versa as an ATO pump. Im holding out to see if ETM comes out with a solution. If not ill set it to constant mode and have my ATO power it on and off.
Thanks! Yea, I’m sure they have something in mind for it. It’ll be nice to have some backup when it comes out.
 
OP
OP
SenatorPOPS

SenatorPOPS

Community Member
View Badges
Joined
Dec 23, 2018
Messages
70
Reaction score
98
Rating - 0%
0   0   0
I'm using a really cheap Jebao doser as my auto top off. I did similar to OP idea:calculate the daily evaporation and program it to dose once an hour to meet daily demand. I went this route because i wanted to use Kalk in my top-off water, but didn't want to ruin pumps in the process. So far it's been very successful for me.
I thought about doing this as well instead of a constant dose. I’ll probably play around with it to figure out what works best since I’m still not sure if the Versa rounds up or down for 2.5 ml/min.
 

DiazE

Active Member
View Badges
Joined
Feb 25, 2020
Messages
129
Reaction score
15
Rating - 0%
0   0   0
Tank on stand, what a difference going from 36” to 48”. I’m gonna have to rearrange some pictures and my mirror to line up properly so they don’t get in the way of the light mounts.
824C826F-7881-4869-81E4-C80FA7560D1C.jpeg
1004716B-9EE7-4AAE-925A-6195FB58CCA8.jpeg


I’ve added some leds to help light up the sump cabinet and 3d printed a small filter floss cup since I hate dealing with filter socks.
869EB0C5-AD27-4201-ADD9-191D83B07C74.jpeg
CB7DA25C-61D6-443E-82C0-E14749C88A57.jpeg


Going to start working on a backing for the cabinet to protect the outlets behind, and I will make a controller board for the smaller compartment as well.
New member following this with much interest. Have been since last year contemplating between lagoon style reef on 105frag or 130.4 6 inches higher.
Where did you get filter sock replacement cups? Was thinking about the same problems with continuous dirty socks. Appreciate your reply; like #5 layout. Simple will be nicer with shallow lagoon and leaves space for sps growth if going that route.
 

Clear reef vision: How do you clean the inside of the glass on your aquarium?

  • Razor blade

    Votes: 122 58.9%
  • Plastic scraper

    Votes: 62 30.0%
  • Clean-up crew

    Votes: 75 36.2%
  • Magic eraser

    Votes: 34 16.4%
  • Other

    Votes: 62 30.0%
Back
Top