show me your DIY plywood stands

Kayotic5011

Active Member
View Badges
Joined
Feb 10, 2018
Messages
209
Reaction score
207
Location
Nooga Strong Tn
Rating - 0%
0   0   0
I just finished this last monday actually. I upgraded from a 40 gallon breeder I set up with a 20 gallon refugium to a 120 gallon with a 40 gallon breeder as my refugium. I still need to add some texture (possibly stone texture) and some trim but heres what I got so far....ohh an some doors still....
DSC_0249.JPG DSC_0259.JPG DSC_0273.JPG

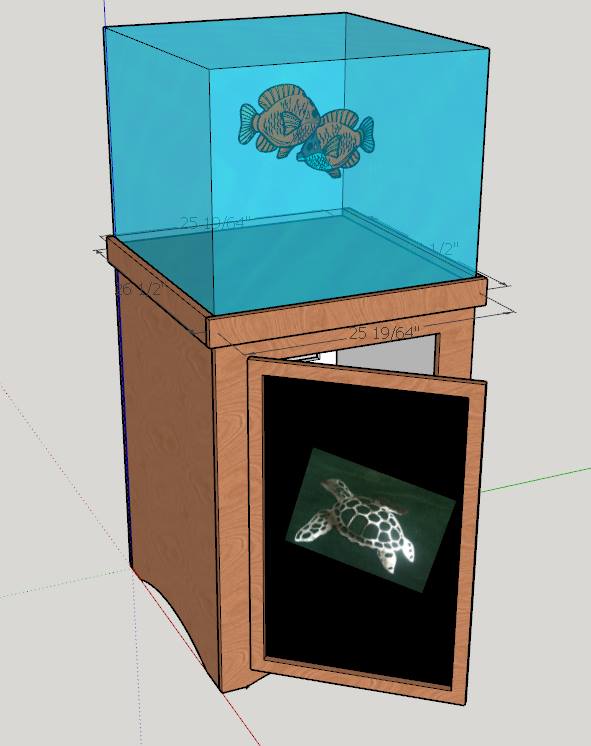
The top will have covers for the port holes up there and the big refugium hole will have a door a long with the supply area. I built this stand to hid the plumbing of the over flow box and the return lines no hanging wires and I built this stand to erect the aquarium off the wall so i can view my tank from 3 sides allowing me to use all of my reef for viewing and corals and never loose sight of a wondering anemone again lol.
 
OP
OP
Devaji

Devaji

5000 Club Member
View Badges
Joined
Aug 27, 2016
Messages
7,205
Reaction score
6,711
Location
Jackson Hole, WY
Rating - 0%
0   0   0
True, price coupled with my inexperience in woodworking but decent metal experience made steel an easy choice. But for smaller tanks i think repurposing a used cabinet could be awesome.

I would do that for a smaller tank but a 40B is just to big IMHO or maybe I have not found the right thing to re-purpose.

thanks for the ideas everyone! keep em coming :D
 

SFKINNC

Community Member
View Badges
Joined
Nov 14, 2017
Messages
83
Reaction score
65
Location
Lincolnton, NC
Rating - 0%
0   0   0
C86CC773-918C-4196-BC61-07C5C19F36D7.jpeg
Here is a photo of my semi DIY stand for my 32 gal BioCube. It is a kitchen base cabinet that I rescued from the Habitat for Humanity Store in Raleigh, NC. After sanding and priming, I gave it three coats of paint. The top is two 1/2” squares of plywood glued together. Under the center of the top is a 2”x4” brace.
 
OP
OP
Devaji

Devaji

5000 Club Member
View Badges
Joined
Aug 27, 2016
Messages
7,205
Reaction score
6,711
Location
Jackson Hole, WY
Rating - 0%
0   0   0
how about a nice bump for this thread...life got in the way of new tank now I am thinking of a redo on my 36" 90 gal with a nice 3/4or 1" plywood stand to.
do you guys think a 100% plywoos stand would work for the 90 with out a inner frame of 1x2 or 2x4??
 

Greybeard

2500 Club Member
View Badges
Joined
Feb 10, 2017
Messages
3,233
Reaction score
8,669
Location
Buffalo, MO
Rating - 0%
0   0   0
do you guys think a 100% plywoos stand would work for the 90 with out a inner frame of 1x2 or 2x4??

A well designed plywood stand can easily hold a 90 gallon tank... or much larger. Plywood is strong. With good joining techniques and load bearing design, way stronger than the typical screwed together 2x4 stand construction.

My latest stand is welded, powder coated steel... but not because plywood isn't strong enough. Simply because steel is inexpensive, and allows for a very open design.

My old 60g cube stand used no screws, no internal frame, just 3/4" hardwood ply, some 3x3 solid poplar, dado joinery, clamped and glued. Could have doubled as a stool for an elephant.

BraceDetail.jpg
 
OP
OP
Devaji

Devaji

5000 Club Member
View Badges
Joined
Aug 27, 2016
Messages
7,205
Reaction score
6,711
Location
Jackson Hole, WY
Rating - 0%
0   0   0
good to know and as I thought. dont have much wood working tools but to can do a pocket holes & wood glue. and rule of thumb on how many pocket holes per foot?
with that work with out any fancy joints? basically a wooden box with all the weight sides and back...
 

rshober

Community Member
View Badges
Joined
May 22, 2015
Messages
76
Reaction score
28
Rating - 0%
0   0   0
good to know and as I thought. dont have much wood working tools but to can do a pocket holes & wood glue. and rule of thumb on how many pocket holes per foot?
with that work with out any fancy joints? basically a wooden box with all the weight sides and back...
I did one pocket screw every 6 inches and use wood glue. Stand is still solid as rock after 7 months.
 

Greybeard

2500 Club Member
View Badges
Joined
Feb 10, 2017
Messages
3,233
Reaction score
8,669
Location
Buffalo, MO
Rating - 0%
0   0   0
Pocket screws are useful for securing boards edge to edge. When building a wooden box, there is little call for this. Oh, I suppose you could use pocket screws to join the styles and rails where you're going to put the door, but for the most part, you're going to be joining boards at a 45 degree angle. There are several methods...

A butt joint, where both ply parts are square cut, the edge of one glued to the face of the other. Two problems... it's not particularly strong, and you end up with one ply edge exposed, which doesn't look very good. You can, however easily use plain wood screws to help strengthen the joint.

Butt.jpg


A miter joint, where both ply parts are cut to 45 degrees, and glued together. Still not particularly strong, edge to edge, but it works. If you can use a square glue block inside the joint, it'll strengthen it quite a bit. no edge grain to deal with, anyway.

Miter.jpg


Biscuit joint, this would be my choice, but you've got to have a biscuit cutter. Biscuits reinforce the joint from the inside, quite strong, and easy, if you've got the tools.

biscuit.jpg


Spline joint, a bit harder, but you can do it with a normal table saw. Cut to 45 degrees, and then reverse cut to accept a thin spline. Quite strong.

spline.jpg


What I did with my stand was use solid poplar corners, and cut a chanel (dado) into each to accept the ply, so that the ply was in contact on 3 sides all across the joint. Strong, simple, and gives you a nice finished look.
 

Greybeard

2500 Club Member
View Badges
Joined
Feb 10, 2017
Messages
3,233
Reaction score
8,669
Location
Buffalo, MO
Rating - 0%
0   0   0
would not adding pocket screws to a but joint made it stronger?
Putting regular wood screws into a butt joint is fine, works well, and certainly makes it stronger. If you counter sink and fill the screw hole, it doesn't look bad, either. Pocket screws? They'd have to be short enough to end before coming out the face grain. On 3/4" ply, you'd have thread engagement of a half inch or so. Honestly, what's the point? Pocket screws are intended for uses where you can't just drill and screw, because you don't have a flat face to screw into. In a butt joint, you do have a flat face to screw into, and could use a much longer screw, with a couple of inches of thread engagement. Wouldn't make sense to me.
 
OP
OP
Devaji

Devaji

5000 Club Member
View Badges
Joined
Aug 27, 2016
Messages
7,205
Reaction score
6,711
Location
Jackson Hole, WY
Rating - 0%
0   0   0
@graybeard I dont have the tools and prob. no where to rent a biscuit router in my remote area.
so but joint will have to do ( if I do go this way over the petco metal stand with cold roll steel sinking.)
I do have the kreeg jig and can wood glue. is there a better way to go about this. sorry for all the question guys :D
 
OP
OP
Devaji

Devaji

5000 Club Member
View Badges
Joined
Aug 27, 2016
Messages
7,205
Reaction score
6,711
Location
Jackson Hole, WY
Rating - 0%
0   0   0
well moving the tank to do the floors in that room and setting up the tank in another room all together. so now the time to think about the all plywood stands for the 40br & 90 gal.

the 90 gal is 12mm rimless glass = heavy prob. 1.5 X the weight of a normal 90.
will have to price it out but was just thinking of doubling up the 3/4 ply wood? might be over kill? not coast effective I dont know...

@Water Dog did you get your stand build going?
 

Water Dog

2500 Club Member
View Badges
Joined
Mar 28, 2016
Messages
4,219
Reaction score
4,892
Location
Fairfield, CT
Rating - 0%
0   0   0
@Water Dog did you get your stand build going?

I started to build the 3/4” plywood stand. Unfortunately, the guide on my table saw was a hair off so my plywood cuts were slightly off, thus making the pieces when put together a good bit out of square. I’ve begun putting together a 2x4 stand instead. Will try to salvage the pieces of plywood for the top and floor of the stand turn the other pieces into doors. Here’s what I have so far. Need to skin and trim the stand next.

19935600-A140-4830-93D5-86D80A99E668.jpeg
 

sjeff35

Active Member
View Badges
Joined
Jun 14, 2018
Messages
172
Reaction score
356
Location
Corrales, NM
Rating - 0%
0   0   0
Drew this up a couple of weeks ago in Sketchup. This is for a IM Nuvo 40 cube.
35306003_1795938467112056_6807280322414116864_n.jpg


In progress last weekend...

35564379_1800193060019930_8013382258108923904_o.jpg


Finished

35465329_1800694986636404_2089808447737430016_o.jpg


Inside painted with high gloss enamel to reflect light and make for an easy cleanup.

35507221_1800695369969699_3738473073561567232_o.jpg


Filled it last night, looking good this morning.

35686925_1804502022922367_1826254346623385600_o.jpg


Box is made from 3/4" Oak ply with some oak trim applied across the top and down the sides to cover the edges of the plywood. I also used oak banding strips to cover the edge facing inside the door and the back cut out.
 

High pressure shells: Do you look for signs of stress in the invertebrates in your reef tank?

  • I regularly look for signs of invertebrate stress in my reef tank.

    Votes: 38 32.2%
  • I occasionally look for signs of invertebrate stress in my reef tank.

    Votes: 28 23.7%
  • I rarely look for signs of invertebrate stress in my reef tank.

    Votes: 22 18.6%
  • I never look for signs of invertebrate stress in my reef tank.

    Votes: 30 25.4%
  • Other.

    Votes: 0 0.0%
Back
Top