So it begins - SCA 120G build

Benoit Martin

Active Member
View Badges
Joined
Jun 1, 2018
Messages
137
Reaction score
103
Rating - 0%
0   0   0
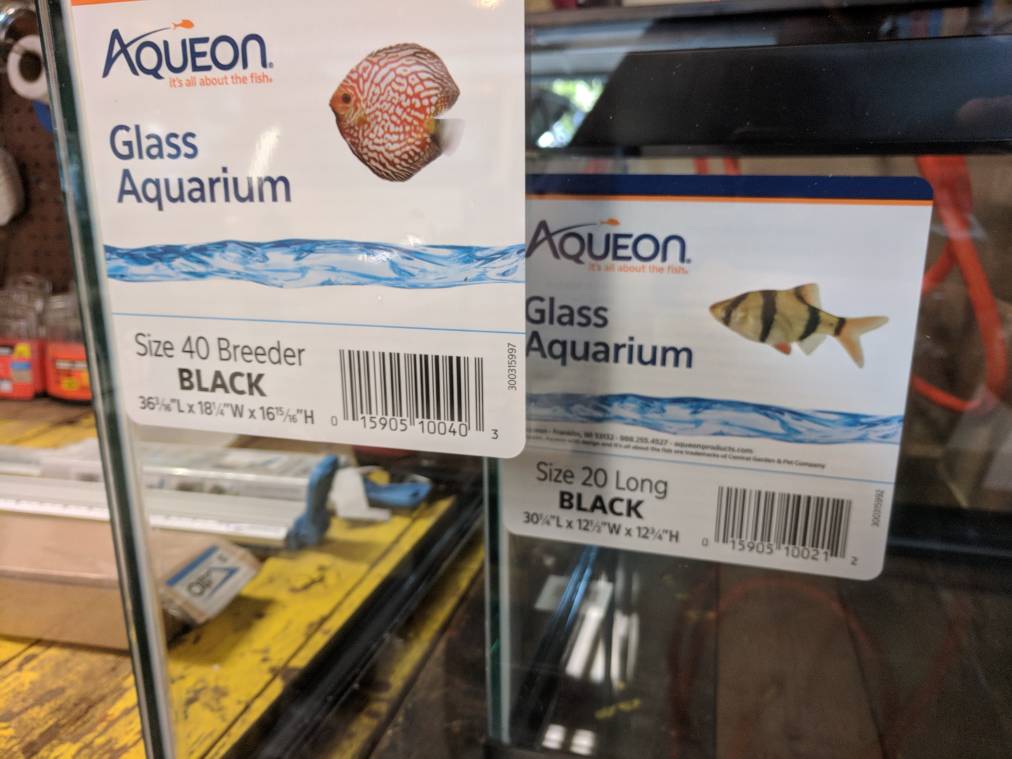
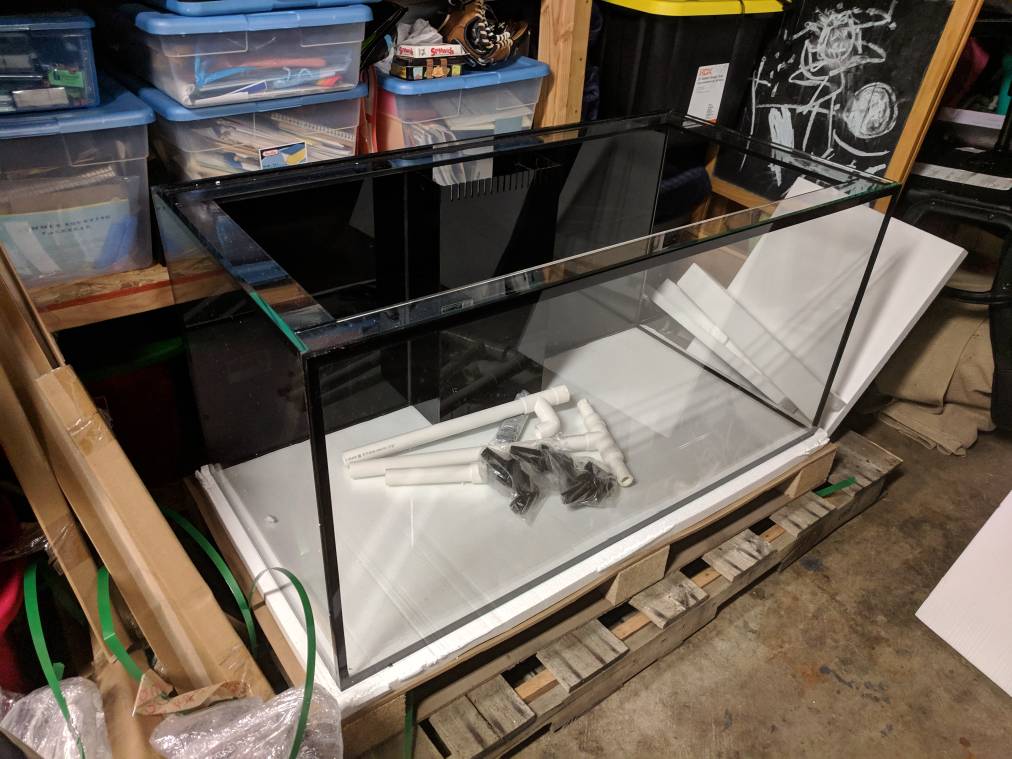
First purchase toward my journey to build my first saltwater aquarium. I took advantage of the $1/G sale at Petco and got myself a 40B that will become my sump and a 20 long for QT.

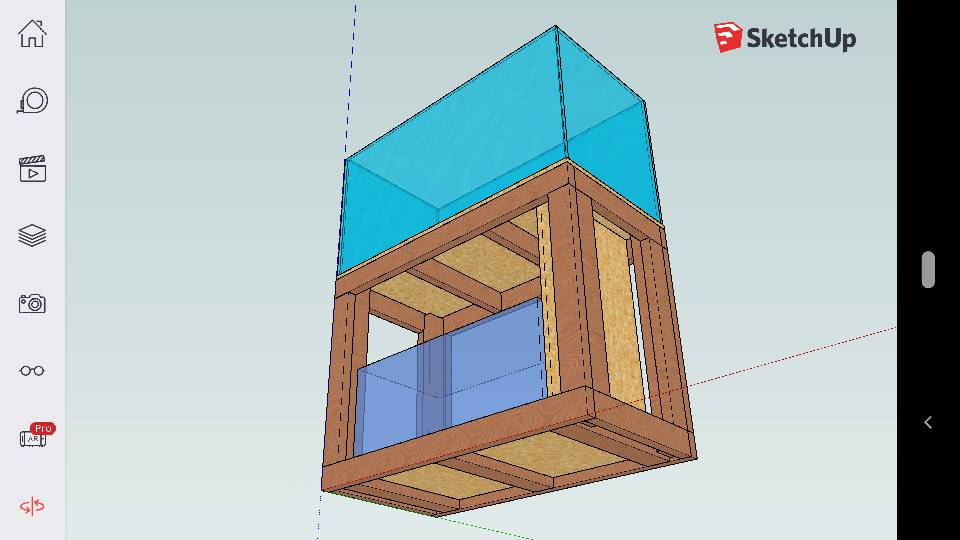
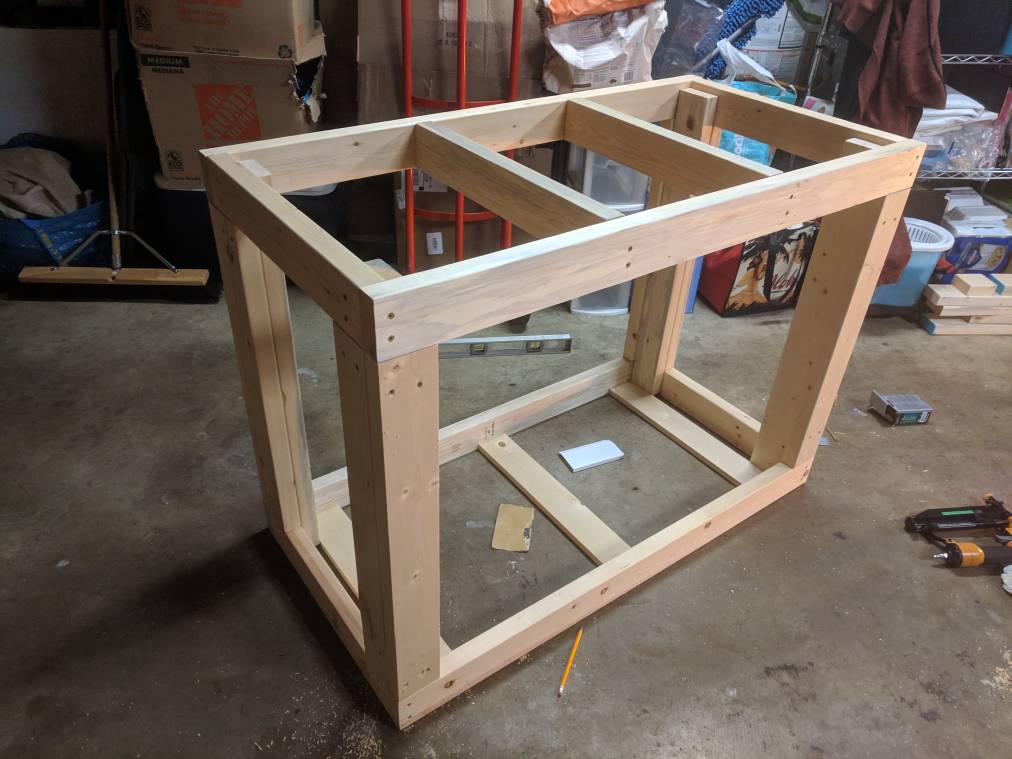
The plan is for a 120G SCA tank, DIY stand and hopefully a good compromise between price and quality for the rest of the equipment.
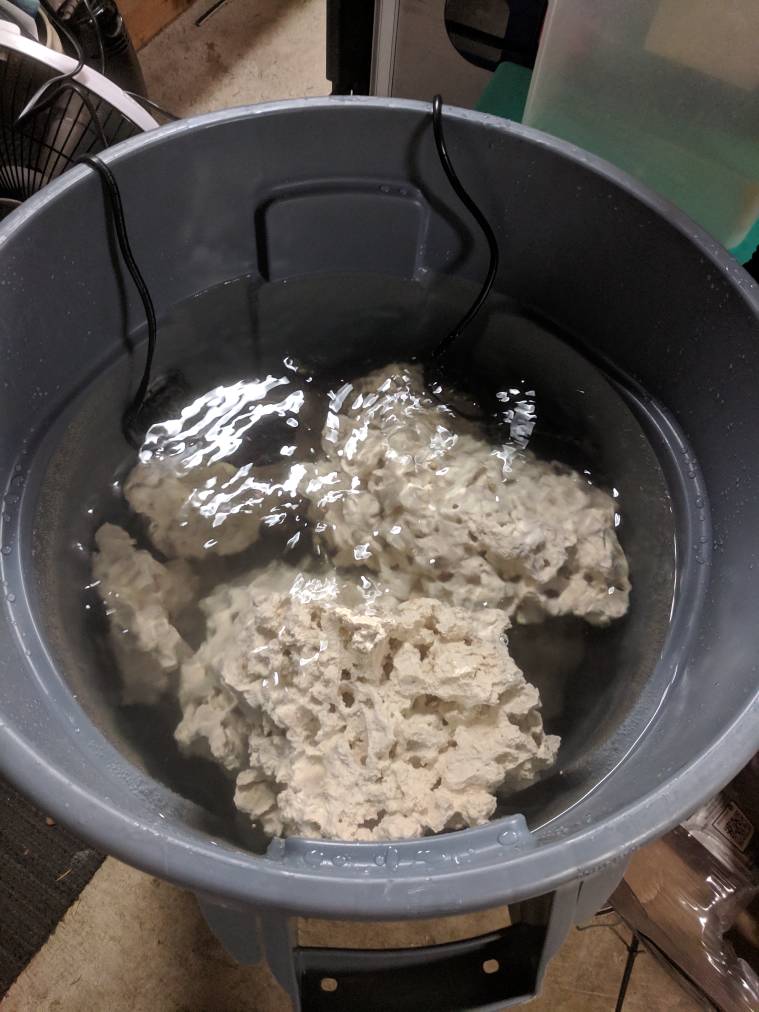
Still trying to decide if I'll go Marco or ReefCleaner for the rocks.

I'll start with a FOWLR but will probably add some corral once I am experienced enough.

Feel free to follow but beware that it will be a very slow build because of time and budget constraints [emoji16]
f2456d5eb596a601884ee9814efc90db.jpg
 
OP
OP
Benoit Martin

Benoit Martin

Active Member
View Badges
Joined
Jun 1, 2018
Messages
137
Reaction score
103
Rating - 0%
0   0   0
Hey, I wasn't kidding when I said I was going to take it slow. [emoji39]

I took advantage of Black Friday and Cyber Monday deals to do the bulk of my shopping.

I got my 120 SCA tank (pictures below), 200 pounds of Marco rock, BRS RO/DI, Reef Octopus skimmer, Varios DC pump, 2 heaters (for redundancy) and 2 Koralia wave pumps.

All this was delivered in the last 3 days and I did the floor reinforcements last weekend so now I have no excuse, gotta get going.

Didn't take pictures of the gear because, well, you can see better pictures on the BRS site [emoji4] but I'll be trying to add more pictures as I progress.

First steps are to start curing the rocks while building the stand at the same time. Hopefully this won't be a multi months process.
0797ed5d42b5be150388093084d6a288.jpg
 
OP
OP
Benoit Martin

Benoit Martin

Active Member
View Badges
Joined
Jun 1, 2018
Messages
137
Reaction score
103
Rating - 0%
0   0   0
Making some progress. I am making RODI water, I am curing my rocks and I have drawings for my stand.

Next step is hitting the lumber shop to get all the material I need to start the build.

By the way, if anybody knows a clever way to figure out the most optimal number of 2x4s from a SketchUp drawing, please let me know.
7c59d8cd50e25d4bb9231fa89357d521.jpg


59aae63efd07b558f2766c1036e16465.jpg


af899d75c23a08b37476f86c402690c2.jpg


0ca8ef3ab898072e1515d9c78bdb1470.jpg
 
Last edited:
OP
OP
Benoit Martin

Benoit Martin

Active Member
View Badges
Joined
Jun 1, 2018
Messages
137
Reaction score
103
Rating - 0%
0   0   0
Another step closer. It's starting to feel real now that I have completed the first step in building the stand.

Can't wait to paint the inside to make it moisture proof and start building the outside skin.

I am very anxious about the plumbing part of it as it doesn't look easy and I have never done that before. We'll see how it goes ;Nailbiting

85489a90f22458ff5afd3df7876b85ce.jpg
 
Last edited:

Captain Quint

Plank Owner of the Orca
View Badges
Joined
May 5, 2018
Messages
4,000
Reaction score
17,228
Location
Carolina
Rating - 0%
0   0   0
Outstanding @Benoit Martin!

And you have a wonderful build starting up here with a fantastic step by step by step quality pictures.

You should really have this as an official 'Build thread'. Perhaps @jsker or another Moderator could put this thread where it goes for 'Build Thread Contributor' ribbon on this well-deserved build.

Thanks for sharing and the awesome pics. *following*
 

jsker

Reefing is all about the adventure
View Badges
Joined
Apr 11, 2015
Messages
24,974
Reaction score
79,737
Location
Saint Louis
Rating - 0%
0   0   0
Click the link in by signature and post over in the build contributor thread, this we can get you a badge.
 
OP
OP
Benoit Martin

Benoit Martin

Active Member
View Badges
Joined
Jun 1, 2018
Messages
137
Reaction score
103
Rating - 0%
0   0   0
A little more progress on the stand. Never thought it would be so time consuming and I didn't even tackle the hard parts yet :)

IMG_20181226_230309.jpg


IMG_20181227_152846.jpg


I need to add 2 coats of the Kilz Latex primer on the bottom and the top. Did the caulking on all the seams at the bottom of the stand hoping that with the Kilz primer it will be mostly water resistant (hopefully will never to find out if it's fully waterproof).

Started designing the plumbing by taking inspiration from videos and pictures I found online. Not feeling any better about the process. I can already tell this is the part that will take me the longest. As much as I have been enjoying building the stand, I wish I could just have somebody do the plumbing for me :)

Anyway, also found another issue that will throw me back a little. As I was playing with my circuit breaker to find which one to disconnect to replace my outlet with a GFCI one, I found out that it was on the same circuit as my fridge and stove. I have an electrician coming in next week to give me a quote to switch it to a dedicated circuit. Hopefully it won't cost too much since the outlet is already wired but since I know nothing about house electrical wiring, I might be totally underestimating the work required.
 
OP
OP
Benoit Martin

Benoit Martin

Active Member
View Badges
Joined
Jun 1, 2018
Messages
137
Reaction score
103
Rating - 0%
0   0   0
Stand is inside the house. Still a long way to go and patience is not really my forte so it's a interesting challenge for me but I am happy with the progress so far.
I will be getting some 1/2 birch plywood soon for the sides and front panels. I know that I want to be able to open all 3 sides but not sure yet if I'm going to go with removable panels (easy) or doors (harder but nicer looking IMO).
Valves and couplings have been ordered from BRS and I will be getting the pipes and elbows from HD to save a few bucks.

On to the next challenge...

IMG_20181230_213857.jpg
 
OP
OP
Benoit Martin

Benoit Martin

Active Member
View Badges
Joined
Jun 1, 2018
Messages
137
Reaction score
103
Rating - 0%
0   0   0
Plumbing has started now that I have received the parts from BRS and took another trip to HD for the elbows and PVC piping.
IMG_20190106_143023.jpg


Not as bad as I thought so far but I didn't cement it yet as I don't want to do it until I have the tank on the stand and can mount the bulkheads.
I am also waiting for the baffles kit coming in this week which will allow me to more precisely position everything.
IMG_20190106_154711.jpg

The main challenge now is that the flexible 1 1/4" tubing is definitely not as flexible as I thought and I am a little short in space. Not sure yet how it's all going to work out.

I am really hoping to bring the tank in next week-end but that will depend on the availability of my friends willing to help with the heavy lifting.
I got a dolly and 2 glass suction handles from Harbor Freight but I still need the hands to carry it.

The Husky PVC pipe cutter is awesome. Only $13 at HD and cuts easily, precisely without making any mess. Would highly recommend.

Finally, rocks are ready for my first attempts at aquascaping. I might try to get started on that during the week.
IMG_20190106_160325.jpg
 
OP
OP
Benoit Martin

Benoit Martin

Active Member
View Badges
Joined
Jun 1, 2018
Messages
137
Reaction score
103
Rating - 0%
0   0   0
And here it is, my first setback... I'm leaking!

First, a few pics of my progress since the last update:

Tank in on the stand and all the equipment has been taken out of their boxes and placed in their rightful location.
There is an ugly mess with the wires on the right side of the stand but that's because I did not try to organize it or plug in anything yet. It will NOT look like this when I'm ready to power on the beast.
IMG_20190113_212849.jpg


The plumbing is done and even though I made a little bit of a mess with the hot blue glue (didn't realize I didn't buy clear glue until it was too late), I think this is looking ok. I did make a few mistakes the pipes do not land exactly where I intended them to. The main issue is that once the primer and glue are applied to the pipes, they get a lot more slippery and they go all the way in the elbows. So, even though I did all the dry fitting and I had everything measured precisely, it all go thrown a little bit out of whack once the glue was applied. Not a big deal, I can live with it.

IMG_20190113_212803.jpg


I played with the rocks this week-end and came up with an aquascape I like. There is a tunnel in the rocks on the left side and the pile on the right side has a big cave that will be visible from the side panel. I am happy with it because it's not symmetrical and I was able to build the features I wanted (a tunnel, a cave and a small island). Of course, if anybody has feedback or suggestions, I'll gladly listen.
My acrylics rod came in the mail today so I'll be drilling and mounting soon so that I can bring them in the tank without worrying about the piles falling down.
IMG_20190113_204436.jpg

Now, for the setback/reality-check. I was so excited for my plumbing to be done and tank to be ready that I decided to do a water test last night. I poured some water in the different chambers in the sump and everything went according to plan. Silicone is holding up, no leaks, we're good.
I then started adding some water to the main tank and did not see any leaks with the overflow or anything else (granted I did not add a whole lot of water to it).
I then decided to test the overflow/plumbing and that's where it all went wrong. I was on my step-stool, pouring water in the overflow and after about 3-4 gallons, I can hear the water flowing and splashing everywhere in the stand. When I first looked it seemed that the water was coming out of the first union on the main drain but once that flow started slowing down I realized that I had water coming from all 3 bulk heads :(
I tightened all 3 of them as tight as I could by hand as recommended but after doing some reading it seems that the recommendation is to actually put an extra 1/4 turn with a wrench. I probably should have read that before starting the plumbing but I was too excited to get it all together.
I now have to figure out how I am going to tighten those bulkheads with a wrench since they are in the back of the stand, and recessed inside the holes I made in the 3/4 inch plywood. I'll have to get creative.

My fear is that this is not the only issue. I can't tell because everything was wet very quickly with water flowing from everywhere but can't tell if that was just the water dripping from the bulkheads along the pipes or if I have other leaks.

This was very disappointed but considering how well everything went so far, I guess I needed a reminder that it's not supposed to be an easy process, I need to be more patient and I have to prepare better for flooding.

You live, you learn...
 

Creating a strong bulwark: Did you consider floor support for your reef tank?

  • I put a major focus on floor support.

    Votes: 40 43.5%
  • I put minimal focus on floor support.

    Votes: 20 21.7%
  • I put no focus on floor support.

    Votes: 30 32.6%
  • Other.

    Votes: 2 2.2%
Back
Top