ReeferBryan

New Member
View Badges
Joined
Aug 24, 2016
Messages
2
Reaction score
0
Rating - 0%
0   0   0
I know it has been awhile since you did the ATO refugium build, but could you please tell me where you purchased your bulkheads for this, particularly the ⅜" bulkhead push connect?
Also where you picked up the hole saws for this.

Thank you,
Bryan


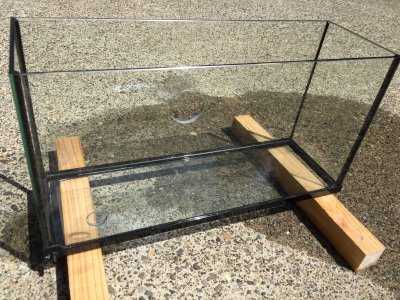
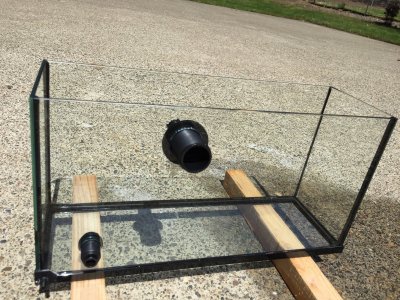
As I previously promised, here is an overview of how I converted my stock Red Sea ATO reservoir into a refugium.

Parts list:

Overflow Drain:
  • 3/4" bulkhead, threaded inside and slip fitting outside
  • 3/4" threaded strainer
  • 3/4" PVC elbow
  • 3/4" PVC pipe
Input Feed:
  • 3/8" bulkhead, push connect on both ends
  • 3/8" push connect elbow (qty 2)
  • 3/8" push connect T fitting
  • 3/8" push connect straight coupler
  • 3/8" poly tubing
Misc:
  • Black corrugated plastic (for light-blocking siding)
  • Plumbers putty
  • Silicon caulking
Tools:
  • 21 mm diamond coated hole saw for 3/8" input bulkhead
  • 35 mm diamond coated hole saw for 3/4" overflow bulkhead
  • Drill
  • Clamps
  • 2 scraps of wood for drill guide and backing
  • 2 scraps of 3/8" poly tubing for guide spacers
  • Masking tape
  • Glass marking pen
Process:
  1. Mark where you want the input and output holes on the glass. I left 1" from each edge to reduce the risk of cracking the glass. I placed the input nearest the bottom rear of the refugium so the input water will flow forward from the bottom end of the tank. I'm hoping this will cause the chaeto to rotate from the flow on the bottom of the tank. IMG_2817.jpg
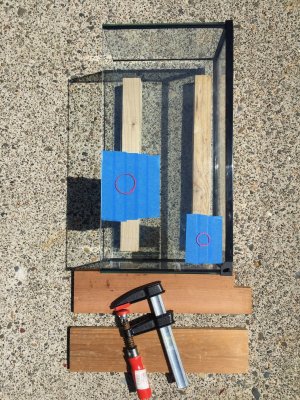
  2. Place a ring of plumbers putty around the marked hole, leaving about 1/2" buffer around the marked circle to allow a good pool of water to cool the drill bit.
  3. Cover the inside of the glass with masking tape to both catch the cutout as well as help to prevent chipping. IMG_2818.jpg
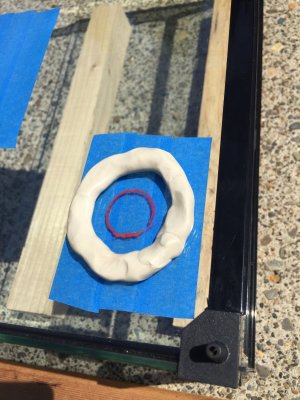
  4. Cut a 90 degree notch out of one of the scraps of wood to use as a drill guide. You only need to support the drill bit against two solid surfaces, so it's not necessary to cut a guide hole through the wood. This also allows you to cut any size hole using the same guide.
  5. Place one scrap of wood inside the tank over the masking tape, then place the two scraps of poly tubing on the outer glass surface.
  6. Place the guide wood block on top of the poly tubing, align the 90 degree notch with the marked hole on the glass, and clamp it in place so the clamp holds both pieces of wood in place. The poly tubing underneath the wood guide is there to provide spacing so the wood does not smash down on the plumbers putty. You could use anything else you like for a spacer, but the poly tubing was what I had on hand and was the right thickness. Do not over-tighten the clamp to avoid cracking the glass. It only needs to be secure enough to resist light pressure from the hole saw bit pressing against it. IMG_2819.jpg
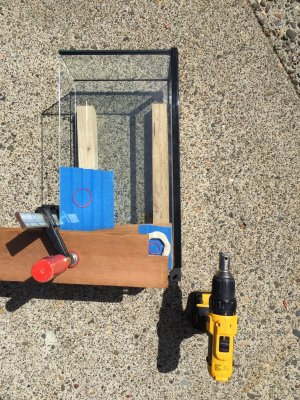
  7. Pour some water into the ring of plumbers putty to create a pool of water over the marked hole.
  8. Place the hole saw bit onto the glass surface and gently press it against the notch in the wood block so it's tucked nicely into that corner. Begin drilling slowly and just focus on keeping the drill bit pressed sideways against the wood. Do not actually press down on the drill against the glass. The weight of the drill alone is enough to cut the glass.
  9. I stopped drilling after about 30 seconds and poured more water to flush out the cloudy water, then resumed drilling. After about 1.5 - 2 minutes, the hole was completed. You will feel the difference when the drill bit gets through the glass and hits the wood backing block.
  10. Remove the drilled hole scrap of glass, remove the clamp, and remove the tape. You should have a nicely drilled hole with no cracks and no chips. IMG_2820.jpg
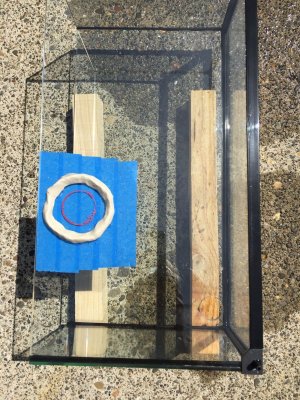
  11. Repeat these steps for the 2nd hole. IMG_2821.jpg
  12. Verify the bulkheads fit properly. IMG_2822.jpg
  13. Cut a piece of the corrugated plastic sheet to fit the side of the tank and the bottom of the tank. This will be used to block the refugium light from shining into the rest of your sump to avoid growing algae in the sump.
  14. Place the plastic sheet against the side of the refugium and mark where the bulkhead holes are. Using either scissors or another hole saw, cut out the bulkhead holes in the plastic.
  15. Glue the corrugated plastic to the side and bottom of the refugium with the silicon caulking.
  16. Place the bulkheads in place and tighten. IMG_2823.jpg
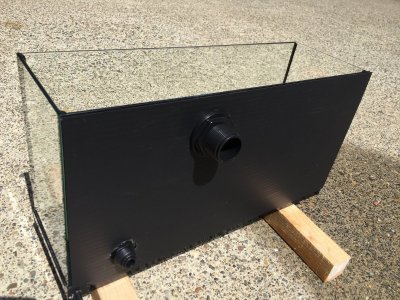
  17. Attach the push connect fittings and tubing.
  18. Attach the PVC elbow, drain pipe, and straining filter. I did not glue these PVC fittings because it's a tight fit getting the refugium into and out of the sump area, so the ability to easily remove the drain pipe will make this process easier.
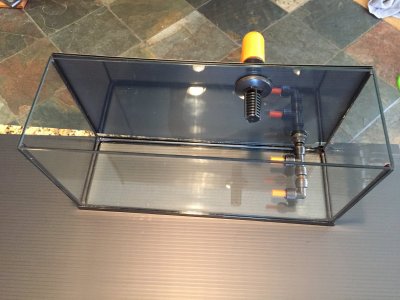
IMG_2824.jpg

IMG_2825.jpg

Once the silicon has set, I will place the refugium on top of the sump and attach my Neptune PMUP to the 3/8" feed line, and attach my ChaetoMax grow light on top. I'll configure the Apex to turn on the refugium lights on the opposite schedule of my display tank lights.

Now I just need to purchase some chaeto!

(EDIT: On 6/5/18 I changed out the strainer with a low-profile strainer because the chaeto was getting snagged and stopped rotating. See this post for updated details: https://www.reef2reef.com/threads/s...eefer-xl-425-build.358990/page-8#post-4796540)
As I previously promised, here is an overview of how I converted my stock Red Sea ATO reservoir into a refugium.

Parts list:

Overflow Drain:
  • 3/4" bulkhead, threaded inside and slip fitting outside
  • 3/4" threaded strainer
  • 3/4" PVC elbow
  • 3/4" PVC pipe
Input Feed:
  • 3/8" bulkhead, push connect on both ends
  • 3/8" push connect elbow (qty 2)
  • 3/8" push connect T fitting
  • 3/8" push connect straight coupler
  • 3/8" poly tubing
Misc:
  • Black corrugated plastic (for light-blocking siding)
  • Plumbers putty
  • Silicon caulking
Tools:
  • 21 mm diamond coated hole saw for 3/8" input bulkhead
  • 35 mm diamond coated hole saw for 3/4" overflow bulkhead
  • Drill
  • Clamps
  • 2 scraps of wood for drill guide and backing
  • 2 scraps of 3/8" poly tubing for guide spacers
  • Masking tape
  • Glass marking pen
Process:
  1. Mark where you want the input and output holes on the glass. I left 1" from each edge to reduce the risk of cracking the glass. I placed the input nearest the bottom rear of the refugium so the input water will flow forward from the bottom end of the tank. I'm hoping this will cause the chaeto to rotate from the flow on the bottom of the tank. IMG_2817.jpg
  2. Place a ring of plumbers putty around the marked hole, leaving about 1/2" buffer around the marked circle to allow a good pool of water to cool the drill bit.
  3. Cover the inside of the glass with masking tape to both catch the cutout as well as help to prevent chipping. IMG_2818.jpg
  4. Cut a 90 degree notch out of one of the scraps of wood to use as a drill guide. You only need to support the drill bit against two solid surfaces, so it's not necessary to cut a guide hole through the wood. This also allows you to cut any size hole using the same guide.
  5. Place one scrap of wood inside the tank over the masking tape, then place the two scraps of poly tubing on the outer glass surface.
  6. Place the guide wood block on top of the poly tubing, align the 90 degree notch with the marked hole on the glass, and clamp it in place so the clamp holds both pieces of wood in place. The poly tubing underneath the wood guide is there to provide spacing so the wood does not smash down on the plumbers putty. You could use anything else you like for a spacer, but the poly tubing was what I had on hand and was the right thickness. Do not over-tighten the clamp to avoid cracking the glass. It only needs to be secure enough to resist light pressure from the hole saw bit pressing against it. IMG_2819.jpg
  7. Pour some water into the ring of plumbers putty to create a pool of water over the marked hole.
  8. Place the hole saw bit onto the glass surface and gently press it against the notch in the wood block so it's tucked nicely into that corner. Begin drilling slowly and just focus on keeping the drill bit pressed sideways against the wood. Do not actually press down on the drill against the glass. The weight of the drill alone is enough to cut the glass.
  9. I stopped drilling after about 30 seconds and poured more water to flush out the cloudy water, then resumed drilling. After about 1.5 - 2 minutes, the hole was completed. You will feel the difference when the drill bit gets through the glass and hits the wood backing block.
  10. Remove the drilled hole scrap of glass, remove the clamp, and remove the tape. You should have a nicely drilled hole with no cracks and no chips. IMG_2820.jpg
  11. Repeat these steps for the 2nd hole. IMG_2821.jpg
  12. Verify the bulkheads fit properly. IMG_2822.jpg
  13. Cut a piece of the corrugated plastic sheet to fit the side of the tank and the bottom of the tank. This will be used to block the refugium light from shining into the rest of your sump to avoid growing algae in the sump.
  14. Place the plastic sheet against the side of the refugium and mark where the bulkhead holes are. Using either scissors or another hole saw, cut out the bulkhead holes in the plastic.
  15. Glue the corrugated plastic to the side and bottom of the refugium with the silicon caulking.
  16. Place the bulkheads in place and tighten. IMG_2823.jpg
  17. Attach the push connect fittings and tubing.
  18. Attach the PVC elbow, drain pipe, and straining filter. I did not glue these PVC fittings because it's a tight fit getting the refugium into and out of the sump area, so the ability to easily remove the drain pipe will make this process easier.
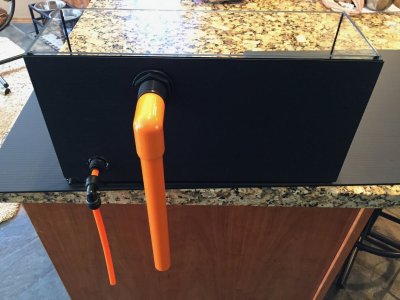
IMG_2824.jpg

IMG_2825.jpg

Once the silicon has set, I will place the refugium on top of the sump and attach my Neptune PMUP to the 3/8" feed line, and attach my ChaetoMax grow light on top. I'll configure the Apex to turn on the refugium lights on the opposite schedule of my display tank lights.

Now I just need to purchase some chaeto!

(EDIT: On 6/5/18 I changed out the strainer with a low-profile strainer because the chaeto was getting snagged and stopped rotating. See this post for updated details: https://www.reef2reef.com/threads/s...eefer-xl-425-build.358990/page-8#post-4796540)
 
OP
OP
SuncrestReef

SuncrestReef

That Apex guy
View Badges
Joined
Jan 18, 2018
Messages
4,214
Reaction score
9,217
Location
Oregon
Rating - 0%
0   0   0
OP
OP
SuncrestReef

SuncrestReef

That Apex guy
View Badges
Joined
Jan 18, 2018
Messages
4,214
Reaction score
9,217
Location
Oregon
Rating - 0%
0   0   0
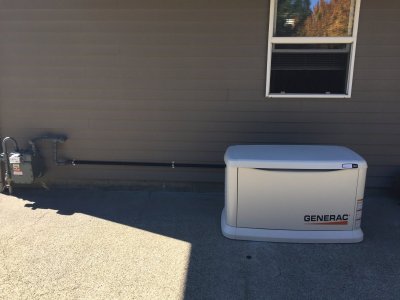
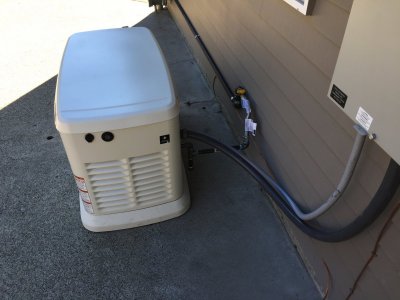
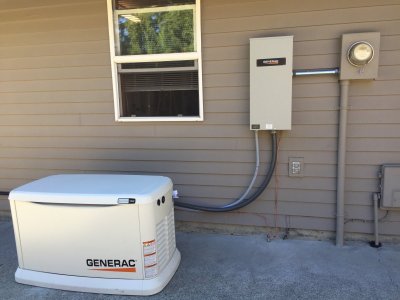
The generator was delivered today! I have to wait until next Tuesday for the electrician to install the transfer switch and make the final connections, but at least we're getting close.

IMG_4292.jpg

I posted these same photos on the Red Sea Owners group on Facebook, and (as frequently happens on social media) several people posted harsh comments that the generator should not be installed near a window. For the record, this window is on my garage, not a living space in my home, and is perfectly acceptable in my local building code guidelines.

I also had several people challenging my decision to get a 22 kW generator, saying it's way too much capacity for a single family dwelling and a waste of money. At first I made an effort to explain my decision process and the power needs I anticipated, but these people were adamant that they were right and I was wrong. It got to the point where I had to disable comments on my posting, and then just deleted the whole thread to rid myself of the unwanted debate.

Sometimes I really question whether the Internet is a good thing or bad thing for mankind. Why can't we just post something we're excited and proud of, only to have it shot down by hateful people? :mad:
 
OP
OP
SuncrestReef

SuncrestReef

That Apex guy
View Badges
Joined
Jan 18, 2018
Messages
4,214
Reaction score
9,217
Location
Oregon
Rating - 0%
0   0   0
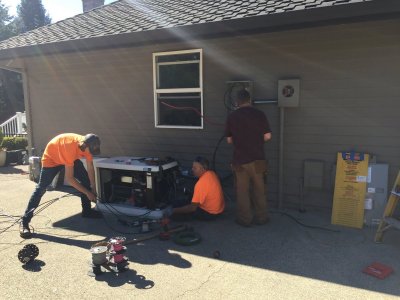
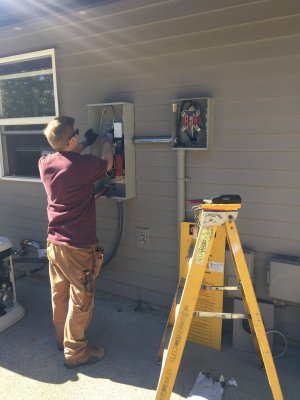
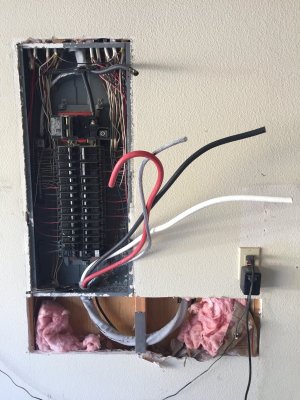
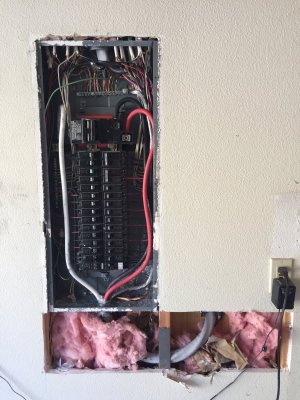
The electricians installed the automatic transfer switch and connected the generator today.

They had to shut off power to my house for over 2 hours during this installation, but they provided a portable generator to keep my aquarium running the whole time. These guys from Bryant Power Services were great!

Now I just need to wait for the final inspection and then I'm ready for winter storms.

IMG_4313.jpg

IMG_4311.jpg

IMG_4310.jpg

IMG_4312.jpg

IMG_4317.jpg

IMG_4315.jpg
 

mta_morrow

Of course I have room for 1 more fish!
View Badges
Joined
Sep 15, 2015
Messages
7,234
Reaction score
29,675
Location
Sumter, SC
Rating - 0%
0   0   0
I posted these same photos on the Red Sea Owners group on Facebook, and (as frequently happens on social media) several people posted harsh comments that the generator should not be installed near a window. For the record, this window is on my garage, not a living space in my home, and is perfectly acceptable in my local building code guidelines.

I also had several people challenging my decision to get a 22 kW generator, saying it's way too much capacity for a single family dwelling and a waste of money. At first I made an effort to explain my decision process and the power needs I anticipated, but these people were adamant that they were right and I was wrong. It got to the point where I had to disable comments on my posting, and then just deleted the whole thread to rid myself of the unwanted debate.

Sometimes I really question whether the Internet is a good thing or bad thing for mankind. Why can't we just post something we're excited and proud of, only to have it shot down by hateful people? :mad:

Sorry for what you went through on FB.

I have no social media accounts. This forum is my only source of communication with the outside world!
 

mta_morrow

Of course I have room for 1 more fish!
View Badges
Joined
Sep 15, 2015
Messages
7,234
Reaction score
29,675
Location
Sumter, SC
Rating - 0%
0   0   0
The electricians installed the automatic transfer switch and connected the generator today.

They had to shut off power to my house for over 2 hours during this installation, but they provided a portable generator to keep my aquarium running the whole time. These guys from Bryant Power Services were great!

Now I just need to wait for the final inspection and then I'm ready for winter storms.

IMG_4313.jpg

IMG_4311.jpg

IMG_4310.jpg

IMG_4312.jpg

IMG_4317.jpg

IMG_4315.jpg

Excellent! Anxious to hear how the test run goes!
 
OP
OP
SuncrestReef

SuncrestReef

That Apex guy
View Badges
Joined
Jan 18, 2018
Messages
4,214
Reaction score
9,217
Location
Oregon
Rating - 0%
0   0   0
@SuncrestReef I swear this is one of the best of the many tank threads I follow. Evcellent job on the video!

Thank you! I always try to post information that I think will be valuable or useful to others. Or at least entertaining!
 

Raptor72

Well-Known Member
View Badges
Joined
Jul 19, 2011
Messages
621
Reaction score
429
Location
Southern California
Rating - 0%
0   0   0
What an amazing set up! Was there a how to on the NYOS skimmer wiper mod? I have the same skimmer and was thinking about adding the Davey Jones Locker but had no idea you could do that mod on the cup.
 
OP
OP
SuncrestReef

SuncrestReef

That Apex guy
View Badges
Joined
Jan 18, 2018
Messages
4,214
Reaction score
9,217
Location
Oregon
Rating - 0%
0   0   0
What an amazing set up! Was there a how to on the NYOS skimmer wiper mod? I have the same skimmer and was thinking about adding the Davey Jones Locker but had no idea you could do that mod on the cup.

Thanks! Glad you like it.

For the Swabbie skimmer wiper, Avast Marine has three options:
1. Buy the Swabbie and mount it yourself for $125.
2. Buy the Swabbie pre-mounted to a generic skimmer lid. You tell them the dimensions and you'll receive a lid that will hopefully fit. $170.
-- or --
3. Send them your skimmer lid, and they will drill & attach the Swabbie for you and send it back within 2 business days for $160. I chose this option because I don't have the needed tools to accurately center, drill, and tap screw threads needed to mount it properly, and I didn't want a non-Nyos lid on my skimmer.

Here's my Apex code that runs the Swabbie for 2 minutes every 6 hours, unless the skimmer is turned off:

Fallback OFF
Set OFF
OSC 000:00/002:00/359:00 Then ON
If Output EB_3_Skimmer = OFF Then OFF
 

sam.veilleux30

Well-Known Member
View Badges
Joined
Apr 7, 2018
Messages
584
Reaction score
1,185
Location
Otterburn park, Qc
Rating - 0%
0   0   0
I posted these same photos on the Red Sea Owners group on Facebook, and (as frequently happens on social media) several people posted harsh comments that the generator should not be installed near a window. For the record, this window is on my garage, not a living space in my home, and is perfectly acceptable in my local building code guidelines.

I also had several people challenging my decision to get a 22 kW generator, saying it's way too much capacity for a single family dwelling and a waste of money. At first I made an effort to explain my decision process and the power needs I anticipated, but these people were adamant that they were right and I was wrong. It got to the point where I had to disable comments on my posting, and then just deleted the whole thread to rid myself of the unwanted debate.

Sometimes I really question whether the Internet is a good thing or bad thing for mankind. Why can't we just post something we're excited and proud of, only to have it shot down by hateful people? :mad:

Crappy people will post crap.
 

sam.veilleux30

Well-Known Member
View Badges
Joined
Apr 7, 2018
Messages
584
Reaction score
1,185
Location
Otterburn park, Qc
Rating - 0%
0   0   0
Maybe you mentioned this earlier and i missed it, but what do you think of the diffuser for the radions?
Have you ramp up the % of the lamp to compensate?
Nice setup, and to have a generator for the house... wow.
Last winter we had an ice storm and no power for one night, i did not slept well that night running the gas generator on the balcony (getting it there was something).
I prefer your approach.
 
OP
OP
SuncrestReef

SuncrestReef

That Apex guy
View Badges
Joined
Jan 18, 2018
Messages
4,214
Reaction score
9,217
Location
Oregon
Rating - 0%
0   0   0
Maybe you mentioned this earlier and i missed it, but what do you think of the diffuser for the radions?
Have you ramp up the % of the lamp to compensate?
Nice setup, and to have a generator for the house... wow.
Last winter we had an ice storm and no power for one night, i did not slept well that night running the gas generator on the balcony (getting it there was something).
I prefer your approach.

I really like the diffusers! They smooth out the light and dramatically reduce the disco ball effect. Also, when I'm sitting on the couch across the room from the aquarium, the diffuser housing blocks the light from shining out the sides of the Radions, so it doesn't glare in my eyes.

Since I started from scratch with the diffusers on my tank, I didn't need to ramp up the intensity to compensate. I simply used my PAR meter to determine how much light I needed. I currently have the Radions peaking at 80% during the day, and use the AB+ spectrum. This gives me about 420 PAR at the top of my rocks, and about 150 PAR on the sand bottom.

In case you missed it, I documented the diffuser installation process in post #73 of my build: https://www.reef2reef.com/threads/s...eefer-xl-425-build.358990/page-4#post-4614895
 

High pressure shells: Do you look for signs of stress in the invertebrates in your reef tank?

  • I regularly look for signs of invertebrate stress in my reef tank.

    Votes: 42 31.3%
  • I occasionally look for signs of invertebrate stress in my reef tank.

    Votes: 31 23.1%
  • I rarely look for signs of invertebrate stress in my reef tank.

    Votes: 27 20.1%
  • I never look for signs of invertebrate stress in my reef tank.

    Votes: 34 25.4%
  • Other.

    Votes: 0 0.0%
Back
Top