OP
OP
SuncrestReef

SuncrestReef

That Apex guy
View Badges
Joined
Jan 18, 2018
Messages
4,214
Reaction score
9,216
Location
Oregon
Rating - 0%
0   0   0
The water cleared up nicely within 12 hours, so I added the Dr. Tim's bacteria and ammonium chloride solution today to begin cycling!

IMG_2811.jpg
 
OP
OP
SuncrestReef

SuncrestReef

That Apex guy
View Badges
Joined
Jan 18, 2018
Messages
4,214
Reaction score
9,216
Location
Oregon
Rating - 0%
0   0   0
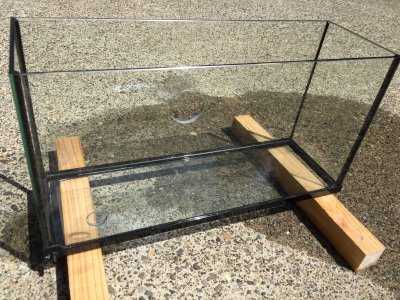
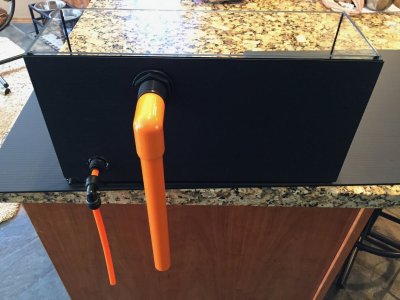
As I previously promised, here is an overview of how I converted my stock Red Sea ATO reservoir into a refugium.

Parts list:

Overflow Drain:
  • 3/4" bulkhead, threaded inside and slip fitting outside
  • 3/4" threaded strainer
  • 3/4" PVC elbow
  • 3/4" PVC pipe
Input Feed:
  • 3/8" bulkhead, push connect on both ends
  • 3/8" push connect elbow (qty 2)
  • 3/8" push connect T fitting
  • 3/8" push connect straight coupler
  • 3/8" poly tubing
Misc:
  • Black corrugated plastic (for light-blocking siding)
  • Plumbers putty
  • Silicon caulking
Tools:
  • 21 mm diamond coated hole saw for 3/8" input bulkhead
  • 35 mm diamond coated hole saw for 3/4" overflow bulkhead
  • Drill
  • Clamps
  • 2 scraps of wood for drill guide and backing
  • 2 scraps of 3/8" poly tubing for guide spacers
  • Masking tape
  • Glass marking pen
Process:
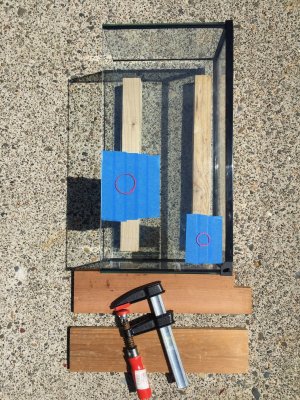
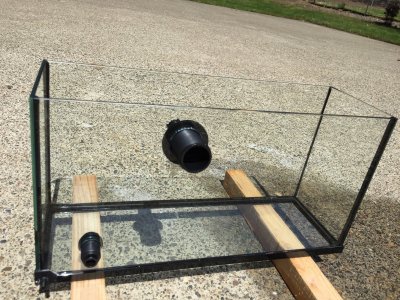
  1. Mark where you want the input and output holes on the glass. I left 1" from each edge to reduce the risk of cracking the glass. I placed the input nearest the bottom rear of the refugium so the input water will flow forward from the bottom end of the tank. I'm hoping this will cause the chaeto to rotate from the flow on the bottom of the tank. IMG_2817.jpg
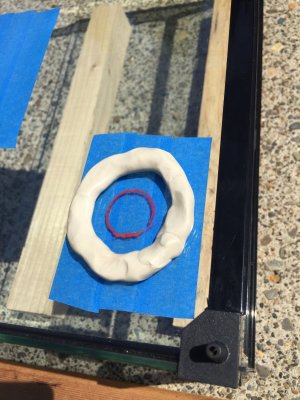
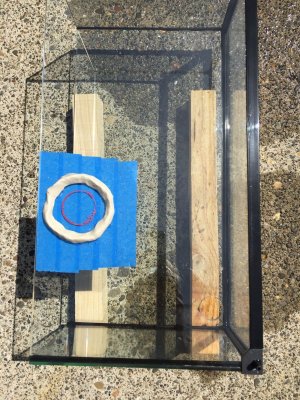
  2. Place a ring of plumbers putty around the marked hole, leaving about 1/2" buffer around the marked circle to allow a good pool of water to cool the drill bit.
  3. Cover the inside of the glass with masking tape to both catch the cutout as well as help to prevent chipping. IMG_2818.jpg
  4. Cut a 90 degree notch out of one of the scraps of wood to use as a drill guide. You only need to support the drill bit against two solid surfaces, so it's not necessary to cut a guide hole through the wood. This also allows you to cut any size hole using the same guide.
  5. Place one scrap of wood inside the tank over the masking tape, then place the two scraps of poly tubing on the outer glass surface.
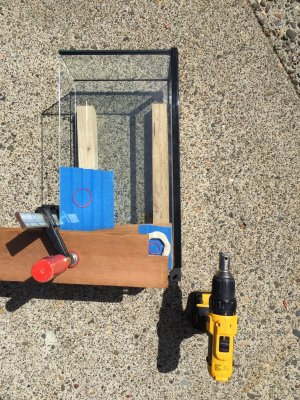
  6. Place the guide wood block on top of the poly tubing, align the 90 degree notch with the marked hole on the glass, and clamp it in place so the clamp holds both pieces of wood in place. The poly tubing underneath the wood guide is there to provide spacing so the wood does not smash down on the plumbers putty. You could use anything else you like for a spacer, but the poly tubing was what I had on hand and was the right thickness. Do not over-tighten the clamp to avoid cracking the glass. It only needs to be secure enough to resist light pressure from the hole saw bit pressing against it. IMG_2819.jpg
  7. Pour some water into the ring of plumbers putty to create a pool of water over the marked hole.
  8. Place the hole saw bit onto the glass surface and gently press it against the notch in the wood block so it's tucked nicely into that corner. Begin drilling slowly and just focus on keeping the drill bit pressed sideways against the wood. Do not actually press down on the drill against the glass. The weight of the drill alone is enough to cut the glass.
  9. I stopped drilling after about 30 seconds and poured more water to flush out the cloudy water, then resumed drilling. After about 1.5 - 2 minutes, the hole was completed. You will feel the difference when the drill bit gets through the glass and hits the wood backing block.
  10. Remove the drilled hole scrap of glass, remove the clamp, and remove the tape. You should have a nicely drilled hole with no cracks and no chips. IMG_2820.jpg
  11. Repeat these steps for the 2nd hole. IMG_2821.jpg
  12. Verify the bulkheads fit properly. IMG_2822.jpg
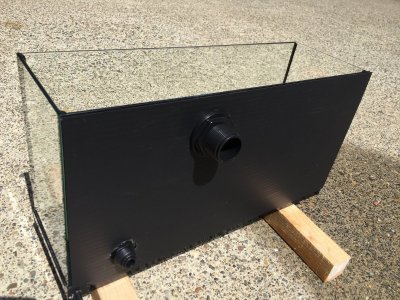
  13. Cut a piece of the corrugated plastic sheet to fit the side of the tank and the bottom of the tank. This will be used to block the refugium light from shining into the rest of your sump to avoid growing algae in the sump.
  14. Place the plastic sheet against the side of the refugium and mark where the bulkhead holes are. Using either scissors or another hole saw, cut out the bulkhead holes in the plastic.
  15. Glue the corrugated plastic to the side and bottom of the refugium with the silicon caulking.
  16. Place the bulkheads in place and tighten. IMG_2823.jpg
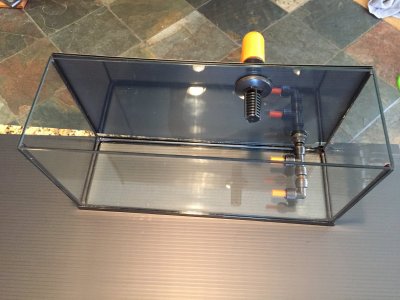
  17. Attach the push connect fittings and tubing.
  18. Attach the PVC elbow, drain pipe, and straining filter. I did not glue these PVC fittings because it's a tight fit getting the refugium into and out of the sump area, so the ability to easily remove the drain pipe will make this process easier.
IMG_2824.jpg

IMG_2825.jpg

Once the silicon has set, I will place the refugium on top of the sump and attach my Neptune PMUP to the 3/8" feed line, and attach my ChaetoMax grow light on top. I'll configure the Apex to turn on the refugium lights on the opposite schedule of my display tank lights.

Now I just need to purchase some chaeto!

(EDIT: On 6/5/18 I changed out the strainer with a low-profile strainer because the chaeto was getting snagged and stopped rotating. See this post for updated details: https://www.reef2reef.com/threads/s...eefer-xl-425-build.358990/page-8#post-4796540)
 
Last edited:
OP
OP
SuncrestReef

SuncrestReef

That Apex guy
View Badges
Joined
Jan 18, 2018
Messages
4,214
Reaction score
9,216
Location
Oregon
Rating - 0%
0   0   0
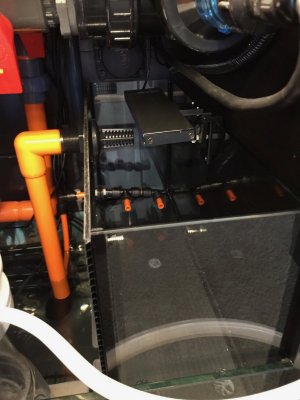
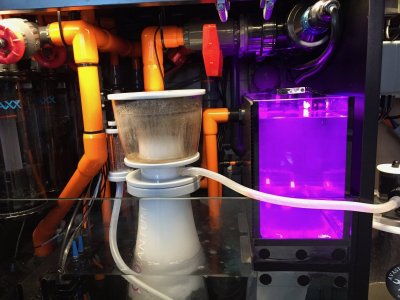
Here's the new refugium in place under the cabinet. Everything fits, water is flowing, and no leaks.

IMG_2826.jpg

IMG_2828.jpg

I did a quick system shutdown to see where the sump water level ends up after adding the approximately 3 gallons to the refugium. After both the display tank and refugium siphon back into the sump, I have about 1/2" of clearance before overflowing. That's a little too close for comfort to me, so I might look into a check valve or anti-siphon for the refugium. Or perhaps I will adjust my normal sump level a little bit by draining out a couple gallons and lowering my optical sensors for the ATK.
 

Raptor72

Well-Known Member
View Badges
Joined
Jul 19, 2011
Messages
620
Reaction score
426
Location
Southern California
Rating - 0%
0   0   0
Sweet set up. Is that where your water level usually is surrounding the skimmer? I ask because I'm running a NYOS 160 on my RS 750 and I'm trying to find the right water height level.
 

offtropic

Active Member
View Badges
Joined
Nov 1, 2017
Messages
147
Reaction score
80
Location
Bay Area, California
Rating - 0%
0   0   0
I have tremendous respect for the thought and engineering you are putting into this. I am definitely looking forward to seeing how this works out as I am still trying to figure out how I want to use the stock ATO (or if I want to use a different sump altogether). Of course, there are some reports that Red Sea is changing their sump so that adds another layer of uncertainty.
 
OP
OP
SuncrestReef

SuncrestReef

That Apex guy
View Badges
Joined
Jan 18, 2018
Messages
4,214
Reaction score
9,216
Location
Oregon
Rating - 0%
0   0   0
Sweet set up. Is that where your water level usually is surrounding the skimmer? I ask because I'm running a NYOS 160 on my RS 750 and I'm trying to find the right water height level.

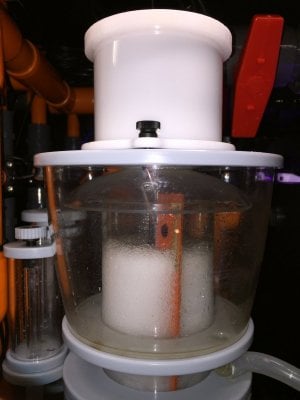
Nyos recommends a water depth of 8" for the Quantum 160 skimmer, but because the Red Sea sump baffle is glued in at 10.5", the water is a bit too deep for the Nyos. I have my skimmer sitting on top of a 1" thick MarinePure plate and a 1/4" thick piece of egg crate, so that puts my skimmer about 9.25" deep. It seems to be close enough to the recommended level.
 
Last edited:
OP
OP
SuncrestReef

SuncrestReef

That Apex guy
View Badges
Joined
Jan 18, 2018
Messages
4,214
Reaction score
9,216
Location
Oregon
Rating - 0%
0   0   0
I have tremendous respect for the thought and engineering you are putting into this. I am definitely looking forward to seeing how this works out as I am still trying to figure out how I want to use the stock ATO (or if I want to use a different sump altogether). Of course, there are some reports that Red Sea is changing their sump so that adds another layer of uncertainty.

Thank you! I put months of thought and research into the design before I made a single purchase. It seems like so long ago now, but it's been worth the wait to get to this point. I'm just trying to be patient as I wait for the tank to cycle, but I'm really looking forward to putting some livestock into the tank after all these months!
 
OP
OP
SuncrestReef

SuncrestReef

That Apex guy
View Badges
Joined
Jan 18, 2018
Messages
4,214
Reaction score
9,216
Location
Oregon
Rating - 0%
0   0   0
Last edited:

Mystikal

Active Member
View Badges
Joined
Jan 31, 2017
Messages
496
Reaction score
460
Rating - 0%
0   0   0
It’s a ChaetoMax LED light. You can find it at many online stores:
https://www.bulkreefsupply.com/chaetomax-2-n-1-refugium-led-auqa-gadget-innovative-marine.html

I needed something very slim since most of the space above my refugium is taken up by my UV sterilizer. There’s no way I could fit a Kessil or other larger grow light.

I really like that design. How are you liking the growth? Currently using a HomeDep Flood Light and its doing the job, but there is a lot of light spill. This ChaetoMax seems like it would be a nice tidy fit.
 
OP
OP
SuncrestReef

SuncrestReef

That Apex guy
View Badges
Joined
Jan 18, 2018
Messages
4,214
Reaction score
9,216
Location
Oregon
Rating - 0%
0   0   0
I really like that design. How are you liking the growth? Currently using a HomeDep Flood Light and its doing the job, but there is a lot of light spill. This ChaetoMax seems like it would be a nice tidy fit.

I can’t answer your question because I don’t have anything in the refugium yet. I’m still cycling the tank and won’t have any inhabitants for a few more weeks. Once I do have some results to report I’ll let you know.
 
OP
OP
SuncrestReef

SuncrestReef

That Apex guy
View Badges
Joined
Jan 18, 2018
Messages
4,214
Reaction score
9,216
Location
Oregon
Rating - 0%
0   0   0
Here's a quick update on my cycling progress. I'm using Dr. Tim's One and Only bacteria and dosing with ammonia chloride as directed by Dr. Tim's instructions, and I just completed day 8. Each time after dosing 2 ppm ammonia on the prescribed schedule, the following day the ammonia level drops down to nearly zero, but the nitrite levels are extremely high. My Red Sea nitrite test kit only measures up to 1 ppm, and the color was off the chart so I knew it was high. I picked up an API nitrite test kit from my LFS since the API test reads up to 5 ppm, and found the nitrite was over 5 ppm. Dr. Tim recommends water changes to lower nitrite if it exceeds 5 ppm, so yesterday I did a 70% water change. Today the nitrites were down closer to 2 ppm and hopefully I'm back on track. I'll test the parameters again tomorrow to see if nitrites continue to rise.
 
Last edited:
OP
OP
SuncrestReef

SuncrestReef

That Apex guy
View Badges
Joined
Jan 18, 2018
Messages
4,214
Reaction score
9,216
Location
Oregon
Rating - 0%
0   0   0
I picked up some Chaeto and my refugium design is tumbling it nicely!


The tank cycling should be completed soon, then I can finally put in some livestock.
 

revhtree

Owner Administrator
View Badges
Joined
May 8, 2006
Messages
47,762
Reaction score
87,128
Rating - 100%
1   0   0
Looks great!
 
OP
OP
SuncrestReef

SuncrestReef

That Apex guy
View Badges
Joined
Jan 18, 2018
Messages
4,214
Reaction score
9,216
Location
Oregon
Rating - 0%
0   0   0
I'm now 17 days into cycling my tank using Dr. Tim's bacteria. His instructions state that if nitrites exceed 5 ppm, make water changes to prevent the cycling process from stalling. Since day 3 I've found the dosed ammonia dissipated quickly while nitrites are very high (my Red Sea nitrite test kit only measures up to 1 ppm, so picked up an API test kit that measures up to 5 ppm) so I've done frequent small water changes (5% per day) and larger weekly water changes (50% the 1st week and 60% the 2nd week). Today, only 2 days after the 60% change, my nitrites were still over 5 ppm, so I did a 100% water change. I'm hoping to get the cycling back on track so nitrites are consumed as quickly as the ammonia. I'll keep testing each day to see if this helped.

On a side note, I purchase the Avast Marine Swabbie retrofit for my Nyos Quantum 160 skimmer. It's controlled by my Apex to wipe the skimmer neck clean every 6 hours. Pretty simple to install and I think it will make life a lot easier once I stock my tank and have more skimmate to collect.

IMG_2913.jpg

IMG_2914.jpg
 
OP
OP
SuncrestReef

SuncrestReef

That Apex guy
View Badges
Joined
Jan 18, 2018
Messages
4,214
Reaction score
9,216
Location
Oregon
Rating - 0%
0   0   0
I really like that design. How are you liking the growth? Currently using a HomeDep Flood Light and its doing the job, but there is a lot of light spill. This ChaetoMax seems like it would be a nice tidy fit.
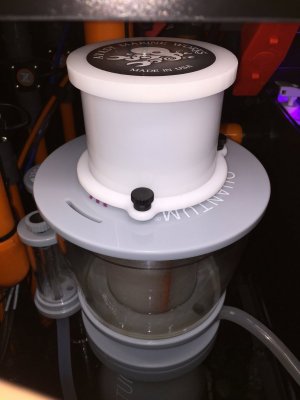
@Mystikal I can now report that my chaeto has more than doubled in size after 1 week in the refugium under the ChaetoMax LED light.

Compare this video today against the one from last week:


Last week:
 

tdunmore2

Active Member
View Badges
Joined
Jan 24, 2017
Messages
161
Reaction score
82
Rating - 0%
0   0   0
Great build! Where did you find those power cables?

The electrician won't be able to install the new dedicated 20 amp circuit until next Monday, so I've been killing time getting other things ready before I can finally mount the display tank on top of the stand. Here's a brief update on my recent progress:


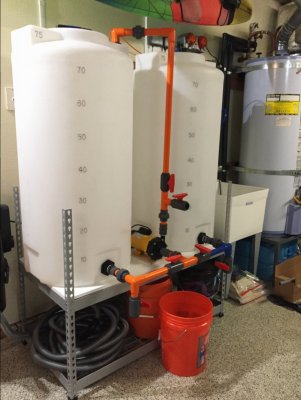
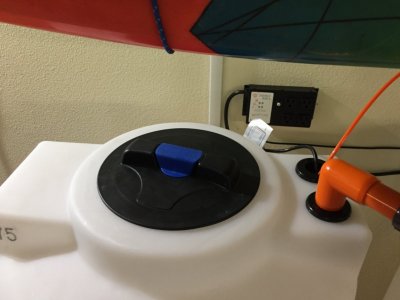
4. I also finalized my saltwater mixing station design and put all the plumbing together. Keeping with my color-coded pipes, blue is RO/DI water and orange is salt water:
IMG_2596.JPG

IMG_2597.JPG
 

Algae invading algae: Have you had unwanted algae in your good macroalgae?

  • I regularly have unwanted algae in my macroalgae.

    Votes: 18 34.0%
  • I occasionally have unwanted algae in my macroalgae.

    Votes: 11 20.8%
  • I rarely have unwanted algae in my macroalgae.

    Votes: 4 7.5%
  • I never have unwanted algae in my macroalgae.

    Votes: 5 9.4%
  • I don’t have macroalgae.

    Votes: 14 26.4%
  • Other.

    Votes: 1 1.9%
Back
Top