SuncrestReef's Reefer XL 425 Rebuild

OP
OP
SuncrestReef

SuncrestReef

That Apex guy
View Badges
Joined
Jan 18, 2018
Messages
4,214
Reaction score
9,217
Location
Oregon
Rating - 0%
0   0   0
Life has a way of interfering with one's reefing plans. After quite a delay, I'm finally starting to tackle this rebuild project. Today I turned off the return pump and drained my sump. It will take me a day or two to get the old sump pulled out, cleaned up, and staged to be a temporary lifeboat for my remaining corals. During this time, I'm running my Reefer XL 425 display tank sumpless, so I had to relocate the heater, temperature probe, and ATK directly into the display tank.

It's funny what a mess it creates when you unbundle all those neatly routed wires to take things apart:

9E4149AA-3A46-412C-86BA-F37C5C39CE39.jpeg


Once the old sump is clean and ready to hold the corals, then I'll also set up my 20 gallon QT tank to temporarily hold my fish. Then I can start draining the display tank, move the corals, and net the fish, shrimp, and cleanup crew to move to the QT tank.

At that point I can finally take the display tank down for a thorough cleaning, rebuild the cabinet to replace the divider panel with my 8020 aluminum frame, and finally place the new sump in the cabinet. I'm hoping that will be done by next week.

Glad to have made some progress today!
 

Tacticool-Reefer

I have spoken!
View Badges
Joined
Nov 26, 2020
Messages
438
Reaction score
525
Location
U.S.A.
Rating - 0%
0   0   0
Life has a way of interfering with one's reefing plans. After quite a delay, I'm finally starting to tackle this rebuild project. Today I turned off the return pump and drained my sump. It will take me a day or two to get the old sump pulled out, cleaned up, and staged to be a temporary lifeboat for my remaining corals. During this time, I'm running my Reefer XL 425 display tank sumpless, so I had to relocate the heater, temperature probe, and ATK directly into the display tank.

It's funny what a mess it creates when you unbundle all those neatly routed wires to take things apart:

9E4149AA-3A46-412C-86BA-F37C5C39CE39.jpeg


Once the old sump is clean and ready to hold the corals, then I'll also set up my 20 gallon QT tank to temporarily hold my fish. Then I can start draining the display tank, move the corals, and net the fish, shrimp, and cleanup crew to move to the QT tank.

At that point I can finally take the display tank down for a thorough cleaning, rebuild the cabinet to replace the divider panel with my 8020 aluminum frame, and finally place the new sump in the cabinet. I'm hoping that will be done by next week.

Glad to have made some progress today!
Good luck!!!
Make sure you take plenty of pictures for us to follow. :)
 
OP
OP
SuncrestReef

SuncrestReef

That Apex guy
View Badges
Joined
Jan 18, 2018
Messages
4,214
Reaction score
9,217
Location
Oregon
Rating - 0%
0   0   0
The old sump is nearly empty now. It's amazing how many vermetid snails and other creatures lined the sump:

IMG_0173.jpg


IMG_0174.jpg


I removed the refugium (was the original Red Sea ATO reservoir which I converted), and it too was pretty messy inside. I think I last cleaned it about 2 years ago.
IMG_0172.jpg


IMG_0171.jpg


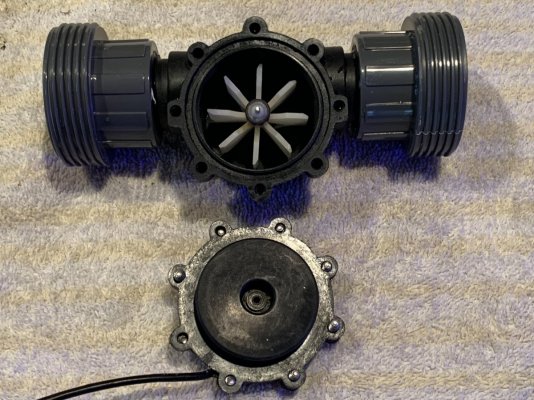
In the 3 years this tank has been running, I never took apart the 1" flow sensor on my return line, mainly because it was still working and I didn't want to mess with it. It had quite a bit of debris inside, so I'm actually surprised it still worked.
IMG_0175.jpg


IMG_0176.jpg


IMG_0180.jpg


It cleaned up easily:
IMG_0181.jpg
 

powers2001

started reefing 1999
View Badges
Joined
May 2, 2013
Messages
5,812
Reaction score
5,509
Location
LIVING WELLS MONTANA
Rating - 0%
0   0   0
Life has a way of interfering with one's reefing plans. After quite a delay, I'm finally starting to tackle this rebuild project. Today I turned off the return pump and drained my sump. It will take me a day or two to get the old sump pulled out, cleaned up, and staged to be a temporary lifeboat for my remaining corals. During this time, I'm running my Reefer XL 425 display tank sumpless, so I had to relocate the heater, temperature probe, and ATK directly into the display tank.

It's funny what a mess it creates when you unbundle all those neatly routed wires to take things apart:

9E4149AA-3A46-412C-86BA-F37C5C39CE39.jpeg


Once the old sump is clean and ready to hold the corals, then I'll also set up my 20 gallon QT tank to temporarily hold my fish. Then I can start draining the display tank, move the corals, and net the fish, shrimp, and cleanup crew to move to the QT tank.

At that point I can finally take the display tank down for a thorough cleaning, rebuild the cabinet to replace the divider panel with my 8020 aluminum frame, and finally place the new sump in the cabinet. I'm hoping that will be done by next week.

Glad to have made some progress today!
@SuncrestReef great plan with simple execution.
 

Husker-reef

Active Member
View Badges
Joined
Mar 5, 2020
Messages
111
Reaction score
68
Location
Omaha, NE
Rating - 0%
0   0   0
OK, now I can get started on the plumbing. I ordered a few extra fittings so I can experiment with different manifold designs to optimize the space under the cabinet and for easier maintenance. My old design didn’t leave enough room between the reactors and the skimmer, so the skimmer blocked the sock trays from opening without tilting the skimmer out of the way. I won’t have socks now with the new roller mat, but I still want more working room.

24DA382A-6057-49FB-AB0D-C97FA853E5C0.jpeg

1FAF40A0-01A4-45FE-8418-F37EA0BF9A1E.jpeg
Suncrest, thank you for this build thread, has been a lifesaver to say the least. I could not find it here in this thread but where did you purchase all of your PVC adapters, valves, fittings, etc. and the orange elbows? TIA
 
OP
OP
SuncrestReef

SuncrestReef

That Apex guy
View Badges
Joined
Jan 18, 2018
Messages
4,214
Reaction score
9,217
Location
Oregon
Rating - 0%
0   0   0
I made a little more progress today. I removed all the old sump PVC plumbing and removed the sump from the cabinet to clean it up for re-use as my temporary frag tank:

IMG_0187.jpg

IMG_0189.jpg

IMG_0191.jpg

IMG_0193.jpg


I also pulled out my multi-float switch bracket so I can re-use it in the new sump:
IMG_0188.jpg


Tomorrow I will set up the old sump for the corals and a separate 20 gallon QT tank for my fish in my dining room while I take the time to clean the display tank and rebuild the cabinet to make room for the new larger sump. To protect the table from any water spills, I built a PVC frame and covered it with thick plastic to act as a containment dam in case there's a spill or splash:
IMG_0194.jpg
 
OP
OP
SuncrestReef

SuncrestReef

That Apex guy
View Badges
Joined
Jan 18, 2018
Messages
4,214
Reaction score
9,217
Location
Oregon
Rating - 0%
0   0   0
Suncrest, thank you for this build thread, has been a lifesaver to say the least. I could not find it here in this thread but where did you purchase all of your PVC adapters, valves, fittings, etc. and the orange elbows? TIA
I got the orange PVC pipe and orange fittings at http://formufit.com

The valves and most of the adapters, bushings, unions are from http://pvcfittingsonline.com

The Red Sea fittings are from https://www.marineandreef.com/ProductDetails.asp?ProductCode=RRS42221

And the metric to US adapter is from https://flexpvc.com/cart/agora.cgi?p=PVC-Fittings-Metric-Adapters&p_id=417-6127&xm=on&ppinc=detail
 

powers2001

started reefing 1999
View Badges
Joined
May 2, 2013
Messages
5,812
Reaction score
5,509
Location
LIVING WELLS MONTANA
Rating - 0%
0   0   0
I made a little more progress today. I removed all the old sump PVC plumbing and removed the sump from the cabinet to clean it up for re-use as my temporary frag tank:

IMG_0187.jpg

IMG_0189.jpg

IMG_0191.jpg

IMG_0193.jpg


I also pulled out my multi-float switch bracket so I can re-use it in the new sump:
IMG_0188.jpg


Tomorrow I will set up the old sump for the corals and a separate 20 gallon QT tank for my fish in my dining room while I take the time to clean the display tank and rebuild the cabinet to make room for the new larger sump. To protect the table from any water spills, I built a PVC frame and covered it with thick plastic to act as a containment dam in case there's a spill or splash:
IMG_0194.jpg
@SuncrestReef you must have one heck of a strong dining room table. 20 gallons of water is around 160 pounds. ;-)
 
OP
OP
SuncrestReef

SuncrestReef

That Apex guy
View Badges
Joined
Jan 18, 2018
Messages
4,214
Reaction score
9,217
Location
Oregon
Rating - 0%
0   0   0
@SuncrestReef you must have one heck of a strong dining room table. 20 gallons of water is around 160 pounds. ;-)
I'm putting a couple of 2x4's under the table to support the extra weight, just in case.
 
OP
OP
SuncrestReef

SuncrestReef

That Apex guy
View Badges
Joined
Jan 18, 2018
Messages
4,214
Reaction score
9,217
Location
Oregon
Rating - 0%
0   0   0
Does he REALLY like drinking salt water? :)
It's less about him getting into the tank; it's more about his hard head knocking into things when he's chasing his toys around the house. At 80 lbs, he could easily knock the lights into the tank, tip over the temporary ATO reservoir, or knock the Apex cords loose. Everything needs to be up out of the way.
 

mdh71

New Member
View Badges
Joined
Jan 14, 2018
Messages
21
Reaction score
15
Rating - 0%
0   0   0
I cannot wait to see how this turns out. I am going to make a switch to the trigger platinum cube for my reefer 425. I would love to do what you are doing, but the modification to the internal wall is too much for me. Worrying about switching the plumbing has me worried enough.
 
OP
OP
SuncrestReef

SuncrestReef

That Apex guy
View Badges
Joined
Jan 18, 2018
Messages
4,214
Reaction score
9,217
Location
Oregon
Rating - 0%
0   0   0
I decided to place the temporary tanks in my home office rather than on the dining room table. Just more out of the way and lets us still use the table without all the clutter of cables. There's a low bench cabinet below the windows that's perfectly sized to fit both tanks:

IMG_0214.jpg

IMG_0215.jpg

IMG_0213.jpg

I'm just waiting on the water to heat up and clear up a bit from the new sand I placed in the tank before I start moving the fish over. I want to make sure my pistol shrimp and diamond goby have some sand to work with. You'll notice I'm using a WAV for water movement. I was worried it would be too powerful for this 20 gallon tank, but found it's just right when set to 10% power. I also placed one ATK in the rear of this tank, and I'll place another one in the old sump for the coral.
IMG_0216.jpg

All of this is currently running on my spare Apex since my primary Apex is still in use running my Reefer XL 425 in my living room. I always have spare parts for everything critical on hand, so in cases like this it makes setting things up very convenient.

I should be ready to move all the livestock tomorrow, then I can begin breaking down the Reefer for reconfiguration.
 
OP
OP
SuncrestReef

SuncrestReef

That Apex guy
View Badges
Joined
Jan 18, 2018
Messages
4,214
Reaction score
9,217
Location
Oregon
Rating - 0%
0   0   0
I successfully moved my livestock to the temporary tanks. It's a little messy with cabling and tubing, but it will only be in place for about a month while I clean the rocks and rebuild the display tank & sump.

IMG_0232a.jpg


Catching the fish was pretty easy once I pulled all the rocks out and drained the tank down to about 6" of water. The only exception was my tailspot blenny, which I couldn't find. I'm hoping he wasn't hiding in the rocks I took outside, and I'm crossing my fingers he's somewhere in that large rock in the coral tank.
IMG_0227.jpg


The old sump's overflow chamber actually makes a perfect little ATO reservoir for both tanks. I have ATK's set up in each tank, both drawing water from this reservoir. I'll add another optical sensor to monitor it for low water.
IMG_0231.jpg


Here's all that's left of my corals. Luckily a few of my favorites made it, but it's devastating to lose so many others.
IMG_0229.jpg


The next step is to remove the sand from the Reefer XL 425 display tank, then remove the display tank from the stand for cleaning.
IMG_0233.jpg
 

DS204

Active Member
View Badges
Joined
Apr 11, 2019
Messages
356
Reaction score
417
Location
Winnipeg, Canada
Rating - 0%
0   0   0
Thanks for sharing all these pictures! Planning to tear down my tank in about a year and re-locate it so this really helps to visualize the journey and help me to plan for success as well.

Curious, how did you locate your pistol shrimp? I have one too and was wondering how tricky they'll be to find!
 

Creating a strong bulwark: Did you consider floor support for your reef tank?

  • I put a major focus on floor support.

    Votes: 20 42.6%
  • I put minimal focus on floor support.

    Votes: 11 23.4%
  • I put no focus on floor support.

    Votes: 15 31.9%
  • Other.

    Votes: 1 2.1%
Back
Top