The “ITotallyKnowWhatImDoing” 200g build.

Bugeater281

Active Member
View Badges
Joined
Dec 4, 2018
Messages
184
Reaction score
107
Rating - 0%
0   0   0
A little secret. I have no clue what I’m doing. But I’m doing it anyways. I have never set up a tank this size. And I’m learning as I go.

This build started over a year ago. However things where moving very slowly, so I didn’t start a build thread. Bi-monthly updates wouldn’t have got any attention. I’m finally on the homestretch, but I do still have quite a bit to do. I will periodically update this through the day, until I catch up to where I’m currently at.

So I ended up getting a free tank, had to help move 3 truckloads of aquariums and aquarium stuff. But it was an acrylic 135g. It was in rough shape.
F91049FB-99D9-45D8-A62C-1B06834487C8.png


At this point I really had to clean this tank well. That was a long process, only to find the tank looked like this.
7C6F949E-5F87-4D94-9551-982C36B305DA.png
65C221CE-DCAB-442D-8786-D6CD81A61658.png


It was winter, so I couldn’t do much at this point.
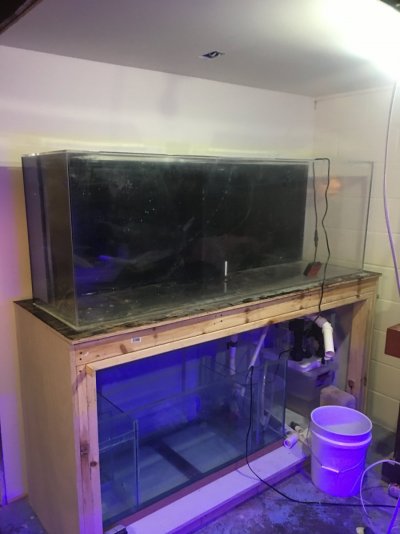
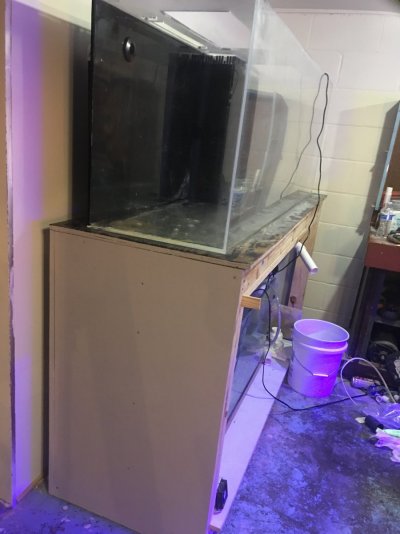
I build the stand(I have no photos of that build). Once spring hit, I got some more work done. The tank now looks like this(I’m happy with it).
D2E0ACD3-D34B-4BE5-9A47-F115E3895726.png

)Looks a bit dirty in this next photo)
14B58942-E261-4CAF-8C0D-92B38FC91468.png


Next update will be in a few hours. I’m bored at work. I also have a year of work to post. But it’s not tons and tons of stuff. But I’ll start taking more photos from this point on.
 
OP
OP
Bugeater281

Bugeater281

Active Member
View Badges
Joined
Dec 4, 2018
Messages
184
Reaction score
107
Rating - 0%
0   0   0
You definitely turned that yank around, it'll look even better once water is in it. Just wondering in the last pic, is that a return or supply in your hvac?

Not sure yet . That’s one of the things on my list to figure out. I plan on drywalling the wood and ceiling around the tank. That way I don’t have dust issues. However I’m still debating whether I can remove that or turn it into the thinner rectangle style.
 
OP
OP
Bugeater281

Bugeater281

Active Member
View Badges
Joined
Dec 4, 2018
Messages
184
Reaction score
107
Rating - 0%
0   0   0
The next thing I worked on, this would have been around Christmas of last year. I had a 75g oceanic tank laying around in my garage. I was tempted to build an acrylic sump. But I decided to use this instead. But to make know oceanic tanks build quality. I’ve been using this tank for the last 10 years. Center brace has been broken the whole time. Never had an issue. And even sadder. The last time this tank was used, it was outside in the Midwest, full of water and bait fish(catfishing). Over winter this think froze into a giant icecube, except for the very center. Where somehow these bullhead survived all winter long .
2F89F379-5889-4D6C-8C2F-A1BED0175BDE.png


Well we tore off the top rim, resealed the whole tank, added some baffles. This tank also use to be a reef tank before I aquired it. It was corner drilled. So I silicones some 1/4in glass in the corner. Here’s what it looks like now.
44C21389-3DB5-4FD4-8705-580F4978196D.png
 
OP
OP
Bugeater281

Bugeater281

Active Member
View Badges
Joined
Dec 4, 2018
Messages
184
Reaction score
107
Rating - 0%
0   0   0
So I little backstory. I still flinch everytime I stick my hand in a basement aquarium. My house is from the 1950s. So my wiring isn’t grounded, and couple outlets wire wired backwards. The amount of time I was shocked badly(while standing on top of two 2x4s and wearing a rubber glove). This got old quick. I had enough space for two more circuits. So I ran two new circuits. Only one is actually hooked up currently. However now the whole circuit is properly wired and gcfi protected. Not sure if this part is up to code, but by the aquariums in the basement(7 of them). I decided to go with pvc conduit. I don’t trust saltwater and metal conduit . I don’t get shocked anymore, but I still flinch everytime I touch the water!
8544E334-6D2D-490B-B422-49C4A2408DD8.png
 
OP
OP
Bugeater281

Bugeater281

Active Member
View Badges
Joined
Dec 4, 2018
Messages
184
Reaction score
107
Rating - 0%
0   0   0
So at this point I started to get some new equipment. A recirculating skimmer, a 600w heater and a vectra m1 pump. At this point I tested the pump in the tank. Moves a good amount of water.


At this point a had a very bad/good idea. And well.... some extra holes showed up in the tank.
FD30E3BA-3BA1-4F2C-945C-F04DB4CDBBDE.png

(Bulkheads are not actually attached at this point)

So I decided to go closed loop. Currently it will be set up with a single pump, one drain and 2 returns. But I set it up so another pump can be easily added. This is were thing have started to get messy. Plumbing is a pain.

And the skimmer I went with.
B09B621A-0AEE-433F-BBA5-5A01640DFF5D.png
 
OP
OP
Bugeater281

Bugeater281

Active Member
View Badges
Joined
Dec 4, 2018
Messages
184
Reaction score
107
Rating - 0%
0   0   0
So I started mocking up the closed loop plumbing last night. Now there is one thing I wish I did a bit differently. And that’s the closed loop return size. I went with 3/4. The closed loop drains are 1.5in. Which should be plenty big. Unfortunately I already have all the bulkheads. And I don’t really want to go spend another 40$ on bulkheads and drill the holes out bigger to go 1 inch. But, this pumps stocks piping is 3/4in(even though the site says the output is 1in). However, I think I’ll be fine. Considering this pump is rated for 2000gph. And after the plumbing I’d expect it to be closer to 1500gph. The other thing I’m doing is getting rid of the stock plumbing from the pump. I’ll have 1.25in plumbing coming out the pump that will reduce to 1in then tee off the two 3/4in piping. I’m hoping this will lower head pressure a bit. And based on my math. Two 3/4in outlets should move about the same amount of water as a single 1in. This is a crude drawing, but you can see how I’m plumbing these togeather.
7D308864-4AE9-4F67-846B-077ED110B6A4.jpeg


I’m still messing with exactly how I want the plumbing to go. But here what I’ve come up with so far.
3F19C92A-A16F-4D50-B250-4D216DCBC1A7.jpeg
D0E6157F-C8B9-4C89-8F7E-43455957560E.jpeg
93212134-7B41-42D1-86F0-DBCD98B82579.jpeg
A321C7C3-40AC-465C-817F-78E889107CA8.jpeg
 
OP
OP
Bugeater281

Bugeater281

Active Member
View Badges
Joined
Dec 4, 2018
Messages
184
Reaction score
107
Rating - 0%
0   0   0
Managed to get some more work done last night.
Hoping to have this up and going by the end of the year. I have rock that’s been curing for 6+ months.
0E79EB50-F1F9-4127-A958-FEAAB8A8591C.jpeg
1DF6AFCB-13D6-454E-92CB-57BB2EEC48BB.jpeg
 
OP
OP
Bugeater281

Bugeater281

Active Member
View Badges
Joined
Dec 4, 2018
Messages
184
Reaction score
107
Rating - 0%
0   0   0
Made some more progress. Changed the closed loop plumbing a bit.
FE7D1AFF-8475-4EEC-94D2-E7D4615124A6.jpeg
0BE4786A-8A33-4DE1-B61A-4D80386947FB.jpeg
 

Daniel@R2R

Living the Reef Life
View Badges
Joined
Nov 18, 2012
Messages
37,474
Reaction score
63,857
Location
Fontana, California
Rating - 100%
1   0   0
Following along!
 
OP
OP
Bugeater281

Bugeater281

Active Member
View Badges
Joined
Dec 4, 2018
Messages
184
Reaction score
107
Rating - 0%
0   0   0
Finally figured out how I’m going to plumb the closed loop. This isn’t finished. But a basic idea(both drains ends will be a bit shorter and both will have a 90* going down).
D8DDF1D4-A7DE-4C4F-A5A8-EFC6204AE4C3.jpeg
 
OP
OP
Bugeater281

Bugeater281

Active Member
View Badges
Joined
Dec 4, 2018
Messages
184
Reaction score
107
Rating - 0%
0   0   0
And we have some water!
 

Attachments

  • IMG_4548.mov
    2.8 MB
OP
OP
Bugeater281

Bugeater281

Active Member
View Badges
Joined
Dec 4, 2018
Messages
184
Reaction score
107
Rating - 0%
0   0   0
That's quite some PVC work! Did you mock this up beforehand much, or did you sort of just fit it in place and make it work?


A bit of both. I’m pretty sure I spend 8+ hours just laying under the stand looking at it and ticketing with pvc to find a way I’d like it to be. I ended up with some leaks. But some adjustments and it’s been leak free for a week.
 
OP
OP
Bugeater281

Bugeater281

Active Member
View Badges
Joined
Dec 4, 2018
Messages
184
Reaction score
107
Rating - 0%
0   0   0
Made a little progress this week. Closed loop is 80% plumbed. Just have to hook up pumps. Return is plumbed, had a few leaks at the bulkheads. But I got them fixed. I was going to build a sophet around this piping. But I ended up removing it. And then I drywalled. Also wired in a plug above the tank for lights. Hopefully it will be cleaned up and painted by this weekend. Then the stand will go into it permanent position. And I can start getting controllers and stuff set up.

E5CC4AA1-31CA-497B-AE75-BFFDD62F3746.jpeg
BBB36D12-7905-4739-8379-E86FC566D6D9.png
A8216FD5-36C7-4985-93F1-90212B31671A.png
 
OP
OP
Bugeater281

Bugeater281

Active Member
View Badges
Joined
Dec 4, 2018
Messages
184
Reaction score
107
Rating - 0%
0   0   0
Tank is In place. And in other news, I just got a job at an lfs. And I start tomorrow. Which means I get discounted fish and salt. Gotta clean the water thats in it out. Got some drywall dust in it. Then she starts getting filled.
 

Attachments

  • 9A5B77A0-2A8C-4708-832E-6AA157BA2603.jpeg
    9A5B77A0-2A8C-4708-832E-6AA157BA2603.jpeg
    113.9 KB · Views: 23
  • 16BEF9D2-B406-4E63-BFBA-C061E06DB962.jpeg
    16BEF9D2-B406-4E63-BFBA-C061E06DB962.jpeg
    124.9 KB · Views: 24

More than just hot air: Is there a Pufferfish in your aquarium?

  • There is currently a pufferfish in my aquarium.

    Votes: 32 17.4%
  • There is not currently a pufferfish in my aquarium, but I have kept one in the past.

    Votes: 32 17.4%
  • There has never been a pufferfish in my aquarium, but I plan to keep one in the future.

    Votes: 33 17.9%
  • I have no plans to keep a pufferfish in my aquarium.

    Votes: 79 42.9%
  • Other.

    Votes: 8 4.3%
Back
Top