The Shadow™ Overflow from Synergy Reef has arrived!

Engloid

Valuable Member
View Badges
Joined
Mar 26, 2010
Messages
2,082
Reaction score
315
Location
Tennessee
Rating - 0%
0   0   0
So they plastic pieces are just shims?

The piece I got extra of is the piece inside the tank with fingers that water flows through. It snaps off the inside box for cleaning.
 

mixer911

Make them green with envy
View Badges
Joined
Jun 11, 2009
Messages
2,422
Reaction score
748
Location
Murfreesboro
Rating - 0%
0   0   0
So they plastic pieces are just shims?

The piece I got extra of is the piece inside the tank with fingers that water flows through. It snaps off the inside box for cleaning.

No they are not shims. They are used to remove the front weir. The unboxing video shows this at 3:36. The other pieces you are talking about are the weirs. Yes you get 2 of them. One to have on the overflow and one to switch out when you need to clean the one that is running. Watch the Unboxing video as it should help you see how they work.
 

Engloid

Valuable Member
View Badges
Joined
Mar 26, 2010
Messages
2,082
Reaction score
315
Location
Tennessee
Rating - 0%
0   0   0
I watched the video and got the answers. Thanks. Good video.


The only suggestions I would have on the video, should you ever have significant reason to redo it:

1) I would suggest using primer before the glue. It greatly increases the bond strength, both by softening the materials and cleaning any oils off of it. I like the clear primer, because that purple stuff is just ugly. For those that may not know, the purple was made so plumbing inspectors can visually verify that primer was used. Many building codes will not allow the use of clear primer, because its too easy for a plumber to skip the primer and claim he used it when he didn't.
2) Mention deburring the inside of the pipe also, not just a chamfer on the outside of it.
3) Put the unions on the pipe before putting the pipe into the outside box. This decreases the number of times you're pressing on the box while pressing in glued fittings...which means half the chances to crack the box.
4) Look closely at the dimensions given for the pipes inside the box. By having the primary and secondary only one inch different in length, by the time you get the primary siphon U pipe completely submerged, you're already dumping quite a bit into the secondary pipe. Correct me if I'm wrong on this, but we want our primary U pipe to be completely submerged, right?
5) Make note of the serial number location when talking about the warranty, or people may do like I did and install it in a tough place before they warranty and not be able to find the serial number. :)
6) Add in a section on tuning the siphon, to show what water levels should be on the U pipes, and how it reacts to power outages.

Overall, a nice product. I'm very happy with mine and recommend it to others. I considered making my own box, but by the time I calculated the costs of buying materials, cement, etc....I would have been lucky to save $30 overall..and the time it would take would be definitely worth more than that. If I had it to do over again, I'd buy again...and next time I need one, I will. Thanks!
 

Engloid

Valuable Member
View Badges
Joined
Mar 26, 2010
Messages
2,082
Reaction score
315
Location
Tennessee
Rating - 0%
0   0   0
Ahoy there,
I don't know if this has been addressed, but I am curious about the height of the return lines in the tank. Should they be higher, equal or lower than the fins in the siphon box? I have not drilled the returns yet and wanted to find out what the opimal would be. I have a black rim stock 37 gal tank which i have mounted the overflow box at the top of the inside of the tank.
Thanks for the guidance in advance.
Smitty
I like loc-line on returns. I put mine about 1.5-2" below the tank's plastic trim. Make sure you have room to turn the nut. If you put it too close, the flange side or nut may be restricted. By having them up close to the top, I can bend the loc-line so that it comes out just above the water surface, but not enough to crate bubbles. It just makes waves on the surface and I can kinda adjust the shimmering effect I get from the lighting.
 

mixer911

Make them green with envy
View Badges
Joined
Jun 11, 2009
Messages
2,422
Reaction score
748
Location
Murfreesboro
Rating - 0%
0   0   0
I watched the video and got the answers. Thanks. Good video.


The only suggestions I would have on the video, should you ever have significant reason to redo it:

1) I would suggest using primer before the glue. It greatly increases the bond strength, both by softening the materials and cleaning any oils off of it. I like the clear primer, because that purple stuff is just ugly. For those that may not know, the purple was made so plumbing inspectors can visually verify that primer was used. Many building codes will not allow the use of clear primer, because its too easy for a plumber to skip the primer and claim he used it when he didn't.
2) Mention deburring the inside of the pipe also, not just a chamfer on the outside of it.
3) Put the unions on the pipe before putting the pipe into the outside box. This decreases the number of times you're pressing on the box while pressing in glued fittings...which means half the chances to crack the box.
4) Look closely at the dimensions given for the pipes inside the box. By having the primary and secondary only one inch different in length, by the time you get the primary siphon U pipe completely submerged, you're already dumping quite a bit into the secondary pipe. Correct me if I'm wrong on this, but we want our primary U pipe to be completely submerged, right?
5) Make note of the serial number location when talking about the warranty, or people may do like I did and install it in a tough place before they warranty and not be able to find the serial number. :)
6) Add in a section on tuning the siphon, to show what water levels should be on the U pipes, and how it reacts to power outages.

Overall, a nice product. I'm very happy with mine and recommend it to others. I considered making my own box, but by the time I calculated the costs of buying materials, cement, etc....I would have been lucky to save $30 overall..and the time it would take would be definitely worth more than that. If I had it to do over again, I'd buy again...and next time I need one, I will. Thanks!


@Engloid Actually Let me answer those for you as some of this is incorrect information. The video is how we as the manufacture recommend it be done to minimize any damage to the overflow. We appreciate the feed back, but I will list the reasons why we do things a certain way. We have been developing and testing for over 4 years. This new version is different than our older versions even. This is why we want to get some more videos up even more details on setup.

1) I would suggest using primer before the glue. It greatly increases the bond strength, both by softening the materials and cleaning any oils off of it. I like the clear primer, because that purple stuff is just ugly. For those that may not know, the purple was made so plumbing inspectors can visually verify that primer was used. Many building codes will not allow the use of clear primer, because its too easy for a plumber to skip the primer and claim he used it when he didn't.
DO NOT USE Primer on the overflow. It is made of ABS and you WILL damage it. Using primer will VOID the warranty. Primer is made for PVC ONLY!!! This is why we did not use primer in the video. I guess we should have said why we did not use it. So we could update that.

2) Mention deburring the inside of the pipe also, not just a chamfer on the outside of it.
Yes you can , but it is not as important as the outside chamfer. This is the main point of the video.

3) Put the unions on the pipe before putting the pipe into the outside box. This decreases the number of times you're pressing on the box while pressing in glued fittings...which means half the chances to crack the box.
You could do it that way also. But with 1.5" unions it makes the piece of pipe heavy and unstable and could cause someone to glue the PVC into the box incorrectly.

4) Look closely at the dimensions given for the pipes inside the box. By having the primary and secondary only one inch different in length, by the time you get the primary siphon U pipe completely submerged, you're already dumping quite a bit into the secondary pipe. Correct me if I'm wrong on this, but we want our primary U pipe to be completely submerged, right?
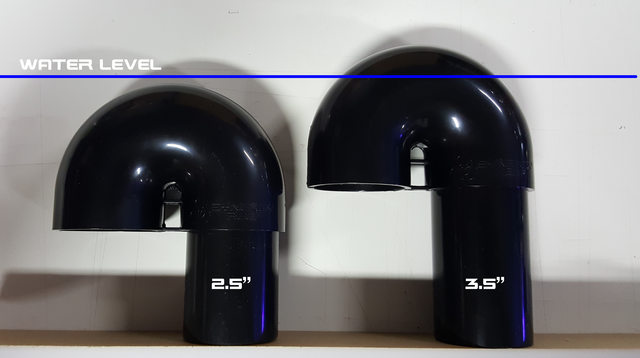
Correct you want the primary completely submerged. They are only 1" difference, but this is usually plenty to make the water level between the 2 pipes flow properly. The idea is to have the water level in the box higher that the incoming flow. Again these are base sizes and as we mentioned you may need to modify the pieces inside the rear box to fit your flow needs, but should work for most people. Here is a picture to show you the difference when installed. The blue line is the proper running water level in the rear box. The secondary should have just a little head space to allow a partial siphon.
8zrgsjPl.jpg


5) Make note of the serial number location when talking about the warranty, or people may do like I did and install it in a tough place before they warranty and not be able to find the serial number. :)
We can do that. When Plumbing we figured it would be obvious :p

6) Add in a section on tuning the siphon, to show what water levels should be on the U pipes, and how it reacts to power outages.
Working on that. This is not the last video we will do. This video was just to show the basic plumbing of the exterior rear box, not to show details on the internal plumbing of the box. Many more to come, we just have to do them in series. Each video takes us about 2 days, and we can't do it every week as we still have products to build for customers :)

And THANK YOU for choosing us! We appreciate your feed back and suggestions and will definitely make some of the things clearer.
 

mixer911

Make them green with envy
View Badges
Joined
Jun 11, 2009
Messages
2,422
Reaction score
748
Location
Murfreesboro
Rating - 0%
0   0   0
I like loc-line on returns. I put mine about 1.5-2" below the tank's plastic trim. Make sure you have room to turn the nut. If you put it too close, the flange side or nut may be restricted. By having them up close to the top, I can bend the loc-line so that it comes out just above the water surface, but not enough to crate bubbles. It just makes waves on the surface and I can kinda adjust the shimmering effect I get from the lighting.

Exactly how I like to do them. It also creates a siphon break if the power shuts off and the return pump stops.
 

Engloid

Valuable Member
View Badges
Joined
Mar 26, 2010
Messages
2,082
Reaction score
315
Location
Tennessee
Rating - 0%
0   0   0
Correct you want the primary completely submerged. They are only 1" difference, but this is usually plenty to make the water level between the 2 pipes flow properly. The idea is to have the water level in the box higher that the incoming flow. Again these are base sizes and as we mentioned you may need to modify the pieces inside the rear box to fit your flow needs, but should work for most people. Here is a picture to show you the difference when installed. The blue line is the proper running water level in the rear box. The secondary should have just a little head space to allow a partial siphon.
8zrgsjPl.jpg
Since mine is somewhat new...and I put in a ball valve, it's a bit more difficult to adjust flow than if I had used a gate valve...so I'm still adjusting and/or figuring out if it will get quieter by adjusting it. Therefore, I have questions about this, not so much any difference in opinion.

Capture.JPG

I modified your pic and added a red line. The gap between the blue and red lines is how much water will be going down the secondary drain. I would think you'd want your blue line much closer to the red, in order to reduce the amount going down that secondary (where it will be noisier). I had to put a longer pipe on the secondary so that red line is higher than the top of the primary U pipe. I found this helped me to reduce what's going down the secondary.

Essentially, I figured that the primary height would set the water level in the box, for the most part. I wanted it high enough that water didn't pour through the bulkheads and make noise. The secondary, I wanted to drain nothing at all until water level got over the top of the primary U pipe.
At this point, the loudest thing is the flow through the weir into the inside box. I have an idea which would greatly reduce that noise...but can't give away all my secrets. :)

again...great product and support.
 

tammieh

Active Member
View Badges
Joined
Feb 5, 2017
Messages
222
Reaction score
230
Location
Palmetto, Fl
Rating - 0%
0   0   0
About how far does the 20" model let the water drop in the tank if the pumps are off? (Assuming normal placement on a non rimless tank) I'm working on my sump plans and want to make sure it's big enough in case of pump failure.
 

Engloid

Valuable Member
View Badges
Joined
Mar 26, 2010
Messages
2,082
Reaction score
315
Location
Tennessee
Rating - 0%
0   0   0
About how far does the 20" model let the water drop in the tank if the pumps are off? (Assuming normal placement on a non rimless tank) I'm working on my sump plans and want to make sure it's big enough in case of pump failure.

They may give you a specific number, but keep in mind that if you have a wavemaker or something that moves the surface of the water a lot, it will let a lot more drain down if pumps turn off.
 

mixer911

Make them green with envy
View Badges
Joined
Jun 11, 2009
Messages
2,422
Reaction score
748
Location
Murfreesboro
Rating - 0%
0   0   0
About how far does the 20" model let the water drop in the tank if the pumps are off? (Assuming normal placement on a non rimless tank) I'm working on my sump plans and want to make sure it's big enough in case of pump failure.
Figure 2" from the top of the overflow's front box to the weirs opening when the teeth are removed. With the 20" model water can drain down below the teeth slightly. So we usually say at least 2.5" is a safe number and that takes into consideration the 1/8" gap a over the overflow.
 

Engloid

Valuable Member
View Badges
Joined
Mar 26, 2010
Messages
2,082
Reaction score
315
Location
Tennessee
Rating - 0%
0   0   0
.Another suggestion for the future if changes are made... a second weir that would allow adjustability of water level. One of my fears in doing this install was where finished water level would be. I knew it would all be dependent on where I dripped the holes, and it couldny be changed later. A second weir with different finger depth would allow a person to change depth. Maybe even just make a second one that you could sell in the event somebody screwed up, but not include it in the pack.
 

mixer911

Make them green with envy
View Badges
Joined
Jun 11, 2009
Messages
2,422
Reaction score
748
Location
Murfreesboro
Rating - 0%
0   0   0
.Another suggestion for the future if changes are made... a second weir that would allow adjustability of water level. One of my fears in doing this install was where finished water level would be. I knew it would all be dependent on where I dripped the holes, and it couldny be changed later. A second weir with different finger depth would allow a person to change depth. Maybe even just make a second one that you could sell in the event somebody screwed up, but not include it in the pack.

That is a possibility, more for different types of inhabitants and teeth styles. The water level hasn't really been an issue with the over 2000+ overflows out there. It is possible to drill your tank to low, but we have made it so the water level is high enough to give that room for error. Problem is that the molds to make the weirs is not cheap. So maybe on the next generation.
 

nova65ss

Valuable Member
View Badges
Joined
Jan 9, 2011
Messages
1,489
Reaction score
348
Location
Raleigh
Rating - 0%
0   0   0
Anyone know how far the waterline is from the rim of the tank with the overflow installed per the template? Thanks
 

mixer911

Make them green with envy
View Badges
Joined
Jun 11, 2009
Messages
2,422
Reaction score
748
Location
Murfreesboro
Rating - 0%
0   0   0
Anyone know how far the waterline is from the rim of the tank with the overflow installed per the template? Thanks

@nova65ss Not sure if you mean the top inside rim or if you mean will the waterline be visible under the trim when viewing the tank. The waterline will be above the exterior trim line and non visible. How far down from the inside top trim depends on your flow.
 

nova65ss

Valuable Member
View Badges
Joined
Jan 9, 2011
Messages
1,489
Reaction score
348
Location
Raleigh
Rating - 0%
0   0   0
Sorry on a rimless tank is what I was referring to. How mach space from the rim of the tank to the waterline. I want to have a lot of flow wondering if I may want to go a 1/4 to 3/8 of an inch lower to be give me some more room to keep from running a wave over the side.
 

mixer911

Make them green with envy
View Badges
Joined
Jun 11, 2009
Messages
2,422
Reaction score
748
Location
Murfreesboro
Rating - 0%
0   0   0
Sorry on a rimless tank is what I was referring to. How mach space from the rim of the tank to the waterline. I want to have a lot of flow wondering if I may want to go a 1/4 to 3/8 of an inch lower to be give me some more room to keep from running a wave over the side.

Ah ok.

So basically you will use the sticker on the template. It has a line that shows you where the approx water level will be. Just measure down to that and set your level. With the template flush against the top of the glass (not recommended) you would have about 3/4" - 1" water level. I would recommend at least 2" water level. So drop the top of the overflow box (or top of template) down to 1.25".
 

Engloid

Valuable Member
View Badges
Joined
Mar 26, 2010
Messages
2,082
Reaction score
315
Location
Tennessee
Rating - 0%
0   0   0
Y wayer line is barely upbehind the black trim. I think ihad the template top edge on the trim. I wanted to be lowas I could, but not show water level below the trim. That gives an inch or so that fish have to jump to get out. If that what you want let me know amd I can measure.
 

Engloid

Valuable Member
View Badges
Joined
Mar 26, 2010
Messages
2,082
Reaction score
315
Location
Tennessee
Rating - 0%
0   0   0
Sorry for the typos. This app wont rotate the screen, so buttons are small.
 

Aquatic acrobat in your aquarium: Have you ever kept an eel?

  • I currently keep an eel in my tank.

    Votes: 27 14.2%
  • I have kept an eel in my tank in the past.

    Votes: 32 16.8%
  • I have not kept an eel in my tank, but I hope to in the future.

    Votes: 32 16.8%
  • I have no plans to keep an eel.

    Votes: 96 50.5%
  • Other.

    Votes: 3 1.6%
Back
Top