Whip’s Red Sea Reefer XXL 750 Hybrid Bare Bottom Build

OP
OP
Whip

Whip

Active Member
View Badges
Joined
Nov 22, 2018
Messages
235
Reaction score
561
Location
Sparks, NV.
Rating - 0%
0   0   0
Converting to standard plumbing...

Cut down the original RSR piping...

upload_2019-1-11_22-44-14.jpeg


upload_2019-1-11_22-44-41.jpeg


My hole saw arbor fit perfectly into a cutdown 1” threaded nipple...

upload_2019-1-11_22-45-26.jpeg


I chucked it up in my drill and turned it down on my belt sander...

upload_2019-1-11_22-46-50.jpeg


It fits perfectly... RSR plumbing converted to 1” standard.

upload_2019-1-11_22-48-6.jpeg


Do this two more times and it’s a done deal!
 

marito09

Active Member
View Badges
Joined
Mar 10, 2017
Messages
158
Reaction score
117
Rating - 0%
0   0   0
Converting to standard plumbing...

Cut down the original RSR piping...

upload_2019-1-11_22-44-14.jpeg


upload_2019-1-11_22-44-41.jpeg


My hole saw arbor fit perfectly into a cutdown 1” threaded nipple...

upload_2019-1-11_22-45-26.jpeg


I chucked it up in my drill and turned it down on my belt sander...

upload_2019-1-11_22-46-50.jpeg


It fits perfectly... RSR plumbing converted to 1” standard.

upload_2019-1-11_22-48-6.jpeg


Do this two more times and it’s a done deal!
Great idea. Going to consider this for my 625xxl. Keep the details coming once you start plumbing thanks
 
OP
OP
Whip

Whip

Active Member
View Badges
Joined
Nov 22, 2018
Messages
235
Reaction score
561
Location
Sparks, NV.
Rating - 0%
0   0   0
Great idea. Going to consider this for my 625xxl. Keep the details coming once you start plumbing thanks

Thanks!!! I hope the information helps. I was going to do something similar to what @R&J Reefs did, but this solution kept the pipe to 1” and didn’t neck it down to 3/4”, reduced a fitting (saving me headroom and space), and reduced “custom” glue joints from 2/pipe to 1/pipe.

Here is where I got the 1” threaded nipple:

https://www.amazon.com/gp/aw/d/B009F3H9SY?psc=1&ref=ppx_pop_mob_b_pd_title

Here is a dry fit. The return has to be offset (when using 1” pipe) because of the spacing.

upload_2019-1-12_10-30-17.jpeg


I’ve been watching your XXL 625 build with interest. I hope you get your replacement sump quickly!
 
Last edited:

marito09

Active Member
View Badges
Joined
Mar 10, 2017
Messages
158
Reaction score
117
Rating - 0%
0   0   0
Thanks!!! I hope the information helps. I was going to do something similar to what @R&J Reefs did, but this solution kept the pipe to 1” and didn’t neck it down to 3/4”, reduced a fitting (saving me headroom and space), and reduced “custom” glue joints from 2/pipe to 1/pipe.

Here is where I got the 1” threaded nipple:

https://www.amazon.com/gp/aw/d/B009F3H9SY?psc=1&ref=ppx_pop_mob_b_pd_title

I’ve been watching your XXL 625 build with interest. I hope you get your replacement sump quickly!
Thank you! Your info is priceless. The sump is on the way should be here by Monday or Tuesday. Just taking my time on this one from what I learn with my 250 I want to have a nice simple clean set up. Yours is definitely going to be [emoji91]
 
OP
OP
Whip

Whip

Active Member
View Badges
Joined
Nov 22, 2018
Messages
235
Reaction score
561
Location
Sparks, NV.
Rating - 0%
0   0   0
Thank you! Your info is priceless. The sump is on the way should be here by Monday or Tuesday. Just taking my time on this one from what I learn with my 250 I want to have a nice simple clean set up. Yours is definitely going to be [emoji91]

That’s great to hear. I can imagine the wait is a killer!

I’m taking my time too. I would say (if you’re lucky) a majority of people only get to perform a build from scratch a few times per life; might as well enjoy it and do it right the first time!
 

Diesel48

Active Member
View Badges
Joined
Sep 7, 2018
Messages
159
Reaction score
159
Rating - 0%
0   0   0
How has that plumbing conversion worked out for you? My 750 comes in on Friday and am debating how I am going to convert to Imperial for my hard plumbing. I did find a site that has a few MM to Imperial unions that could work as well.
 
OP
OP
Whip

Whip

Active Member
View Badges
Joined
Nov 22, 2018
Messages
235
Reaction score
561
Location
Sparks, NV.
Rating - 0%
0   0   0
How has that plumbing conversion worked out for you? My 750 comes in on Friday and am debating how I am going to convert to Imperial for my hard plumbing. I did find a site that has a few MM to Imperial unions that could work as well.

Theoretically, it worked great, but I still have to put water in my aquarium. It’s been slow going. I’ll post some pictures this weekend and get the build thread caught up.
 
OP
OP
Whip

Whip

Active Member
View Badges
Joined
Nov 22, 2018
Messages
235
Reaction score
561
Location
Sparks, NV.
Rating - 0%
0   0   0
absolutely stunning build... i loved your Mixing station -
you think the pump you are using will be able to push through that much distance?

Thanks!!!

Great question. I live in a one story house, so the mixing station pump can push water to where I need it as the head pressure isn’t so much affected by elevation changes (same floor) as it is by the frictional loses of the run itself.

BUT, as I was putting this build together, I was truly honest with myself and I came to terms with a few things:

1. I work ridiculous hours
2. I have to spend quality time with the wife and kids
3. I am notoriously lazy
4. I spend way too much time watching aquarium videos on YouTube
5. I have another hobby that is expensive and takes time
6. I tend to get into things 110%... then drop to 50%, 25%, you get the picture...

So with that said, I am putting the effort in upfront, to be successful on the backend. The mixing station pump will be put on a timer (along with a heater) and just recirculate saltwater; I’m doing a fully automatic water change using my Neptune DOS.

“IF” I get confident, I’ll run RO straight to my ATO reservoir for auto top-off via another Neptune DOS. Right now, I am running the tubing for RO, so it’ll be there if I decide to do it.
 

Diesel48

Active Member
View Badges
Joined
Sep 7, 2018
Messages
159
Reaction score
159
Rating - 0%
0   0   0
Theoretically, it worked great, but I still have to put water in my aquarium. It’s been slow going. I’ll post some pictures this weekend and get the build thread caught up.

You did not sand down threads of the pipe correct? Only a portion of the smooth area? Do you have to sand down quite a bit to make it fit?
 
OP
OP
Whip

Whip

Active Member
View Badges
Joined
Nov 22, 2018
Messages
235
Reaction score
561
Location
Sparks, NV.
Rating - 0%
0   0   0
You did not sand down threads of the pipe correct? Only a portion of the smooth area? Do you have to sand down quite a bit to make it fit?

I did not sand the threads, just the smooth portion of the pipe.

Unsanded, the pipe “almost” fits... so I thought a light sand would do the trick. After a bit of “light sanding”, I just chucked it up and found an easier way. It worked perfectly. I’ll take some detailed photos for you.

If I had to do it all over again, the only thing I would have done would be to leave a bit more length on the stock Red Sea downpipes.
 
OP
OP
Whip

Whip

Active Member
View Badges
Joined
Nov 22, 2018
Messages
235
Reaction score
561
Location
Sparks, NV.
Rating - 0%
0   0   0
Rolling back time to January 13th...

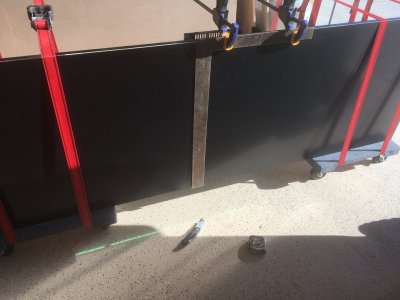
I strapped the tank to some cheap furniture dollies I bought from Home Depot for $20 each. They worked like a charm!

upload_2019-2-21_19-11-12.jpeg

As can be seen above, I knew I was going with the see-through concept, so I strapped a square to the back and pre-cut the vinyl background. I will stage the tank in the room with the black background installed. Once I am sure it needs to come off, and can just peel it off, but leave it intact behind the overflow (so I don’t see the pipes behind the smoked glass of the overflow).

Next... pay my son’s baseball teammates $20 dollars each to move my tank. Money well spent!

upload_2019-2-21_19-16-36.jpeg


And after they did the all of the heavy lifting...

upload_2019-2-21_19-17-55.jpeg
 
OP
OP
Whip

Whip

Active Member
View Badges
Joined
Nov 22, 2018
Messages
235
Reaction score
561
Location
Sparks, NV.
Rating - 0%
0   0   0
oh yeah so you know what that I am talking about with the cold then. :D hmm you might be fine but one long cold spell could frieze a line of course it would be the dirty water out thus making a big mess. if you can i would just insulate it while you are doing it just to be safe.

oh on a side note maxspect released there new like up the 300's but they will not be available until Feb. I got 2x 230 for my 750 but thinking I might trade up for the 330. my build is going slow as you saw. so might just work... just food for thought in case you did not know.

loved that your neighbor came to ask what the heck you where doing dragging around a rock in your driveway....priceless should of told him cross fit..lol

The cold spell issue you mentioned had me a little worried, so I was totally thinking about running my remote RODI and remote automatic water change tubing inside PVC pipe; then insulating the PVC pipe. While in the attic scoping the magnitude of the project, I found all of my water lines are hoses in a big bundle (I live on a slab). I can run all of my tubing in this bundle and because half of the hoses are hot water hoses... everything will stay warm. Problem solved!

upload_2019-2-23_14-18-31.jpeg


Ok... so my attic is not like any I’ve ever seen. My house has a bunch of gables and it has a tile roof. Those combined make it a flipp’in jungle of 2x4’s, ducts, and layers of “other” roof bits. It was BRUTAL trying to get above my tank. It might have been reasonable if I was 25 years younger and packing 50 pounds less!!!

Not having to insulate my tubing was was a small price to pay for the brutality I had to endure!

upload_2019-2-23_14-30-33.jpeg


upload_2019-2-23_14-31-14.jpeg


upload_2019-2-23_14-31-51.jpeg


And the light at the end of the tunnel...

Black Tubing = Dirty SW Out
White Tubing = Fresh SW In
Blue Tubing = Fresh RODI In
Aquabus Cable

upload_2019-2-23_14-34-57.jpeg


upload_2019-2-23_14-35-45.jpeg
 
Last edited:

Devaji

5000 Club Member
View Badges
Joined
Aug 27, 2016
Messages
7,193
Reaction score
6,701
Location
Jackson Hole, WY
Rating - 0%
0   0   0
The cold spell issue you mentioned had me a little worried, so I was totally thinking about running my remote RODI and remote automatic water change tubing inside PVC pipe; then insulating the PVC pipe. While in the attic scoping the magnitude of the project, I found all of my water lines are hoses in a big bundle (I live on a slab). I can run all of my tubing in this bundle and because half of the hoses are hot water hoses... everything will stay warm. Problem solved!

nice lucky you!!
I have been slacking on my 750 soooo bad. been sick then messup up my back...uggg so now I am getting "back" into to it.
I have spent so many hours researching how to plump it. not sure I like the new V3 sump with the return on the right. makes running a manifold quite hard. what to speak of converting it to "standard" pluming uggg what a mess.

I like what you did. might do the same. if I can get my stand pipes in the overflow out. was just planing around with the nut on the bottom of the tank and it quite hard...guess I have to man up and get the tools out. haha

why would you have left more lenth on the RS down pipes? it look good form here? am I messing something before I go cutting

you did all 1" on all 3 drains correct? so far this is the best solution I have came across.
 
OP
OP
Whip

Whip

Active Member
View Badges
Joined
Nov 22, 2018
Messages
235
Reaction score
561
Location
Sparks, NV.
Rating - 0%
0   0   0
nice lucky you!!
I have been slacking on my 750 soooo bad. been sick then messup up my back...uggg so now I am getting "back" into to it.
I have spent so many hours researching how to plump it. not sure I like the new V3 sump with the return on the right. makes running a manifold quite hard. what to speak of converting it to "standard" pluming uggg what a mess.

I like what you did. might do the same. if I can get my stand pipes in the overflow out. was just planing around with the nut on the bottom of the tank and it quite hard...guess I have to man up and get the tools out. haha

why would you have left more lenth on the RS down pipes? it look good form here? am I messing something before I go cutting

you did all 1" on all 3 drains correct? so far this is the best solution I have came across.

Haha. I was just reading your build thread and responded to your header question too.

We are in the same boat... life is busy and taking time from our builds! We bought at the same time and two months later... we are in the same spot.

Anyway, the reason I’d leave maybe 1” or more on the RSR stand pipes is that I tightened them from the bottom and there wasn’t much to grab with the channel locks. Regardless, it still worked AND kept the pipes as close to the top as possible (maximizing headroom).

Yes. Everything is 1”. That is the beauty of this solution. The header (I’ll build it this weekend) will be made with 1” tees bushed down to 3/4” pipe.

ETA: This conversation is pretty cake. The belt sander and drill were only needed because I was impatient.

Use a hacksaw to cut the RSR downpipes. They are super brittle. Using a PVC cutter will likely shatter or crack them. They do, however, glue nicely, so glueing the sanded 1” pipe inside of the was cake.
 
Last edited:

Devaji

5000 Club Member
View Badges
Joined
Aug 27, 2016
Messages
7,193
Reaction score
6,701
Location
Jackson Hole, WY
Rating - 0%
0   0   0
Haha. I was just reading your build thread and responded to your header question too.

We are in the same boat... life is busy and taking time from our builds! We bought at the same time and two months later... we are in the same spot.

Anyway, the reason I’d leave maybe 1” or more on the RSR stand pipes is that I tightened them from the bottom and there wasn’t much to grab with the channel locks. Regardless, it still worked AND kept the pipes as close to the top as possible (maximizing headroom).

Yes. Everything is 1”. That is the beauty of this solution. The header (I’ll build it this weekend) will be made with 1” tees bushed down to 3/4” pipe.

ETA: This conversation is pretty cake. The belt sander and drill were only needed because I was impatient.

Use a hacksaw to cut the RSR downpipes. They are super brittle. Using a PVC cutter will likely shatter or crack them. They do, however, glue nicely, so glueing the sanded 1” pipe inside of the was cake.

I think I am going to do your solution and give you made probs On my build thread of course!
funny I did this years ago for my reef octo skimmer needed to direct the water down into the sump to quite it down. did not think about that here.
 

Rock solid aquascape: Does the weight of the rocks in your aquascape matter?

  • The weight of the rocks is a key factor.

    Votes: 12 8.9%
  • The weight of the rocks is one of many factors.

    Votes: 46 34.1%
  • The weight of the rocks is a minor factor.

    Votes: 44 32.6%
  • The weight of the rocks is not a factor.

    Votes: 31 23.0%
  • Other.

    Votes: 2 1.5%
Back
Top