Acrylic Fabrication Q & A

suresh2989

Community Member
View Badges
Joined
Jan 11, 2022
Messages
48
Reaction score
27
Location
Toronto
Rating - 0%
0   0   0
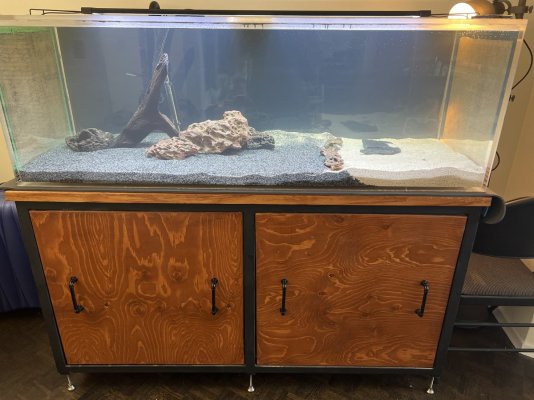
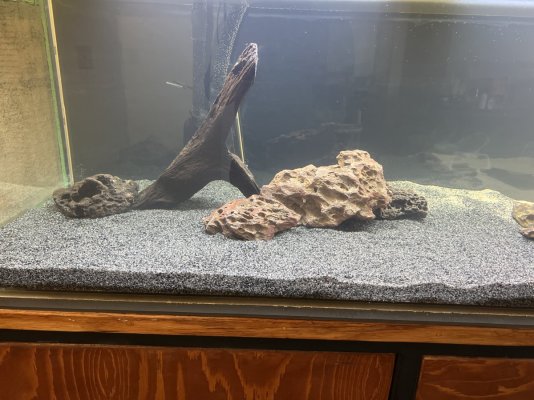
This thread and people here have been very helpful for my build and I was busy with work and personal stuff but yesterday filled my tank with substrate and water.
Can’t understate my appreciation to people such as @Cabinetman and @ReefEco for their support and advise and especially Cabinetman for swooping in saving my project on the penultimate step.
 

Attachments

  • image.jpg
    image.jpg
    194.9 KB · Views: 83
  • image.jpg
    image.jpg
    227.7 KB · Views: 74

suresh2989

Community Member
View Badges
Joined
Jan 11, 2022
Messages
48
Reaction score
27
Location
Toronto
Rating - 0%
0   0   0
My pet peeve is leaving the paper on the bottom
Ha ha if you think that’s bad, you’re gonna hate me with passion for the next thing, I still have the paper backing and green painters tape from when I leak tested, it became very think and hard to remove, so I left it under the substrate.

if it disintegrates in the future I need to keep on catching those bits or run a polishing submersible filter to catch ‘em.

Sorry but I was tired and I dont think straight when I’m tired.
 

suresh2989

Community Member
View Badges
Joined
Jan 11, 2022
Messages
48
Reaction score
27
Location
Toronto
Rating - 0%
0   0   0
Nice job. Looks like bubble free seams.

Thansk,It’s bubble free for most part, not bad for my first project tank, I did another smaller prototype(earlier) with the offcuts that has a bit more bubbles but even that still holds water.
 

jashton928

New Member
View Badges
Joined
Oct 15, 2022
Messages
4
Reaction score
0
Location
Omaha, NE
Rating - 0%
0   0   0
I had some questions about acrylic bonding specifically. I have been using scigrip medium speed bod which sets in 3-4 minutes 80% at 72 hours for solvent welding, and Caseway ps-30 2 part epoxy for normal bonding with a 5 degree angle to create a gap for the epoxy to run into. I have basically experimented with a bunch of different variables because I hadn't been able to find anyone to give me good information on how to do this correctly, and also found that what you said about the youtube videos available was true. they just showed how to bond the acrylic but didn't care about the quality of the bond or the clarity of the joint. Basically the problems I have not been able to flush out is that my joints are clear sometimes but always have either a bunch of very small bubbles or super random crazing and other than moisture or maybe not using the right process to clean off the parts before joining. Im just at a loss for what to do cause its been extremely hard to find anywhere where someone actually cares so much about the quality of the joints and is willing to help someone else get that same quality and clarity on the joints. If you can help me feel free to DM me or anything, super sorry if you have answered this before. I went thru the first page of this thread and couldn't find what I was looking for but I just don't have the time to scower the 86 pages of posts on this great thread. Thanks!
 

Tenecor Aquariums

Valuable Member
View Badges
Joined
Oct 5, 2020
Messages
1,576
Reaction score
3,450
Location
Phoenix
Rating - 0%
0   0   0
I had some questions about acrylic bonding specifically. I have been using scigrip medium speed bod which sets in 3-4 minutes 80% at 72 hours for solvent welding, and Caseway ps-30 2 part epoxy for normal bonding with a 5 degree angle to create a gap for the epoxy to run into. I have basically experimented with a bunch of different variables because I hadn't been able to find anyone to give me good information on how to do this correctly, and also found that what you said about the youtube videos available was true. they just showed how to bond the acrylic but didn't care about the quality of the bond or the clarity of the joint. Basically the problems I have not been able to flush out is that my joints are clear sometimes but always have either a bunch of very small bubbles or super random crazing and other than moisture or maybe not using the right process to clean off the parts before joining. Im just at a loss for what to do cause its been extremely hard to find anywhere where someone actually cares so much about the quality of the joints and is willing to help someone else get that same quality and clarity on the joints. If you can help me feel free to DM me or anything, super sorry if you have answered this before. I went thru the first page of this thread and couldn't find what I was looking for but I just don't have the time to scower the 86 pages of posts on this great thread. Thanks!
How thick is the acrylic you are bonding? 5 degree angle? You lost me on that one. What are you building? How long are the seams? You have options.
 
Last edited:

jashton928

New Member
View Badges
Joined
Oct 15, 2022
Messages
4
Reaction score
0
Location
Omaha, NE
Rating - 0%
0   0   0
How thick is the acrylic you are bonding? 5 degree angle? You lost me on that one. What are you building? How long are the seams? You have options.
I was told when using 2 part epoxy you want to cut the seam at a 5 degree angle to allow enough space for the epoxy to flow into. Since the epoxy is so thick there has to be a minimum area for it to flow into to get a decent seam. The acrylic I have been experimenting on is 3/8”. While testing solvent welding I have only used 90 degree T joints. Only about 4” seams for testing.
 

Troylee

all about the diy!!!!!
View Badges
Joined
Jan 15, 2010
Messages
18,794
Reaction score
15,576
Location
Vegas baby!!!!
Rating - 0%
0   0   0
I had some questions about acrylic bonding specifically. I have been using scigrip medium speed bod which sets in 3-4 minutes 80% at 72 hours for solvent welding, and Caseway ps-30 2 part epoxy for normal bonding with a 5 degree angle to create a gap for the epoxy to run into. I have basically experimented with a bunch of different variables because I hadn't been able to find anyone to give me good information on how to do this correctly, and also found that what you said about the youtube videos available was true. they just showed how to bond the acrylic but didn't care about the quality of the bond or the clarity of the joint. Basically the problems I have not been able to flush out is that my joints are clear sometimes but always have either a bunch of very small bubbles or super random crazing and other than moisture or maybe not using the right process to clean off the parts before joining. Im just at a loss for what to do cause its been extremely hard to find anywhere where someone actually cares so much about the quality of the joints and is willing to help someone else get that same quality and clarity on the joints. If you can help me feel free to DM me or anything, super sorry if you have answered this before. I went thru the first page of this thread and couldn't find what I was looking for but I just don't have the time to scower the 86 pages of posts on this great thread. Thanks!
What material are you using? Most of the acrylic today is garbage and the solvents have been modified to meet todays voc standards etc. it’s a lot different than it was 30 years ago when I started out doing acrylic lol.. extruded will always glue up better and look better but it shouldn’t be used for displays unless it’s over rated material thickness… it’s great for sumps! Displays should be cast acrylic and not just any cast will do!
 

jashton928

New Member
View Badges
Joined
Oct 15, 2022
Messages
4
Reaction score
0
Location
Omaha, NE
Rating - 0%
0   0   0
How thick is the acrylic you are bonding? 5 degree angle? You lost me on that one. What are you building? How long are the seams? You have options.
I was told when using 2 part epoxy you want to cut the seam at a 5 degree angle to allow enough space for the epoxy to flow into. Since the epoxy is so thick there has to be a minimum area for it to flow into to get a decent seam. The acrylic I have been experimenting on is 3/8”. While testing solvent welding I have only used 90 degree T joints.
What material are you using? Most of the acrylic today is garbage and the solvents have been modified to meet todays voc standards etc. it’s a lot different than it was 30 years ago when I started out doing acrylic lol.. extruded will always glue up better and look better but it shouldn’t be used for displays unless it’s over rated material thickness… it’s great for sumps! Displays should be cast acrylic and not just any cast will do!
not sure about the brand or if it’s rolled or cast. I can get you that info tomorrow for sure. Do you have a suggestion on a specific acrylic to use in combination with a specific adhesive? I’m not worried about if I need to do an epoxy or a solvent, happy to learn whatever process would give me the best result for display cases. The applications I would be using it for won’t need to be as load bearing as a sump, if even at all. Only thing I’m concerned about is the clarity of the joints.
 

Troylee

all about the diy!!!!!
View Badges
Joined
Jan 15, 2010
Messages
18,794
Reaction score
15,576
Location
Vegas baby!!!!
Rating - 0%
0   0   0
I was told when using 2 part epoxy you want to cut the seam at a 5 degree angle to allow enough space for the epoxy to flow into. Since the epoxy is so thick there has to be a minimum area for it to flow into to get a decent seam. The acrylic I have been experimenting on is 3/8”. While testing solvent welding I have only used 90 degree T joints.

not sure about the brand or if it’s rolled or cast. I can get you that info tomorrow for sure. Do you have a suggestion on a specific acrylic to use in combination with a specific adhesive? I’m not worried about if I need to do an epoxy or a solvent, happy to learn whatever process would give me the best result for display cases. The applications I would be using it for won’t need to be as load bearing as a sump, if even at all. Only thing I’m concerned about is the clarity of the joints.
Just get a cheap extruded acrylic then. Solvents work best on small stuff.. I wouldn’t recommend Weldon 40/42 unless it’s very thick acrylic like 1” above. If it’s just small displays use the pins and needles method, wick some Weldon 4 in the joint and let it soak for 30seconds or so and pull the pins and light clamp or weigh the material down on the joint.
 

Tenecor Aquariums

Valuable Member
View Badges
Joined
Oct 5, 2020
Messages
1,576
Reaction score
3,450
Location
Phoenix
Rating - 0%
0   0   0
I was told when using 2 part epoxy you want to cut the seam at a 5 degree angle to allow enough space for the epoxy to flow into. Since the epoxy is so thick there has to be a minimum area for it to flow into to get a decent seam. The acrylic I have been experimenting on is 3/8”. While testing solvent welding I have only used 90 degree T joints.

not sure about the brand or if it’s rolled or cast. I can get you that info tomorrow for sure. Do you have a suggestion on a specific acrylic to use in combination with a specific adhesive? I’m not worried about if I need to do an epoxy or a solvent, happy to learn whatever process would give me the best result for display cases. The applications I would be using it for won’t need to be as load bearing as a sump, if even at all. Only thing I’m concerned about is the clarity of the joints.
Your objective of clear seams depends on edge prep. The edges need to be flat square and true. Acrylic surfaces are not flat to begin with. The thicker you go the greater your chances of occlusions (bubbles) it really does depend on what you are trying to put together. A long seam will require different approach than a short seam. As a point of reference, we do not ever use saw cut acrylics for cosmetic seams. Everything we fabricate is CNC up to 12 feet. +/- 2mm. This is not possible for DIY fabs. Therefore you have to spend extra time to fixture and line up everything. Use one of the suggested weldons I PM you. Remember though, 16 is thick and will require a syringe. I would advise that for small fabs although like I mentioned in the PM it is the go to for large fabs. Attached are a couple of pics of a research tank we built last week for a defense contractor. Note the dimensions we are at less than 1/16 plus minus. And this is a loose tolerance. Usually we are below 1/32. All about sizing and edge prep. FYI, notice that there are some occlusions on one of the corners. They are not concerned about it because the tank will be used just a couple of times and that's it. These guys make electronics for missiles or something like that. I try to give you suggestions for how you can succeed in a DIY setting. We are a production shop and how we do it is not necessarily how hobbyists should do it we have several diy kits already. Up to 400 plus gallons. What makes theee appealing is the panels are true, square and flat. Plus the acrylic prices are lower than anything you will find on line diy and cut to size acrylic is a business we will be expanding in the next few months. Meanwhile, Edge prep and fixturing.

739A6EBA-A6F2-4D75-BA4A-7EB50F04212A.jpeg


2D3F23B9-A675-441C-9BC3-BD28DCB74640.jpeg
 
OP
OP
Turbo's Aquatics

Turbo's Aquatics

Super Duper Member
View Badges
Joined
Jun 7, 2011
Messages
2,810
Reaction score
4,040
Location
West Des Moines, IA
Rating - 0%
0   0   0
I see I was tagged on the first post here 7 years ago lol.. I’m back and can help you guys if ya need it just ask away! I’m still at it!
Bro yeah! Nice to see you back!
I had some questions about acrylic bonding specifically. I have been using scigrip medium speed bod which sets in 3-4 minutes 80% at 72 hours for solvent welding, and Caseway ps-30 2 part epoxy for normal bonding with a 5 degree angle to create a gap for the epoxy to run into. I have basically experimented with a bunch of different variables because I hadn't been able to find anyone to give me good information on how to do this correctly, and also found that what you said about the youtube videos available was true. they just showed how to bond the acrylic but didn't care about the quality of the bond or the clarity of the joint. Basically the problems I have not been able to flush out is that my joints are clear sometimes but always have either a bunch of very small bubbles or super random crazing and other than moisture or maybe not using the right process to clean off the parts before joining. Im just at a loss for what to do cause its been extremely hard to find anywhere where someone actually cares so much about the quality of the joints and is willing to help someone else get that same quality and clarity on the joints. If you can help me feel free to DM me or anything, super sorry if you have answered this before. I went thru the first page of this thread and couldn't find what I was looking for but I just don't have the time to scower the 86 pages of posts on this great thread. Thanks!
I don't know where you read about the 5 degree thing...that's probably coming from a material supplier (acrylic or solvent manufacturer) and I can tell you, they don't know jack about building aquariums or pressure vessels in general. So don't even listen to them. Literally everything you need to know is in this thread or in the minds of the people responding.

All you need to build a tank up to 2" thick is solvent. By solvent I mean methylene chloride (as high grade as you can get, within reason) and up to about 5% glacial acetic acid. You don't need Weld-On 40 for anything. Weld on 16 is junk. Weld on 3 or 4 is OK but you're honestly better off making your own out of MC and AA, but if you're only making one or two tanks, WO3/4 will do the trick. Weld-on = SciGrip (just a name change)

Routed edges that are straight and flat/square, a flat work surface, a piece of carpet or foam as a cushion under the flat piece (I use anti-fatigue mats, the black semi-squishy foam), shims, pins, and canned air. prep technique is important.

Acrylic brand can drive how you perform the application. Arkema is now under Trinseo, so Plexiglas-G or PMACS is that product. Acrylite is OK also. Anything else, might need to modify things like pin thickness, soak time, and "leave alone" time for the joints to cure properly.

Cast is better. Extruded will work in many cases for DIY jobs.
 

Tenecor Aquariums

Valuable Member
View Badges
Joined
Oct 5, 2020
Messages
1,576
Reaction score
3,450
Location
Phoenix
Rating - 0%
0   0   0
I was told when using 2 part epoxy you want to cut the seam at a 5 degree angle to allow enough space for the epoxy to flow into. Since the epoxy is so thick there has to be a minimum area for it to flow into to get a decent seam. The acrylic I have been experimenting on is 3/8”. While testing solvent welding I have only used 90 degree T joints.

not sure about the brand or if it’s rolled or cast. I can get you that info tomorrow for sure. Do you have a suggestion on a specific acrylic to use in combination with a specific adhesive? I’m not worried about if I need to do an epoxy or a solvent, happy to learn whatever process would give me the best result for display cases. The applications I would be using it for won’t need to be as load bearing as a sump, if even at all. Only thing I’m concerned about is the clarity of the joints.
You are not wrong about the five degree information. What you are describing is part of the gold standard of building aquariums. Only a few companies are capable of this technique which is used to build the strongest and largest aquariums. There are other opinions posted here and I will be addressing this technique in one of my articles coming up later this week. Meanwhile, this is the latest. Discussing how to cut acrylic.
 
Last edited:
OP
OP
Turbo's Aquatics

Turbo's Aquatics

Super Duper Member
View Badges
Joined
Jun 7, 2011
Messages
2,810
Reaction score
4,040
Location
West Des Moines, IA
Rating - 0%
0   0   0
You are not wrong about the five degree information. What you are describing is part of the gold standard of building aquariums. Only a few companies are capable of this technique which is used to build the strongest and largest aquariums.
Yup - exactly. That kind of technique is way beyond the hobbyists level and most fabricators as well, and is only for 2-part bonding (which is also largely unnecessary unless you're building very large tanks). You can bond up to 2" thick panels using solvent techniques.
 

Lowell Lemon

2500 Club Member
View Badges
Joined
May 23, 2015
Messages
4,031
Reaction score
17,219
Location
Washington State
Rating - 0%
0   0   0
Turbo speaks the truth! Mix your own solvents and forget the other nonsense. Only use cell cast acrylic sheet properly guaged for aquariums. All the company name changes make my head swim LOL.
 

Kraig

Well-Known Member
View Badges
Joined
Oct 24, 2021
Messages
547
Reaction score
1,673
Location
St. Louis
Rating - 0%
0   0   0
Lots of info in this thread! I might be asking a repeat question so please forgive me if so!

I'm finishing up an acrylic sump build. I want to add some inch markings to keep track of the water depth. I've seen this on some commercial sumps and I'm not sure if they are engraving and painting, or using some kind of sticker or some other method.

Outside of just using a marker and stencil to keep the numbers decent looking, is there another technique that I could use to get depth markings on the sump?
 

Troylee

all about the diy!!!!!
View Badges
Joined
Jan 15, 2010
Messages
18,794
Reaction score
15,576
Location
Vegas baby!!!!
Rating - 0%
0   0   0
Lots of info in this thread! I might be asking a repeat question so please forgive me if so!

I'm finishing up an acrylic sump build. I want to add some inch markings to keep track of the water depth. I've seen this on some commercial sumps and I'm not sure if they are engraving and painting, or using some kind of sticker or some other method.

Outside of just using a marker and stencil to keep the numbers decent looking, is there another technique that I could use to get depth markings on the sump?
An engraver, router, scribe with a knife etc. most of the ones you see are done on a cnc machine.
 

Kraig

Well-Known Member
View Badges
Joined
Oct 24, 2021
Messages
547
Reaction score
1,673
Location
St. Louis
Rating - 0%
0   0   0
An engraver, router, scribe with a knife etc. most of the ones you see are done on a cnc machine.
Thanks, what I was looking for. So cnc then painted in. I’ve never seen one up close so couldn’t tell if they were scribed or just decals of some sorts.
 
Back
Top