Apollo LED Issue

OP
OP
redfishbluefish

redfishbluefish

Stay Positive, Stay Productive
View Badges
Joined
Mar 22, 2012
Messages
11,849
Reaction score
26,166
Location
Sayreville, NJ
Rating - 0%
0   0   0
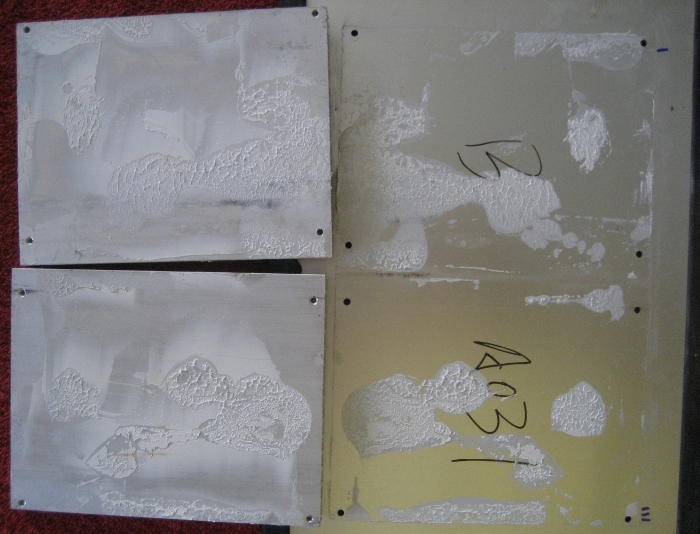
The second batch of 50 blue LEDs arrived today. I soldered in the 40 new LEDs and applied the Arctic Silver Ceramique 2 thermal compound on the finned aluminum. I did this by first distributing the compound over the plate.


By the way, one $7 tube (25g), of this compound does the two plates in a fixture.

I then spread this compound around like icing a cake. Now this is what the proper amount of compound looks like on one of these plates.


So I'm now back to where I started......two Apollo's working properly over my tank! Wooo Hooo!

I still have another eBay China fixture coming in some time this week and I now want to pull apart the TauTronics that I was using while I fixed the Apollos and see what's wrong with that. The blues on that fixture went out 3-4 days ago and I'm thinking its a driver. It never ends!
 

mtswaneya

Active Member
View Badges
Joined
Mar 29, 2014
Messages
152
Reaction score
100
Location
Reno Nevada
Rating - 0%
0   0   0
I have 3 of these that I ordered for my 180 that I plan to have running soon. Thinking I might want to open up mine. I also have to figure out how to set them up lol. Never ran LEDS on my tank.
 
OP
OP
redfishbluefish

redfishbluefish

Stay Positive, Stay Productive
View Badges
Joined
Mar 22, 2012
Messages
11,849
Reaction score
26,166
Location
Sayreville, NJ
Rating - 0%
0   0   0
Curious as to where you ordered them....the company has been out of business for about a year. The other consideration is that I had older models. I know the newer models were different in the finned aluminum (much larger in the newer ones), and different drivers (Meanwell), and hopefully better thermal compound application.


If it were me, as a minimum, I'd pull off the finned aluminum and check the thermal compound on that. If it looked insufficient, I'd pick up the large syringe of Arctic Silver Ceramique 2 and cover that aluminum with it.

Good luck.
 

mtswaneya

Active Member
View Badges
Joined
Mar 29, 2014
Messages
152
Reaction score
100
Location
Reno Nevada
Rating - 0%
0   0   0
I have 3 of these that I ordered for my 180 that I plan to have running soon. Thinking I might want to open up mine. I also have to figure out how to set them up lol. Never ran LEDS on my tank.
 

mtswaneya

Active Member
View Badges
Joined
Mar 29, 2014
Messages
152
Reaction score
100
Location
Reno Nevada
Rating - 0%
0   0   0
I ordered them right before they went out of business and they have been sitting in their boxes ever since. I've taken them out to make sure they turned on when I got them other three that they haven't been on a tank. They are for my 180 I have been working on for the last like 3 + years. All I can say is life happens. The light are the solar blast.
 

cdness

2006 - Present
View Badges
Joined
Jul 15, 2009
Messages
3,988
Reaction score
165
Location
West Fargo, ND
Rating - 0%
0   0   0
The second batch of 50 blue LEDs arrived today. I soldered in the 40 new LEDs and applied the Arctic Silver Ceramique 2 thermal compound on the finned aluminum. I did this by first distributing the compound over the plate.


By the way, one $7 tube (25g), of this compound does the two plates in a fixture.

I then spread this compound around like icing a cake. Now this is what the proper amount of compound looks like on one of these plates.


FYI the thermal compound is supposed to me a VERY THIN layer of compound between the two surfaces. You should not see ridges in the compound at all. If there is too much there, it will have just as bad if not worse heat transfer capabilities. If you look at the cleaner heatsink picture, you will see the extrusion marks from the manufacturing of the finned heatsink. The compound is meant only to fill imperfections in the machining of the surface of the heatsink, not be a layer like the cream filling of an oreo cookie... One thing from my techie overclocking days was to polish the contact surface of the heatsink by wetsanding with very fine grit to remove the imperfections. Then just a tiny thin (semi transparent) layer was all that's needed for a good contact to the CPU.

The issue with the heatsink contact looks to be more of an engineering/assembly issue. If you have just 4 screws on the corners holding it down, there is a chance for the center to be raised a little, creating an air gap of zero heat transfer. Adding a couple screws in the middle of the aluminum plate would help reduce the potential air gap and create a better bond between the two surfaces. The Aluminum plate is not rigid enough to avoid the air gap issue on its own. I am not sure if the addition of screws though is even possible with the design of the embedded circuit the LEDs are mounted to.

If you have a infrared thermometer, test the heat on the LED board in the middle compared to the edges and you will see the difference. In the end it looks like it was applied inconsistently which is not good. But using too much may be worse in the long run...
 
OP
OP
redfishbluefish

redfishbluefish

Stay Positive, Stay Productive
View Badges
Joined
Mar 22, 2012
Messages
11,849
Reaction score
26,166
Location
Sayreville, NJ
Rating - 0%
0   0   0
I ordered them right before they went out of business and they have been sitting in their boxes ever since. I've taken them out to make sure they turned on when I got them other three that they haven't been on a tank. They are for my 180 I have been working on for the last like 3 + years. All I can say is life happens. The light are the solar blast.


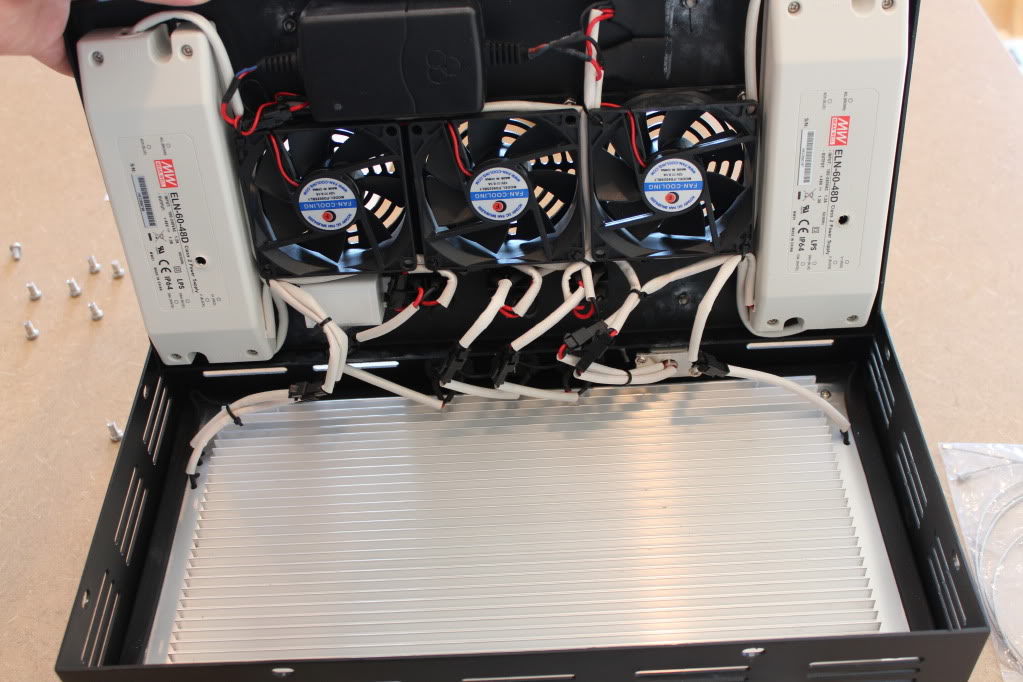
I have a friend who has the newer Solar Blast as well and he hasn't had any problems. They did change up the guts a bit.....very large finned aluminum heat transfer piece and also with Meanwell drivers. Should look like this:

IMG_0750.jpg


I've got to believe that large finned plate almost completely covering the LED plate will make for cooler LED's. Best of luck.
 
OP
OP
redfishbluefish

redfishbluefish

Stay Positive, Stay Productive
View Badges
Joined
Mar 22, 2012
Messages
11,849
Reaction score
26,166
Location
Sayreville, NJ
Rating - 0%
0   0   0
cdness, thanks for the input. All this thermal compound stuff was new for me. I had to research the different compounds.....ran across overclocking and had to look that word up.....and found about the differences in all the brands of compound. Interesting education. I was aware that it had to be applied thin, so what I did was put the two pieces together and applied as much pressure as I could, with some compound squeezing out the sides. I might have a bit too much, but I'm happier with that when compaired to what I felt was insufficient compound from the manufacturer......actual bare metal. Time will tell.

IMG_1098_zpsxrvwhlpr.jpg


I agree that it would be nice to have a few more machine bolts to hold the finned plate on. However, with a printed board on the opposite side, I think this would be a crap shoot drilling through the board. I wouldn't be comfortable doing this.

Interesting you also mentioned polishing. Actually I did run some 400 grit paper over one of the finned pieces because it had a slight ding in it.....but not to polish it. But here's my say on polishing, and I say this with ignorance, not with a clear understanding of thermal transfer, but through my experience. I use to work pit crew / mechanic for a car racing team. On one of the engines, I ported and polished the head...the polishing supposedly for making flow of gas / exhaust easier, increasing performance. The head was so heavily polished, it looked like chrome. It was a picture! Anyway, we kept burning out valves on this head and couldn't figure it out. Someone mentioned that the roughness of the original cast greatly increased the surface area, making heat transfer that much better. Well, I glass beaded (sand blasted) all my polishing work away, and then had no more problems with burnt valves. So I wouldn't suggest polishing heat transfer surfaces.
 

cdness

2006 - Present
View Badges
Joined
Jul 15, 2009
Messages
3,988
Reaction score
165
Location
West Fargo, ND
Rating - 0%
0   0   0
You would have to know the exact routes of the printed board to be able to guess where to drill. I wouldn't suggest it, but it would make it better.

Keep us posted on how well it works. It would be interesting to hear some good temp numbers if you have access to an infrared thermometer.
 

mtswaneya

Active Member
View Badges
Joined
Mar 29, 2014
Messages
152
Reaction score
100
Location
Reno Nevada
Rating - 0%
0   0   0
Thanks I'm hoping to start setup Ina month or so. Then I will just have to see what to set the settings at.
 

ReefLEDLights

Valuable Member
View Badges
Joined
Jul 12, 2011
Messages
1,594
Reaction score
195
Location
IL
Rating - 0%
0   0   0
cdness, thanks for the input. All this thermal compound stuff was new for me. I had to research the different compounds.....ran across overclocking and had to look that word up.....and found about the differences in all the brands of compound. Interesting education. I was aware that it had to be applied thin, so what I did was put the two pieces together and applied as much pressure as I could, with some compound squeezing out the sides. I might have a bit too much, but I'm happier with that when compaired to what I felt was insufficient compound from the manufacturer......actual bare metal. Time will tell.

IMG_1098_zpsxrvwhlpr.jpg


I agree that it would be nice to have a few more machine bolts to hold the finned plate on. However, with a printed board on the opposite side, I think this would be a crap shoot drilling through the board. I wouldn't be comfortable doing this.

Interesting you also mentioned polishing. Actually I did run some 400 grit paper over one of the finned pieces because it had a slight ding in it.....but not to polish it. But here's my say on polishing, and I say this with ignorance, not with a clear understanding of thermal transfer, but through my experience. I use to work pit crew / mechanic for a car racing team. On one of the engines, I ported and polished the head...the polishing supposedly for making flow of gas / exhaust easier, increasing performance. The head was so heavily polished, it looked like chrome. It was a picture! Anyway, we kept burning out valves on this head and couldn't figure it out. Someone mentioned that the roughness of the original cast greatly increased the surface area, making heat transfer that much better. Well, I glass beaded (sand blasted) all my polishing work away, and then had no more problems with burnt valves. So I wouldn't suggest polishing heat transfer surfaces.
I have a friend who has the newer Solar Blast as well and he hasn't had any problems. They did change up the guts a bit.....very large finned aluminum heat transfer piece and also with Meanwell drivers. Should look like this:

IMG_0750.jpg


I've got to believe that large finned plate almost completely covering the LED plate will make for cooler LED's. Best of luck.

Gotta say it...The guy who recommended this upgrade to the fixture improved it.

Bill
 
OP
OP
redfishbluefish

redfishbluefish

Stay Positive, Stay Productive
View Badges
Joined
Mar 22, 2012
Messages
11,849
Reaction score
26,166
Location
Sayreville, NJ
Rating - 0%
0   0   0
Actually the new replacement blues started to blacken up again. Because these were first generation Apollo's.....steel case, no adjustments (on 100%), and second go around with replacing burnt LEDs...I decided to change over to SBReef Lights. Apollo is out of business, but when I purchased these fixtures, they had the highest PAR of the LEDs on the market. They are basically CBB's that the owner modified. The later versions had larger finned aluminum and now used Meanwell drivers. I actually have one of these still in use today. Because this "newer" Apollo is still working flawlessly, I'm now convinced that the issues I had with the older versions were either cooling or the no-name drivers that were over-juicing the LEDs, causing them to get too hot, and char the primary lenses.
 

TOP 10 Trending Threads

WHAT'S HOLDING YOU BACK FROM BUYING THAT ONE FISH OR CORAL YOU'VE ALWAYS WANTED?

  • I need a bigger tank.

    Votes: 79 44.1%
  • I need a FOWLR tank.

    Votes: 11 6.1%
  • It isn't compatible with the current inhabitants in my tank.

    Votes: 32 17.9%
  • It is not in the budget right now.

    Votes: 61 34.1%
  • It is above my level of care experience.

    Votes: 25 14.0%
  • It is rare/not readily available to the public.

    Votes: 13 7.3%
  • Is is known to not do well in home reefs/it has a high mortality rate in home reefs.

    Votes: 9 5.0%
  • Other (please explain).

    Votes: 19 10.6%
Back
Top