

Sorry but I do not speak English well and I have to use google translator.On the Italian forum I inserted my article:
"It started from the idea of a move into a new home to be placed according to the new needs and even for renovation, according to personal tastes.Of course we could not take into account the creation of a new aquarium, and we evaluated the idea of a spa on the ground floor, larger than the previous. My initial idea was to build an aquarium dedicated only to the fish, including stingrays, for a volume of about 8,000 / 10,000 liters, but in the end did not want to abandon the initial path of raising SPS corals, LPS and soft, easy course, we opted for the construction of the bath.After bringing down a wall to extend the stay, we found the space in which to locate the aquarium.It starts with the creation of the structure on which to lay the tub.Having a clear idea was easy to design and build six pillars of various sizes made of reinforced concrete on which the aquarium will be located; providing the right spaces to also move into a future that said space will accommodate.It starts with the holes in the old floor: of the headquarters of the concrete structure:
  The wooden structure that will give form to the six pillars, high cm.104, was previously shaped so that on it is going to place a stainless steel frame, wide and deep cm.206 cm.116.
  Said stainless steel structure was built with thick profiles cm.4 x cm.6, embedded in the pillars until their top and rear bearing wall 10 cm.The masonry with concrete columns will allow the construction of three doors, cm.67x104, made of wood, with hinges for the immediate opening and inspection. For closing the compartment, he said gates rest directly on the ground and support with magnets that attach to the metal structure.It was thought at the disposal of the sump and the container of water r.o. with pump / osmocontroller, for which in the phase of building works have been arranged the various electrical plugs and the water discharge pipeline in the garden.Also in this phase it is arranged a double dedicated power line to the tank, a direct to the general framework
  and one to the ordinary line with provision for the future of continuity / UPS group.
  Considered and not excluding the problem of a potential on the mold walls, especially on the rear ones to the tank, such as to create strong discomfort and difficulties for the future removal, we opted for the laying of tiles on walls; creating an attractive appearance and eliminating the problem of the plaster falling off, they make bubbles and give rise to unwanted mold. Of course tiling has been enriched with strips coated with olive flatting paint.After the laying of the tiles and the painting, they were carried no.4 holes with plugs 8 mm. to support the ceiling to be realized.
  A facility ready switches to cover the same panel with 20mm marine plywood, treated with four coats of special flatting paint for boats, measuring cm. 208x108x2, with slots for the passage of ventilation pipes and sump.

 In the compartment below, before laying the wooden panel and the tub, it is placed the container of 150 liters for water osmosis r.o. and an old aquarium from 120x60x60x1,2 measures cm., which has been specially modified transformed into the sump / cryptic. In this aquarium it was modified a part of the front glass lowering it from 60 to 45cm for easy work, a glass to separate the sump compartment (85x60x45) from cryptic (42x60x58) and finally an overflow has been achieved has been inserted / unloading. Said hole serves to drain the water from the sump to the garden and not flood the house in case of failure of the pump and also dell'osmoregolatore also thought of as the exhaust path to the periodic changes of water. The latter expedient to avoid having to carry a number of waste water tanks during the monthly changes.
  R.o. water container
  Discharge from the sump to the garden
  Chiller and under tiles the exhaust pipe that starts from the sump
  Sump hole to connect the drain hose
 For the construction of the tank, this time, I turned to a professional and have requested the implementation of a bathtub 190x90x58. I used glass 15mm., The front and one side in extra. Facts make 3 holes 50 for discharging and 2 to 25 for the load. For greater security I did place upper links and lower sides for only 190 cm.


 Discharges and loads are to me were assembled using PVC fittings.
  the tank has been coated on two sides with a special blue color film.For coverage of discharges I made a grid acrylic laser cutting, assembled with a special non-toxic glue.
 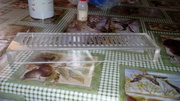 For the realization of the ceiling here we finally got to see the light presenting my 7th Plafo Led.The ceiling light at the end of the realization has a measurement of cm.178x69x2,5.SINK: I used 6 aluminum heat sinks from cm.17,5x85x2,4 in whose underside were made threaded holes where the screws screwed into steel for clamping of the Cree multichip LED, after laying of thermal paste. It was originally intended to order long 3 sinks 170 cm., But the fear, later confirmed by the company, which in the process of anodizing could be deformed, made us change the design so that they become six (three per side) that for them assemble I had to build an anodized aluminum frame on which to place the heat sinks themselves. Among the three coolers I have positioned two aluminum profiles that host the various drivers.


 COVER LOWER: I have set it up to full coverage, both for reasons of cost, given the total measurements of the ceiling light, both for increased passive cooling whereas the same coverage limits air contact with the heatsink; Therefore I decided to cover the single multichip to use methacrylate measures cm laser cutting. 12x7x0,7 composed of a frame of 4 mm and a plate of 3 mm glued and screwed to the body with stainless steel screws.
  LED: Used Cree multichip divided into four channels1st channel No.3 led by White 10,000K °2nd No.2 Blue channel and 1 Royal Blue3rd no.3 Royal Blue channel4th channel No.1 Royal Blue and 2 actinic.the specifications in the following link:http://www.ebay.it/itm/4-Channel-Cr...-/361122415535?ssPageName=ADME:L:COSI:IT:1123They were positioned 4 multichip for each sink, total 24 multichip. Each multichip has 12 led all powered at 700mA.DRIVER: nr. 24 drivers MeanWell LDD700H, each driver led driver nr.12.CONTROLLER: allows independent control of 4 channels on-off with sunrise-sunset, management of the percentage (%) of each channel to separate brightness and on / off of lunar nr.6 5mm. Moreover, the presence of a temperature sensor manages the power delivery and consequently lowers the percentage of lighting to reduce overheating of the LEDs. (The photo will be published later)POWER SUPPLY: No.1 MeanWell SDR-960-48TECHNIQUE:SKIMMER: LGM Lgs2500, customized and modified to my needs;PUMPS ski: No.2 New Jet 3000, waiting to change;COOLER: Sfiligoi Super Flite, the external unit to the house;FILTER: Deltec, which if necessary food with charcoal and antifosfati resins;PUMPS movement: No.3 and No.1 Sicce HP9 Sicce Voyager Voyager HP10;REACTOR Soccer: LGM Lgr1401 fed with aragonite K.Z. pH meter and Milwaukee;CO2 canister 5 kg;osmosis plant Ruwal 5-stageThe tank was launched in July 2015, after a reef to reef move, distance run of about thirty kilometers in full heat, which caused the loss of some corals and irreversible damage to many others, that as of today you I have recovered very well albeit showing the injuries suffered.Now there are clear signs of growth, the colors are not the most desirable, but satisfy my philosophy and my way of seeing the aquarium. still think not risk the rest of animate to come up with stratospheric colors, those who are content enjoys.For the moment no public photos of the corals, waiting for better presentation.I am satisfied.Special thanks to my wife for patience, Kevin, Robert and Irwin for their support and to all those who in various ways helped me in the realization.I am available for any clarification, in fact I'd love to.In a few weeks I add pictures of the tank in its current situation, in order to have a comparison in the course of time."
Thank you again.
"It started from the idea of a move into a new home to be placed according to the new needs and even for renovation, according to personal tastes.Of course we could not take into account the creation of a new aquarium, and we evaluated the idea of a spa on the ground floor, larger than the previous. My initial idea was to build an aquarium dedicated only to the fish, including stingrays, for a volume of about 8,000 / 10,000 liters, but in the end did not want to abandon the initial path of raising SPS corals, LPS and soft, easy course, we opted for the construction of the bath.After bringing down a wall to extend the stay, we found the space in which to locate the aquarium.It starts with the creation of the structure on which to lay the tub.Having a clear idea was easy to design and build six pillars of various sizes made of reinforced concrete on which the aquarium will be located; providing the right spaces to also move into a future that said space will accommodate.It starts with the holes in the old floor:
of the headquarters of the concrete structure: The wooden structure that will give form to the six pillars, high cm.104, was previously shaped so that on it is going to place a stainless steel frame, wide and deep cm.206 cm.116. Said stainless steel structure was built with thick profiles cm.4 x cm.6, embedded in the pillars until their top and rear bearing wall 10 cm.The masonry with concrete columns will allow the construction of three doors, cm.67x104, made of wood, with hinges for the immediate opening and inspection. For closing the compartment, he said gates rest directly on the ground and support with magnets that attach to the metal structure.It was thought at the disposal of the sump and the container of water r.o. with pump / osmocontroller, for which in the phase of building works have been arranged the various electrical plugs and the water discharge pipeline in the garden.Also in this phase it is arranged a double dedicated power line to the tank, a direct to the general framework and one to the ordinary line with provision for the future of continuity / UPS group. Considered and not excluding the problem of a potential on the mold walls, especially on the rear ones to the tank, such as to create strong discomfort and difficulties for the future removal, we opted for the laying of tiles on walls; creating an attractive appearance and eliminating the problem of the plaster falling off, they make bubbles and give rise to unwanted mold. Of course tiling has been enriched with strips coated with olive flatting paint.After the laying of the tiles and the painting, they were carried no.4 holes with plugs 8 mm. to support the ceiling to be realized. A facility ready switches to cover the same panel with 20mm marine plywood, treated with four coats of special flatting paint for boats, measuring cm. 208x108x2, with slots for the passage of ventilation pipes and sump. In the compartment below, before laying the wooden panel and the tub, it is placed the container of 150 liters for water osmosis r.o. and an old aquarium from 120x60x60x1,2 measures cm., which has been specially modified transformed into the sump / cryptic. In this aquarium it was modified a part of the front glass lowering it from 60 to 45cm for easy work, a glass to separate the sump compartment (85x60x45) from cryptic (42x60x58) and finally an overflow has been achieved has been inserted / unloading. Said hole serves to drain the water from the sump to the garden and not flood the house in case of failure of the pump and also dell'osmoregolatore also thought of as the exhaust path to the periodic changes of water. The latter expedient to avoid having to carry a number of waste water tanks during the monthly changes. R.o. water container Discharge from the sump to the garden Chiller and under tiles the exhaust pipe that starts from the sump Sump hole to connect the drain hose For the construction of the tank, this time, I turned to a professional and have requested the implementation of a bathtub 190x90x58. I used glass 15mm., The front and one side in extra. Facts make 3 holes 50 for discharging and 2 to 25 for the load. For greater security I did place upper links and lower sides for only 190 cm. Discharges and loads are to me were assembled using PVC fittings. the tank has been coated on two sides with a special blue color film.For coverage of discharges I made a grid acrylic laser cutting, assembled with a special non-toxic glue. For the realization of the ceiling here we finally got to see the light presenting my 7th Plafo Led.The ceiling light at the end of the realization has a measurement of cm.178x69x2,5.SINK: I used 6 aluminum heat sinks from cm.17,5x85x2,4 in whose underside were made threaded holes where the screws screwed into steel for clamping of the Cree multichip LED, after laying of thermal paste. It was originally intended to order long 3 sinks 170 cm., But the fear, later confirmed by the company, which in the process of anodizing could be deformed, made us change the design so that they become six (three per side) that for them assemble I had to build an anodized aluminum frame on which to place the heat sinks themselves. Among the three coolers I have positioned two aluminum profiles that host the various drivers. COVER LOWER: I have set it up to full coverage, both for reasons of cost, given the total measurements of the ceiling light, both for increased passive cooling whereas the same coverage limits air contact with the heatsink; Therefore I decided to cover the single multichip to use methacrylate measures cm laser cutting. 12x7x0,7 composed of a frame of 4 mm and a plate of 3 mm glued and screwed to the body with stainless steel screws. LED: Used Cree multichip divided into four channels1st channel No.3 led by White 10,000K °2nd No.2 Blue channel and 1 Royal Blue3rd no.3 Royal Blue channel4th channel No.1 Royal Blue and 2 actinic.the specifications in the following link:http://www.ebay.it/itm/4-Channel-Cr...-/361122415535?ssPageName=ADME:L:COSI:IT:1123They were positioned 4 multichip for each sink, total 24 multichip. Each multichip has 12 led all powered at 700mA.DRIVER: nr. 24 drivers MeanWell LDD700H, each driver led driver nr.12.CONTROLLER: allows independent control of 4 channels on-off with sunrise-sunset, management of the percentage (%) of each channel to separate brightness and on / off of lunar nr.6 5mm. Moreover, the presence of a temperature sensor manages the power delivery and consequently lowers the percentage of lighting to reduce overheating of the LEDs. (The photo will be published later)POWER SUPPLY: No.1 MeanWell SDR-960-48TECHNIQUE:SKIMMER: LGM Lgs2500, customized and modified to my needs;PUMPS ski: No.2 New Jet 3000, waiting to change;COOLER: Sfiligoi Super Flite, the external unit to the house;FILTER: Deltec, which if necessary food with charcoal and antifosfati resins;PUMPS movement: No.3 and No.1 Sicce HP9 Sicce Voyager Voyager HP10;REACTOR Soccer: LGM Lgr1401 fed with aragonite K.Z. pH meter and Milwaukee;CO2 canister 5 kg;osmosis plant Ruwal 5-stageThe tank was launched in July 2015, after a reef to reef move, distance run of about thirty kilometers in full heat, which caused the loss of some corals and irreversible damage to many others, that as of today you I have recovered very well albeit showing the injuries suffered.Now there are clear signs of growth, the colors are not the most desirable, but satisfy my philosophy and my way of seeing the aquarium. still think not risk the rest of animate to come up with stratospheric colors, those who are content enjoys.For the moment no public photos of the corals, waiting for better presentation.I am satisfied.Special thanks to my wife for patience, Kevin, Robert and Irwin for their support and to all those who in various ways helped me in the realization.I am available for any clarification, in fact I'd love to.In a few weeks I add pictures of the tank in its current situation, in order to have a comparison in the course of time."Thank you again.
Last edited:


