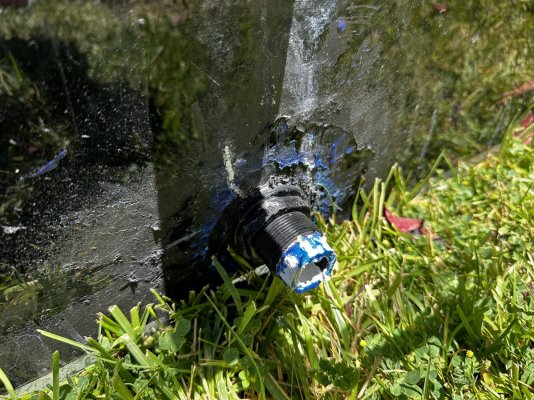
bought used acrylic tank - want to permanently seal a bulkhead near the bottom I cannot remove.

revenant

Active Member
View Badges
Joined
Aug 26, 2020
Messages
449
Reaction score
473
Location
91320
Rating - 0%
0   0   0
I got this used 240G (8x2x2) recently and want to seal some holes which are drilled into the back.

The main one which concerns me is near the bottom on the back center and the bulkhead is glued/sealed so removal is not an option. There's a plug on the back and the whole back of it has a rather nasty looking sealant job but it's been holding (fresh) water for years like this. I am planning on filling this with salt water and I want to plug the inside of the bulkhead (inside the tank) with a plug and also use sealant between the tank back and the lip of the bulkhead.

I think a Lasco 3/4 or 1" threaded plug will work for this. I am going to Home Depot today to check out the plug options and get a couple to see what fits the best. Should I use some plumbers tape for the plug threads? Or use sealant? I want this to be permanent so I would prefer to use sealant for the threads and also the seam between the bulkhead lip and the tank...

What sealant should I use? the bulkhead seems to be some kind of ABS plastic - so I want to make sure the sealant is not a solvent for that or acrylic (obviously).. I am new to plumbing but I am pretty handy and learn fast.. so trying to get my bearings here. Am I going about this correctly or should I do something differently?

Thanks for any assistance with this.

Photo notes: bulkhead inner diameter 1" ... yeah that sealant job on the outside is a mess... just want to seal this thing from the inside as best i can too.. YES I have two other holes well under the waterline which I am going to plug as well but going to buy new bulkheads with plugs for those...
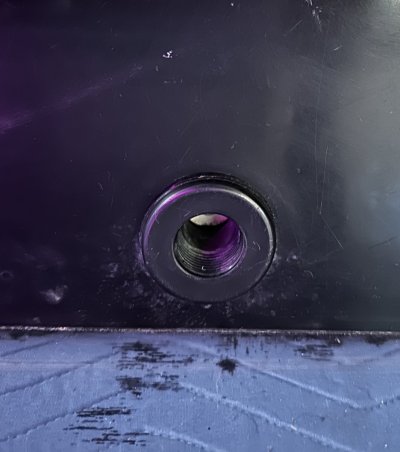
IMG_1904.jpeg IMG_1905.jpeg IMG_1840.jpeg
 
Last edited:

Saltyreef

I'm not your dad...
View Badges
Joined
Nov 25, 2018
Messages
7,041
Reaction score
6,034
Location
Central Coast, California
Rating - 0%
0   0   0
Yes its abs. Buy a schedule 80 plug the correct size and some ABS glue and go to town.

For the open holes, buy some acrylic sheet and fusing glue, prep and cover them up with a good overlap.
then repaint the back black.

If you want to fix the look of the bottom hole from the inside, hacksaw the schedule 40 pipe flush with the bulkhead and put some black silicone inside and spread around the outside to cover it up.
 
OP
OP
revenant

revenant

Active Member
View Badges
Joined
Aug 26, 2020
Messages
449
Reaction score
473
Location
91320
Rating - 0%
0   0   0
ty ty ty.. nice tip on covering the inside to make it look nicer.. I'll have rock and stuff in the way so not sure it'll be too much of an eye sore but I can't exactly do that later if change my scape heh.
 

Saltyreef

I'm not your dad...
View Badges
Joined
Nov 25, 2018
Messages
7,041
Reaction score
6,034
Location
Central Coast, California
Rating - 0%
0   0   0
ty ty ty.. nice tip on covering the inside to make it look nicer.. I'll have rock and stuff in the way so not sure it'll be too much of an eye sore but I can't exactly do that later if change my scape heh.
Yeah i catch your drift!

it will give another layer of security as well.

But,
If the sealent of that bottom bulkhead is just silicone, i would be trying to remove it with some metal scrapers and razorblades and do a real acrylic patch over it like the other two holes. Would be the safest longterm.
Who knows how good that bulkhead is sealed to the acrylic anyways since they normally dont need any glue to install.
 

Troylee

all about the diy!!!!!
View Badges
Joined
Jan 15, 2010
Messages
18,735
Reaction score
15,359
Location
Vegas baby!!!!
Rating - 0%
0   0   0
You could run a sawzall down the back and cut it off and remove it easy enough.. I’d do that and then glue a patch on the inside of the tank the proper way with Weldon. It looks like silicone you can prolly just grab the nut with channel locks and remove it..
 

Saltyreef

I'm not your dad...
View Badges
Joined
Nov 25, 2018
Messages
7,041
Reaction score
6,034
Location
Central Coast, California
Rating - 0%
0   0   0
You could run a sawzall down the back and cut it off and remove it easy enough.. I’d do that and then glue a patch on the inside of the tank the proper way with Weldon. It looks like silicone you can prolly just grab the nut with channel locks and remove it..
Agreed. Lay the tank down on its face and cut with the blade perpendicular so the blade will reach flush all the way through.
 

Troylee

all about the diy!!!!!
View Badges
Joined
Jan 15, 2010
Messages
18,735
Reaction score
15,359
Location
Vegas baby!!!!
Rating - 0%
0   0   0
Agreed. Lay the tank down on its face and cut with the blade perpendicular so the blade will reach flush all the way through.
With a long blade obviously so it flexes and doesn’t cut into the tank.. depending on what size bulkhead that is another option is using a step drill bit and drilling it out from the inside to remove that flange and push it through. Then patch the inside.
 
OP
OP
revenant

revenant

Active Member
View Badges
Joined
Aug 26, 2020
Messages
449
Reaction score
473
Location
91320
Rating - 0%
0   0   0
Thanks and yeah I would love to get rid of that thing.. the black stuff on the back is silicon but the blue crud under it is some kind of non-silicon stuff..

yeah I guess I could just cut the whole thing off real careful like then seal it from the inside properly. Thanks much.. gears turning. Thanks for the tips on that!

I am looking over this tank with a lot more scrutiny now that it's dry, "clean" and here on my floor.. it's got a lot of micro fissures in the seams .. the tank is 8 to 10 years old - had been fresh for the last 6 and the condition looks worse and worse to me the more time I examine it... it was cheap all things considered but starting to think I should have waited for something in a little better shape.. That said as long as it doesn't leak I will be happy with it.

Nothing frighteningly alarming but loads of little stuff.. I just don't know what should worry me.. I see tons of little micro fissures on the edges of seams but they only extrude in a little way.. there is one spot to that I don't know how i missed on initial inspection.. I showed it to one tank buddies who said don't worry about it.. when I look down the sheet it doesn't get past maybe 1/3 of the seam.. I might be overthinking this.. is this the right sub forum to post pics of acrylic seams?
 
Last edited:

Saltyreef

I'm not your dad...
View Badges
Joined
Nov 25, 2018
Messages
7,041
Reaction score
6,034
Location
Central Coast, California
Rating - 0%
0   0   0
With a long blade obviously so it flexes and doesn’t cut into the tank.. depending on what size bulkhead that is another option is using a step drill bit and drilling it out from the inside to remove that flange and push it through. Then patch the inside.
thats the point of the perpendicular cut with the tool oriented over the void. To negate any flexing.
I've marred plenty of expensive metal finishes by trying to make a clean flush cut with a flexed blade and the sawsall pressed as far against a wall as it will go.

I could just forsee this not working well on acrylic paneling :face-in-clouds::confounded-face:
 

Troylee

all about the diy!!!!!
View Badges
Joined
Jan 15, 2010
Messages
18,735
Reaction score
15,359
Location
Vegas baby!!!!
Rating - 0%
0   0   0
Thanks and yeah I would love to get rid of that thing.. the black stuff on the back is silicon but the blue crud under it is some kind of non-silicon stuff..

yeah I guess I could just cut the whole thing off real careful like then seal it from the inside properly. Thanks much.. gears turning. Thanks for the tips on that!

I am looking over this tank with a lot more scrutiny now that it's dry, "clean" and here on my floor.. it's got a lot of micro fissures in the seams .. the tank is 8 to 10 years old - had been fresh for the last 6 and the condition looks worse and worse to me the more time I examine it... it was cheap all things considered but starting to think I should have waited for something in a little better shape.. That said as long as it doesn't leak I will be happy with it.

Nothing frighteningly alarming but loads of little stuff.. I just don't know what should worry me.. I see tons of little micro fissures on the edges of seams but they only extrude in a little way.. there is one spot to that I don't know how i missed on initial inspection.. I showed it to one tank buddies who said don't worry about it.. when I look down the sheet it doesn't get past maybe 1/3 of the seam.. I might be overthinking this.. is this the right sub forum to post pics of acrylic seams?
Post them up! That’s called crazing and is normal to a point over the years.
 

Saltyreef

I'm not your dad...
View Badges
Joined
Nov 25, 2018
Messages
7,041
Reaction score
6,034
Location
Central Coast, California
Rating - 0%
0   0   0
Thanks and yeah I would love to get rid of that thing.. the black stuff on the back is silicon but the blue crud under it is some kind of non-silicon stuff..
It almost looks like they used pvc glue to bond the abs to the acrylic panel.

Which makes more sense cause they obviously used it to try to bond the pvc to the ABS bulkhead which is halfassing it (works sometimes) and its the same color.
 

Troylee

all about the diy!!!!!
View Badges
Joined
Jan 15, 2010
Messages
18,735
Reaction score
15,359
Location
Vegas baby!!!!
Rating - 0%
0   0   0
It almost looks like they used pvc glue to bond the abs to the acrylic panel.

Which makes more sense cause they obviously used it to try to bond the pvc to the ABS bulkhead which is half butt (works sometimes) and its the same color.
That’s exactly what it is.. it doesn’t stick to acrylic so I’m sure a large pair of channel locks you could remove the nut and take it out permanently.. I wouldn’t even try to cap that bulkhead it will leak and has as you can see lol..
 
OP
OP
revenant

revenant

Active Member
View Badges
Joined
Aug 26, 2020
Messages
449
Reaction score
473
Location
91320
Rating - 0%
0   0   0
Post them up! That’s called crazing and is normal to a point over the years.

Sound very accurate lol.


Top middle front .. this is the most extreme I see of the top micro fracture stuff.. it almost looks like some sealant was applied at some point (the owner said he didn't do that) and it's worked it's way into the seam?
(inside)
IMG_1906.jpeg

(outside)

More top middle … same spot zoomed out more.. some of the stuff on the right is on the surface, not seam.
(inside)
IMG_1907.jpeg
IMG_1908.jpeg


Bottom right side near corner.. this doesn’t extend in too far but it’s a mass around an inch wide… maybe some dysmorphia in the original sealant seam union?

IMG_1910.jpeg


more bottom front seam.. loads of these little things

IMG_1911.jpeg


same stuff zoomed out.. none of this extends past 1/2 into the seam but it's the way across the front like this pretty much..

IMG_1926.jpeg


Def have a busted seam on this overflow.. or looks like it… the other one looks fine though. don't mind the cat hair.
IMG_1935.jpeg


Maybe I need to have someone come physically inspect it on prem who knows this stuff… I was about to start building a stand for it and plan out plumbing etc but this is the first really good inspection I’ve given it and my confidence gets lower every time I look at it now lol.

I saw this here for seam repair

1st apply IPS Weldon-On #3 Solvent Acrylic Plexiglass Glue /this is like water it will penitrates the crack.
2nd apply IPS Weldon-On #16 Solvent Acrylic Plexiglass Glue /like gel to add extra strength and fill up if theres some chips.

here: https://www.reef2reef.com/threads/240-gallon-acrylic-tank-leaking-help.335691/post-4407634

Or I could glue some acrylic in that seam to fix the overflow? clean it really well / prep the surfaces etc
 
Last edited:
OP
OP
revenant

revenant

Active Member
View Badges
Joined
Aug 26, 2020
Messages
449
Reaction score
473
Location
91320
Rating - 0%
0   0   0
That’s exactly what it is.. it doesn’t stick to acrylic so I’m sure a large pair of channel locks you could remove the nut and take it out permanently.. I wouldn’t even try to cap that bulkhead it will leak and has as you can see lol..
I was going to seal the seam too but ok I'll try this first for sure. Should I warm it up with a hair drier first?
 

Troylee

all about the diy!!!!!
View Badges
Joined
Jan 15, 2010
Messages
18,735
Reaction score
15,359
Location
Vegas baby!!!!
Rating - 0%
0   0   0
I was going to seal the seam too but ok I'll try this first for sure. Should I warm it up with a hair drier first?
No reason for a hair dryer… it should just come loose because pvc glue and silicone don’t stick to acrylic…. As I’m typing this you might have too if that pvc glue got on the threads of the bulk head.. :rolleyes:
 

vetteguy53081

Well known Member and monster tank lover
View Badges
Joined
Aug 11, 2013
Messages
92,480
Reaction score
204,662
Location
Wisconsin -
Rating - 100%
14   0   0
I got this used 240G (8x2x2) recently and want to seal some holes which are drilled into the back.

The main one which concerns me is near the bottom on the back center and the bulkhead is glued/sealed so removal is not an option. There's a plug on the back and the whole back of it has a rather nasty looking sealant job but it's been holding (fresh) water for years like this. I am planning on filling this with salt water and I want to plug the inside of the bulkhead (inside the tank) with a plug and also use sealant between the tank back and the lip of the bulkhead.

I think a Lasco 3/4 or 1" threaded plug will work for this. I am going to Home Depot today to check out the plug options and get a couple to see what fits the best. Should I use some plumbers tape for the plug threads? Or use sealant? I want this to be permanent so I would prefer to use sealant for the threads and also the seam between the bulkhead lip and the tank...

What sealant should I use? the bulkhead seems to be some kind of ABS plastic - so I want to make sure the sealant is not a solvent for that or acrylic (obviously).. I am new to plumbing but I am pretty handy and learn fast.. so trying to get my bearings here. Am I going about this correctly or should I do something differently?

Thanks for any assistance with this.

Photo notes: bulkhead inner diameter 1" ... yeah that sealant job on the outside is a mess... just want to seal this thing from the inside as best i can too.. YES I have two other holes well under the waterline which I am going to plug as well but going to buy new bulkheads with plugs for those...
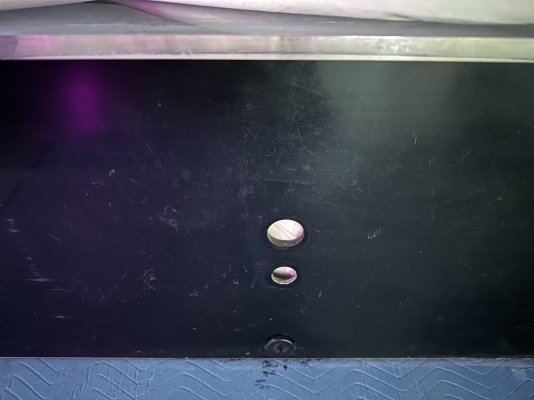
IMG_1904.jpeg IMG_1905.jpeg IMG_1840.jpeg
Ive used a heat gun to soften sealant for removal
 

Troylee

all about the diy!!!!!
View Badges
Joined
Jan 15, 2010
Messages
18,735
Reaction score
15,359
Location
Vegas baby!!!!
Rating - 0%
0   0   0
Sound very accurate lol.


Top middle front .. this is the most extreme I see of the top micro fracture stuff.. it almost looks like some sealant was applied at some point (the owner said he didn't do that) and it's worked it's way into the seam?
(inside)
IMG_1906.jpeg

(outside)

More top middle … same spot zoomed out more.. some of the stuff on the right is on the surface, not seam.
(inside)
IMG_1907.jpeg
IMG_1908.jpeg


Bottom right side near corner.. this doesn’t extend in too far but it’s a mass around an inch wide… maybe some dysmorphia in the original sealant seam union?

IMG_1910.jpeg


more bottom front seam.. loads of these little things

IMG_1911.jpeg


same stuff zoomed out.. none of this extends past 1/2 into the seam but it's the way across the front like this pretty much..

IMG_1926.jpeg


Def have a busted seam on this overflow.. or looks like it… the other one looks fine though. don't mind the cat hair.
IMG_1935.jpeg


Maybe I need to have someone come physically inspect it on prem who knows this stuff… I was about to start building a stand for it and plan out plumbing etc but this is the first really good inspection I’ve given it and my confidence gets lower every time I look at it now lol.

I saw this here for seam repair

1st apply IPS Weldon-On #3 Solvent Acrylic Plexiglass Glue /this is like water it will penitrates the crack.
2nd apply IPS Weldon-On #16 Solvent Acrylic Plexiglass Glue /like gel to add extra strength and fill up if theres some chips.

here: https://www.reef2reef.com/threads/240-gallon-acrylic-tank-leaking-help.335691/post-4407634

Or I could glue some acrylic in that seam to fix the overflow? clean it really well / prep the surfaces etc
That bottom seam worries me a little bit.. it does appear that someone squirted some Weldon 3 or 4 in there and did more damage them good.. sigh… I mean you already own the tank and if you’re gonna use sand I would get some strips cut out of 1/2” acrylic like 1/2x1/2 and back all the lower seams up around the perimeter… cheap fix but ugly… sand will hide it and a piece of trim around the outside when it’s on the stand and nobody would ever know… Weldon 40-42 would be ideal to do this… I mean 16 would work but leave a ton of bubbles and isn’t nearly as strong
 
OP
OP
revenant

revenant

Active Member
View Badges
Joined
Aug 26, 2020
Messages
449
Reaction score
473
Location
91320
Rating - 0%
0   0   0
That bottom seam worries me a little bit.. it does appear that someone squirted some Weldon 3 or 4 in there and did more damage them good.. sigh… I mean you already own the tank and if you’re gonna use sand I would get some strips cut out of 1/2” acrylic like 1/2x1/2 and back all the lower seams up around the perimeter… cheap fix but ugly… sand will hide it and a piece of trim around the outside when it’s on the stand and nobody would ever know… Weldon 40-42 would be ideal to do this… I mean 16 would work but leave a ton of bubbles and isn’t nearly as strong
Yes I am planning a 2" sand bed and putting some trim on the stand to cover the very bottom 1" or so of the tank.. yeah this sounds like what I need to have peace of mind... and not too tough to do. I have to do that for the overflow seam too anyways..

I am about to order a bunch of sealant.. so 40 or 42? not 16? I was about to get 16oz Weld-on #16 but I'll get whatever is best for this job.

Any recommendations on where to order the acrylic from?

..and when cleaning just water and a sponge with an abrasive side to dislodge the old sand bits from the seam?
 
Last edited:

Troylee

all about the diy!!!!!
View Badges
Joined
Jan 15, 2010
Messages
18,735
Reaction score
15,359
Location
Vegas baby!!!!
Rating - 0%
0   0   0
Yes I am planning a 2" sand bed and putting some trim on the stand to cover the very bottom 1" or so of the tank.. yeah this sounds like what I need to have peace of mind... and not too tough to do. I have to do that for the overflow seam too anyways..

I am about to order a bunch of sealant.. so 40 or 42? not 16? I was about to get 16oz Weld-on #16 but I'll get whatever is best for this job.

Any recommendations on where to order the acrylic from?

..and when cleaning just water and a sponge with an abrasive side to dislodge the old sand bits from the seam?
Just go with the 16… number 4 you got have a flawless butt joint and it’s not easy to accomplish.. the solvent might cause more crazing also since it’s a older tank.. as for getting the acrylic a local plastic shop, Home Depot, Amazon etc will have small pieces.. the thicker stuff to back up the joints you’d have to find a sign shop or plastic shop I’d think. Somebody with a table saw or cnc router anyways.
 
OP
OP
revenant

revenant

Active Member
View Badges
Joined
Aug 26, 2020
Messages
449
Reaction score
473
Location
91320
Rating - 0%
0   0   0
Just go with the 16… number 4 you got have a flawless butt joint and it’s not easy to accomplish.. the solvent might cause more crazing also since it’s a older tank.. as for getting the acrylic a local plastic shop, Home Depot, Amazon etc will have small pieces.. the thicker stuff to back up the joints you’d have to find a sign shop or plastic shop I’d think. Somebody with a table saw or cnc router anyways.
ok tyvm.. I was looking for 40 and 42 (oh these are two part - got it) and it wasn't nearly as available as 16 and complaints about old stock and shelf life on those. I'll get the pint of 16. Thanks again
 

Making aqua concoctions: Have you ever tried the Reef Moonshiner Method?

  • I currently use the moonshiner method.

    Votes: 32 20.5%
  • I don’t currently use the moonshiner method, but I have in the past.

    Votes: 2 1.3%
  • I have not used the moonshiner method.

    Votes: 116 74.4%
  • Other.

    Votes: 6 3.8%
Back
Top