Dextereefs Reef Paradise Build Thread

Dextereef

Well-Known Member
View Badges
Joined
Aug 18, 2012
Messages
562
Reaction score
139
Location
West Chester, Ohio
Rating - 0%
0   0   0
It's well past time I put up my build thread and what better reason than to get chance to win the new Neptune WAV! Good luck everyone. I'm copying and pasting from my local reef forum so please bear with me...

System(s) Basics:

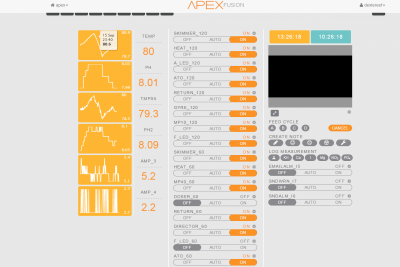
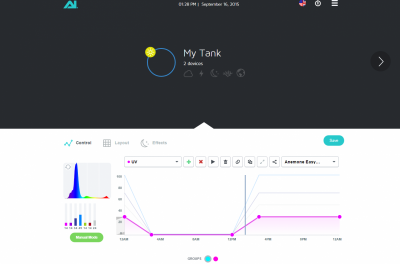
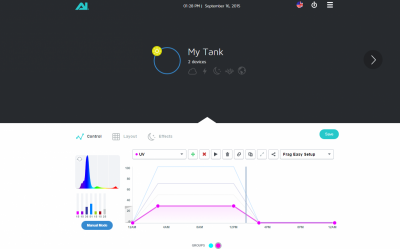
*All controlled with an Apex, 2-8-outlets, pm1 module, reactors plumbed in, AI Director controlling the LEDS*

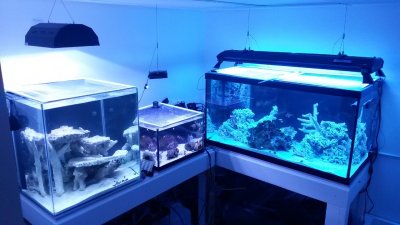
  • 120g RR single overflow (LPS/Softies)--Aquaticlife 6-bulb T-5
  • 21g Shallow cube (Anemones)--AI Hydra 26 LED
  • Frag nursery in sump--AI Hydra 26 LED
  • Both plumbed to 75g custom glass sump
  • Bubble Magus curve 7 skimmer
  • BRS deluxe reactor (carbon)
  • 2LF phosban reactor (gfo as needed)
  • Gyre 150 & Flow eductor on return (120g)
  • MP10 (21g)
  • Mag 12 return
  • Hydor Smartlevel ATO
  • Kalk in ATO

  • 60g RR cube (SPS)--Hamilton 250w HQI & 2-24" t5 supps
  • plumbed to 40breeder DIY sump
  • Eshopps psk-150 skimmer
  • BRS mini reactor (carbon)
  • 2LF phosban reactor (biopellets)
  • MP40
  • Sicce syncra 3 return
  • Smart ATO
  • marinemagic 3 doser
  • aquamaxx dosing containers
I know I am probably missing something but I will update with photos in a few...back to work :(
 
OP
OP
Dextereef

Dextereef

Well-Known Member
View Badges
Joined
Aug 18, 2012
Messages
562
Reaction score
139
Location
West Chester, Ohio
Rating - 0%
0   0   0
combo wet test/vinegar bath on the 70 temporary holding tank and the new sump for the 120g (thanks Queen City Aquatics!). So far so good this morning.


The new sump is a big volume upgrade from the 40 breeder I am using right now and will bring more stability to the big boy. Here is a volume break down.

 
OP
OP
Dextereef

Dextereef

Well-Known Member
View Badges
Joined
Aug 18, 2012
Messages
562
Reaction score
139
Location
West Chester, Ohio
Rating - 0%
0   0   0
I taped out "fishy corner" as my son calls it. He loves winnie the pooh so, along with pooh corner, in our house we have fishy corner, dinosaur corner, matchbox corner, lego corner, and on and on and on
icon_rolleyes.gif
This is where I should have put the tank all along. It is a part of the basement we never use and where random items go to die.


Acid bathed some of the new rock that will be going in. I plan on totally starting from scratch so the existing rock in my system will be getting a muriatic acid bath once my temporary tank is setup.


Quick update from the past couple days. Plumbed the water station behind the wall and built the stand. Still need to do some shimming and shaking...err I mean leveling lol and then caulking and painting. I will be setting up the temporary tank tonight. Once she's reached equilibrium with the main tank I will move everything over. Hope everyone is staying cool
icon_cool.gif


One last shot of the old tank placement. This will free up a lot of room in that area. More room + no skimmer smell + more room = happy wife
icon_lol.gif


OP
OP
Dextereef

Dextereef

Well-Known Member
View Badges
Joined
Aug 18, 2012
Messages
562
Reaction score
139
Location
West Chester, Ohio
Rating - 0%
0   0   0
I came across a great resource while going through a similar build thread on R2R for fittings, valves, and unions....www.sprinklerwarehouse.com (thanks @d2mini !). I found the below manifold on sale for $15! I'm referring to just the gray part on top but it was really easy to assemble and disassemble for cleaning. It plays right into my lazy reefer mentality and my hatred for gluing plumbing together. They make these with up to 4 outlets and a simple coupling can attach many together. I'll be using this one to plumb in my reactors to the return instead of them running on their own independent pump and save on heat input and energy. Hope this might help if you're puzzled about building your own manifold.


I have the tanks broken down, drained, and clean. Temporary tank is setup and all livestock transferred over. I lost two fish since last Friday when I was able to make the switch
icon_cry.gif
My hippo tang and yellow tang bit the dust. The yellow was going nuts when I was breaking the tank down. He was running into the glass, rock, sand, you name it he was running into it so I think he bludgeoned himself to death. The hippo died a day or so later. He was starting a decline well before the transfer so I wasn't surprised that he passed. He survived a HLLE episode a few years back and as he grew it was becoming harder and harder for him to swim around. He was good buddies with the yellow tang so maybe it was a broken heart
icon_cry.gif
Everyone else seems happy and are eating including corals so I have to be thankful the majority are happy and healthy.


Last edited:
OP
OP
Dextereef

Dextereef

Well-Known Member
View Badges
Joined
Aug 18, 2012
Messages
562
Reaction score
139
Location
West Chester, Ohio
Rating - 0%
0   0   0
A big reason why I am considering going with a shallower sandbed or some sort of faux option. Yuk. Smelly too.


Quick update. It's boring but progress at least
icon_cool.gif
Stand painted, I had to move a cable/phone jack up to the ceiling from underneath the stand, added waterproof outlet housings, drain holes drilled, 60g and 21g put in place, and lights hung above each. I put the metal halide ballast in the back room to keep the heat down.


OP
OP
Dextereef

Dextereef

Well-Known Member
View Badges
Joined
Aug 18, 2012
Messages
562
Reaction score
139
Location
West Chester, Ohio
Rating - 0%
0   0   0
By the beard of Zeus I really dislike plumbing!!!! All plumbed and ready for water! The 21g and 120g are plumbed to the sump on the right and the 60g is plumbed to the left sump. I did not want any extra pumps in the sumps...hehe...so I plumbed in gate valves to feed reactors. The 60g will run carbon and biopellets. The 120 will run carbon and gfo, but only as needed with the gfo. Both sumps will be sockless. Im thinking of adding an acrylic box under the drain lines to break up the drain flow. Im hoping it might cause the drain flow to mushroom more towards the bottom of the sump versus making it all the way back to the surface. Any thoughts on that theory are most welcome/appreciated. I might add in a filter block section via some egg crate magic but will wait and see. I also plumbed a flow line into the fuge area from the return line in each sump. I'm trying to keep as much detritus in suspension as possible. I still need to plumb a feed line through the wall from my water station, aquascape, make a ton of water, and pickup some sand. I'm seriously almost sick of this beast right now. I had to step away for almost a week to avoid total burnout but the finish line is in sight!
 
OP
OP
Dextereef

Dextereef

Well-Known Member
View Badges
Joined
Aug 18, 2012
Messages
562
Reaction score
139
Location
West Chester, Ohio
Rating - 0%
0   0   0


I added a flow accelerator to the 120 just in case all the splits on the return kill the flow


Laid out all the rock last night by size & type. Will be building the scape tonight.


I saw a great tip on youtube while researching for the aquascape. Scrape your base pieces on concrete to wear down any points, bumps, etc...so they do not form pressure points on the bottom glass.


This piece had several small bumps on the bottom which caused it to wobble and roll. Several scrapes later and its mostly flat and very stable. It really does not take much effort to grind the rock down. The concrete washes clean with water too.


First level done. I had to drill some rocks to serve as anchors and run PVC and acrylic rod through them to support the second level. Major PITA
icon_eek.gif
I ziptied a branch piece to the front of the pvc and you cannot tell it's there anymore. I was worried about being able to successfully hide the pvc.


Second level done. It's not puttied together yet just holding with gravity, a few zip ties, and pvc/acrylic support. Im not sold on it yet. I dont know if any of you feel the same way but I'm never satisfied with my aquascape. I know that is just a "me" problem but I can never get it to turn out how I envision it in my mind.


Added a mid level shelf piece to the right side.
 
OP
OP
Dextereef

Dextereef

Well-Known Member
View Badges
Joined
Aug 18, 2012
Messages
562
Reaction score
139
Location
West Chester, Ohio
Rating - 0%
0   0   0
120g scaped and ready to put into the tank. So I need some advice on adding the sand. Should I go rock first then sand or sand then rock? I've always put sand in first and then pressed the base rock into it but am wondering if this contributed to rock slides I experienced.
 
OP
OP
Dextereef

Dextereef

Well-Known Member
View Badges
Joined
Aug 18, 2012
Messages
562
Reaction score
139
Location
West Chester, Ohio
Rating - 0%
0   0   0
Rock moved to tanks and with some modifications to the scape everything is tight and secure. Now it's time to get wet!!!!!


We're off and rolling!


Attachments:
 
OP
OP
Dextereef

Dextereef

Well-Known Member
View Badges
Joined
Aug 18, 2012
Messages
562
Reaction score
139
Location
West Chester, Ohio
Rating - 0%
0   0   0
Quick Update... Cycle complete about two weeks ago and all critters moved from temporary holding into their respective tanks. Had a diatom bloom that dissipated after about a week. Now to get the doser dialed in. I need to work on my fish list too. I cant decide if I want to grab a couple bigger fish (tangs, bellus angel, etc...) or just do bunch of smaller schooling fish, rock dwellers, etc...Thinking of a dwarf lion but that might not jive with the other tank mates. Do any of you have Assesors? The 60g has a ton of outcrops/caves so I think it would be a nice home for them. I'll post some more pics soon.
 
OP
OP
Dextereef

Dextereef

Well-Known Member
View Badges
Joined
Aug 18, 2012
Messages
562
Reaction score
139
Location
West Chester, Ohio
Rating - 0%
0   0   0
Quick look at my apex dashboard and ai director dashboard for all you techie control nuts :cool:
 

Attachments

  • 5.PNG
    5.PNG
    448.7 KB · Views: 189
  • anemone.PNG
    anemone.PNG
    509.2 KB · Views: 217
  • frag.PNG
    frag.PNG
    461.4 KB · Views: 230

owen386

New Member
View Badges
Joined
Jan 18, 2012
Messages
9
Reaction score
3
Location
Boston
Rating - 0%
0   0   0
Nice build everything looks great love the scape. Wish i had room for all those tanks. Always rocks first then sand. Great tip on grinding the rocks flat
 
OP
OP
Dextereef

Dextereef

Well-Known Member
View Badges
Joined
Aug 18, 2012
Messages
562
Reaction score
139
Location
West Chester, Ohio
Rating - 0%
0   0   0
A buddy helped me install a humidity sensing exhaust vent to the setup this weekend. I noticed that the return vent on the other side of the basement was rusting so it was time to combat the humidity problem before it did any real damage. There is a ac/heat vent near the floor but the humidity was not dissipating. I tied the line into my dryer exhaust so it vents straight outside. Worked out wonderfully and now its comfortable to be in fishy corner again!


Reefing threads: Do you wear gear from reef brands?

  • I wear reef gear everywhere.

    Votes: 7 17.1%
  • I wear reef gear primarily at fish events and my LFS.

    Votes: 2 4.9%
  • I wear reef gear primarily for water changes and tank maintenance.

    Votes: 0 0.0%
  • I wear reef gear primarily to relax where I live.

    Votes: 6 14.6%
  • I don’t wear gear from reef brands.

    Votes: 24 58.5%
  • Other.

    Votes: 2 4.9%
Back
Top