Tools for working with acrylic?

OP
OP
thejuggernaut

thejuggernaut

Active Member
View Badges
Joined
Oct 16, 2010
Messages
376
Reaction score
26
Location
Houston
Rating - 0%
0   0   0
Horizontal slots. They are 3/4" wide and 6 inches long (5.5 inches if you don't count the edges where the router makes the fillets) and there are 6 of them. The internal boxes overall length is almost 42." I calculated from a spreadsheet I got from Turbo R Floyd that at 3300 gph I will only be 2/3 of the way up the slot. So at 1200-1400 GPH I should never have any problems as long as I clean it atleast once every six months or so. lol

I think it will operate closer to a smooth weir, and since it is almost the same length of the tank it should surface skim pretty good. Or atleast I hope it will!
 
Last edited:
OP
OP
thejuggernaut

thejuggernaut

Active Member
View Badges
Joined
Oct 16, 2010
Messages
376
Reaction score
26
Location
Houston
Rating - 0%
0   0   0
I managed to get some time today to rough cut and then route some edges for the external box of my overflow.

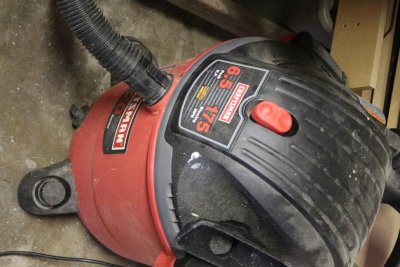
Here is the fence setup. I use the 1" thick acrylic strip as my fence, with the rough cut piece in between the fence and the blade. The other fence I made for making cabinet doors, but the vacuum attachment made it so that I didn't have to clean up a single flake of acrylic.

IMG_2175.jpg
IMG_2176.jpg
IMG_2177.jpg
 

Attachments

  • IMG_2178.jpg
    IMG_2178.jpg
    96.2 KB · Views: 564
  • IMG_2179.jpg
    IMG_2179.jpg
    83.6 KB · Views: 584
Last edited:

Strgazr27

Community Member
View Badges
Joined
Dec 5, 2011
Messages
89
Reaction score
0
Location
Kings Park, New York
Rating - 0%
0   0   0
Subscribed and looking forward to seeing the finished product. Looking at doing the same thing for my rimless 60 cube. Gorgeous work and techniques so far.
 
OP
OP
thejuggernaut

thejuggernaut

Active Member
View Badges
Joined
Oct 16, 2010
Messages
376
Reaction score
26
Location
Houston
Rating - 0%
0   0   0
I began putting together the external box today. The eurobrace was the first 360 degree seam I had done, and I got a little anxious and squeezed a little too much weldon but it looks ok. There were only two places where there air got in. While it looks like it would hold water still just fine. That seam should never see water. If it does, I have bigger problems the a tiny leak. After I got over my jitters, and made sure my shims were nice and snug, the bottom seam looked good. Next I need to flush trim the thing, then weld on the spacers for connecting the external box to the tank.

IMG_2183.jpg
IMG_2184.jpg
IMG_2187.jpg
IMG_2190.jpg
IMG_2192.jpg
 
OP
OP
thejuggernaut

thejuggernaut

Active Member
View Badges
Joined
Oct 16, 2010
Messages
376
Reaction score
26
Location
Houston
Rating - 0%
0   0   0
This is the worst part of the top eurobrace seam.
IMG_2193.jpg

Like I mentioned earlier, I do some CAD work, so I have access to laser cutters, water jets and CNC machines through various people. I had the panels rough cut and the holes cut on a friends 100 watt laser cutter. Once I had the parts cut out and knew they were square, it was just a simple case of routing them down on my table to make sure I had removed enough material so that the laser cut edges wouldn't cause my seams to craze. I was a little weary about using a laser cutter but I was assured that if I took off around 3/16 to 1/4" of material, that it wouldn't effect the quality of the seams, and it sure did make it easy to get all my pieces square. Honestly, I think just removing an 1/8" of material probably would have been plenty, but better safe than sorry.

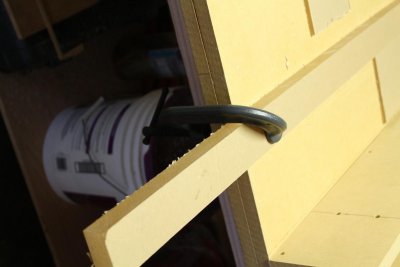
While I was cutting out the parts, I also made this template. The spacing and placement of the etching corresponds with where the weir will drain into the overflow. All I had to do was make sure it was centered and that the water level would be above the rim on my 120. I clamped it and drilled out the tank. It was super easy, and I'm glad I made the template when I cut out the pieces.
IMG_2199.jpg
 
OP
OP
thejuggernaut

thejuggernaut

Active Member
View Badges
Joined
Oct 16, 2010
Messages
376
Reaction score
26
Location
Houston
Rating - 0%
0   0   0
Subscribed and looking forward to seeing the finished product. Looking at doing the same thing for my rimless 60 cube. Gorgeous work and techniques so far.

Thanks for your kind words. I'm just learning as I go. I will say that reading allot and using the right techniques and tools will definitely give you above average results. When are you thinking about starting your build? I am not an expert, but I would be more than happy to answer any questions I can to help you out!
 
OP
OP
thejuggernaut

thejuggernaut

Active Member
View Badges
Joined
Oct 16, 2010
Messages
376
Reaction score
26
Location
Houston
Rating - 0%
0   0   0
I mostly completed the external box tonight.

IMG_2200.jpg
IMG_2202.jpg


The acrylic rings are spacers so that the external box will be offset from the tank a little bit so it will clear the top rim of the tank. Allowing me to have the external box be a little higher.
IMG_2203.jpg


I can't decide if I should run the plumbing like the above pictures with the emergency in the middle and the open on the left and the siphon on the right. I still need to drill the top of the open drain so it doesn't become a full siphon as well.

I think that I may run it like the photo below, with the full siphon in the middle and the open on the right. This way the box empties completely when the pump shuts off and with a restart it slowly fills till it starts pouring down the open drain. I had a corner overflow on this tank before and had the siphon drain on the bottom without any stand pipe and it worked great. I may try both and see which one I like best.
IMG_2208.jpg


I made this bulkhead fitting wrench I made out of 1/4" mdf on the laser cutter. It works awesome and fits like a glove!
IMG_2207.jpg
 

JPG@CFI

Active Member
View Badges
Joined
Jan 31, 2013
Messages
120
Reaction score
45
Location
Seattle, Wa
Rating - 0%
0   0   0
You might have a future as an acrylic fabricator! If you had someone ask you to build your project, how much would you charge? I have plenty of people coming to me for items like this and are shocked at what I have to charge. J
 
OP
OP
thejuggernaut

thejuggernaut

Active Member
View Badges
Joined
Oct 16, 2010
Messages
376
Reaction score
26
Location
Houston
Rating - 0%
0   0   0
You might have a future as an acrylic fabricator! If you had someone ask you to build your project, how much would you charge? I have plenty of people coming to me for items like this and are shocked at what I have to charge. J

It's something to consider, I could always use a little extra money, and I enjoy building stuff. I'll PM you.
 
OP
OP
thejuggernaut

thejuggernaut

Active Member
View Badges
Joined
Oct 16, 2010
Messages
376
Reaction score
26
Location
Houston
Rating - 0%
0   0   0
Little update!

I started working on the internal box today. I welded the sides and the two top braces to the front. Working with black acrylic is both good and bad. The good is that you can't see any bubbles in the seams. The bad is that you can't see the bubbles in the seams! You have no idea if they are good seams or if they will hold water. I feel pretty confident though for a few reasons. I can see a good bead of weldon on both sides of the panel before it started drying. Also, the internal box is inside the tank, so even if it leaks it won't effect the running of the system until there is a power outage, and even then the water level will stop at the bottom of the drain risers in the external box. But that won't happen, cause I know it won't leak. LOL

The way the internal box is designed, you have to install the bulkheads before gluing on the back panel, because it is so narrow that you can't get the bulkheads in and out. So tomorrow I need to drill two holes through the bottom of the foam lined MDF and put it on stilts so that the bulkheads will protrude through it but not hit the table. This way it will allow the back panel to lay flat while I seam it to the front. I'll take more photos once I get it all setup and welded.
 
Last edited:
OP
OP
thejuggernaut

thejuggernaut

Active Member
View Badges
Joined
Oct 16, 2010
Messages
376
Reaction score
26
Location
Houston
Rating - 0%
0   0   0
I got the internal box welded up today.

I had to drill two holes in my board so that the bulkheads would have clearance, but the part still be supported.

IMG_2219.jpg


IMG_2210.jpg


Here it is all jigged up ready to weld the bottom on. The longest joint I had done so far.

IMG_2213.jpg


Several hours later, it's setting up waiting to be flush cut tomorrow evening.

IMG_2221.jpg


I made a scraper block using two pieces of wood and and box cutter blade.

IMG_2218.jpg
 

ccscorpion200

Community Member
View Badges
Joined
Oct 20, 2010
Messages
87
Reaction score
2
Location
texas
Rating - 0%
0   0   0
Nice job. Look good. I'm about to build one myself. I see you are using the pin method, does that work better than just have the two pieces together and run your solvent along the edges?
 
OP
OP
thejuggernaut

thejuggernaut

Active Member
View Badges
Joined
Oct 16, 2010
Messages
376
Reaction score
26
Location
Houston
Rating - 0%
0   0   0
Yes it does. The pins allow the weld-on some time to soften up the acrylic before you join the two pieces. Cast acrylic is much harder than that extruded stuff you buy at Lowes, and needs more soak time before you press the pieces together and squeeze out the solvent. You will get a large pool of solvent push out when you pull the pins, but it will evaporate. From what I have seen in my limited experience and from what I have heard from more veteran acrylic guys, you don't want to do it without the pins. You will probably have a weaker joint. The main thing is to adjust the shims so that all of the pins are taunt. If a pin is loose, the gap will be too large and the solvent won't touch the top piece of acrylic. Once you pull the pins, readjust the pieces so that the top and bottom are as closely aligned as possible and then add some weight to the top to hold the two pieces together while the solvent evaporates.
 
OP
OP
thejuggernaut

thejuggernaut

Active Member
View Badges
Joined
Oct 16, 2010
Messages
376
Reaction score
26
Location
Houston
Rating - 0%
0   0   0
Nice job. Look good. I'm about to build one myself. I see you are using the pin method, does that work better than just have the two pieces together and run your solvent along the edges?

What size tank are you wanting to build it for? I see you're in Texas, I live a little south of Houston.
 

ccscorpion200

Community Member
View Badges
Joined
Oct 20, 2010
Messages
87
Reaction score
2
Location
texas
Rating - 0%
0   0   0
I live south of Beaumont. The one I wan't to build is on a 180 cube I just bought. The old one look like someone just cut some black acrylic with a saw and glued it together. Just going to make a new one and I like the way you have it slotted on the internal overflow. I may do that instead of the tooth style. Can you post a pic of your router table you made? I'm wanting to built one when I get a chance. Been on nights at work here for 2 month, can't really do a whole lot during days. Hopefully will start on some work on the new tank here in a few weeks.
 
OP
OP
thejuggernaut

thejuggernaut

Active Member
View Badges
Joined
Oct 16, 2010
Messages
376
Reaction score
26
Location
Houston
Rating - 0%
0   0   0
I made the frame out of 2X4s and the top is two pieces of 4'X8' 3/4" MDF screwed together with about 30 screws. The table is huge, but I made 19 cabinet doors first for my wife to justify this project, and it was nice to be able to lay out and glue 4 at a time. I made an opening on the bottom piece so that the router is only mounted to the top board. Because it is made of wood and no matter how careful I was it would never be perfectly straight, I used a 60" straight edge and some plastic shims to make sure the table top was level. After six months it had started to sag a little, so I just loosened the top and re-shimmed it.

IMG_2223.jpg


IMG_2225.jpg


This Bosch I got is 2.25hp, 1/2" collar, variable speed, and has a built in lift. It came with the base shown, and a plunge router base. It was around $180 I think. Can't remember. The allen wrench allows you to make fine adjustments moving the bit up and down from the top of the table. Maybe not important for doing acrylic work, but really made it nice when making cabinet doors and wood work. The raised water spots are from a water glass spill. So after that I realize I needed something to protect the table, so I saw that on the wood working forums that they use Johnson paste wax. I would get a shiny smooth piece of Formica if I was doing it again, and may actually do it soon if I keep building projects.

IMG_2227.jpg


HTH
 
OP
OP
thejuggernaut

thejuggernaut

Active Member
View Badges
Joined
Oct 16, 2010
Messages
376
Reaction score
26
Location
Houston
Rating - 0%
0   0   0
Yea, I thought the horizontal slots were a good middle ground between the fish guard you get with a toothed overflow and the performance of a smooth weir. It is almost the entire length of my tank, so it should perform close to a smooth weir.
 

Just grow it: Have you ever added CO2 to your reef tank?

  • I currently use a CO2 with my reef tank.

    Votes: 2 4.3%
  • I don’t currently use CO2 with my reef tank, but I have in the past.

    Votes: 1 2.2%
  • I have never used CO2 with my reef tank, but I plan to in the future.

    Votes: 2 4.3%
  • I have never used CO2 with my reef tank and have no plans to in the future.

    Votes: 38 82.6%
  • Other.

    Votes: 3 6.5%
Back
Top