Calcium reactor is a very efficient and cheap way to add Ca, Alkalinity and trace elements to our reef aquariums, especially those that require high level of Ca and Alkalinity input light large SPS and clam tanks. In order to supply this high level, one needs a huge Calcium reactor, or else a very efficient Calcium reactor. After thinking about this and messing around with my reactors for many years, I came up with a modification that will maximize the production of a Calcium reactor with ease.
In order to maximize the Calcium reactor, on must lower the pH of the reactor chamber to a minimal level. The problem with this is that all the Calcium reactors on the market today do not dissolve CO2 efficiently. My modification is very straight forward and involved minimal work and cost an insignificant amount of money. With my modification I was able to use a standard size Calcium reactor, single chamber 6 inches diameter, 18 inches high GEO reactor, to supply a very high demand 400+ gallons system. I am not even running my Calcium Reactor at it at maxima capacity.
Current Calcium reactor add CO2 with standard air tubing which result in large bubbles of CO2 added to the system, right before the circulation pump which is inefficient in dissolving the large CO2 bubbles. My modification involves adding the CO2 via a capillary tube (flow restrictor for RO system). If we add CO2 via capillary tubing to the main part of the circulation right before the pump, the CO2 will be add in a stream of very fine bubbles. The pump will not have any problem dissolves these bubbles into the solution and thus significantly lower the pH of the chamber with no excessCO2 that escapes as wasted CO2.
I modified my Geo Calcium reactor as below
Geo Ca reactor 6 inches diameter 18 inches high

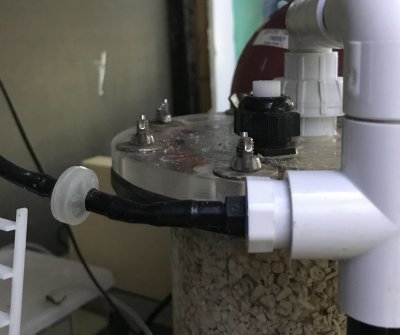
Here are the relevant attachments. The PVC seen in the circulation part outside of the reactor chamber. Circulation here is top down. Take water from the top of the chamber and feed the circulation pump at the bottom and spray out to the bottom of the chamber. At the 4 way intersection the R side is where the CO2 input, there is a one way check valve so that salt water cannot reflux back and ruin the regulator. The L side is where the water intake pump in from the dosing pump to feed the Ca reactor. At the top of the Ca reactor is the output of the Ca reactor, flow to the high flow area in the sump.

I added the capillary tube just right after the check valve. I tape the tube at the position, but on outside so everyone can see where the capillary tube go. "A picture worth a thousand words" I think this is certainly true in this situation.

This is how the capillary tube would fit in standard RO tubing

With this modification, I can easily add this amount of CO2 to the Reactor without any problem
With this modification, I can easily supply all the requirement of a heavy SPS and huge clams. Prior to my tank crash due to Hurricane Harvey, I had multiple clams with the largest is a 28 inch shell Gigas and a large numbers of SPS in a 320 gal DT. I have no problem keeping up with Ca requirement with single chamber 6X18 Ca reactor. If you have problem with keeping up with Ca need, why don't you give this modification a try.
Happy reefing.
In order to maximize the Calcium reactor, on must lower the pH of the reactor chamber to a minimal level. The problem with this is that all the Calcium reactors on the market today do not dissolve CO2 efficiently. My modification is very straight forward and involved minimal work and cost an insignificant amount of money. With my modification I was able to use a standard size Calcium reactor, single chamber 6 inches diameter, 18 inches high GEO reactor, to supply a very high demand 400+ gallons system. I am not even running my Calcium Reactor at it at maxima capacity.
Current Calcium reactor add CO2 with standard air tubing which result in large bubbles of CO2 added to the system, right before the circulation pump which is inefficient in dissolving the large CO2 bubbles. My modification involves adding the CO2 via a capillary tube (flow restrictor for RO system). If we add CO2 via capillary tubing to the main part of the circulation right before the pump, the CO2 will be add in a stream of very fine bubbles. The pump will not have any problem dissolves these bubbles into the solution and thus significantly lower the pH of the chamber with no excessCO2 that escapes as wasted CO2.
I modified my Geo Calcium reactor as below
Geo Ca reactor 6 inches diameter 18 inches high
Here are the relevant attachments. The PVC seen in the circulation part outside of the reactor chamber. Circulation here is top down. Take water from the top of the chamber and feed the circulation pump at the bottom and spray out to the bottom of the chamber. At the 4 way intersection the R side is where the CO2 input, there is a one way check valve so that salt water cannot reflux back and ruin the regulator. The L side is where the water intake pump in from the dosing pump to feed the Ca reactor. At the top of the Ca reactor is the output of the Ca reactor, flow to the high flow area in the sump.
I added the capillary tube just right after the check valve. I tape the tube at the position, but on outside so everyone can see where the capillary tube go. "A picture worth a thousand words" I think this is certainly true in this situation.
This is how the capillary tube would fit in standard RO tubing
With this modification, I can easily add this amount of CO2 to the Reactor without any problem
With this modification, I can easily supply all the requirement of a heavy SPS and huge clams. Prior to my tank crash due to Hurricane Harvey, I had multiple clams with the largest is a 28 inch shell Gigas and a large numbers of SPS in a 320 gal DT. I have no problem keeping up with Ca requirement with single chamber 6X18 Ca reactor. If you have problem with keeping up with Ca need, why don't you give this modification a try.
Happy reefing.