
In planning for my 600 gallon tank build, I’ve been looking at several LED fixtures out on the market because having MHs/T5s and a chiller were not feasible in building a tank of this size. After searching high and low, and taking away many of the features I find to be pointless, I believe I’ve settled on the Apollo Reef LED SolarBlast Dimable fixture. This is my first review but believe that on RC this fixture has not had a lot of exposure. I’m in no way affiliated with Apollo Reef LED and just a fellow Reefaholic looking to share a review on a fixture I find to be a great choice in the current LED market.
First off, the unboxing. The fixture is made up of 55 X 3 Watt BridgeLux LEDs with 90 degree optics and 2 blue LEDs on ON/OFF switch for moonlights and power consumption comes out to ~120 Watts as the LEDs are driven at ~2 watts each. LEDs are made up of a blend of Royal Blues (453 NM), UVs (405 NM), and “high noon whites†at 6500K. The fixture has three power cords and two dimable ports that you use a straight through network cable to tie into the controller of your choice. Channel one covers the whites and channel two covers the RBs/UVs and separate power and toggle switch for the moonlights.
Overall, I’m very satisfied with the fixture and the control I have. While it does not have 8 channels and a full software integration, many of the features such as lightning, sunrise/sunset, and cloud movement can all be easily configured with your controller. With the option to control the RBs/UV and Whites on separate channels I’m able to get the color I desire with the appropriate spectrum that the coral enjoy. Red/Green LEDs are not of concern and if I ever wanted them, I could easily supplement them with some DIY LEDs.
Toggle switches are built in to turn the lights ON/OFF when needed. Power cords need to be on controller/timer to turn off RBs/UVs and Whites so the fan does not constantly run and a third controllable outlet for the moonlights also help to kick them on once the main lights dim down. The fans are quiet and would be happy with the sound level in a living area. Should one fail later down the road, 60mm fans are readily available and could be easily swapped out with the molex connectors under the hood.
With all that being said, below I’ve quickly outlined the Pros/Cons of the fixture. In following posts I also include PAR readings I performed in my frag tank over a 36â€X24†area at three depths and 25 different locations totaling 75 readings. I’ve also taken the 75 sample PAR readings at four different heights based on Apollo Reef LEDs recommended mounting heights above the water surface; 1) 8â€, 2) 10â€, 3) 12â€, and 4) 14â€.
Pros:
Cons:
Package includes light fixture, hanging kit, 3 power cords, straight through network cable, and instructions.

5 Rows of 11 BridgeLux LEDs with 90 degree optics.

29 Royal Blues, 22 Whites, and 4 UVs.

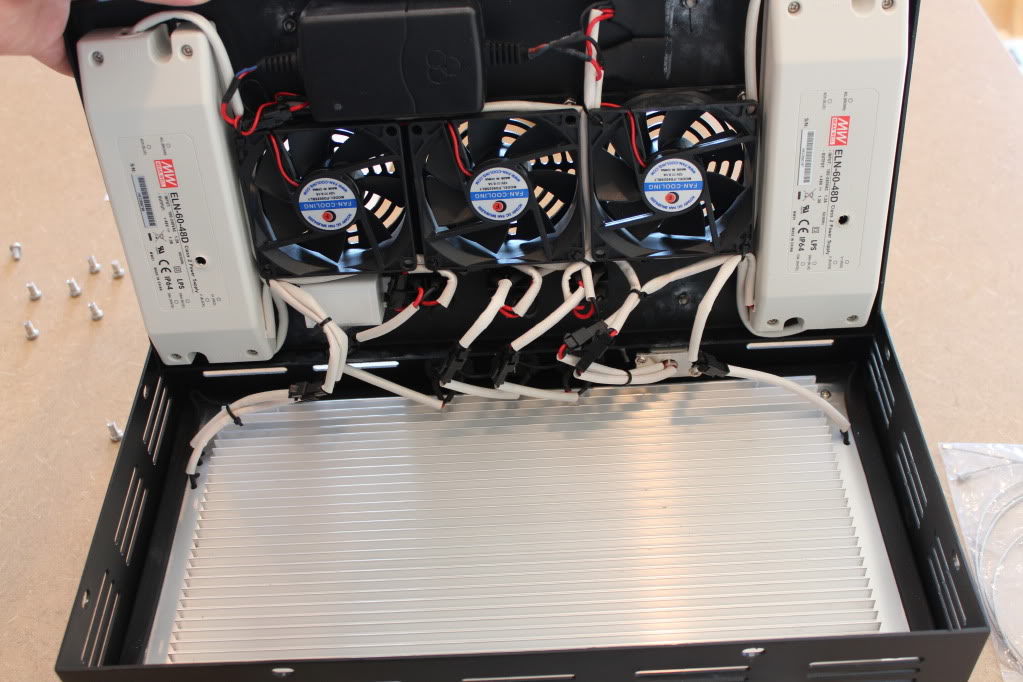
Case opened up and shows MeanWell 60-48D Drivers and three 60mm fans. Everything is well organized and has molex connectors should a part fail and need replacement.
Aluminum heatsink and fully aluminum housing.

“Network Port†where RJ45 goes and three power cords.

And now to the PAR readings…They were all done using a Apogee QMSW-SS Quantum Meter and I used the Electric setting on all. Many will say LED PAR numbers don’t mean everything because PAR meters don’t measure the PAR spectrum very well and the light is actually brighter than represented by PAR readings alone. This is just a common measurement I find to be a good representation of how big of a PAR monster these things are!
Meter Used.

Fixture mounted at 8†above water surface with measurements at surface, 6†down, and 13†down.


First off, the unboxing. The fixture is made up of 55 X 3 Watt BridgeLux LEDs with 90 degree optics and 2 blue LEDs on ON/OFF switch for moonlights and power consumption comes out to ~120 Watts as the LEDs are driven at ~2 watts each. LEDs are made up of a blend of Royal Blues (453 NM), UVs (405 NM), and “high noon whites†at 6500K. The fixture has three power cords and two dimable ports that you use a straight through network cable to tie into the controller of your choice. Channel one covers the whites and channel two covers the RBs/UVs and separate power and toggle switch for the moonlights.
Overall, I’m very satisfied with the fixture and the control I have. While it does not have 8 channels and a full software integration, many of the features such as lightning, sunrise/sunset, and cloud movement can all be easily configured with your controller. With the option to control the RBs/UV and Whites on separate channels I’m able to get the color I desire with the appropriate spectrum that the coral enjoy. Red/Green LEDs are not of concern and if I ever wanted them, I could easily supplement them with some DIY LEDs.
Toggle switches are built in to turn the lights ON/OFF when needed. Power cords need to be on controller/timer to turn off RBs/UVs and Whites so the fan does not constantly run and a third controllable outlet for the moonlights also help to kick them on once the main lights dim down. The fans are quiet and would be happy with the sound level in a living area. Should one fail later down the road, 60mm fans are readily available and could be easily swapped out with the molex connectors under the hood.
With all that being said, below I’ve quickly outlined the Pros/Cons of the fixture. In following posts I also include PAR readings I performed in my frag tank over a 36â€X24†area at three depths and 25 different locations totaling 75 readings. I’ve also taken the 75 sample PAR readings at four different heights based on Apollo Reef LEDs recommended mounting heights above the water surface; 1) 8â€, 2) 10â€, 3) 12â€, and 4) 14â€.
Pros:
- Price/Performance Factor
- Spread and PAR on Deeper Tanks
- Dimable Options (Sunrise/Sunset, Cloud Simulation, and Lightning)
- Great Customer Service from Apollo (Joe is owner and very responsive to each question I had)
- 2 Year Warranty
Cons:
- 3 Power Cords
- Controller Required for Dimable Fixture (Apex, ReefAngel, and Profilux supported)
Package includes light fixture, hanging kit, 3 power cords, straight through network cable, and instructions.
5 Rows of 11 BridgeLux LEDs with 90 degree optics.
29 Royal Blues, 22 Whites, and 4 UVs.
Case opened up and shows MeanWell 60-48D Drivers and three 60mm fans. Everything is well organized and has molex connectors should a part fail and need replacement.
Aluminum heatsink and fully aluminum housing.
“Network Port†where RJ45 goes and three power cords.
And now to the PAR readings…They were all done using a Apogee QMSW-SS Quantum Meter and I used the Electric setting on all. Many will say LED PAR numbers don’t mean everything because PAR meters don’t measure the PAR spectrum very well and the light is actually brighter than represented by PAR readings alone. This is just a common measurement I find to be a good representation of how big of a PAR monster these things are!
Meter Used.
Fixture mounted at 8†above water surface with measurements at surface, 6†down, and 13†down.


")


