Navigation
Install the app
How to install the app on iOS
Follow along with the video below to see how to install our site as a web app on your home screen.
Note: This feature may not be available in some browsers.
More options
You are using an out of date browser. It may not display this or other websites correctly.
You should upgrade or use an alternative browser.
You should upgrade or use an alternative browser.
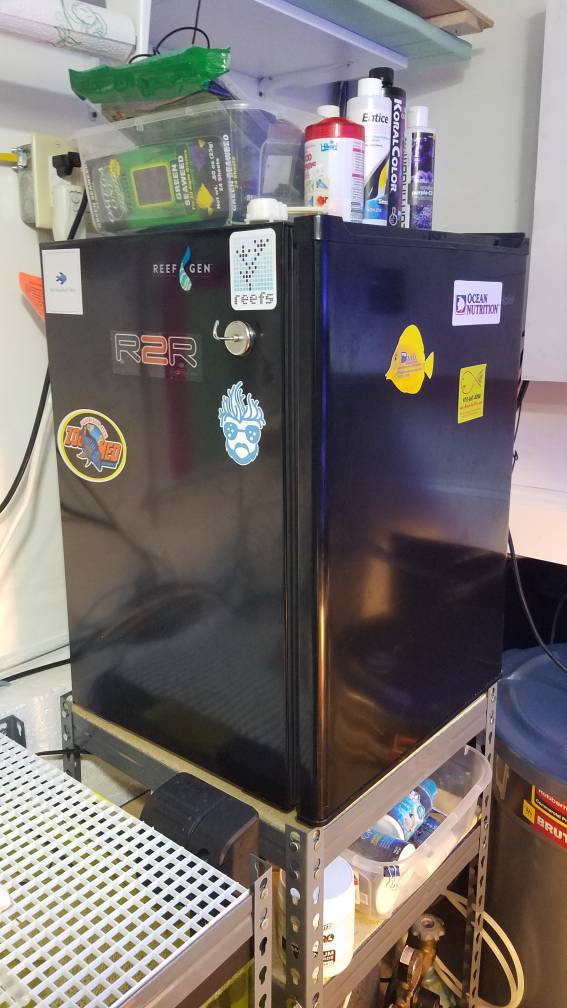
Labridaedicteds 180 Build
- Build Thread
- Thread starter Labridaedicted
- Start date
- Tagged users None


Love following.
- Joined
- Jul 24, 2014
- Messages
- 117
- Reaction score
- 91
Hi, I have enjoyed reading your build thread and i like the concept of a doser feeding refrigerated foods, what I don’t understand is how food doesn’t go bad in the dosing lines between dosing.

OP
OP
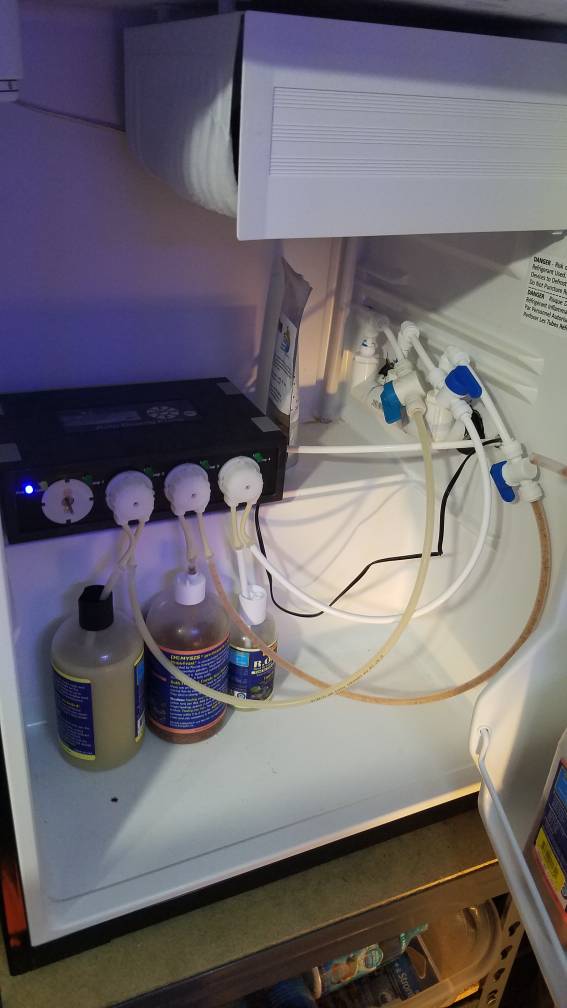
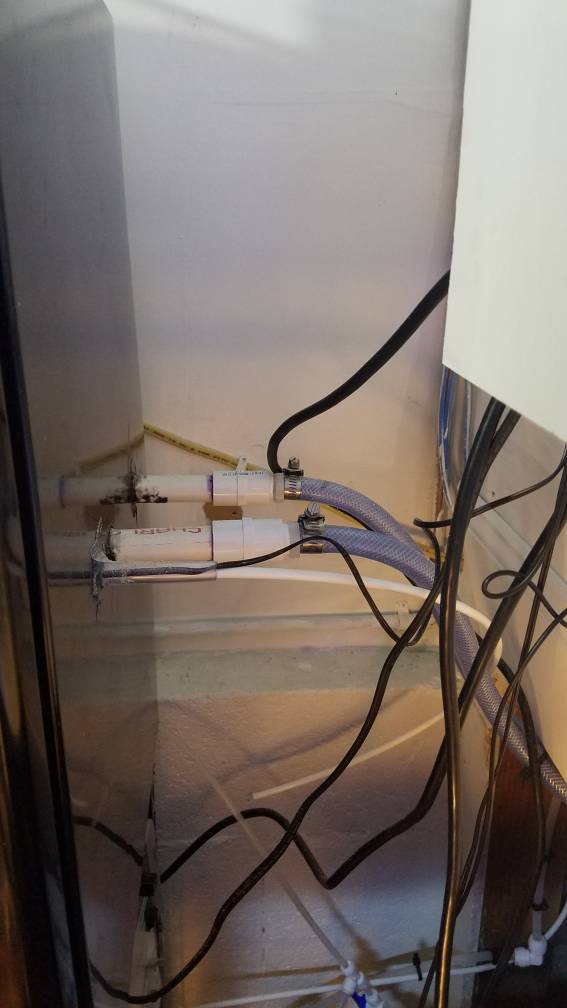
That was the most difficult problem I had to overcome on the auto feeder. So what I did was connected the 1/2" feed to the manifold which has constant circulation (which is what you see as the pvc and braided vinyl in the pictures). The pvc is actually run from the outside of the fridge and I drilled through (careful to avoid any coolant coils or wires) so the constant flow feed is inside the fridge. I put the murloc t's for the feeding tubes inline on the pvc so the dosing lines never go outside the fridge. The feed line discharges directly above the return pump intake, so the food is then distributed through the tank by my 4 return outlets ensuring everyone gets food.Hi, I have enjoyed reading your build thread and i like the concept of a doser feeding refrigerated foods, what I don’t understand is how food doesn’t go bad in the dosing lines between dosing.
As a note, the best food for this type of set up is the Reef Nutrition refrigerated foods since they stay in suspension without need for shaking or stirring.
I attached a few more pictures of this set up to this post.
OP
OP
thanks for following everyone! Hope it has continued to be as exciting for everyone else as it has been for me!
- Joined
- Jul 24, 2014
- Messages
- 117
- Reaction score
- 91
That was the most difficult problem I had to overcome on the auto feeder. So what I did was connected the 1/2" feed to the manifold which has constant circulation (which is what you see as the pvc and braided vinyl in the pictures). The pvc is actually run from the outside of the fridge and I drilled through (careful to avoid any coolant coils or wires) so the constant flow feed is inside the fridge. I put the murloc t's for the feeding tubes inline on the pvc so the dosing lines never go outside the fridge. The feed line discharges directly above the return pump intake, so the food is then distributed through the tank by my 4 return outlets ensuring everyone gets food.
As a note, the best food for this type of set up is the Reef Nutrition refrigerated foods since they stay in suspension without need for shaking or stirring.
I attached a few more pictures of this set up to this post.
-So inside the fridge is your manifold with Constantly circulating tank water from your system.
-Then the doser lines are injected into the manifold which is then expelled by your return pump and shot out 4 return outlets!!
I love it!! That Ingenious!! I really like how your build is far from basic!! Totally my style! Great job!
[emoji106][emoji38]

OP
OP
Exactly! I try to automate as much as possible since sometimes I work odd hours.-So inside the fridge is your manifold with Constantly circulating tank water from your system.
-Then the doser lines are injected into the manifold which is then expelled by your return pump and shot out 4 return outlets!!
I love it!! That Ingenious!! I really like how your build is far from basic!! Totally my style! Great job!
[emoji106][emoji38]
OP
OP
It's been a little while since I posted, but thought I'd put together a little update.
Since I last updated the build thread, some of you guys and gals may have seen my posts concerning my White Tailed Bristletooth Tang basically going crazy. He basically decided he didn't like my pintail or my lineatus wrasses as well as my shrimp goby. It kind of happened overnight but after that, I found the lineatus in the overflow box and the pintail wouldn't come out of the rocks. The goby would get five bombed as soon as he poked his head out. So, I had to pull the tang. I didn't want to, since he is awesome, but I can't have a wrasse bully in my tank. I used an aquamedic large trap and rubber banded nori to a piece of pvc. I put the trap on the sand and grabbed a beer. It took a few days of this method, but I did get him out. He's in the frag tank now until I decide what I'm going to do with him. As soon as I pulled him, though, all the bullied fish came back out and are behaving (mostly) normally now. The lineatus is still acting very timid now a couple of weeks later, but he did recieve the worst of the aggression so he may have some kind of complex now that will take some time to get over.
I've also been filling up the frag tank pretty well. I picked up several aquacultured acro colonies of various kinds. I also finally broke down and got a jawbreaker shroom. I got a Valentine's day massacre in shroom. It looks awesome, and the mother looked even cooler. It's still small though, so the purple still hasn't started developing yet, but it is craaaaaazy bright red. The color on my chalices have also continued to develop (so much so that the bgm chalice pretty much looks Photoshopped when I turn up the blues...)
I ordered my harem of lyretails. I ordered 7 (1 male and 6 female) but lost one female in shipping. They've been in qt and have undergone prazi and observation for a few weeks and I plan to introduce them this week (which will get an update, again)
The copperband is still eating bloodworms soaked in selcon, but I just can't get him eating mysis. He's still got the fuge to himself since I'm not happy with his eating.
Thanks again, everyone, for following!
OP
OP
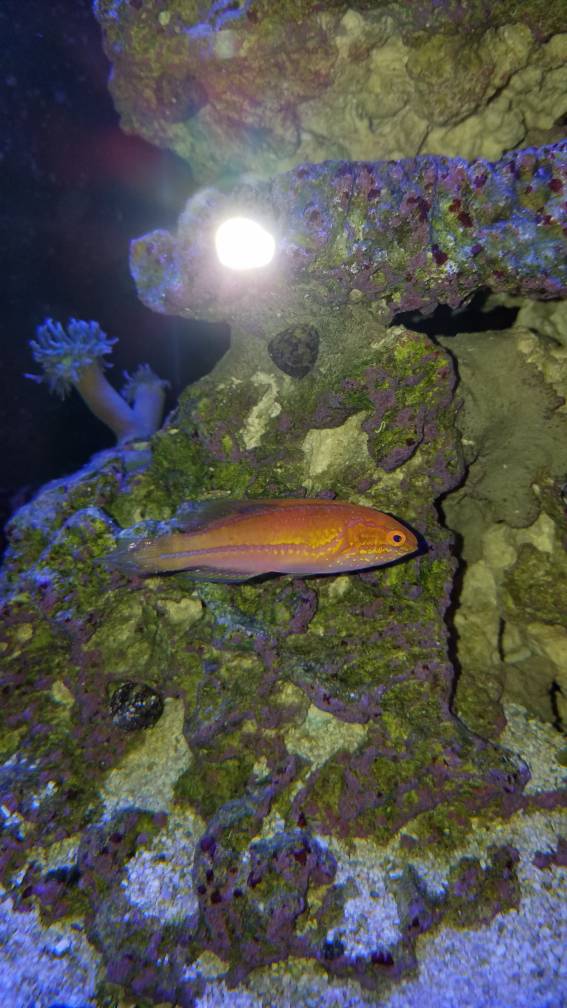
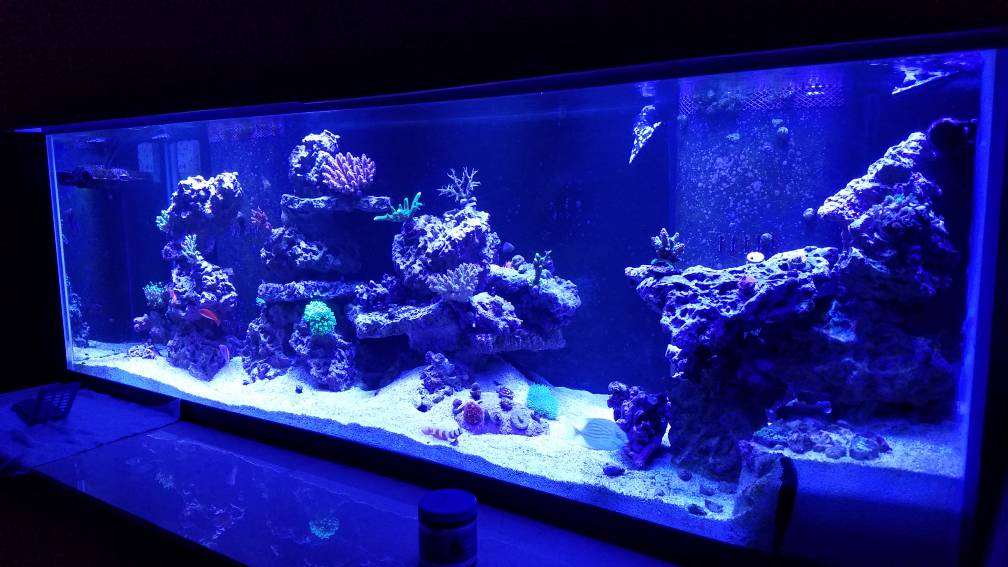
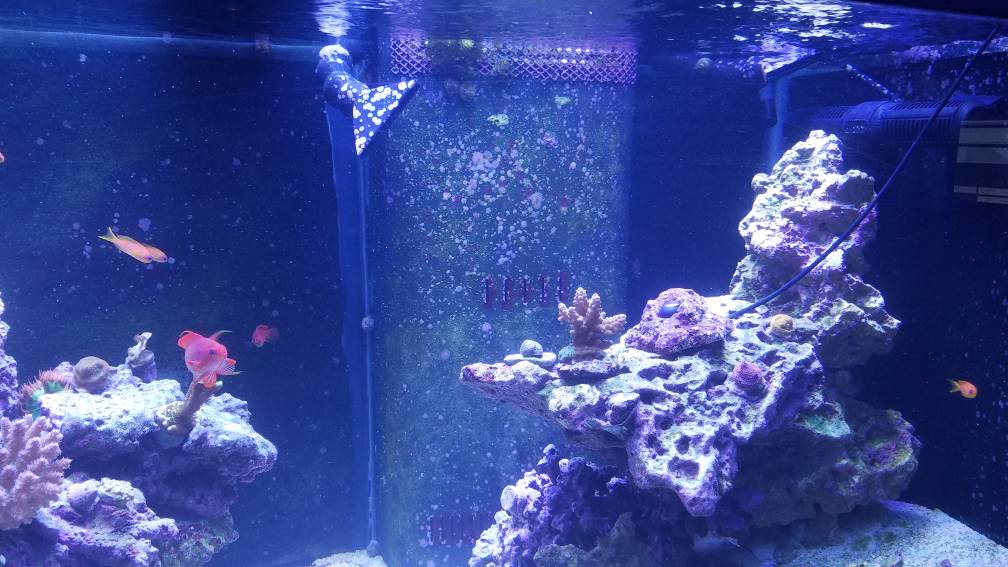
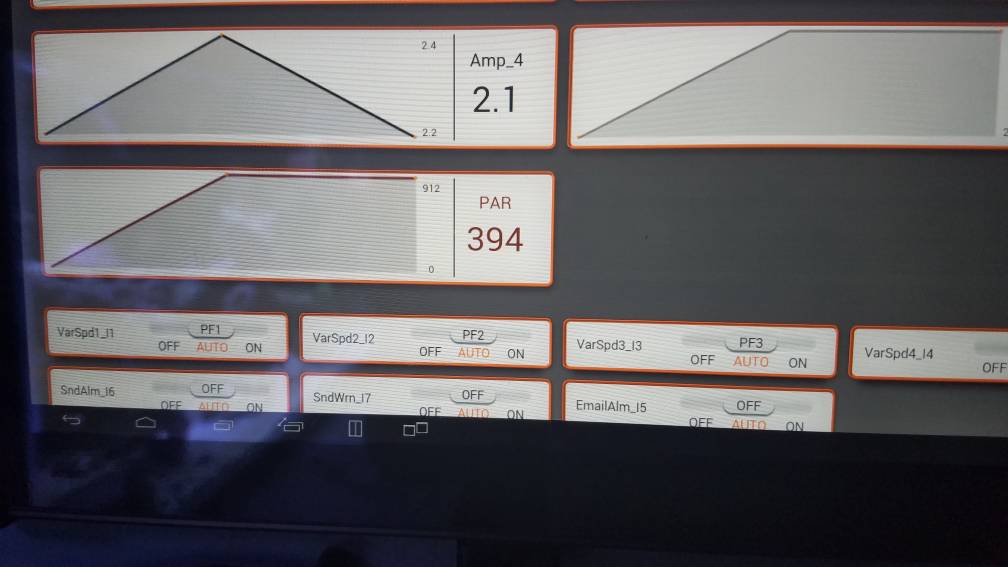
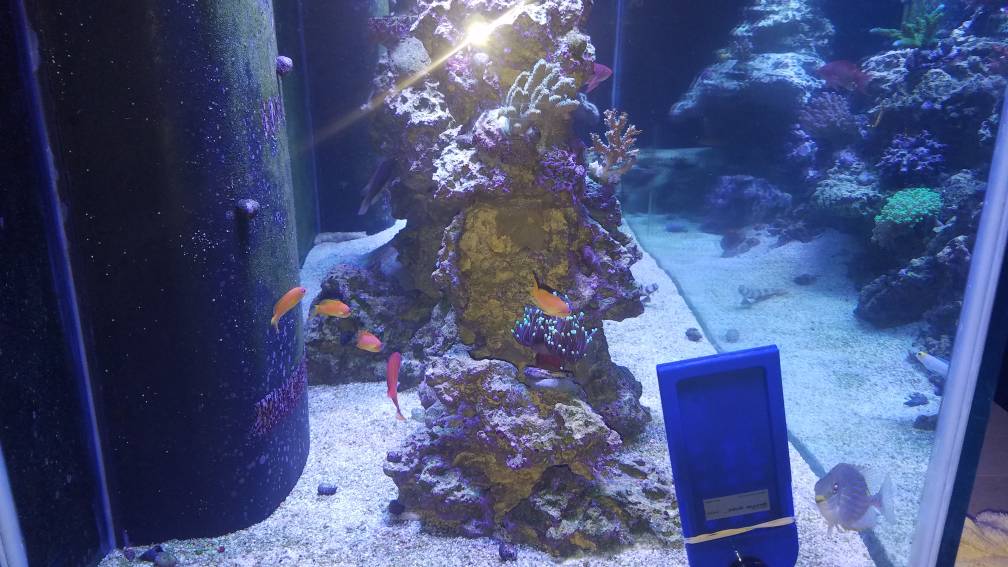
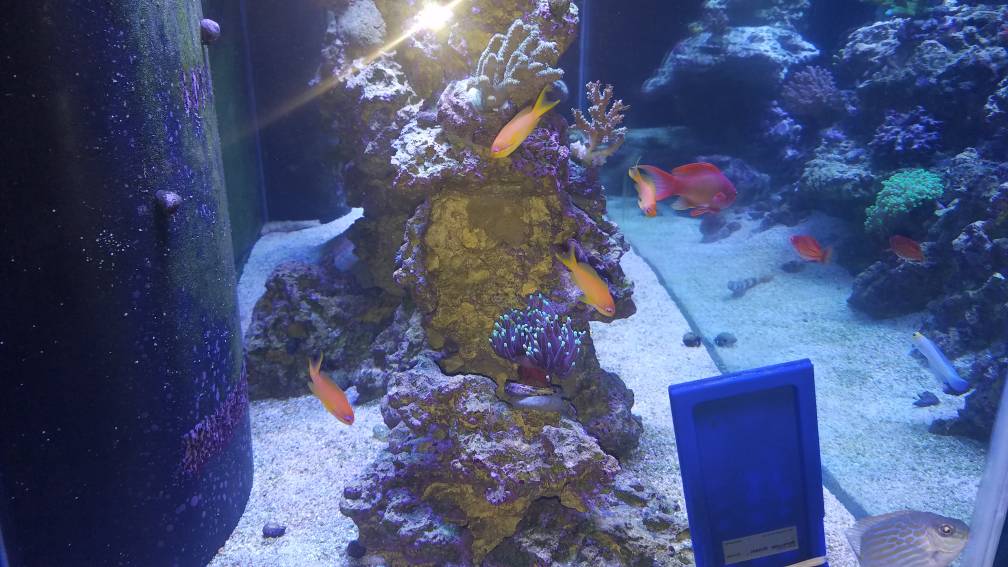
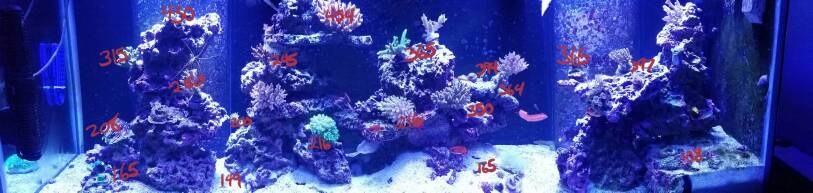
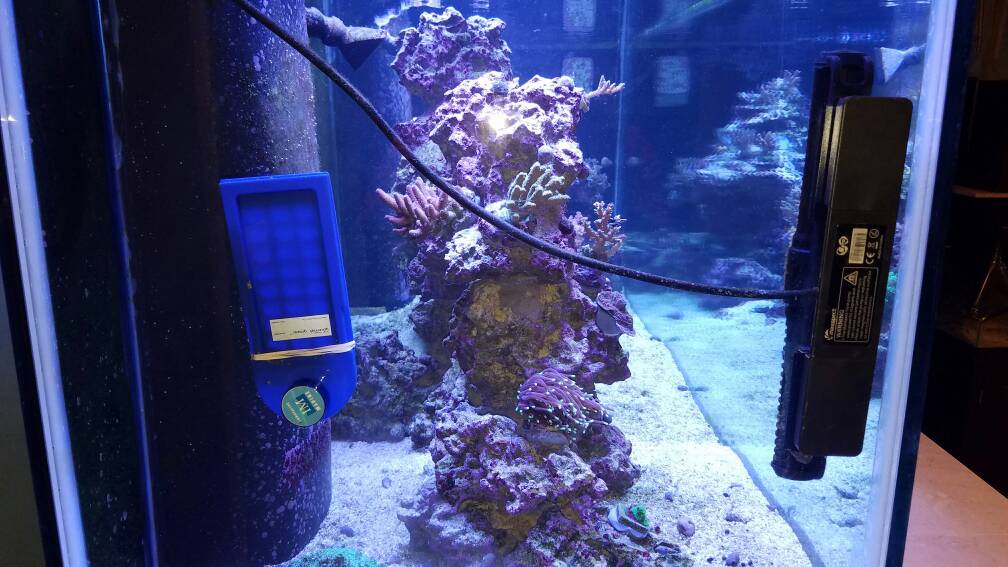
Got a new toy!!! Picked up a Neptune PMK and am going to start doing some par mapping and curves for different parts of the tank. Will also help me dial in my light acclimation for corals in the frag tank. Very excited! I also got the anthias in the tank as you can see in the tank pic, but they'll get a photo shoot later.

Daniel@R2R
Living the Reef Life
View Badges
Staff member
Super Moderator
Reef Squad
Partner Member 2024
Excellence Award
Photo of the Month
Article Contributor
Hospitality Award
Article Administrator
Reef Pumpkin Carver
R2R Secret Santa 2023
My Tank Thread
nice new toy! I want to buy a par meter...some dayGot a new toy!!! Picked up a Neptune PMK and am going to start doing some par mapping and curves for different parts of the tank. Will also help me dial in my light acclimation for corals in the frag tank. Very excited! I also got the anthias in the tank as you can see in the tank pic, but they'll get a photo shoot later.
OP
OP
So far I'm happy with it, I mapped out most of the tank at my current peak. I'm going to ramp it up a bit more after seeing my readings. I'll post what I mapped out, later.nice new toy! I want to buy a par meter...some day
Daniel@R2R
Living the Reef Life
View Badges
Staff member
Super Moderator
Reef Squad
Partner Member 2024
Excellence Award
Photo of the Month
Article Contributor
Hospitality Award
Article Administrator
Reef Pumpkin Carver
R2R Secret Santa 2023
My Tank Thread
looking forward to seeing your par map!So far I'm happy with it, I mapped out most of the tank at my current peak. I'm going to ramp it up a bit more after seeing my readings. I'll post what I mapped out, later.

OP
OP
Did these pictures show up for everyone else? My phone shows x's but my tablet is displaying the picturesGot a new toy!!! Picked up a Neptune PMK and am going to start doing some par mapping and curves for different parts of the tank. Will also help me dial in my light acclimation for corals in the frag tank. Very excited! I also got the anthias in the tank as you can see in the tank pic, but they'll get a photo shoot later.
Photos show up on my PC...
~Bruce
~Bruce
OP
OP
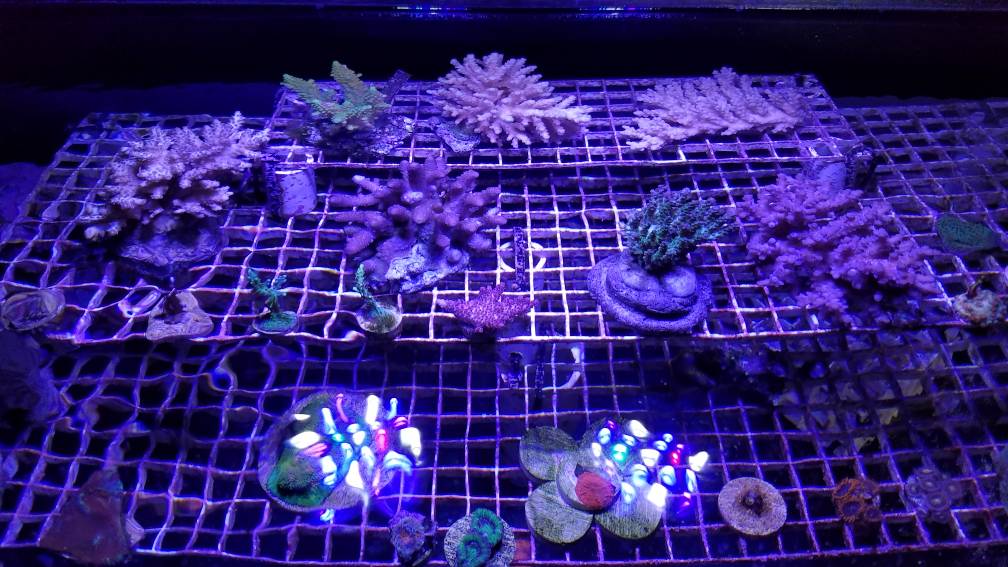
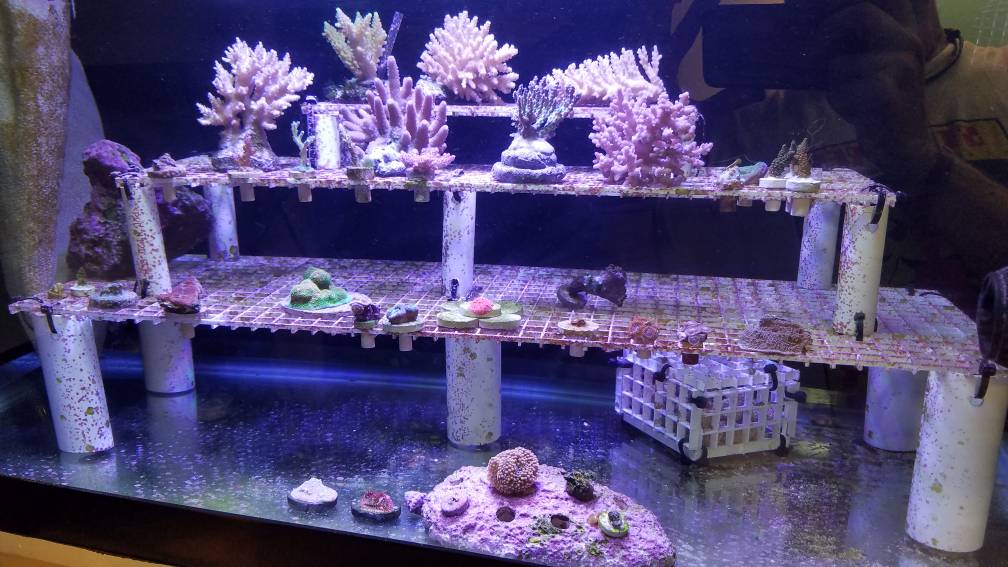
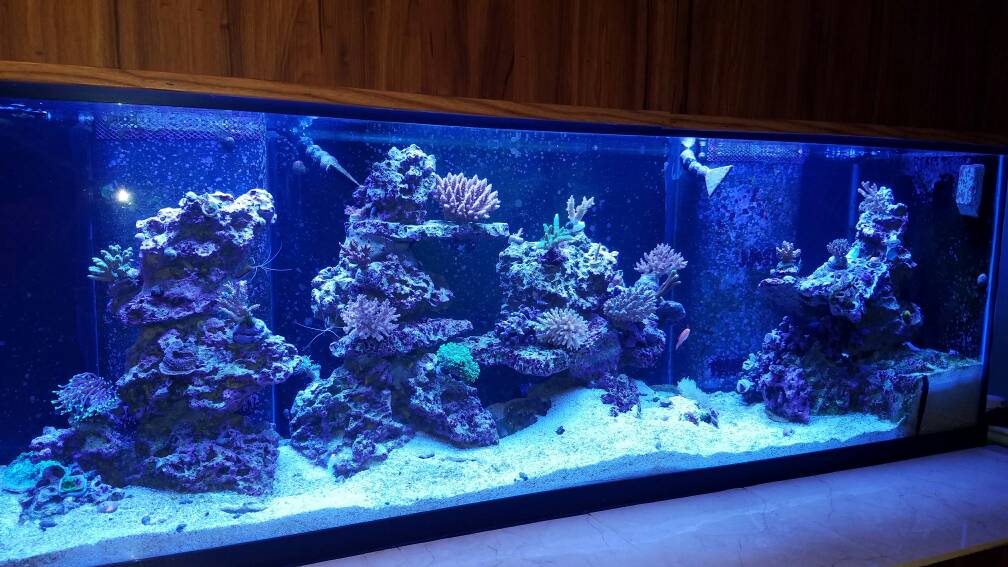
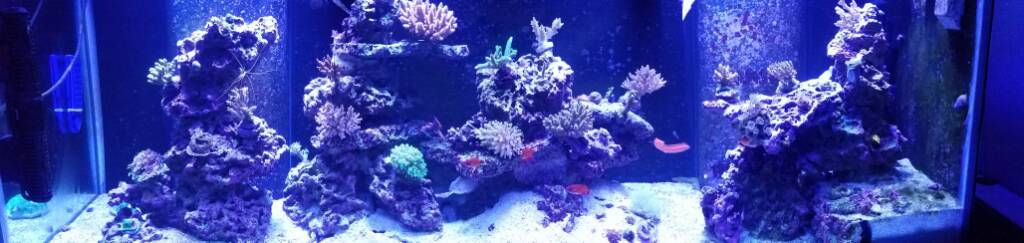
Hey gang! Sorry for the lengthy downtime between posts! Went home to NC for thanksgiving and work was a tad busy around the holidays. Anyways... I transferred BUNCH of stuff from the frag tank to the display today. I was putting it off because epoxying corals is one of the most annoying tasks in the world to me, haha. I did get baseline par readings around peak. I haven't had a chance to do curves yet for the various colonies, but that is on my to do list. Likely not until after christmas, though, because... well.... christmas. It's busy round here. Here's some pics.
Also, the anthias broke out shortly after introduction to the dt despite quarantine and passed very quickly..... nor sure what it was, but the other fish are unaffected... a little dissapointed at that, but alas, I'll try again later and do a longer observation period after the medicated quarantine.
Also, the anthias broke out shortly after introduction to the dt despite quarantine and passed very quickly..... nor sure what it was, but the other fish are unaffected... a little dissapointed at that, but alas, I'll try again later and do a longer observation period after the medicated quarantine.

WoW! about sums it up. Just spent the better part of an hour going thru this entire thread. So much for my my car-washing plans. Great step-by-step documentary of the process and the end result if nothing short of fantastic.
I do have a couple of diverse questions:
1. I did not see much mention of QT for your new fish. With all the time, effort and energy behind this project I’m curious as to why you do not QT your fish. I recently added two tangs who died and I had to evacuate everyone and am the midst of a 76 day fallow period. So I had to ask.
2. I’m impressed with many of your photos and as I’m somewhat of a photography nut I’m interested what what lenses you used? Also regarding white balance on the fish closeups: Did you set up a custom Pre-set WB in the camera settings or are you correcting with post-processing?
Oh, and where in North Jersey are you? gone for many years but a Jersey boy at heart; grew up in West New York.
Thanks for sharing this amazing build thread with the group.
OP
OP
WoW! about sums it up. Just spent the better part of an hour going thru this entire thread. So much for my my car-washing plans. Great step-by-step documentary of the process and the end result if nothing short of fantastic.
I do have a couple of diverse questions:
1. I did not see much mention of QT for your new fish. With all the time, effort and energy behind this project I’m curious as to why you do not QT your fish. I recently added two tangs who died and I had to evacuate everyone and am the midst of a 76 day fallow period. So I had to ask.
2. I’m impressed with many of your photos and as I’m somewhat of a photography nut I’m interested what what lenses you used? Also regarding white balance on the fish closeups: Did you set up a custom Pre-set WB in the camera settings or are you correcting with post-processing?
Oh, and where in North Jersey are you? gone for many years but a Jersey boy at heart; grew up in West New York.
Thanks for sharing this amazing build thread with the group.
Thanks for the compliments, PeterG! I suppose I don't go much into my qt protocol here, but I do qt my fish. Let me detail it here.....
My qt setup consists of 2 tanks. A 40 breeder hospital tank for new intake and a 55 gallon plumbed into the frag stack system with a bypass valve. New fish go into the qt system and get a full run of prazi immediately since pretty much everything comes in wormy, now. Things remain in qt for approximately 4 weeks of observation and will recieve further medication if necessary (showing symptoms). I don't really like to prophylacticly medicate the fishes with copper, with the exception of some of the more disease prone fish (I'm looking at you anthias). Now, I also keep a fully stocked medicine box that contains my shotgun antibiotics (kana, metro, and furan) if I see things looking bacterial and copper for other externals, formalin, and copper. I also keep kick ich and rally on hand. Why, you may ask? Well, their effectiveness in treating a full reef is debateable, however, added to a bath before qt, they can be a great preventative (this is something new I've been doing and am really happy with it, so far).
After fish clear the hospital tank, I close the valve on the normally open 55 gallon tank to close the tank (and the held water) in the tank. The fish are then transfered from the hospital to this observational qt tank that is full of tank water. Fish will remain here until I am satisfied with their eating habits, girth, and acclimation to captivity. This can range from a week to a month. This also allows me the opportunity to observe for any late developing disease symptoms. Also, water changes here are shared with the main display system. I will drain water from this tank and then open the feed valve from the frag tank to feed more water in from the display system, ensuring the fish remains acclimated to the system parameters making the introduction to the display more stress free.
Corals don't get the same kind of depth in their qt. They get a revive dip and sometimes a Bayer dip. They then go to the frag tank spaced well away from the other corals for observation. If after a few weeks, I see no predators of parasites, they will either go to the display or remain for growout in the frag system.
On my photos, it's kind of a mix. Some of my stuff is taken using my phone with flash on for the fish (flash is a must for fish pictures) while others were with my rebel t6i using an ef 75-300 or an ef 18-55. Some of the white balance can be corrected for in post, but if you use a flash, you likely won't need much. Fish color unlike corals present best in white light, so the flash really highlights it. This doesn't work for corals, though. They look like crap with flash. For them use an aperture priority setting and use the digital display to play with other settings until you get something you like then it's all post magic. I'm not good at said post magic, so my coral photos are "eh". I'm handy with a camera, but no expert by any means. Heres where I get most of my info from....
https://www.reef2reef.com/threads/your-guide-to-aquarium-photography-1-getting-the-basics.310349/
I'm not a native New Jerseyan, actually being from the mountains of western north carolina originally, but I live up in the jersey highlands now in west milford. Moved up about 7 years back.
I need to do an update. I have some DIY wizardry I need to share. Look for an update in the next day or 2! I also owe yall some pics of the qt setup, now. Look for those later!
Thanks for the speedy reply. Your QT process seems well thought out and way more advanced then most of the info I've read here. I'm fairly new to this hobby and had to run out and buy a 20 gal QT when my tangs died and my other fish started showing symptoms. Still got the survivors in the Qt with copper for another couple weeks. Then probably gonna have to get another small tank to hold them til my 90 gal DT goes thru its 76 day fallow period. My heads spinning; will have to look up things like Kana, Metro, Furan etc.
Thought about using off camera flash on my fish but didn't want to freak them out. I've got a bunch of Nikkor prime lenses including a couple of micros but was unsure about the WB. Thanks for the link to the photog site. Will definitely check it out; no sense in reinventing the wheel but I'll probably do some more playing around with natural light and post. Adobe Lightroom has really robust color correction features.
West Milford: when I was growing up we considered that "the country". Had a girlfriend once from Cashiers, NC and got to spend some time in that area. Beautiful.

OP
OP
Thanks for the speedy reply. Your QT process seems well thought out and way more advanced then most of the info I've read here. I'm fairly new to this hobby and had to run out and buy a 20 gal QT when my tangs died and my other fish started showing symptoms. Still got the survivors in the Qt with copper for another couple weeks. Then probably gonna have to get another small tank to hold them til my 90 gal DT goes thru its 76 day fallow period. My heads spinning; will have to look up things like Kana, Metro, Furan etc.
Thought about using off camera flash on my fish but didn't want to freak them out. I've got a bunch of Nikkor prime lenses including a couple of micros but was unsure about the WB. Thanks for the link to the photog site. Will definitely check it out; no sense in reinventing the wheel but I'll probably do some more playing around with natural light and post. Adobe Lightroom has really robust color correction features.
West Milford: when I was growing up we considered that "the country". Had a girlfriend once from Cashiers, NC and got to spend some time in that area. Beautiful.
Yeah, sorry i wasn't more help on the camera front. I've only recently gotten into the photography game as i got my rebel last year at christmas. I'm not super well versed in it all yet.
I've definitely been in your situation with the outbreak. Can be super stressful. Make sure everybody is well fed in qt. The fishes natural immune system is our greatest ally in treatment.
OP
OP
Ok, gang, here goes my newest big update! I have been running the 2 phosban reactors for my media (GFO and carbon) but to hold the 2.5 cups of media I need for my system volume, the chambers were almost completely full and had very little room to tumble. Also, if I ever need to run extra carbon, there's not really a good way to do it. So, I decided I needed new media reactors that were much larger. I then looked at the price of large upflow media reactors and found the price to be a little above my budget... especially for what is essentially a pipe in a pipe. So then I grabbed a pen and paper and did some sketches and set out to Lowes. The following is my Journey.......
So, for all real purposes, an upflow reactor is very simple in concept. A pipe carries water from a pump to the bottom of a reaction chamber where it passes upwards through the media before exiting the chamber and returning to the sump (or next reactor or wherever you want, really. The floor is a bad choice, but to each their own.) I knew I needed a longer chamber than the 11 or so inches of the phosban reactor, but I also wanted a larger diameter as well. I found on the phosban reactors that in order to keep the media from compacting on the top sponge or blowing out into the filter sock, the flow rate had to be reduced to a trickle. This was not nearly enough filtration going on. So, with a larger diameter chamber, I should be able to up the flow rate and still not force everything out (This is for the GFO and Biopellets, as the carbon won't be tumbling, but I did still want more flow rate through the carbon, as well.) I debated heavily over whether to go with 4" or 3" PVC, but made up my mind when I saw how much 4" PVC fittings cost. I decided I would just make a taller reactor but a little narrower.
So, supplies were gathered...

What you're going to need here, is as follows........ (A few things are missing in the photo due to changes as I went, but it's mostly there)
Materials
-3" PVC Pipe or acrylic tube. (Choose your length based on the volume you need. Mine are about 18" to 24") (I did both materials as you'll see in later photos, but 3" acrylic tube can be found fairly cheaply. if you're going for fluidized media, you'll want acrylic. I'm going to use the PVC one for carbon since it doesn't have to tumble and the GFO and biopellets in acrylic so I can dial in the flow rate/tumble)
-1/2" PVC pipe (the length you want your reactor plus about a foot for nibs to connect fittings)
-3x 1/2" PVC Solvent union
-2x 1/2" Male adapter
-1/2" Female thread x solvent 90 degree elbow
-3x 1/2" Female thread to solvent adapter
-2x 1/2"Male thread to 1/2" hose barb adapter
-3" cleanout cap
-3" solvent cap (flat one. if you use the round one, you'll need to use a flange of some kind to steady the setup)
-3" cleanout adapter
-3" Male to solvent adapter
-3" Female to solvent adapter
-Cross stitch canvas (A Plastic mesh you can get at craft stores) in size 10 or 14 mesh. 10 works for biopellets or paired with sponge for carbon and GFO. 14 is small enough for gfo but does restrict flow)
-1/8" Acrylic sheet (The little 6 inch one is fine if you're careful)
Tools(Necessary)
-PVC Cement and primer (Essential tool for anyone who likes to transport water)
-Adjustable wrenches or...
-Channel lock pliers
-Razor blade
-1/2" Tap kit (1/2" tap and I believe a 22/32" bit. you can get this as a kit, though)
-Several smaller drill bits to step up to the big one from
-Teflon tape
-Saw for PVC (Pipe saw or hack saw)
-Ruler
-Beer. Or whiskey. I'll let wine slide, too, if that's your thing. In absence of all else, substitute cup of skimmate (It puts hair on your chest)
Tools(Helpful, but not necessary)
-Vise
-Dremel
-PVC Cutter
-Silicone (for one pesky joint that likes to leak.....)
Now that you have your stuff, lets start slapping it all together!!!!
First, cut your main PVC to length. then you will glue on your bottom which is the 3" PVC cap using primer and solvent. The trick with getting good adhesion with PVC cement is to push and twist (in one direction only, not back and forth) and then hold it in place a few seconds. PVC will actually push back out some if you don't keep pressure on it. you should have something like this......

Next, you'll attach the 3" female adapter to the top of your chamber.

The next step is the hardest part. There is no premade way to pass through the top of this contraption, so we will be modifying a 3" cleanout cap to accept a threaded fitting and become a weird bulkhead of sorts. So, take your cap and you will see the raised square on top. What you need to do is find the EXACT center of this square. (if it is off by more than a fraction of a fraction of an inch, you will be buying another cap. I went through 3 before i got this right the first time. I would recommend picking up atleast 2 of these as this is such a touchy thing.) Now with the center marked, take your small drill bit and go right through the middle. Then step up to the next size. Then again. Then go with the big fella. The smaller holes help keep your next holes centered as you go up. This is the step where a vise comes in handy. If you use one, protect the threads with rubber or another material while it's clamped or it will be garbage.


Now you'll need to tap this hole to add threads. This process is fairly easy, but you need to make sure the tap is straight or you'll have your fitting go in at an angle and it wont fit in the next step. Tap it down then back it out and you'll now have threads!


Through this newly minted hole, you will be threading a 1/2" male to solvent adapter. Unfortunately, you're going to do this through the inside. Yeah.... in that little square... I know, and I'm sorry, but after this the rest is easy! Chin up! So here's the problem. These fittings are just a hair too big for this hole. If you have a dremel or a disk sander, though, your in luck! The part that is too big is the edges for a wrench to grip the fitting. Theres no way a wrench is getting in there, so we're taking them off and making this bad boy round on the outside! (You may also have to sand/dremel the inside edges of the square as it gets narrower at the top. some of my caps needed this, some didn't. Just a shaving is all it takes, if it does need this step). Since we rounded our fitting we need to get creative to screw it it. I tried reasoning with it, but the fitting would not do this on it's own, so, i got out a piece of 1/2" pvc and shoved it inside and used that to turn it. ALSO, almost forgot... Teflon tape the threads first. This thing is hard to remove if you need to once it's screwed in.


So, now you have this 4 turn or so nub of thread passing through the top. Remember in the supplies section i mentioned a pesky joint and silicone. It'll be this one. You will be screwing the 90 degree elbow onto this piece. Now, on some of these, teflon tape was enough to seal the joint, but on one, i had to add silicone to the threads. Since there isn't a ton to grip here, it can be a tough one to seal. Screw the elbow down to the top of the cap and the pressure of this tightening will help seal the threads.

By this point, my hand was in rough shape, but, remember you have a beer! (Or you SHOULD, it's in the required supplies!!!!!) and you should proudly sip, because your about halfway done and past the hard part!
Now you can assemble the cap portion. The cleanout cap will screw (with teflon tape) into the cleanout adapter. The cleanout adapter will get glued into the 3" male to solvent adapter. You should have something like this...

Now you've got your chamber! How cool is that!?!
Ok, you're not done yet. Stop celebrating. Ok, well celebrate a little more but then back to it!
Next we need our outlet hole. So, you guessed it, we're tapping again. This time, the placement is less precise, though. You'll want the hole to be on the 3" solvent to female adapter and you'll want it to be where the acrylic and pvc overlap completely to give the fitting more to grip. You'll follow the same process as earlier. The curved surface is intimidating, but it will hold if you do it correctly.

Pardon my messy workbench.... So into this hole, you will screw (With teflon tape. There's a pattern here) a 1/2" male to solvent adapter. make it snug to the pvc and it will hold well.

Ok, now my workbench is really messy. Always make sure to close jars when you're not using them.....

Almost done, gang!!! Next we're making the inlet and outlets which are identical. From the fittings, glue in pvc nubs and then glue the unions to the other side of said nubs. Then another nub with a solvent to female thread. Last, screw in your hose barb adapters and you're set on all the outside pieces!!! This is what you should be looking at.... except hopefully with less purple junk spilled on it. (Also sans inside pipe..... which we're about to get to.)

Inside you will need your pipe to the bottom. I like to have a union in there to make it a little less cumbersome when changing media. So, what you need to do is take your long piece of 1/2" pvc and glue it into the fitting you so lovingly carved into the roof of your reactor earlier (Isn't it cool that it's complete enough to call it a reactor now? I'll let you bask in that for a minute. ok. Back to work). Now you need to cut that piece for your union. go just below the threads of your cap piece and glue in your union, like so.....

Now glue enough pvc to get you near, but not touching the bottom of the reactor chamber. The remaining 1/2" pieces will go at the bottom of this to sandwich the diffuser plate and mesh. I'll detail that tomorrow, but, your reactor is almost done! Here's what she'll end up looking like in the end.....

Thats a half gallon of biopellets and the beer can is there for scale.
I need to go to bed now before the delirium sets in, but i'll detail the diffuser plate tomorrow! Thanks for reading and hope you enjoy!

So, for all real purposes, an upflow reactor is very simple in concept. A pipe carries water from a pump to the bottom of a reaction chamber where it passes upwards through the media before exiting the chamber and returning to the sump (or next reactor or wherever you want, really. The floor is a bad choice, but to each their own.) I knew I needed a longer chamber than the 11 or so inches of the phosban reactor, but I also wanted a larger diameter as well. I found on the phosban reactors that in order to keep the media from compacting on the top sponge or blowing out into the filter sock, the flow rate had to be reduced to a trickle. This was not nearly enough filtration going on. So, with a larger diameter chamber, I should be able to up the flow rate and still not force everything out (This is for the GFO and Biopellets, as the carbon won't be tumbling, but I did still want more flow rate through the carbon, as well.) I debated heavily over whether to go with 4" or 3" PVC, but made up my mind when I saw how much 4" PVC fittings cost. I decided I would just make a taller reactor but a little narrower.
So, supplies were gathered...
What you're going to need here, is as follows........ (A few things are missing in the photo due to changes as I went, but it's mostly there)
Materials
-3" PVC Pipe or acrylic tube. (Choose your length based on the volume you need. Mine are about 18" to 24") (I did both materials as you'll see in later photos, but 3" acrylic tube can be found fairly cheaply. if you're going for fluidized media, you'll want acrylic. I'm going to use the PVC one for carbon since it doesn't have to tumble and the GFO and biopellets in acrylic so I can dial in the flow rate/tumble)
-1/2" PVC pipe (the length you want your reactor plus about a foot for nibs to connect fittings)
-3x 1/2" PVC Solvent union
-2x 1/2" Male adapter
-1/2" Female thread x solvent 90 degree elbow
-3x 1/2" Female thread to solvent adapter
-2x 1/2"Male thread to 1/2" hose barb adapter
-3" cleanout cap
-3" solvent cap (flat one. if you use the round one, you'll need to use a flange of some kind to steady the setup)
-3" cleanout adapter
-3" Male to solvent adapter
-3" Female to solvent adapter
-Cross stitch canvas (A Plastic mesh you can get at craft stores) in size 10 or 14 mesh. 10 works for biopellets or paired with sponge for carbon and GFO. 14 is small enough for gfo but does restrict flow)
-1/8" Acrylic sheet (The little 6 inch one is fine if you're careful)
Tools(Necessary)
-PVC Cement and primer (Essential tool for anyone who likes to transport water)
-Adjustable wrenches or...
-Channel lock pliers
-Razor blade
-1/2" Tap kit (1/2" tap and I believe a 22/32" bit. you can get this as a kit, though)
-Several smaller drill bits to step up to the big one from
-Teflon tape
-Saw for PVC (Pipe saw or hack saw)
-Ruler
-Beer. Or whiskey. I'll let wine slide, too, if that's your thing. In absence of all else, substitute cup of skimmate (It puts hair on your chest)
Tools(Helpful, but not necessary)
-Vise
-Dremel
-PVC Cutter
-Silicone (for one pesky joint that likes to leak.....)
Now that you have your stuff, lets start slapping it all together!!!!
First, cut your main PVC to length. then you will glue on your bottom which is the 3" PVC cap using primer and solvent. The trick with getting good adhesion with PVC cement is to push and twist (in one direction only, not back and forth) and then hold it in place a few seconds. PVC will actually push back out some if you don't keep pressure on it. you should have something like this......
Next, you'll attach the 3" female adapter to the top of your chamber.
The next step is the hardest part. There is no premade way to pass through the top of this contraption, so we will be modifying a 3" cleanout cap to accept a threaded fitting and become a weird bulkhead of sorts. So, take your cap and you will see the raised square on top. What you need to do is find the EXACT center of this square. (if it is off by more than a fraction of a fraction of an inch, you will be buying another cap. I went through 3 before i got this right the first time. I would recommend picking up atleast 2 of these as this is such a touchy thing.) Now with the center marked, take your small drill bit and go right through the middle. Then step up to the next size. Then again. Then go with the big fella. The smaller holes help keep your next holes centered as you go up. This is the step where a vise comes in handy. If you use one, protect the threads with rubber or another material while it's clamped or it will be garbage.
Now you'll need to tap this hole to add threads. This process is fairly easy, but you need to make sure the tap is straight or you'll have your fitting go in at an angle and it wont fit in the next step. Tap it down then back it out and you'll now have threads!
Through this newly minted hole, you will be threading a 1/2" male to solvent adapter. Unfortunately, you're going to do this through the inside. Yeah.... in that little square... I know, and I'm sorry, but after this the rest is easy! Chin up! So here's the problem. These fittings are just a hair too big for this hole. If you have a dremel or a disk sander, though, your in luck! The part that is too big is the edges for a wrench to grip the fitting. Theres no way a wrench is getting in there, so we're taking them off and making this bad boy round on the outside! (You may also have to sand/dremel the inside edges of the square as it gets narrower at the top. some of my caps needed this, some didn't. Just a shaving is all it takes, if it does need this step). Since we rounded our fitting we need to get creative to screw it it. I tried reasoning with it, but the fitting would not do this on it's own, so, i got out a piece of 1/2" pvc and shoved it inside and used that to turn it. ALSO, almost forgot... Teflon tape the threads first. This thing is hard to remove if you need to once it's screwed in.
So, now you have this 4 turn or so nub of thread passing through the top. Remember in the supplies section i mentioned a pesky joint and silicone. It'll be this one. You will be screwing the 90 degree elbow onto this piece. Now, on some of these, teflon tape was enough to seal the joint, but on one, i had to add silicone to the threads. Since there isn't a ton to grip here, it can be a tough one to seal. Screw the elbow down to the top of the cap and the pressure of this tightening will help seal the threads.
By this point, my hand was in rough shape, but, remember you have a beer! (Or you SHOULD, it's in the required supplies!!!!!) and you should proudly sip, because your about halfway done and past the hard part!
Now you can assemble the cap portion. The cleanout cap will screw (with teflon tape) into the cleanout adapter. The cleanout adapter will get glued into the 3" male to solvent adapter. You should have something like this...
Now you've got your chamber! How cool is that!?!
Ok, you're not done yet. Stop celebrating. Ok, well celebrate a little more but then back to it!
Next we need our outlet hole. So, you guessed it, we're tapping again. This time, the placement is less precise, though. You'll want the hole to be on the 3" solvent to female adapter and you'll want it to be where the acrylic and pvc overlap completely to give the fitting more to grip. You'll follow the same process as earlier. The curved surface is intimidating, but it will hold if you do it correctly.
Pardon my messy workbench.... So into this hole, you will screw (With teflon tape. There's a pattern here) a 1/2" male to solvent adapter. make it snug to the pvc and it will hold well.
Ok, now my workbench is really messy. Always make sure to close jars when you're not using them.....
Almost done, gang!!! Next we're making the inlet and outlets which are identical. From the fittings, glue in pvc nubs and then glue the unions to the other side of said nubs. Then another nub with a solvent to female thread. Last, screw in your hose barb adapters and you're set on all the outside pieces!!! This is what you should be looking at.... except hopefully with less purple junk spilled on it. (Also sans inside pipe..... which we're about to get to.)
Inside you will need your pipe to the bottom. I like to have a union in there to make it a little less cumbersome when changing media. So, what you need to do is take your long piece of 1/2" pvc and glue it into the fitting you so lovingly carved into the roof of your reactor earlier (Isn't it cool that it's complete enough to call it a reactor now? I'll let you bask in that for a minute. ok. Back to work). Now you need to cut that piece for your union. go just below the threads of your cap piece and glue in your union, like so.....
Now glue enough pvc to get you near, but not touching the bottom of the reactor chamber. The remaining 1/2" pieces will go at the bottom of this to sandwich the diffuser plate and mesh. I'll detail that tomorrow, but, your reactor is almost done! Here's what she'll end up looking like in the end.....
Thats a half gallon of biopellets and the beer can is there for scale.
I need to go to bed now before the delirium sets in, but i'll detail the diffuser plate tomorrow! Thanks for reading and hope you enjoy!
Similar threads

- Replies
- 2
- Views
- 104
- Replies
- 1
- Views
- 103
- Replies
- 4
- Views
- 138


