Teton Reef - 175-Gallon Build Thread

OP
OP
thewalkingdad

thewalkingdad

Active Member
View Badges
Joined
Aug 17, 2019
Messages
214
Reaction score
290
Location
Idaho Falls, ID
Rating - 0%
0   0   0
Today I finished my third drain pipe, which is my emergency bean animal pipe. I also began plumbing my two return lines along with their accompanying UV sterilizers. There are a few problems I still need to figure out before I can finish the hard plumbing. Let me know if you can see the issues.

IMG_20200811_215755.jpg


I also got a few things in the mail as well. Now only if I could find a battery backup and a spare wetside.

IMG_20200811_161155.jpg
 
OP
OP
thewalkingdad

thewalkingdad

Active Member
View Badges
Joined
Aug 17, 2019
Messages
214
Reaction score
290
Location
Idaho Falls, ID
Rating - 0%
0   0   0
Quick mid-day update. I had a few minutes of a break during lunch and decided to install a waterproof outlet cover over my outlets. I think the chances of having something drip in that outlet were pretty low, but I'd rather be safe than sorry. Especially when considering how cheap outlet covers are and how easy they are to install. I like the idea of being safe and not causing problems. A safe reefer is a ........still a poor reefer?

IMG_20200812_132858.jpg
 
OP
OP
thewalkingdad

thewalkingdad

Active Member
View Badges
Joined
Aug 17, 2019
Messages
214
Reaction score
290
Location
Idaho Falls, ID
Rating - 0%
0   0   0
I finished the wall plumbing on my of my return lines. It was the trickier of the two, so I'm glad it's done. If you look at the top of the picture, I had to plumb around one of the floor supports in the ceiling. I almost had enough clearance, but oh well. It was also tricky because of how many 90* angles I needed in order to connect it to the pipe come down from the ceiling. With all of those bends, it will create some more head pressure. Good thing that is the pump that I need on a lower setting anyway. I used a few more pipe hangar straps to help take some of the weight off of the UV sterilizer units and the brackets holding them up. I don't know what the tolerance is for those, but I figured I might as well be extra secure.

IMG_20200812_215550.jpg


Tomorrow, I should be getting the last fitting I need to finish off my last return line. I should also be getting a few other pieces that will allow me to finish the plumbing that will connect my return pumps to the wall plumbing.

At some point, I really need to leak test the UV sterilizers. Probably this weekend.

I've also started looking at fish, which is a super exciting milestone. I don't have my QT setup done yet, but if I bought a fish, it would force me to set that up. That way, a couple of fish could be going through their time in QT while I finish the rest of the build. It's not critical to overlap those, but it would certainly be nice.
 
OP
OP
thewalkingdad

thewalkingdad

Active Member
View Badges
Joined
Aug 17, 2019
Messages
214
Reaction score
290
Location
Idaho Falls, ID
Rating - 0%
0   0   0
I'm almost done with the hard plumbing of the fish room and I can't believe it. Maybe because I feel so high from all of the plumber's primer and cement. Man, that stuff stinks.

All I have left to do on the plumbing is to just connect the second return pump to its corresponding piping on the wall. It should only take a few cuts and lots of gluing pieces together, but it shouldn't take too long. They aren't shown here, but I will use more pipe hangar straps to help secure the portion of the piping where the gate valve and flow sensor is located. That area of piping isn't supported very well and I'd like to firm that up. I'll do the same for the second return pump as well. After that, I either get to drill my sump and skimmer or drill my RO storage container.

IMG_20200813_230820.jpg


Also, I finally hooked up my second Triple TDS meter. Seems overkill since the only thing you really care about is the number coming out of the DI resin, but I am curious about the impact that all of the other areas of the RO/DI have on the water. It might also help me know when I need to change something. I had one extra TDS meter to I tapped that into my wastewater. It is a complete waste of a TDS meter, but it will be interesting to see what the TDS is coming out of my wastewater line.

IMG_20200813_140204.jpg
 
OP
OP
thewalkingdad

thewalkingdad

Active Member
View Badges
Joined
Aug 17, 2019
Messages
214
Reaction score
290
Location
Idaho Falls, ID
Rating - 0%
0   0   0
Well, I thought the plumbing was done, but I realized there were a few issues with it. The return pumps can't create their own suction, so going over the top wouldn't work because the pumps would never be primed. This means I needed to drill the sump. I've wanted to avoid doing that because I didn't want to screw it up. But I ended up drilling anyways and I don't think I screwed it up.

I procrastinated fixing the plumbing, mostly because I was plumb'd out and I hate plumbing to begin with. So I moved on to installing the water controller and ATO. I was able to get both set up, but haven't plugged either in yet. The water controller was a bit difficult because the mounting bracket they send you is garbage if you're looking to install it in a large storage container.

Thankfully, I had to 3/4" pipe available. I drilled some holes in that and mounting the brackets onto that pipe. This gave me more distance in between the two float switches. I drilled a hole in one of the storage caps. I made it just large enough in diameter to fit pretty much just the pipe and the cables. This pipe now rests on the bottom of the storage container in a small divot. It keeps it straight and should work fine.

IMG_20200819_214038.jpg


As part of the ATO install, I drilled two holes in the remaining cap from the RO container. I dropped the pump in there and fed the RO line and cords through the holes then screwed on the cap. This should help keep everything in place while reducing evaporation.

IMG_20200820_200057.jpg


IMG_20200820_212820.jpg


Since I now have an endless water supply connected to my RO container, I knew I needed to ensure I had a triple-redundant system to protect my house from flooding. One, I don't know how often I will just leave the water turned on at the pipe. I have the booster pump, but that makes too much noise for me, so it's easier to just turn the whole unit, including the water line off. This might defeat the purpose of the water controller, but kind of not. Then, when I am making water, the water controller should use the two float switches to determine if it needs water or not. If those two sensors fail, then I have a float switch inside the barrel. I also have the pressure switch on the RO/DI unit. I've tested those out and they function properly. Also, I have a gravity-fed overflow drain on the barrel so if all of my backups fail, the water will drain out the side of the barrel down my sink drain. I haven't tested this yet, but will soon. Excuse my caulking job, I didn't have a good angle and just wanted a seal. Note, I used GE Silicone I on this.

IMG_20200821_231642.jpg


Now, with the ATO, I trust that it is a pretty reliable unit, so I felt comfortable with most of the precautions is has in place to prevent flooding (1 float sensor, 1 optical eye, 10 min timer, and an alarm). That being said, I still wanted more. I drilled a hole in the back of the sump and installed another float switch. Since I was connecting my sump to a nearly endless supply of water, I wanted to be extra careful.

IMG_20200823_201557.jpg


I also installed a carbon monoxide and smoke detector in the room. It has a 10-year battery and it can't be changed out. We'll see how long that lasts, but probably not 10 full years.

IMG_20200820_213321.jpg


I needed to finish my install of connecting my skimmer to my CO2 scrubber. I finally got the last connector piece I needed. The CO2 scrubber will also be connected to an electric gate valve. So depending on the pH, it will either open and close to let the skimmer air recirculate through the CO2 scrubber. If it the pH gets too high, it will pull in outside (fish room) air. If the pH is low, it will recirculate the air through the CO2 scrubber. I'm hoping this leads to a higher and more stable pH while also reducing how much CO2 media I'm using.

I had to drill a hole in the top of my auto neck cleaner on the skimmer and install the barbed end. It's not airtight, but I don't think it needs to be since there are a dozen other holes on top already.

IMG_20200821_231657.jpg


IMG_20200821_232358.jpg


On to drilling the sump. I was super nervous to drill the sump to make room for the inlets of the return pumps. In the end, it wasn't as big of a deal as I was thinking and the holes came out fine. I haven't put water through them, so who knows, they might really suck. But they look like they will hold. I also glued in a strainer on each bulkhead. I don't need a snail messing up my return pumps.

IMG_20200823_195746.jpg


Then I connected my return pumps to the sump. I used the braided nylon tubes because I want to try to cut down on vibration noise. We'll see if that actually works. This is also where I had to reconfigure some of the pipe from the return pump back up through the UV sterilizers. The good news is, I was able to cut out all of the 90* angles from the inlets and even one 90* angle on one of the outlets.

IMG_20200823_204844.jpg


My other main concern with my setup is that I will have about 185 gallons up top in the DT and I have a ton of piping throughout. My concern here was that there would be so much water in the system that if my power went out or if I otherwise turned off the return pumps, my sump wouldn't be able to hold all of the water. This is only a concern, I haven't tested any of this yet. Either way, since I have so much water in the system and a relatively small sump as well as a limitless supply of water connected to my sump, I needed some other kind of safety mechanism.

I drilled another hole in the back of my sump in the skimmer chamber. I put in a bulkhead and use some of my extra 1" piping to create a gravity-fed overflow down to my utility sink. This should help prevent my sump from ever overflowing. With this installed, by next concern is that I don't want this overflow to be activated after every time I turn off my return pumps. That would be a lot of wasted saltwater. But I won't really know how it all performs until I start throwing water through the system, but that's when I can fine-tune everything...hopefully.

IMG_20200823_162616.jpg


IMG_20200823_215717.jpg


A few other things I worked on was installing check valves on each of my return pumps. I know ahead of time that these things don't work great. Water will still leak through, but hopefully, these valves will hold at least some of the water in the pipes and not in my sump. This should prevent some of the need to use that emergency sump overflow and save me some saltwater. I never want to have to rely solely on these check valves, but they should help out a little bit.

I also performed a leak test on both of my UV sterilizers. They seemed to pass according to what I know. So I installed the bulbs and ran the wires around. When it comes time to change out those bulbs, there's no getting around it. It will be a pain in the butt. I will likely need to remove the entire unit, but I'm mentally preparing myself for that now.

So, with all of the changes and progress, here is what it all looks like now. I'm pretty happy with it. Happy with it enough that I've started to set up my first QT. I've made about 50 gallons of saltwater and have another 55 gallons of RO water at the ready. My tank has also been ordered, but I don't have an ETA on that. I will likely be performing the hybrid TTM that @Humblefish innovated. Then, my little fishes can live in a larger observation tank until I feel comfortable with the status of the DT (whenever that comes in and is ready). So these fish could be living in an observation tank for quite some time. But I only plan on getting very small fish for now.

IMG_20200823_215445.jpg


Up next, I think I will begin mounting all of the electronics and figuring out my electrical control plan. I'm a bit nervous for that since I have a lot of things that all need to be plugged in and ideally controlled/monitored by my Apex. But I'm starting to doubt if 2 20a circuits is enough...
 
OP
OP
thewalkingdad

thewalkingdad

Active Member
View Badges
Joined
Aug 17, 2019
Messages
214
Reaction score
290
Location
Idaho Falls, ID
Rating - 0%
0   0   0
I finished setting up my first QT tonight. I took the day off of work tomorrow and will be headed down 40 miles to the LFS. I don't know what they have in stock or if it's healthy, but it will be a fun day out of the house. I'm going to be pretty strict about sticking very close to my stocking list, so if they don't have any of those initial fish that I'm looking for that are healthy, then I'm comfortable not buying anything. But, I have the QT ready to go. I even have a batch of brine shrimp ready to be fed. The local Petco actually has a surprisingly decent marine section, so between those two places, I might end up making a purchase soon. Or, I might not. Who knows. But the tank is ready.

I'm also beginning to think about electricity and where everything needs to be mounted and how. I'm a bit concerned that were I plan to mount all of the electronics, it will be too far away for most things to reach. I also need to ensure I'm not overloading any single circuit. I have access to two 20 amp circuits in my fish room, but cables and cords can only go so far. Anyway, assuming I don't run into any issues, this is how I'm planning on setting things up. (don't pay attention to the Apex modules, I'm not sure which ones will actually be used. Some of those might need to be upstairs near the DT)

IMG_20200824_222054.jpg


Lastly, I bought a ton of super glue, accelerant, and sand. I plan on breaking up my marco rocks to begin putting together my NSA aquascape.
 
OP
OP
thewalkingdad

thewalkingdad

Active Member
View Badges
Joined
Aug 17, 2019
Messages
214
Reaction score
290
Location
Idaho Falls, ID
Rating - 0%
0   0   0
I took a trip to a few local pet stores and ended up finding three of the four initial fish I wanted to begin my tank with. So I bought a firefish and two ocellaris clownfish. The only one that I couldn't find anywhere was a neon goby. Since I'm doing the hybrid TTM, I would rather run QT in groups so I cut down on how much saltwater I go through.

I have them all in QT right now. They seem to be doing fine. I hatched a bunch of baby brine shrimp and fed that to them on day 1 along with some medicated fish food. All three loved the brine shrimp. The clowns wouldn't touch the medicated food. The firefish at the medicated food fairly well.

I also dosed some general cure today. Tomorrow I will get the next tank setup so I can run the first H2O2 bath and tank transfer on Friday.

So far so good.
IMG_20200825_165718.jpg


IMG_20200825_165726.jpg


OP
OP
thewalkingdad

thewalkingdad

Active Member
View Badges
Joined
Aug 17, 2019
Messages
214
Reaction score
290
Location
Idaho Falls, ID
Rating - 0%
0   0   0
QT day 3 is in the books and everyone seems to be doing well. I am surprised at how shy the firefish is. I knew it was shy, but it is very shy. The clowns are pretty active and they are fun to watch.

Today I did just a little bit of optimization on the RO/DI system. I added a bypass on my Tunze Water Controller valve. This sounds risky and kind of is, since it is one of my backstops against flooding. But it should be pretty rare that I need to bypass that to begin with so that bypass valve should rarely be touched, leaving the water controller as the default.

IMG_20200826_233130.jpg


I also added another valve closer to the DI unit right above my sink. This will allow me to get fresh RO/DI water right at the sink and not having to try to get access to it across the room.

IMG_20200827_084320.jpg


I added a sediment filter right before my booster pump. Hopefully, this prolongs the life of the pump and some of the media.

IMG_20200826_233113.jpg


Lastly, as I begin to think about my aquascape, I decided to build out a mock tank. I plan on doing some sort of an NSA design so I needed to buy a heavy hammer and some chisels. I'll start breaking rocks this weekend. Here is the mock tank in my office. The tank stand will be quite a bit higher than this little desk, but this is where it will go.

IMG_20200827_212413.jpg
 

Milkman420

Active Member
View Badges
Joined
Aug 19, 2020
Messages
154
Reaction score
64
Location
peters township
Rating - 0%
0   0   0
This is an awesome build bro. Too late now but I would have made sure everything worked properly before drilling holes into everything and glueing **** in place. Fingers crossed you don’t run into any issues cuz you’re going to be out a ton of money if anything something doesn’t work properly.
 
OP
OP
thewalkingdad

thewalkingdad

Active Member
View Badges
Joined
Aug 17, 2019
Messages
214
Reaction score
290
Location
Idaho Falls, ID
Rating - 0%
0   0   0
This is an awesome build bro. Too late now but I would have made sure everything worked properly before drilling holes into everything and glueing **** in place. Fingers crossed you don’t run into any issues cuz you’re going to be out a ton of money if anything something doesn’t work properly.

Oh, I almost guarantee there will be a few leaks in the piping when this system finally goes wet. There will probably be a few electronics that are DOA. The pandemic put me back quite a few months, unfortunately.
 

Trey

Active Member
View Badges
Joined
Aug 19, 2009
Messages
397
Reaction score
353
Location
Brunswick, Ohio
Rating - 0%
0   0   0
That plumbing is SICK! Can’t believe there’s not more people commenting on this. Very cool.
Great work so far. If you lose power though, you may have a massive flood. I would invest in some check valves high up and plan on replacing them once a year.
 
OP
OP
thewalkingdad

thewalkingdad

Active Member
View Badges
Joined
Aug 17, 2019
Messages
214
Reaction score
290
Location
Idaho Falls, ID
Rating - 0%
0   0   0
That plumbing is SICK! Can’t believe there’s not more people commenting on this. Very cool.
Great work so far. If you lose power though, you may have a massive flood. I would invest in some check valves high up and plan on replacing them once a year.

Thanks, Trey. If I lose power, I have two check valves on the return pump pipes. Those should help, but won't solve the problem entirely. Also, my sump can't overflow. If the water level in the sump gets too high it drains into my utility sink. The good news is, my floors are saved. The bad news is, I waste a lot of saltwater that way. I still need to tweak this setup some more to reduce wasted saltwater, but won't be able to test too much until I get a tank, lol.

Cheers
 

Trey

Active Member
View Badges
Joined
Aug 19, 2009
Messages
397
Reaction score
353
Location
Brunswick, Ohio
Rating - 0%
0   0   0
Thanks, Trey. If I lose power, I have two check valves on the return pump pipes. Those should help, but won't solve the problem entirely. Also, my sump can't overflow. If the water level in the sump gets too high it drains into my utility sink. The good news is, my floors are saved. The bad news is, I waste a lot of saltwater that way. I still need to tweak this setup some more to reduce wasted saltwater, but won't be able to test too much until I get a tank, lol.

Cheers
Fantastic. I must have entirely missed that ;Blackeye
Either way can’t wait to see it progress. Have you thought more about your stocking plans? I may have some input there.
 
OP
OP
thewalkingdad

thewalkingdad

Active Member
View Badges
Joined
Aug 17, 2019
Messages
214
Reaction score
290
Location
Idaho Falls, ID
Rating - 0%
0   0   0
Fantastic. I must have entirely missed that ;Blackeye
Either way can’t wait to see it progress. Have you thought more about your stocking plans? I may have some input there.

Post #46 has a few of the pictures for how I tried to solve some of those issues. Post #2 has an early version of my stocking list. I've removed a few and added a few, but most of what I want is still there. I'm definitely open to feedback.

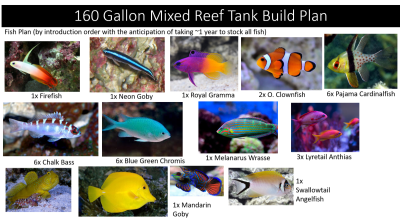
Here is what I'm thinking about for now. The angelfish is the one that I'm not in love with.

Stock.png
 

Trey

Active Member
View Badges
Joined
Aug 19, 2009
Messages
397
Reaction score
353
Location
Brunswick, Ohio
Rating - 0%
0   0   0
Post #46 has a few of the pictures for how I tried to solve some of those issues. Post #2 has an early version of my stocking list. I've removed a few and added a few, but most of what I want is still there. I'm definitely open to feedback.

Here is what I'm thinking about for now. The angelfish is the one that I'm not in love with.

Stock.png
Nice. So I would do a little more research possibly on pajama cardinals and chalk bass. You may want to reconsider those numbers, same with the Chromis. Besides that I like what you’re thinking! Angels can be iffy, but I don’t know enough about that one to comment.
 
OP
OP
thewalkingdad

thewalkingdad

Active Member
View Badges
Joined
Aug 17, 2019
Messages
214
Reaction score
290
Location
Idaho Falls, ID
Rating - 0%
0   0   0
Nice. So I would do a little more research possibly on pajama cardinals and chalk bass. You may want to reconsider those numbers, same with the Chromis. Besides that I like what you’re thinking! Angels can be iffy, but I don’t know enough about that one to comment.

Thanks, I'll keep the research coming!
 
OP
OP
thewalkingdad

thewalkingdad

Active Member
View Badges
Joined
Aug 17, 2019
Messages
214
Reaction score
290
Location
Idaho Falls, ID
Rating - 0%
0   0   0
Today I lost my firefish. When I was doing my first tank transfer to the hybrid TTM, he jumped out and did some concrete surfing. I think it messed him up pretty bad and he eventually died today. The two clowns are still doing great though. I learned a good lesson about keeping my hand over the net with the fish so they don't jump out. That green spot has ben concerned. I don't remember it earlier and isn't natural. I can't say for sure that it is related to him hitting the floor, but who knows.

IMG_20200829_194215.jpg


On to happier news, I spent the entire day working on my aquascape. I'm going with an NSA scape. Overall, I'm very happy with how it turned out. The clearance from the glass is decent all around. It's better front to back than it is on the sides.

There are three main pieces to the superstructure. The piece on the right is a more centralized mass with a few interwinding arches and overhangs. The middle piece has a long tunnel at the bottom and a few arches while reaching out to the right. The leftmost piece is actually a complete spiral. I wasn't planning on making a spiral. It certainly isn't natural, but it was fun to design. We'll see how it holds up to fish and coral.

How I started the day

IMG_20200828_213019.jpg


The rightmost structure, which I think I'll call The Maze

IMG_20200829_220806.jpg


The center structure, which I think I'll name The Monolith

IMG_20200829_220031.jpg


And the leftmost structure, which I think I'll call The Spire

IMG_20200829_220451.jpg


And the overall scape!

IMG_20200829_222200.jpg
 

Algaewarrior

Active Member
View Badges
Joined
May 18, 2018
Messages
423
Reaction score
385
Rating - 0%
0   0   0
Sorry to hear about your firefish. I lost 2 recently. Your NSA looks amazing! Did you use the same method as BRS?
 
OP
OP
thewalkingdad

thewalkingdad

Active Member
View Badges
Joined
Aug 17, 2019
Messages
214
Reaction score
290
Location
Idaho Falls, ID
Rating - 0%
0   0   0
Sorry to hear about your firefish. I lost 2 recently. Your NSA looks amazing! Did you use the same method as BRS?

Thanks!

Yes, I used the BRS method as best I could. I'm still in the process of doing all of the mortar. The mortar is harder and takes longer than the gluing. I'm still not positive which method I'm going to use to cover up the mortar though.

I'm hoping to have all of the mortar done by mid-week and the sanding by the end of Labor Day weekend.
 

Looking back to your reefing roots: Did you start with Instant Ocean salt?

  • I started with Instant Ocean salt.

    Votes: 59 74.7%
  • I did not start with Instant Ocean salt, but I have used it at some point.

    Votes: 9 11.4%
  • I did not start with Instant Ocean salt and have not used it.

    Votes: 9 11.4%
  • Other.

    Votes: 2 2.5%
Back
Top