
Navigation
Install the app
How to install the app on iOS
Follow along with the video below to see how to install our site as a web app on your home screen.
Note: This feature may not be available in some browsers.
More options
You are using an out of date browser. It may not display this or other websites correctly.
You should upgrade or use an alternative browser.
You should upgrade or use an alternative browser.
My Algae Turf Scrubber Build
- Thread starter labas39
- Start date
- Tagged users None


That is not out of the ordinary, at this point if you clean it, only rub with fingertips and lightly rinse (room temp tap water, slow running). Then let it grow for 2 weeks.
That is not out of the ordinary, at this point if you clean it, only rub with fingertips and lightly rinse (room temp tap water, slow running). Then let it grow for 2 weeks.
i actually didnt do anything to it , took it out , took the pics and put it back in ... thought maybe i needed more light hours given that its brown ?

That's fine too (not cleaning)
At 2 weeks, you can't expect an explosion of green unless you have a very specific set of initial circumstances. During the maturing stage, you are shooting for growth of any kind. As long as you are getting some kind of growth, you are at least doing things halfway right. Leave it be and see what happens over the next few weeks. I would give the screen a light cleaning at 21 days but that's about it.
At 2 weeks, you can't expect an explosion of green unless you have a very specific set of initial circumstances. During the maturing stage, you are shooting for growth of any kind. As long as you are getting some kind of growth, you are at least doing things halfway right. Leave it be and see what happens over the next few weeks. I would give the screen a light cleaning at 21 days but that's about it.
My algae scrubber took a few months to really come in properly.
That's fine too (not cleaning)
At 2 weeks, you can't expect an explosion of green unless you have a very specific set of initial circumstances. During the maturing stage, you are shooting for growth of any kind. As long as you are getting some kind of growth, you are at least doing things halfway right. Leave it be and see what happens over the next few weeks. I would give the screen a light cleaning at 21 days but that's about it.
sounds good ... thanks man ! i will post pics at 28 days that would be a week after a light clean

Upflow scrubbers don't scale up very well. Good for nanos and sumpless systems, or setups that otherwise would not have space for a waterfall. Definitely easy to setup and maintain.
IMO flow is the driving factor here. If you have a waterfall scrubber on the low end of flow and lighting, it would probably be on par with an appropriately sized upflow scrubber. But on a waterfall, when properly built (meaning, spray protection for lights, blocking light to the slot/screen junction, etc) you can ramp up the flow after the screen matures and increase the light intensity (especially with LEDs) and really get a lot more production.
This does not appear to be the case with upflow scrubbers, at least not from what I've seen. There's even one example of a test that SM did on his SURF units that showed that increasing the bubble flow rate (by more than double the airflow, IIRC) did not increase growth at all. But I'll throw in a benefit of doubt here, not everything has necessarily been tried.
Cool,
I'm setting up my old 120 after about 5 years and wanted to try something different. Used cheato last time and it worked ok. These things seem to make sense cause I can't think of a more optimal situation for algae growth. Might try DIY cheap to start off with and if i like the results, buy a more professionally built unit.
Regards,
Taylor

There's even one example of a test that SM did on his SURF units that showed that increasing the bubble flow rate (by more than double the airflow, IIRC) did not increase growth at all.
Because it was growing out of the drain holes and was being eaten by the tangs. Everyone who watched to the end knows this. That's why it was put at the end.
Have you ran another test with the unit separated from the main tank so gauge exactly how much the additional air flow increased growth?
There's even one example of a test that SM did on his SURF units that showed that increasing the bubble flow rate
I'll take back this comment per SMs response. However in my defense:
That video is 1 hour and 5 minutes long. I simply do not have that much time. I skipped through it to see the end result of each cleaning (harvest, comments, etc) and came to the conclusion, after watching about 7-8 cleanings, that more air made no difference because that's what the video shows.
If there was an "ah-ha moment" conclusion that explained the lack of additional growth, it would have been good to put that 1) in the video description or 2) as a text pop-up (using YouTube's Annotation feature on the uploaded video) at or near the point of each cleaning to indicate that the mystery was solved at the end of the video, etc. I do not recall seeing any of these when I watched the video when it came out, maybe these have been added, but I don't see them. The cleaning/harvest/weighing process of the 10 cleanings shows the same process repeatedly and this would lead anyone with say only 5 minutes on their hands, because one of their 4 kids need homework help for instance, to conclude that more air=same growth. Only until I just now fast-forwarded to the end of the video (the last 3-4 minutes) do I hear what you are pointing out. I can only imagine my total frustration had I watched the entire hour long video without skipping through it only to find out that the whole 10 harvesting/measuring process was completely skewed because of fish eating the growth.
As far as testing this in your setup goes, it is totally possible to block the fish from having access to the bottom of the scrubber in a pond situation. All you need is a few sheets of #5 plastic canvas, or better yet a box frame assembled to hang on the edge of the tank and made out of 1/2" PVC pipe with that 1/4" or 1/2" netting from BRS that people use for DIY tank covers stretched around it (would allow unimpeded flow better than the canvas). I would like to see the experiment repeated.
Starting to fill in better, it this after cleaning or before?
Starting to fill in better, it this after cleaning or before?
this was before , i ran some warm tap water over both sides and rubbed a little bit with fingers

- Joined
- Aug 19, 2014
- Messages
- 10
- Reaction score
- 0
Flow looks good, screen is huge. How big is your tank and how much do you feed? Light need to be perpendicular to screen, not from above pointing down.
Also with the 2-valve setup, while it gives you the ability to control flow to each device, you are setting yourself up for disaster unless you have a secondary full-flow path from the tank. If anything makes it's way down the overflow pipe and blocks on of the drain paths, the water can back up in the tank and overflow it. Of course, if you don't have a lot of available water in your sump to pump back into the tank this problem is minimized - your sump has baffles and the pump section has limited water but it's always good to check with a worst-case-scenario test.
My worst case scenario test is:
1) top off bucket is full and the top off pump gets stuck "on" and empties the whole bucket
2) power goes out right at that moment, sump needs to be sized and have the normal operation water level set to avoid sump overflow
That's more of a sump/tank design worst-case scenario but it would apply also if #1 happened and then something blocked one of the drain paths, tank would potentially overflow.
You can remedy this in a single drain system by building in a bypass like this:

Hi Floyd, thanks for your recommendations, I just didn't wanted to run another pump to run the scrubber and wanted to try it out first, then I was gonna make an acrylic ATS.
To answer your questions. My tank is 150 gal, I use gravity fed ATO with Kalk. I don't trust switches. My sump is 40 breeder and i turnoff everything for water changed and I can still fill 15 gal.
Also I have filter on drain pipe in overflow.
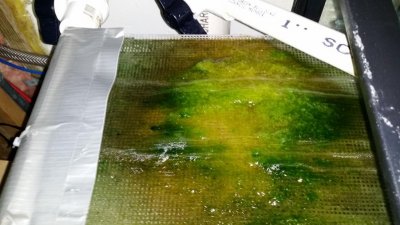
Below pics are of 2 weeks growth under PAR 36 RED AND BLUE LEDS. Will either buy two more leds or buy 4 grow leds and shorten the screen. Will post my progress.
However, it will be safer and easier to just make a separate unit like this one. http://youtu.be/wD6kA3xDPaM
My ATS TWO WEEKS GROWTH VIDEO AND PICS:
http://youtu.be/YOyV3zpk_E8
Attachments

I have to add a revision to my posts #107 and #109, when copying them for re-post on RC I noticed I had a calculation error that had to deal with the "minimum" and "maximum" levels, as noted in italics and underline in this revised guideline below:
Here is my recommendation for LED lighting of a waterfall algae scrubber screen:
This is for a double-sided screen using Philips Luxeon ES 3W Deep Red 660nm LEDs without lenses (120-140 degree) running at 700mA at 2-3" from the screen to LED
Minimum coverage: One LED on each side of every 8 sq in of screen
Maximum coverage: One LED on each side of every 4 sq in of screen
Simple as that. For new screens (bare) if using the "Maximum" level, run at 350mA until mature, or use a diffuser. Might have to do this with the Minimum level also actually, but not typically. The minimum could probably be stretched to a larger area but screen will cure slower and generally have less capacity.
So for a 6x6 screen, which is 36 sq in, /8=4.5 per side. Make it 5.
So for a 6x6 screen, which is 36 sq in, /4=9 per side.
Supplementing with blue/violet: Always run at 350mA. Use one to two at this current level for every 5-6 reds, roughly. Lots of flexibility here, a little blue/violet goes a long way. I've used 440-445nm Royal Blue Luxeon ESs for this, but I know of at least one other that used to use RBs and switched to Deep Violets and almost doubled growth. Steve's used to carry a good one but it was on a bad substrate so he pulled them. They are getting a better one in but it will be about 3-4 weeks before it's available, and then I will be testing them out on some established scrubbers.
Regarding non DIY-LEDs in general, this is what I have roughed out to help with this.
The issue is that my DIY LED guideline is based on coverage. You can't say "I need 5 3W LEDs which is 15W, so a 15 W fixture is what I need". It doesn't work that way.
That's because a 3W LED does not necessarily consume 3W, and a purchased LED may rate it's intensity based on actual wattage used, or it may add up the LEDs and give a wattage but the actual watt draw is less. You have to watch for this.
A 3W Philips Luxeon ES 660nm LED will typically drop 2.2v across the LED at 700mA. Power = Amps * Volts so 2.2 V * 0.700 A = 1.54W. What? I thought it was a 3W. It is. That is something called MARKETING. The LEDs become more efficient, so a lover Vdrop and Idrive results in the same output, but instead of calling it a 1.5W and confusing everyone, they call it a 3W still.
So now on to your fixture you are looking at.
Converting the "LED per unit area guideline" to a "wattage" guideline is as simple as doing the math.
Figure out what you need per the "unit area" guideline. In the above example, 6x6 screen, minimum level (low intensity), 5x 3W per side. Each is actually drawing 1.5W, so 5x1.5 = 7.5W. Your light fixture should actually consume, at the wall, a minimum of 7.5W. The electronics built into the fixture will draw power also, meaning that you might want to add a little cushion to the number. So a 10W fixture on a 6x6 screen would be about right for a comparable replacement to an array of 5x 3W LEDs.
^^the second sentence above I had previously stated as "maximum level" which was not correct.
Now let's add that factor in and parallel it to screen size. A 6x6 screen = 36 sq in. Make it 40. you need a 10W actual-draw LED fixture on each side of this. So you could say that the rule of thumb for a pre-built LED fixture is that you need 0.25W per square inch of screen. That would get you into the Minimum light arena - or "Minimum Intensity".
^^same with last sentence above
Doubling that would put you on the higher end. 0.5W per square inch - actual wattage draw of fixture.
^^this one is also revised
What you have to watch for is when they use a multi-chip that has 9 1W LEDs on it and they call that 10W. Not necessarily true. But 1W LEDs are actually more efficient than 3W LEDs when you are talking radiant flux output per unit of energy input into the LED, so it's not horrible, just shoot for the higher light level and you'll be OK usually. At best, you will actually be at the minimum level. At worst, you'll be on the low side but still OK.
Last edited:
at 21 days did a light cleaning , how does this look so far
To me, that looks good for 21 days. I still don't have the bright green but it must be working!
This is now what my screen looks like after 7 days:
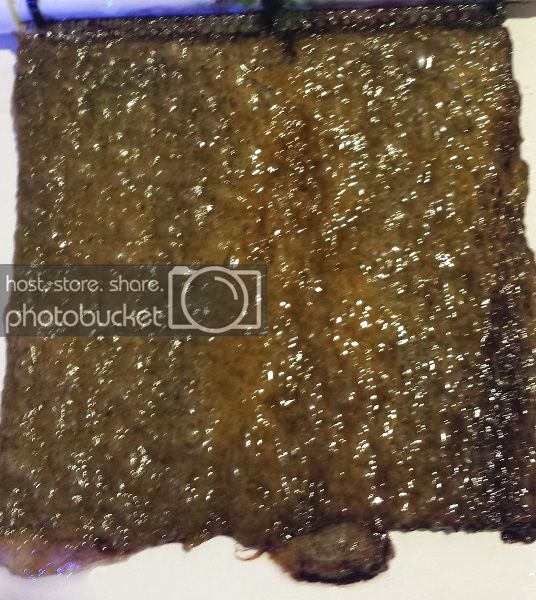
This is how much I scrape off: note the screen at the top of the photo for a frame of reference:
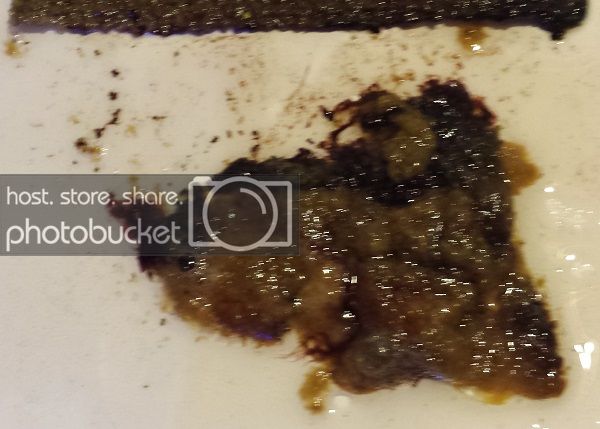
I tested my PO4 and NO3 yesterday with API test kits and they read zero; those kits aren't that great at low readings but it's way better than before I started the scrubber.

Nice. Scrape it down to the bare screen, so that green hair can start attaching.
Similar threads

- Replies
- 1
- Views
- 187
- Replies
- 3
- Views
- 110
- Replies
- 5
- Views
- 104
New Posts
-
-

-

-
 IT'S HERE ARBORDAYMAGEDDON!! THE FINEST ARBOR DAY SALE IN THE WORLD!!!!
- Latest: Reefer Matt


