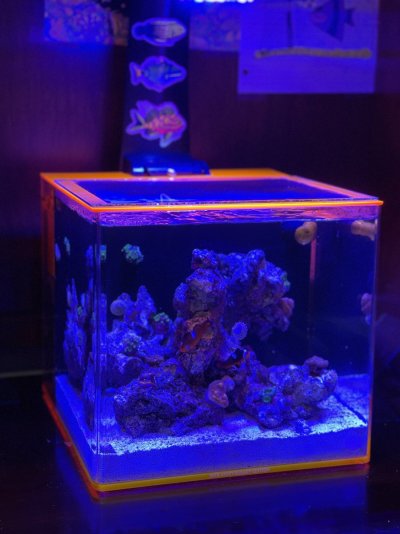
New Deskmate Lid - Plexi and Glass

Haggisman14

Valuable Member
View Badges
Joined
Oct 12, 2017
Messages
1,951
Reaction score
2,359
Location
North Carolina
Rating - 0%
0   0   0
Nothing crazy or earth shattering, but upped my game from just a glass lid to a plexiglass and glass combo.

I wasn't patient enough and accidentally cracked the plexi, but the way that it sits on the tank it doesn't effect anything (overtime might get a new one and do it up right!

Upgraded my tank lid. I wanted something that would cover my entire tank to really cut down on evaporation, and at the same time look good.

I tried doing it all out of glass first, but I cracked 3 different pieces of glass when trying to cut out the rear notch where the Radion RMS mount is, and where the electrical cords come out of the tank. After fail number 3, I knew that there was no way I was going to be able to do it myself.

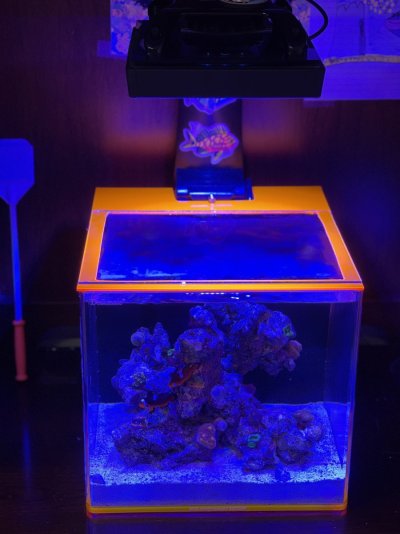
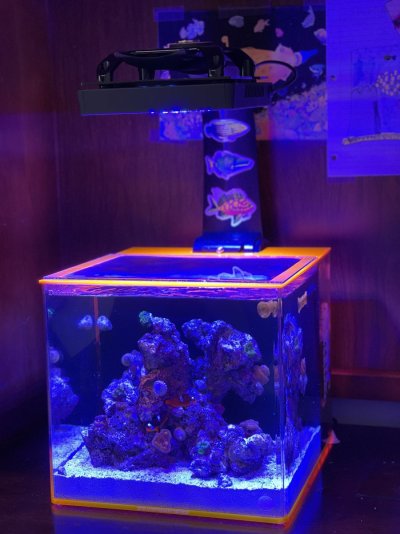
Fast forward I decided to get a piece of orange plexiglass that would match the tank, and cut it out myself.. I got my handy dandy 20 year old jig saw, and a fresh "fine" blade to cut through it. First cut out the rear notch....then I accidentally "cracked" it when I was cutting out the hole for the glass. I think it came out great for a home made lid. I've got the original glass lid over the cutout that I can now just slightly scoot it back and feed the tank.

Cuts aren't as smooth as say a Kraken Lid (which I really want), but for a $6 pound piece of glass, and a $10 piece of plexi...it's going to work for now!

Plus it glows like the bottom of the tank so it's a match made in heaven!
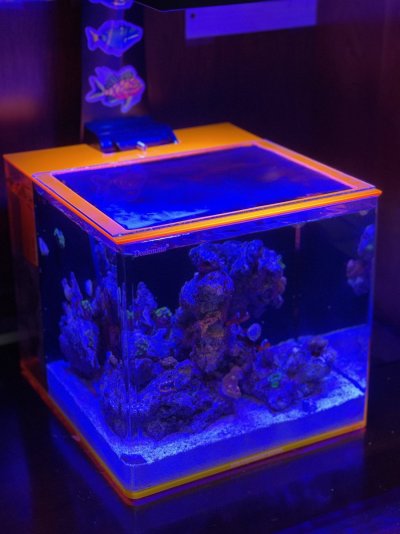
IMG_5246.jpg IMG_5247.jpg IMG_5248.jpg IMG_5245.jpg
 

Peace River

Thrive Master
View Badges
Joined
Apr 29, 2014
Messages
21,536
Reaction score
164,664
Location
USA
Rating - 100%
1   0   0
I like it a lot! Nice work!!!

Shaun The Sheep Movie Ok GIF
 
OP
OP
Haggisman14

Haggisman14

Valuable Member
View Badges
Joined
Oct 12, 2017
Messages
1,951
Reaction score
2,359
Location
North Carolina
Rating - 0%
0   0   0
Thanks! If I do it again in the future (probably will to fix the break in the side), I would also make the front lip a little bit more narrow as there is a "slight" orange shadow on one of my rocks.

As with most DIY...make sure you take your time and don't rush so you don't make a stupid mistake like I did and snap your pelexi!

Thanks for looking everyone!
 

Peace River

Thrive Master
View Badges
Joined
Apr 29, 2014
Messages
21,536
Reaction score
164,664
Location
USA
Rating - 100%
1   0   0
I’m wondering if it would be worth the bother to get a router so you could round the interior and exterior corners?
 

vetteguy53081

Well known Member and monster tank lover
View Badges
Joined
Aug 11, 2013
Messages
92,047
Reaction score
203,352
Location
Wisconsin -
Rating - 100%
14   0   0
Nothing crazy or earth shattering, but upped my game from just a glass lid to a plexiglass and glass combo.

I wasn't patient enough and accidentally cracked the plexi, but the way that it sits on the tank it doesn't effect anything (overtime might get a new one and do it up right!

Upgraded my tank lid. I wanted something that would cover my entire tank to really cut down on evaporation, and at the same time look good.

I tried doing it all out of glass first, but I cracked 3 different pieces of glass when trying to cut out the rear notch where the Radion RMS mount is, and where the electrical cords come out of the tank. After fail number 3, I knew that there was no way I was going to be able to do it myself.

Fast forward I decided to get a piece of orange plexiglass that would match the tank, and cut it out myself.. I got my handy dandy 20 year old jig saw, and a fresh "fine" blade to cut through it. First cut out the rear notch....then I accidentally "cracked" it when I was cutting out the hole for the glass. I think it came out great for a home made lid. I've got the original glass lid over the cutout that I can now just slightly scoot it back and feed the tank.

Cuts aren't as smooth as say a Kraken Lid (which I really want), but for a $6 pound piece of glass, and a $10 piece of plexi...it's going to work for now!

Plus it glows like the bottom of the tank so it's a match made in heaven!
IMG_5246.jpg IMG_5247.jpg IMG_5248.jpg IMG_5245.jpg
Looks great. Dont have it too tight of fit even though we want to avoid jumpers getting out. No ventilation or holes will allow condensation to filter out the light spectrums and precip can build up on the lid. I use glass always and have to clean mine periodically as it accumulates algae and precip
 

Gumbies R Us

Certified Noob
View Badges
Joined
Nov 10, 2022
Messages
10,013
Reaction score
19,352
Location
North Georgia
Rating - 0%
0   0   0
Nothing crazy or earth shattering, but upped my game from just a glass lid to a plexiglass and glass combo.

I wasn't patient enough and accidentally cracked the plexi, but the way that it sits on the tank it doesn't effect anything (overtime might get a new one and do it up right!

Upgraded my tank lid. I wanted something that would cover my entire tank to really cut down on evaporation, and at the same time look good.

I tried doing it all out of glass first, but I cracked 3 different pieces of glass when trying to cut out the rear notch where the Radion RMS mount is, and where the electrical cords come out of the tank. After fail number 3, I knew that there was no way I was going to be able to do it myself.

Fast forward I decided to get a piece of orange plexiglass that would match the tank, and cut it out myself.. I got my handy dandy 20 year old jig saw, and a fresh "fine" blade to cut through it. First cut out the rear notch....then I accidentally "cracked" it when I was cutting out the hole for the glass. I think it came out great for a home made lid. I've got the original glass lid over the cutout that I can now just slightly scoot it back and feed the tank.

Cuts aren't as smooth as say a Kraken Lid (which I really want), but for a $6 pound piece of glass, and a $10 piece of plexi...it's going to work for now!

Plus it glows like the bottom of the tank so it's a match made in heaven!
IMG_5246.jpg IMG_5247.jpg IMG_5248.jpg IMG_5245.jpg
Really nice lid for the tank!
 
OP
OP
Haggisman14

Haggisman14

Valuable Member
View Badges
Joined
Oct 12, 2017
Messages
1,951
Reaction score
2,359
Location
North Carolina
Rating - 0%
0   0   0
Looks great. Dont have it too tight of fit even though we want to avoid jumpers getting out. No ventilation or holes will allow condensation to filter out the light spectrums and precip can build up on the lid. I use glass always and have to clean mine periodically as it accumulates algae and precip

Main precip on the lid only happens over night / over weekends, so in the mornings and Monday mornings I clean off the glass and it's back to normal, haven't had any sort of algae build up on it. But I totally understand your reasoning. I might leave a little gap on the glass to possibly prevent that preceip in total!

I’m wondering if it would be worth the bother to get a router so you could round the interior and exterior corners?

I would love to, and perfect world I would, but I don't know anyone with a router, and if I purchased one that would blow the whole reason for the "budget" build. But believe me..If I had one, that's EXACTLY what I would have done!
 

Just grow it: Have you ever added CO2 to your reef tank?

  • I currently use a CO2 with my reef tank.

    Votes: 1 3.1%
  • I don’t currently use CO2 with my reef tank, but I have in the past.

    Votes: 0 0.0%
  • I have never used CO2 with my reef tank, but I plan to in the future.

    Votes: 1 3.1%
  • I have never used CO2 with my reef tank and have no plans to in the future.

    Votes: 27 84.4%
  • Other.

    Votes: 3 9.4%
Back
Top