Navigation
Install the app
How to install the app on iOS
Follow along with the video below to see how to install our site as a web app on your home screen.
Note: This feature may not be available in some browsers.
More options
You are using an out of date browser. It may not display this or other websites correctly.
You should upgrade or use an alternative browser.
You should upgrade or use an alternative browser.
Poseidon's NEW Adventure! ;)
- Build Thread
- Thread starter Poseidon
- Start date
- Tagged users None


Thanks Dave! I was hoping to catch a peak at Todd's before I make a decision.
I was more depressed after seeing his! Thinking how much $ i have in AIs

OP
OP
This is going to be a very nice tank to watch come together.
Thanks, I hope so!
I was more depressed after seeing his! Thinking how much $ i have in AIs
Ya, AI's are on the short list too, Reef Paradise has them on an SPS tank, and they are nice for sure. I have always preferred a "warmer" tank lighting, the AI's look very cool to me. (Almost to blue, without the reds and yellows to go with it.) I was a big fan of the GE 6.5K T5 bulb, and "purple plus" in my previous T5 setups. No reason for me to think I won't like the red/yellow in my tank now.
Ok here they are....
I only have ONE Picture of the actual tank, it is still in the Jeep. To be honest that is as good as any place until I have a spot to put it.
The Starphire panel is the one farthest away in this picture.
Okay, on to the stand construction!
70 Feet of 1x4 Cedar. My circular saw is also in the picture, but I didn't use it at all during construction.
Same 70 feet in the basement, darn rain wouldn't quit. I had to spend an hour or so cleaning the basement before I was able to get started. The kids had taken over the space that used to be mine, was theirs, and is now mine again!
You can see the "rough" side of the Cedar here, when I saw this in the lumber shop, I thought immediately how STRONG the glue joint would be if I put the rough sides together with glue and screws. In effect I was able to create my own 2x4's with this Cedar.
These are 2 rails, front and back, top and bottom, all the same. These rails are the only pieces that both pieces are the same length. I had them glued, screwed, and clamped at this point to allow the glue to dry for a while.
A close up of how I planned to put all the pieces together. All the rails rest on wood, which extends to the floor. There are no joints that are supported by screws only.
Here are all the pieces, ready for final assembly. Kinda like a jigsaw puzzle.
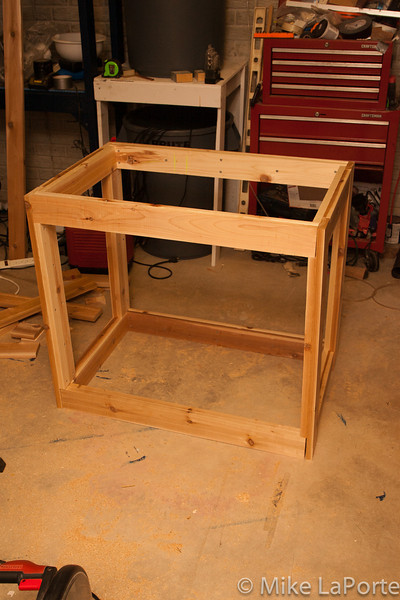
One of the corners. At this point, they are NOT attached. The stand is not complete even now, as I need some longer screws. (I'll get them tomorrow) In this picture and the next, the stand is sitting as it will when it is finished, but there are no screws or glue holding it together!
Final picture of the night, rough completion of the stand, again not attached, just all the pieces placed together.
Now on to the important question, STAIN IT, or PAINT IT?


Nice work.
OP
OP
The stand is all put together, I decided I need an extra set of hands and arms, but they just didn't happen, so I have some sanding to do. Funny how all my measurements were less then a 1/16" tolerance, but I ended up with just over that on the "high" corner. According to my trusty steel square, I am good all around though, so that is a good thing.
I have a shorter work day tomorrow, hopefully I can get it sanded and stained and then in the house the day after. All the pieces are starting to fall into line, now I just need to find a few Benjamin's to spend...
I have a shorter work day tomorrow, hopefully I can get it sanded and stained and then in the house the day after. All the pieces are starting to fall into line, now I just need to find a few Benjamin's to spend...
revhtree
Owner Administrator
View Badges
Staff member
Super Moderator
Reef Squad
Partner Member 2024
Excellence Award
RGB
Photo of the Month
Article Contributor
R2R TV Featured
Hospitality Award
Article Administrator
Black Friday Sponsor
Partner Sponsor 2023
Industry Professional
My Aquarium Showcase
- Joined
- May 8, 2006
- Messages
- 48,344
- Reaction score
- 91,512
Nice man I bet you are excited!

Thanks, I hope so!
Ya, AI's are on the short list too, Reef Paradise has them on an SPS tank, and they are nice for sure. I have always preferred a "warmer" tank lighting, the AI's look very cool to me. (Almost to blue, without the reds and yellows to go with it.) I was a big fan of the GE 6.5K T5 bulb, and "purple plus" in my previous T5 setups. No reason for me to think I won't like the red/yellow in my tank now.
This is one of the reasons I moved from LED to T5. My new build is all T5 and I'm playing with lamps. I do have plans to DIY and LED strip into my T5 fixture. The primary purpose for this is to get some shimmer to the tank that is simply missing.
Again, really looking forward to your build. Looks great thus far.
great to hear man. hope to see the tank up soon.The stand is all put together, I decided I need an extra set of hands and arms, but they just didn't happen, so I have some sanding to do. Funny how all my measurements were less then a 1/16" tolerance, but I ended up with just over that on the "high" corner. According to my trusty steel square, I am good all around though, so that is a good thing.
I have a shorter work day tomorrow, hopefully I can get it sanded and stained and then in the house the day after. All the pieces are starting to fall into line, now I just need to find a few Benjamin's to spend...

OP
OP
Tank and stand are in the living room, I have the official seal of approval from the wife on the stand too!
Now that I have it in place, I want to dress up the stand a bit, it needs a couple shelves I think, one on the bottom, and one in the middle. I am also thinking of adding a back, so that it is open on 3 sides, but has a back to cover the pipes that will be going to the basement. I'll post up some pictures tomorrow of where I am so far.
Now that I have it in place, I want to dress up the stand a bit, it needs a couple shelves I think, one on the bottom, and one in the middle. I am also thinking of adding a back, so that it is open on 3 sides, but has a back to cover the pipes that will be going to the basement. I'll post up some pictures tomorrow of where I am so far.

Glad to see your making progess on this man! Hope that cO2 tank will be useful to ya as well..... you did remember to grab it right? lol Keep up the good work can't wait to see it with water!!!!!!!!!!!!!!!!!!!!!!!!
Niceeeeeee

OP
OP
Here are the few quick snaps I took last night:


I think Lightroom did a bit to much to the stain color, it is not quite that dark, but close. (I used a natural Danish Oil finish on Cedar.)
I think Lightroom did a bit to much to the stain color, it is not quite that dark, but close. (I used a natural Danish Oil finish on Cedar.)
Nice, will the stand have doors :bounce: Still love those tank dimensions!
Similar threads
- Replies
- 7
- Views
- 217
- Replies
- 4
- Views
- 110
- Replies
- 30
- Views
- 965
- Replies
- 34
- Views
- 938