Heating large aquariums with your domestic hot water heater or boiler.
On the workbench today, heating large (>200g) tanks with your existing gas hot water heater or boiler. Why would you want to do this?
Well here are some of the benefits of this type of system:
On average, 40% (±15%) energy cost savings over electrical heaters (depending on how efficient your hot water heater is). For my tank (I have an abnormally cold basement), I use 1500w of heaters and temperatures drop slightly at night. I also have a 1000w metal halide lighting system, which takes over most of the heating for 8 hours. But I figure I can say I average 1500w of heating 6 months out of the year, for half of the day. So my yearly heating cost of my tank is approximately $375. Assuming 40% energy savings switching to gas, I’ll save $150 per year.
Few/no electrical heaters in the tank that can fail and electrify the tank (safer).
Few/no electrical heater purchase and replacement cost. Lets say you need 1500w of heaters, that’s about $150 to $200 of heaters, and depending on who you talk to, heaters should be replaced every 2-3 years, I don’t think this applies to heaters with digital thermostats, but I’m not sure. I also don’t think many people follow this guideline- I don’t, but I’m sure many do.
Ability to heat larger tanks faster (a 40000 btu water heater is roughly the equivalent of a 12000w heater). But heating rate also depends on the size of the heat exchanger, speed both circulating and return pump are set to, and what temperature you set your hot water heater to.
Reduced electrical load. This can be important in older homes that have 100 amp service or older lines and higher demands, but it can also reduce the number of breakers and circuits needed to run large tanks. When I first installed my 260g tank, I had to install 2 new 20amp breakers and lines, and even though I did all the work myself, I am sure it cost me at least $100 in materials. I’d guess around $500 minimum for an electrician to do this.
Ability to heat your tank during a power outage- both gas hot water heaters and furnaces can easily be run off of a portable generator, allowing you to heat your home and tank. Running 1000+ watts of electric heaters on a generator is not a great idea- unless you like wear and tear on your generator and waking up in the middle of the night to refill the gas tank This can be very important in cold, rural areas that can expect to go without power every couple years for a few days due to winter storms. Just last year we had some suburban areas around Rochester without power in 10 degree F weather for up to two weeks.
The system can be modified to easily serve as a chiller as well, provided you have central air (sadly I don’t) or are willing to modify a window AC unit.
And here are the downsides:
The initial start-up cost can be higher- figure around $300-400. This can be done cheaper, but it increases the possibility of other problems. Even so, with even a borderline sized system such as mine, I can expect a 2 year payoff period.
It requires some plumbing. The greater the distance between the sump/tank and the hot water heater, the more expensive this plumbing becomes. Don’t be afraid to tackle this though- soldering is easy, hard to screw up, and a life skill worth having. If you really don’t want to solder, then buy sharkbite fittings instead.
It requires more upkeep- cleaning the heat exchanger and draining the system during times when it does not see use.
It puts marginally more load on the hot water heater, which might, hypothetically shorten its lifespan.
There are other possible problems, but these typically result from a poorly designed system. The most common problematic design is running pex directly from your hot water heater to a coil of pex in your sump. This type of system is what is known as an open heating loop. It is very cheap (<$100), but should generally be avoided because of the concerns it raises:
It puts household pressure freshwater in your tank.
Warm water that is left stagnant can grow legionella, which can make humans seriously ill or dead. Legionella grows in stagnant water in pipes with temperatures below 113 degrees. Obviously, the danger is not too great, otherwise every time we left our plumbing idle for more than a couple days we would have problems. However, Pex is more prone to bacterial growth, and letting 100ft of pex sit at tank temperatures is a very good breeding ground for bacteria. These problems can be mitigated by daily flushing, but using a heat exchanger basically eliminates them.
There is debate about how reef safe the exterior of some pex tubing is.
Many people don’t what a 100ft coil of pex in their sump.
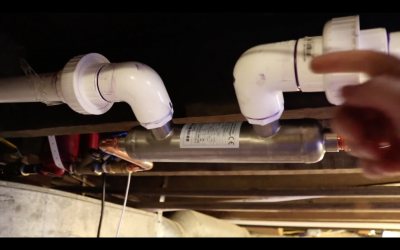
The method used in this how-to is not the cheapest, but it is simple, safe, compact, and reliable. This method uses your return pump to cycle water through a titanium heat exchanger, which is fed from your domestic hot water heater
Parts needed: (I am listing links to parts made in china, some of these can and should be substituted for higher quality parts -these parts can often be found for cheaper than their Chinese counterparts- particularly the pump):
Titanium heat exchanger ($170): http://www.ebay.com/itm/55k-BTU-Tit...Side-Ports-Saltwater-Pools-Spas-/301141502602 If you are running a freshwater system or a second loop stainless steel can be used to save money.
Circulating pump ($50): http://www.ebay.com/itm/110-120V-St...PT-3-4-Domestic-Circulator-Pump-/281959131515 I don’t know if I would recommend the above pump, as I have never purchased one. I would recommend a low HP stainless or bronze pump by one of the major manufactures like Grundfos or Taco. I was able to pick up a new Grundfos UP15-10SU7P/TLC 1/25 HP pump without the accessories for under $50 on ebay and there were a couple others for similar prices available.
Motorized ball valve ($35): http://www.ebay.com/itm/Motorized-B...alve-DC9-24V-2-Wire-Auto-Return-/272626731194 I have bought a number of these for different projects and never had a problem with them.
Temperature controller x2 ($35): https://www.amazon.com/Inkbird-Temperature-Controller-Thermostat-Fermentation/dp/B015E2UFGM or https://www.amazon.com/Finnex-Temperature-Controller-Digital-Heater/dp/B002TMTA7G or https://www.amazon.com/Inkbird-All-Purpose-Temperature-Controller-Fahrenheit/dp/B00OXPE8U6/ I would not trust 1 controller-no matter the type of heater or controller. Electric heaters have a built in thermostat, so plugging them into a controller or temp controller gives you a redundancy. With this system you need to provide that redundancy yourself, and that redundancy is particularly important, since we are essentially using one oversized heater.
Misc parts ($60): These parts will vary based on instillation, but this is a rough approximation based on the parts I used.
3- pvc 1.5’’ unions
2- pvc 1.5 slip to 1’’ threaded reducer
2- pvc 1” nipples
2- pvc 1.5” elbows
2- 1/2 in. x 1/2 in. x 3/4 in. Copper Pressure Cup x Cup x Cup Tee
2- ¾’’ copper union
1- brass ¾’’ ball valves.
3- brass ¾’’ nipples
4- copper ¾’’ braze to threaded
4- copper ¾ 90 degree elbows
Length of ¾ tubing
Tools:
PVC Glue
torch- propane will work but MAP gas will work better
tubing cutter- ½ and ¾
Emory cloth
Lead free solder
Flux
Thread sealant/tape
Assembly:
Assembly of the system is super simple- we are going to splice the heat exchanger into the return line from the sump. Alternatively we could run a second pump to feed the heat exchanger, but I feel this adds needless complexity and another failure point.
The hot water feed side is slightly more complicated. Tee off of the nearest hot water line, and attach the electronic ball valve, the circulating pump, and attach that line to the heat exchanger so that water flows in the opposite direction of the tank water. Then run the return line from the heat exchanger to the cold water feed on your hot water heater, placing a shut off ball valve close to the tee on the cold water feed. Somewhere along these lines you will want to put unions in so that you can dismantle, drain, and clean the system. It is possible that you could have hard water deposits form in your heat exchanger, so this is important. We also do not want to leave water stagnant in the pipes all summer, so at the very least, install a bleed valve in 2 locations.
To control the system, plug both the electronic ball valves ac adapter and circulator pump into a temperature controller. The ball valve I linked to has an automatic return, meaning that when you supply it with power it opens, and when you remove power, an onboard capacitor returns the pump to an off position. The first temperature controller is then plugged into the second temperature controller. Ideally the first temperature controller would do the fine adjustments, and the second temperature controller would be the backup, so that both temperature controllers always have power. However, as my second temperature controller is my apex, I reversed these roles, as the apex tends to drift slightly less, and I want to be able to fine tune the control through the apex. Hopefully the backup temperature controller can handle being turned on and off repeatedly.
I have only been running this system for about a week, but so far it is performing flawlessly. I don’t see any complications arising, so I figured I would release it to you sooner rather than later. My more complicated DIYs I tend to test for long periods of time, but this one is pretty simple. If anything does come up I will be sure update. For a better understanding of the total installation, refer to the video.
On the workbench today, heating large (>200g) tanks with your existing gas hot water heater or boiler. Why would you want to do this?
Well here are some of the benefits of this type of system:
On average, 40% (±15%) energy cost savings over electrical heaters (depending on how efficient your hot water heater is). For my tank (I have an abnormally cold basement), I use 1500w of heaters and temperatures drop slightly at night. I also have a 1000w metal halide lighting system, which takes over most of the heating for 8 hours. But I figure I can say I average 1500w of heating 6 months out of the year, for half of the day. So my yearly heating cost of my tank is approximately $375. Assuming 40% energy savings switching to gas, I’ll save $150 per year.
Few/no electrical heaters in the tank that can fail and electrify the tank (safer).
Few/no electrical heater purchase and replacement cost. Lets say you need 1500w of heaters, that’s about $150 to $200 of heaters, and depending on who you talk to, heaters should be replaced every 2-3 years, I don’t think this applies to heaters with digital thermostats, but I’m not sure. I also don’t think many people follow this guideline- I don’t, but I’m sure many do.
Ability to heat larger tanks faster (a 40000 btu water heater is roughly the equivalent of a 12000w heater). But heating rate also depends on the size of the heat exchanger, speed both circulating and return pump are set to, and what temperature you set your hot water heater to.
Reduced electrical load. This can be important in older homes that have 100 amp service or older lines and higher demands, but it can also reduce the number of breakers and circuits needed to run large tanks. When I first installed my 260g tank, I had to install 2 new 20amp breakers and lines, and even though I did all the work myself, I am sure it cost me at least $100 in materials. I’d guess around $500 minimum for an electrician to do this.
Ability to heat your tank during a power outage- both gas hot water heaters and furnaces can easily be run off of a portable generator, allowing you to heat your home and tank. Running 1000+ watts of electric heaters on a generator is not a great idea- unless you like wear and tear on your generator and waking up in the middle of the night to refill the gas tank This can be very important in cold, rural areas that can expect to go without power every couple years for a few days due to winter storms. Just last year we had some suburban areas around Rochester without power in 10 degree F weather for up to two weeks.
The system can be modified to easily serve as a chiller as well, provided you have central air (sadly I don’t) or are willing to modify a window AC unit.
And here are the downsides:
The initial start-up cost can be higher- figure around $300-400. This can be done cheaper, but it increases the possibility of other problems. Even so, with even a borderline sized system such as mine, I can expect a 2 year payoff period.
It requires some plumbing. The greater the distance between the sump/tank and the hot water heater, the more expensive this plumbing becomes. Don’t be afraid to tackle this though- soldering is easy, hard to screw up, and a life skill worth having. If you really don’t want to solder, then buy sharkbite fittings instead.
It requires more upkeep- cleaning the heat exchanger and draining the system during times when it does not see use.
It puts marginally more load on the hot water heater, which might, hypothetically shorten its lifespan.
There are other possible problems, but these typically result from a poorly designed system. The most common problematic design is running pex directly from your hot water heater to a coil of pex in your sump. This type of system is what is known as an open heating loop. It is very cheap (<$100), but should generally be avoided because of the concerns it raises:
It puts household pressure freshwater in your tank.
Warm water that is left stagnant can grow legionella, which can make humans seriously ill or dead. Legionella grows in stagnant water in pipes with temperatures below 113 degrees. Obviously, the danger is not too great, otherwise every time we left our plumbing idle for more than a couple days we would have problems. However, Pex is more prone to bacterial growth, and letting 100ft of pex sit at tank temperatures is a very good breeding ground for bacteria. These problems can be mitigated by daily flushing, but using a heat exchanger basically eliminates them.
There is debate about how reef safe the exterior of some pex tubing is.
Many people don’t what a 100ft coil of pex in their sump.
The method used in this how-to is not the cheapest, but it is simple, safe, compact, and reliable. This method uses your return pump to cycle water through a titanium heat exchanger, which is fed from your domestic hot water heater
Parts needed: (I am listing links to parts made in china, some of these can and should be substituted for higher quality parts -these parts can often be found for cheaper than their Chinese counterparts- particularly the pump):
Titanium heat exchanger ($170): http://www.ebay.com/itm/55k-BTU-Tit...Side-Ports-Saltwater-Pools-Spas-/301141502602 If you are running a freshwater system or a second loop stainless steel can be used to save money.
Circulating pump ($50): http://www.ebay.com/itm/110-120V-St...PT-3-4-Domestic-Circulator-Pump-/281959131515 I don’t know if I would recommend the above pump, as I have never purchased one. I would recommend a low HP stainless or bronze pump by one of the major manufactures like Grundfos or Taco. I was able to pick up a new Grundfos UP15-10SU7P/TLC 1/25 HP pump without the accessories for under $50 on ebay and there were a couple others for similar prices available.
Motorized ball valve ($35): http://www.ebay.com/itm/Motorized-B...alve-DC9-24V-2-Wire-Auto-Return-/272626731194 I have bought a number of these for different projects and never had a problem with them.
Temperature controller x2 ($35): https://www.amazon.com/Inkbird-Temperature-Controller-Thermostat-Fermentation/dp/B015E2UFGM or https://www.amazon.com/Finnex-Temperature-Controller-Digital-Heater/dp/B002TMTA7G or https://www.amazon.com/Inkbird-All-Purpose-Temperature-Controller-Fahrenheit/dp/B00OXPE8U6/ I would not trust 1 controller-no matter the type of heater or controller. Electric heaters have a built in thermostat, so plugging them into a controller or temp controller gives you a redundancy. With this system you need to provide that redundancy yourself, and that redundancy is particularly important, since we are essentially using one oversized heater.
Misc parts ($60): These parts will vary based on instillation, but this is a rough approximation based on the parts I used.
3- pvc 1.5’’ unions
2- pvc 1.5 slip to 1’’ threaded reducer
2- pvc 1” nipples
2- pvc 1.5” elbows
2- 1/2 in. x 1/2 in. x 3/4 in. Copper Pressure Cup x Cup x Cup Tee
2- ¾’’ copper union
1- brass ¾’’ ball valves.
3- brass ¾’’ nipples
4- copper ¾’’ braze to threaded
4- copper ¾ 90 degree elbows
Length of ¾ tubing
Tools:
PVC Glue
torch- propane will work but MAP gas will work better
tubing cutter- ½ and ¾
Emory cloth
Lead free solder
Flux
Thread sealant/tape
Assembly:
Assembly of the system is super simple- we are going to splice the heat exchanger into the return line from the sump. Alternatively we could run a second pump to feed the heat exchanger, but I feel this adds needless complexity and another failure point.
The hot water feed side is slightly more complicated. Tee off of the nearest hot water line, and attach the electronic ball valve, the circulating pump, and attach that line to the heat exchanger so that water flows in the opposite direction of the tank water. Then run the return line from the heat exchanger to the cold water feed on your hot water heater, placing a shut off ball valve close to the tee on the cold water feed. Somewhere along these lines you will want to put unions in so that you can dismantle, drain, and clean the system. It is possible that you could have hard water deposits form in your heat exchanger, so this is important. We also do not want to leave water stagnant in the pipes all summer, so at the very least, install a bleed valve in 2 locations.
To control the system, plug both the electronic ball valves ac adapter and circulator pump into a temperature controller. The ball valve I linked to has an automatic return, meaning that when you supply it with power it opens, and when you remove power, an onboard capacitor returns the pump to an off position. The first temperature controller is then plugged into the second temperature controller. Ideally the first temperature controller would do the fine adjustments, and the second temperature controller would be the backup, so that both temperature controllers always have power. However, as my second temperature controller is my apex, I reversed these roles, as the apex tends to drift slightly less, and I want to be able to fine tune the control through the apex. Hopefully the backup temperature controller can handle being turned on and off repeatedly.
I have only been running this system for about a week, but so far it is performing flawlessly. I don’t see any complications arising, so I figured I would release it to you sooner rather than later. My more complicated DIYs I tend to test for long periods of time, but this one is pretty simple. If anything does come up I will be sure update. For a better understanding of the total installation, refer to the video.