DIY Sump Drain Bubble Fix

redfishbluefish

Stay Positive, Stay Productive
View Badges
Joined
Mar 22, 2012
Messages
11,711
Reaction score
25,759
Location
Sayreville, NJ
Rating - 0%
0   0   0
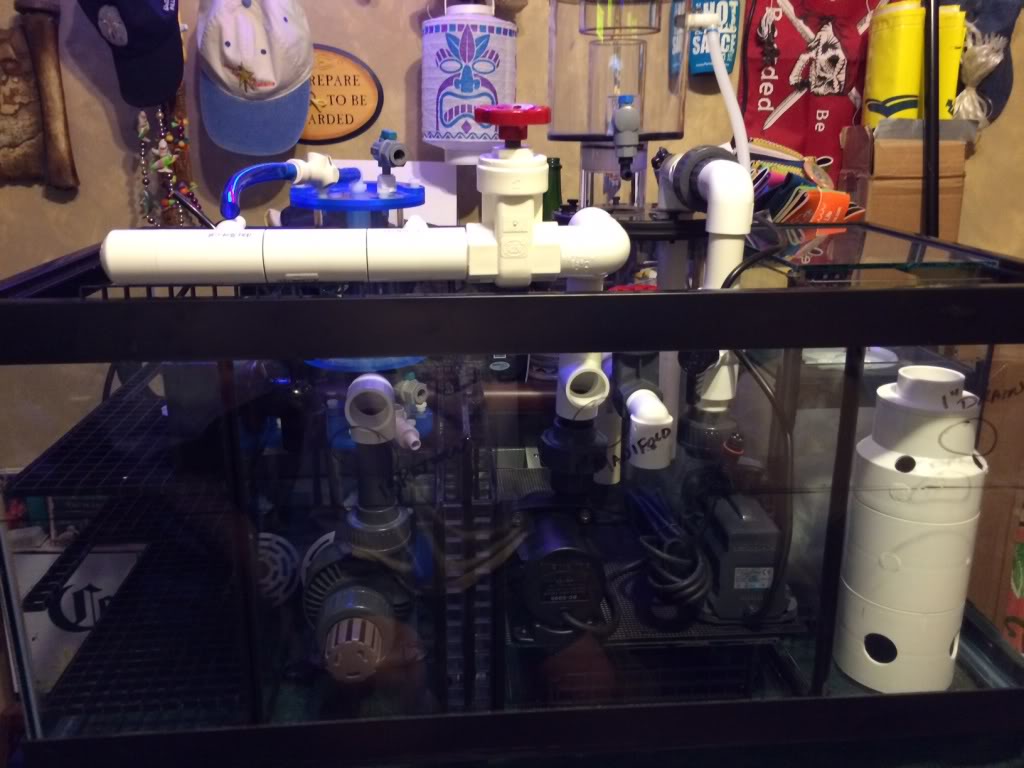
Over the years I have built a number of Rube Goldberg’s to try to stop the bubbles / salt creep I get in my sump. To top it off, I have two drains on either side of the sump, so I get twice the amount of salt creep. These devices I’ve made have had some degree of success, but there was still room for improvement.

I was inspired to try my next go at stopping the bubbles by a recent post by ryleary, were he had made what he called a reverse durso to quiet down the drain and reduce the bubbles in his sump.


So I thought I’d give this a go in my sump.

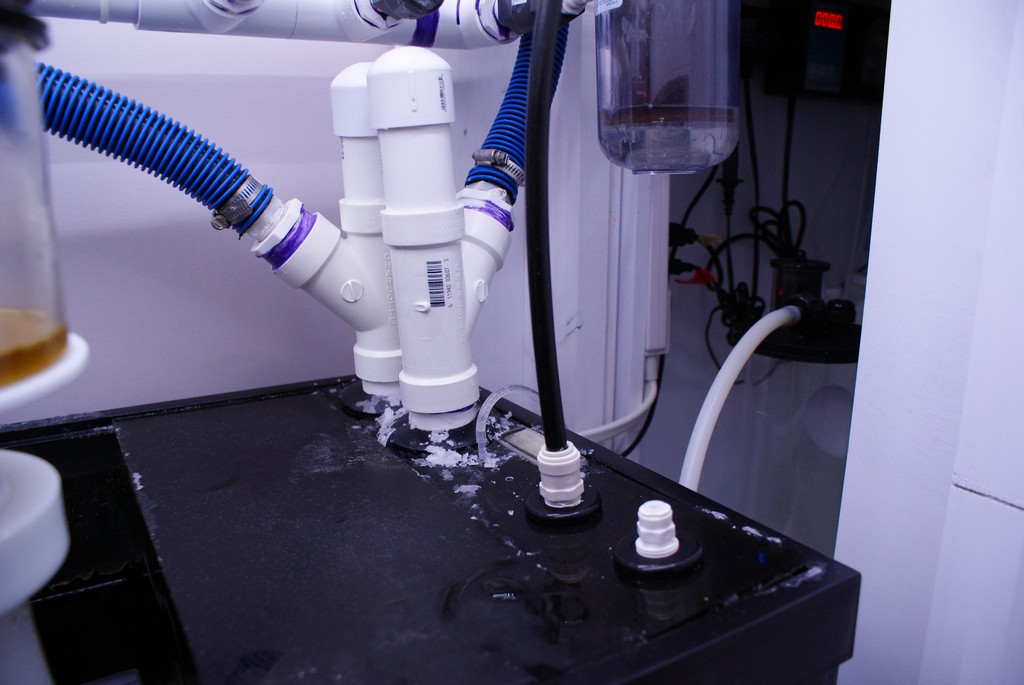
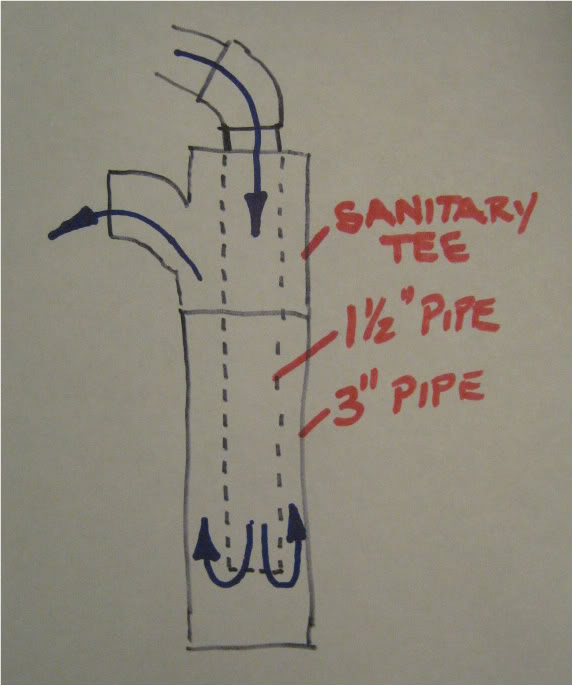
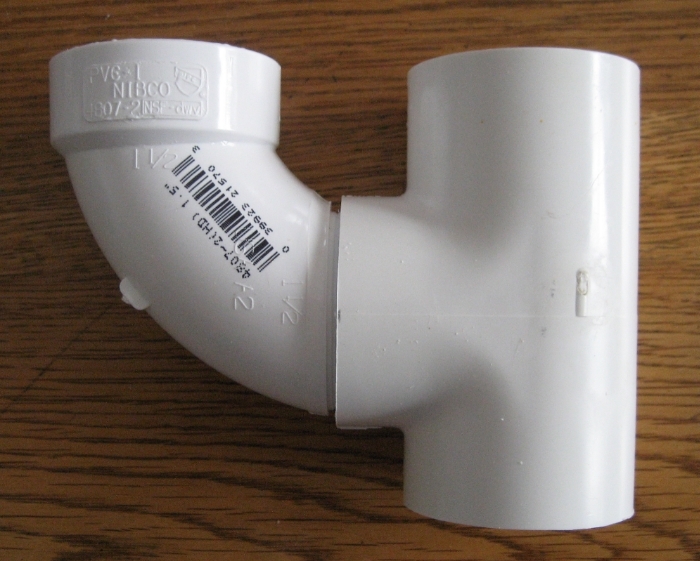
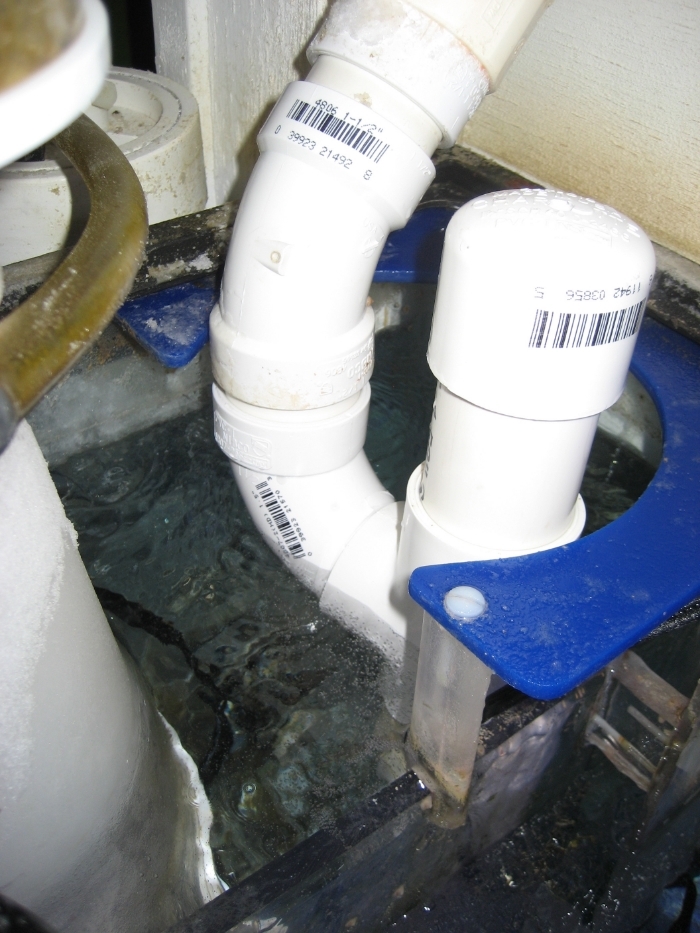
My drains are 1 ½ inches, so I picked up a DWV street elbow, a schedule 40 tee and an end cap….I already had the pipe. The reason the tee was schedule 40 is that it is made where it could be cut down (the DWV tee can not be cut down.) I was concerned about the width of this thing fitting in my filter sock (7†sock). Here is the elbow in the cut down tee. Cutting the tee brought the two pipes together by about 5/8 of an inch.


I also drilled a hole in the top of the end cap….didn’t notice bit size, but one or two bits larger than ¼ inch.


This durso assembly was put together with no glue….just friction fit.


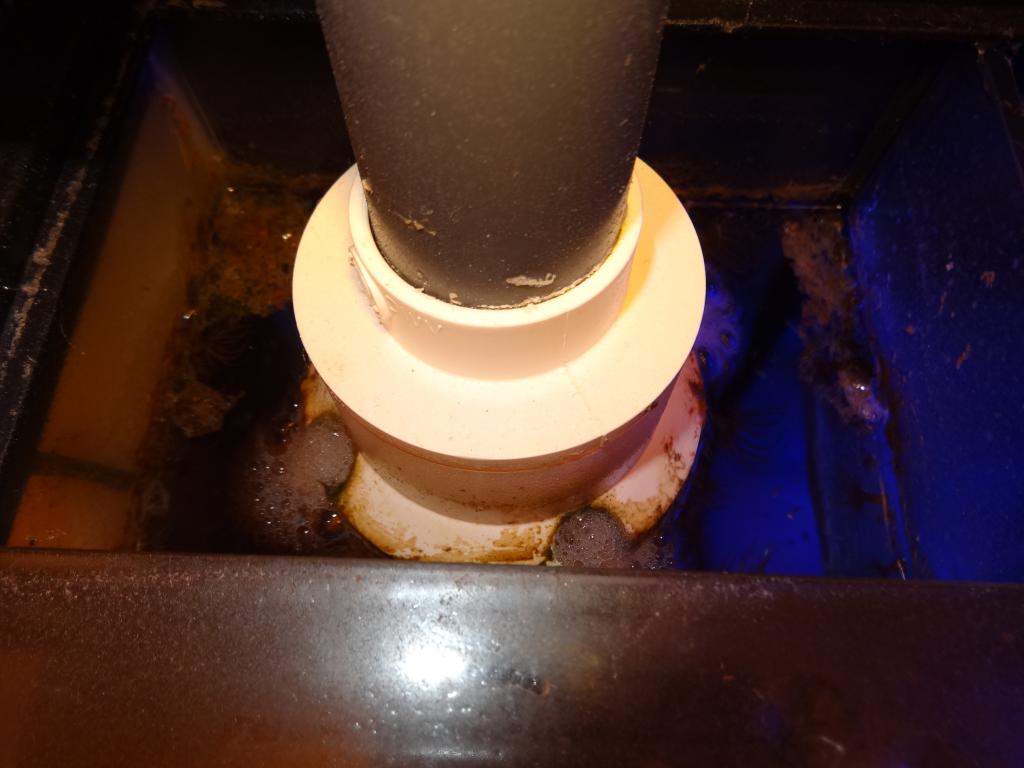
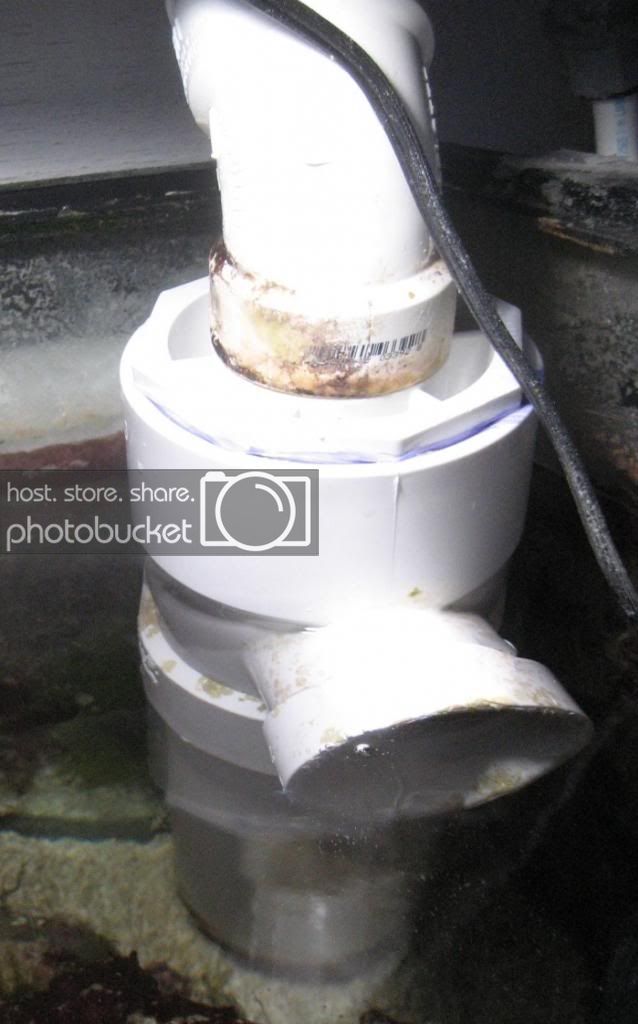
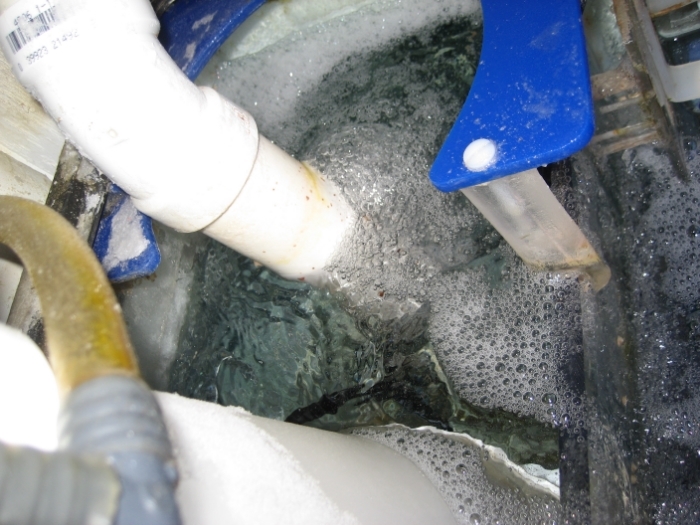
Now here’s the good news…..it stopped the bubbles! Here is my sock area drain with the original drain pipe:


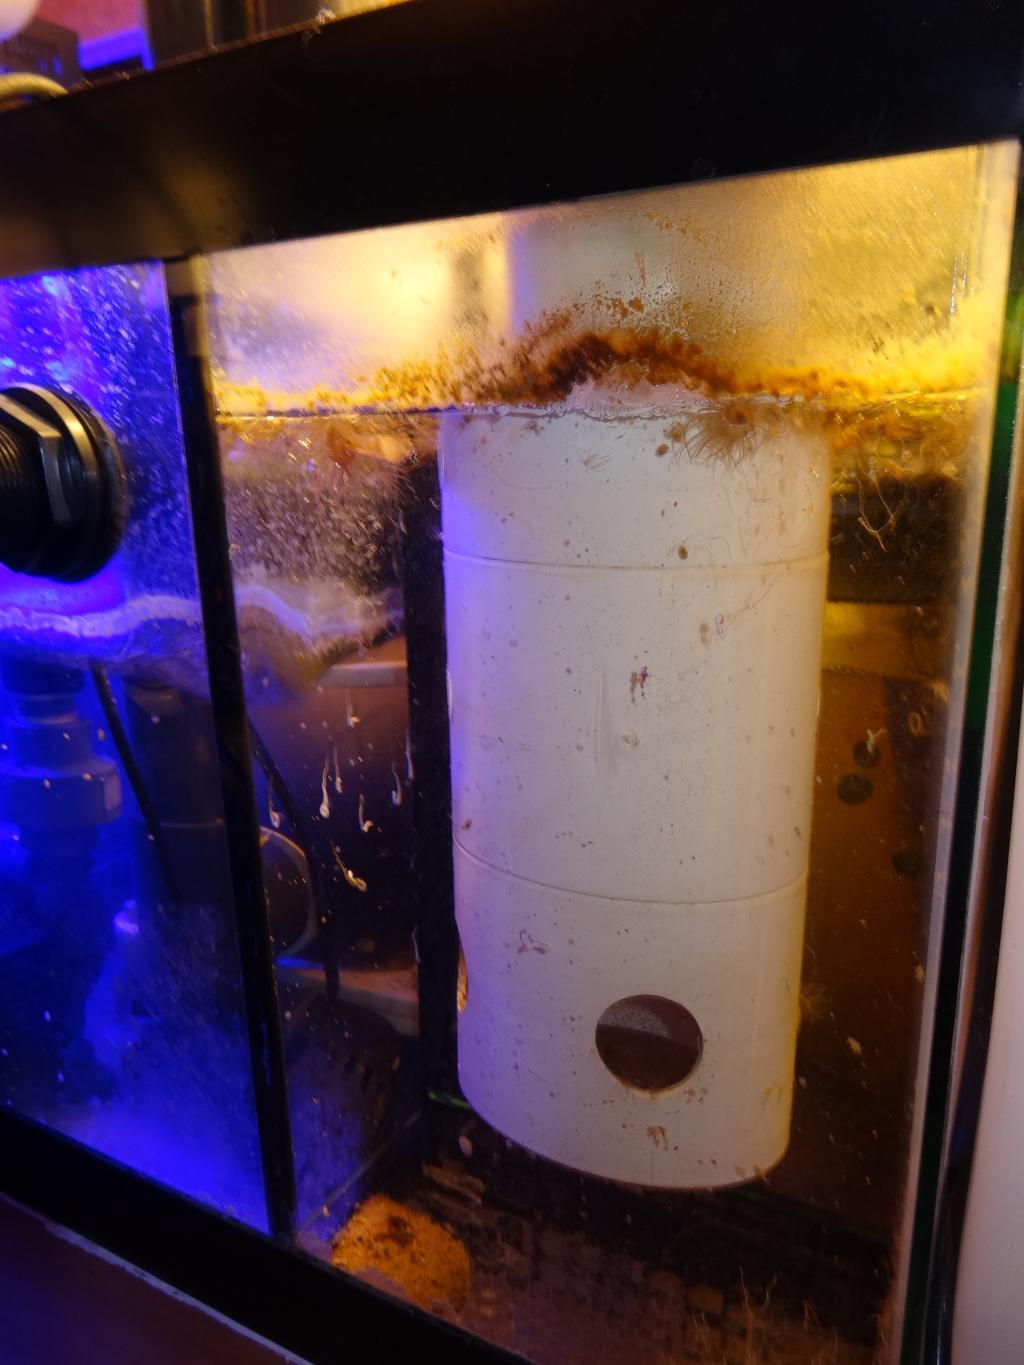
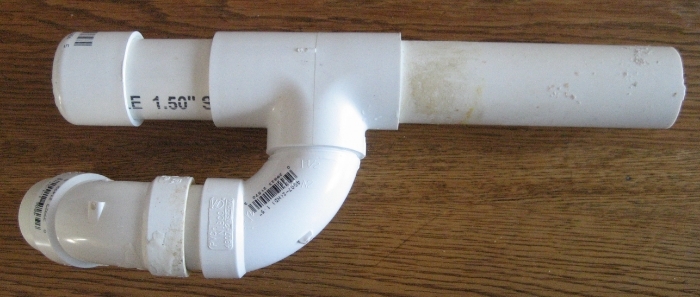
And here it is with the new reverse durso drain….bubble free.


I think tomorrow I’ll go buy the parts to make another one for the other drain. I’m happy.
 
OP
OP
redfishbluefish

redfishbluefish

Stay Positive, Stay Productive
View Badges
Joined
Mar 22, 2012
Messages
11,711
Reaction score
25,759
Location
Sayreville, NJ
Rating - 0%
0   0   0
After all that I would just add filter socks


On this drain that I've shown, I have a sock, but still get salt creep. I now have to see if I can fit the sock back in with this contraption. The other drain goes to my refugium, and I don't want to sock it. So that will get one of these reverse dursos tomorrow.
 
OP
OP
redfishbluefish

redfishbluefish

Stay Positive, Stay Productive
View Badges
Joined
Mar 22, 2012
Messages
11,711
Reaction score
25,759
Location
Sayreville, NJ
Rating - 0%
0   0   0
Well that didn't last long!


I couldn't fit the sock on with this durso drain. So what I did was move this over to the right drain and I was now getting small micro bubbles coming out. I can only guess that the flow coming out of the right is slightly higher than the left. So I went back to my original bubble trap on the right.


However, I wasn't done with the sock side. Here's my next try....I think you can figure it out while I let the epoxy cure. That 1 1/2, 45 elbow will flow directly down into the sock. Now that I'll be back to a single pipe, this will fit in the sock. Just don't know if it will act like the durso with a 3/4 breather pipe.


OP
OP
redfishbluefish

redfishbluefish

Stay Positive, Stay Productive
View Badges
Joined
Mar 22, 2012
Messages
11,711
Reaction score
25,759
Location
Sayreville, NJ
Rating - 0%
0   0   0
Well this latest lame brain idea of mine didn't work!


Here's the quasi reverse durso (without the end cap):


And here it is not stopping the bubbling:


I'm guessing that 90 degree turn in the original reverse durso was instrumental in allowing the air to escape.


Oh well! Back to the drawing board.
 

rayn

Bluefin Believer
View Badges
Joined
Mar 25, 2014
Messages
3,351
Reaction score
2,806
Location
Illinois
Rating - 0%
0   0   0
Not seeing the whole area, can you not raise the original one and put a longer pipe into the sock?

Looks like a nice idea
 
OP
OP
redfishbluefish

redfishbluefish

Stay Positive, Stay Productive
View Badges
Joined
Mar 22, 2012
Messages
11,711
Reaction score
25,759
Location
Sayreville, NJ
Rating - 0%
0   0   0
Not seeing the whole area, can you not raise the original one and put a longer pipe into the sock?

Looks like a nice idea


Rayn, it's tough showing the whole area because this sock is in a tight area. In this picture, it's behind the skimmer on the left.


I also can not raise the plumbing considering the entrance into the stand is right at the lower edge of the supporting beam.....plumbing comes in from the back from a Glass-Hole overflow. It's not the more typical bottom of the tank bulkhead/monster overflow.


However, your last comment about adding a longer pipe caused me to go back and look at the original reverse durso and compare it to the latest. I did use the exact same last piece of pipe in both drains. However, if you look at the first drain, it includes the elbow and tee, that added to the overall length. So there might be hope, since the first one actually had more lenght for the bubbles to escape. I'll cut another "last" pipe that will be close to the original length of the first durso. Thanks Rayn.....there might be hope. Give me half and hour and I'll be back.
 
Last edited:
OP
OP
redfishbluefish

redfishbluefish

Stay Positive, Stay Productive
View Badges
Joined
Mar 22, 2012
Messages
11,711
Reaction score
25,759
Location
Sayreville, NJ
Rating - 0%
0   0   0
Thanks to Rayn, I now compared apples to apples as far as the lenght of the drains. Here is the original reverse durso next to the lastest single pipe version...now both the same overall length.


And the result.......bubbles.......poo! I think there are a little less bubbles, but they are still there. I've got to believe it's that elbow that does the trick.


rayn

Bluefin Believer
View Badges
Joined
Mar 25, 2014
Messages
3,351
Reaction score
2,806
Location
Illinois
Rating - 0%
0   0   0
Looking at both side by side, it looks like the original allows the water to fall after the elbow and the air to escape out the top cap. The second try doesn't have that "break" for air and water to separate.

Don't suppose flex pipe would help any? Maybe to get the bends you need.

Also, it looks to me that your drain comes down at a angle. Is there a possibility of running a couple 45 to get the two pipes closer together? Scratch that. Could you turn the T? Maybe use flex tubing to vent the bubbles,
 

YodaHart

Active Member
View Badges
Joined
Nov 26, 2012
Messages
206
Reaction score
41
Location
Lithia, FL
Rating - 0%
0   0   0
The bubbles need a straight path to escape. Looks like they did in your first try, but not the second. It also helps if the durso pipes are a few sizes bigger to slow down the water a little.

Here's a few pics of my reverse durso drains. I used 'Y' fittings to make the plumbing super easy

DSC07392_zpscb33bcb2.jpg
 

Attachments

  • uploadfromtaptalk1423358922248.jpg
    uploadfromtaptalk1423358922248.jpg
    23 KB · Views: 603
Last edited:

Zacco

Active Member
View Badges
Joined
Feb 2, 2014
Messages
397
Reaction score
45
Location
Pennsylvania
Rating - 0%
0   0   0
Some one posted on a thread to cut the end of your drain pipe on a 45 degree angle going into your sump. Have the top of the 45 cut above the water line in your sump so the air escapes before it hits the water. Im gonna try this theory tomorrow.
 

Fin

Professional Procrastinator
View Badges
Joined
Sep 28, 2013
Messages
7,860
Reaction score
43,913
Location
Lake Charles LA
Rating - 0%
0   0   0
I saw something that someone at another forum came up with and I modified it a little to suit my sump. The original builder called it the "Bubble Killer." I also had a bad problem with salt creep, so when I built my new sump, I built a version of the Bubble Killer to try to keep that to a minimum. I have to say, it has been in use for about eight months now and I haven't once had any significant salt creep.

The idea is to contain most of the turbulence of the water entering the sump inside the 3" PVC tower and allowing the air to escape through holes in the top, right at the water line. It doesn't stop 100% of the bubbles, but makes a big difference in the mess from salt spray. I also don't use this with a filter sock beneath it. I have water going through 2 4' socks in the next chamber.

It is the big white thing on the right side of the (back) of the sump.

photo_zps9657b55d.jpg


This is it after it has been in use on the sump for 8 months. I have yet to clean this area since setting it up. You can see the bubbles gently coming out of the vent holes. I have the water level a tad higher than I would have liked, but it works well enough, so I just haven't cut the pipe.

DSC09394_zps8kxzskli.jpg


DSC09395_zpsyzlenult.jpg
 
OP
OP
redfishbluefish

redfishbluefish

Stay Positive, Stay Productive
View Badges
Joined
Mar 22, 2012
Messages
11,711
Reaction score
25,759
Location
Sayreville, NJ
Rating - 0%
0   0   0
Some one posted on a thread to cut the end of your drain pipe on a 45 degree angle going into your sump. Have the top of the 45 cut above the water line in your sump so the air escapes before it hits the water. Im gonna try this theory tomorrow.


I would think my last attempt with the elephant trunk coming out of the elbow would allow the air to escape....but I'm willing to try anything. I still have about 15 feet of 1 1/2 pipe to play with. When my lights come on, I'll give this a try and post the results. I would think the velocity of water will still drive air underwater.


........................It is the big white thing on the right side of the (back) of the sump.......


My "big white thing" is back on my other drain on the right and has been the best at stopping bubbles/salt creep. Here's the drawing that was done when I first made this four years ago:


IMG_2248.jpg


What's missing from this drawing is that there is a test cap on the bottom of the three inch pipe and the reducing coupling on the top is drilled with multiple holes to allow the air to escape. Here it is in use:


IMG_7448_zpsc6c315c6.jpg
 
Last edited:
OP
OP
redfishbluefish

redfishbluefish

Stay Positive, Stay Productive
View Badges
Joined
Mar 22, 2012
Messages
11,711
Reaction score
25,759
Location
Sayreville, NJ
Rating - 0%
0   0   0
Some one posted on a thread to cut the end of your drain pipe on a 45 degree angle going into your sump. Have the top of the 45 cut above the water line in your sump so the air escapes before it hits the water. Im gonna try this theory tomorrow.


Let us know what you find.


So here'what I found with this Zacco Drain:


And here's the Zacco drain in action.....with bubbles.


I did notice one thing....it didn't look like the bubbles were being driven down very deep. So I've got another idea that I'm going to try.
 

Zacco

Active Member
View Badges
Joined
Feb 2, 2014
Messages
397
Reaction score
45
Location
Pennsylvania
Rating - 0%
0   0   0
I was going to try this 45 theory on mine tonight but you beat me to the punch. Would you say the 45 cut made an improvment on the bubbles in your opinion? I'll wait to see what you come up with RedFishBlueFish before i attempt any mods myself.
 
OP
OP
redfishbluefish

redfishbluefish

Stay Positive, Stay Productive
View Badges
Joined
Mar 22, 2012
Messages
11,711
Reaction score
25,759
Location
Sayreville, NJ
Rating - 0%
0   0   0
Here's the latest lame brain idea....a modified Zacco.


And what happened with this drain is that bubbly water flowed out the opening like it was puking.


And so I shorten the upper part to raise the mouth......and it still continued to puke bubbles.


Zacco

Active Member
View Badges
Joined
Feb 2, 2014
Messages
397
Reaction score
45
Location
Pennsylvania
Rating - 0%
0   0   0
So which 45 produced the lowest amount of bubbles? The Zacco 45 or the redfishbluefish wedge 45?
 

When to mix up fish meal: When was the last time you tried a different brand of food for your reef?

  • I regularly change the food that I feed to the tank.

    Votes: 41 23.0%
  • I occasionally change the food that I feed to the tank.

    Votes: 60 33.7%
  • I rarely change the food that I feed to the tank.

    Votes: 57 32.0%
  • I never change the food that I feed to the tank.

    Votes: 16 9.0%
  • Other.

    Votes: 4 2.2%
Back
Top