




This is my second DIY LED setup. I learned 2 big things between this and the last.
1) solderless LEDs have huge benefits are easily installed and replaced if needed.
2) spend the extra few dollars and get a prefab heatsink
Total time was about 3 hours. It would have been quicker, except that the some of the hood screws were rusted and I needed to drill them out. I did not take pics of the dimmer build as I just wanted to get it done. There are great instructions (which I posted and linked in a below post).
The only big issue was that when setting the dim settings on the drivers, there were no clear instructions when using the solderless LEDs. There was also no online assistance that I could find in a timely matter. I was able to figure out the information though. Hence why there are copper pads still on the LEDs although it is supposed to be a solderless LED.
Here we go...this is a rapidled.com DIY LED retro fit kit.
Solderless JBJ Nanocube 28 HQI Dimmable Retrofit Kit

Price: $255.00
This retrofit kit fit seamlessly into my existing Nanocube 28 HQI hood (once gutted), and attached via 4 screws (included).
This kit included:
5.9" x 10" Heatsink drilled/tapped for 24 LEDs and 4 installation holes
11 Solderless Cool White CREE XP-G LEDs
11 Solderless Royal Blue CREE XP-E LEDs
2 Solderless UV LED (410-420nm wavelength)
2 Mean Well ELN-60-48P dimmable driver or 2 Mean Well ELN-60-48D dimmable driver (i purchased the ELN-60-48D)
2 Driver Jumper
2 Terminal Plug
22 3" LED to LED Wire (3" were out of stock, I opted for the 4.5" to get my order sooner)
1 tube of Thermal Grease (more then enough)
12V AC Adapter
10 non-water repellant wire nuts
2 power cords to attach to the drivers (US + Canada orders only)
5 feet of black bulk wire (if we're out of black we may send blue or white wire instead)
5 feet of red bulk wire (if we're out of red we may send blue or white wire instead)
Screws (for the LEDs and to mount the heatsink to the hood)
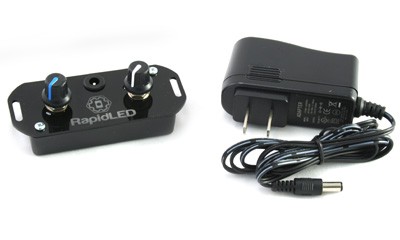
DIY 2 color dimming kit
Price: $30.00
This kit allows you to use two Meanwell ELN-60-27D/ELN-60-48D drivers to control dimming of two separate colors. The kit includes:
1 x 10V AC Adapter
2 x 10K Ohm Linear Potentiometers
1 x DC Power Connector
1 x Face Plate and Case
2 x Rubber knobs
2 x Face Plate screws
Some assembly is required, this is not a plug and play unit
Please note that a multimeter may be required to set the current on your drivers
Before: (lights were only on for a few minutes before this pic was taken, typically the torch is much happier :) )

After: (still playing with color and strength of each string)

Not going to go into detail about how to put paste on the LED and then add 2 screws. For LEDs you just put them in the same way, V+ to V- to V+ to V-. The LEDs are clearly marked on them when you get them. There are so many different variations to list and post, I am just alternating CW then RB. There is one UV on each of the 2 strings.


And done...total time, less then 20 minutes.

Here is the original hood.

Glass removed.

Old wiring to the ballast which is cut and the original power cord is used to power the LEDs. There is a new cord to power the cooling fans though.

LED installed

New wires connected

Completed unit

All back together

I am in no way affiliated with RapidLED or sponsored and am received no compensation for the above information/build. The posted messages express the views of the author, and not necessarily the views of RapidLED.com.

1) solderless LEDs have huge benefits are easily installed and replaced if needed.
2) spend the extra few dollars and get a prefab heatsink
Total time was about 3 hours. It would have been quicker, except that the some of the hood screws were rusted and I needed to drill them out. I did not take pics of the dimmer build as I just wanted to get it done. There are great instructions (which I posted and linked in a below post).
The only big issue was that when setting the dim settings on the drivers, there were no clear instructions when using the solderless LEDs. There was also no online assistance that I could find in a timely matter. I was able to figure out the information though. Hence why there are copper pads still on the LEDs although it is supposed to be a solderless LED.
I do not suggest this project to anyone who does not have basic electrical knowledge as you are working with live 120v while adjusting the dimmable drivers. You also need have and be able to operate a Multimeter.
Here we go...this is a rapidled.com DIY LED retro fit kit.
Solderless JBJ Nanocube 28 HQI Dimmable Retrofit Kit
Price: $255.00
This retrofit kit fit seamlessly into my existing Nanocube 28 HQI hood (once gutted), and attached via 4 screws (included).
This kit included:
5.9" x 10" Heatsink drilled/tapped for 24 LEDs and 4 installation holes
11 Solderless Cool White CREE XP-G LEDs
11 Solderless Royal Blue CREE XP-E LEDs
2 Solderless UV LED (410-420nm wavelength)
2 Mean Well ELN-60-48P dimmable driver or 2 Mean Well ELN-60-48D dimmable driver (i purchased the ELN-60-48D)
2 Driver Jumper
2 Terminal Plug
22 3" LED to LED Wire (3" were out of stock, I opted for the 4.5" to get my order sooner)
1 tube of Thermal Grease (more then enough)
12V AC Adapter
10 non-water repellant wire nuts
2 power cords to attach to the drivers (US + Canada orders only)
5 feet of black bulk wire (if we're out of black we may send blue or white wire instead)
5 feet of red bulk wire (if we're out of red we may send blue or white wire instead)
Screws (for the LEDs and to mount the heatsink to the hood)
DIY 2 color dimming kit
Price: $30.00
This kit allows you to use two Meanwell ELN-60-27D/ELN-60-48D drivers to control dimming of two separate colors. The kit includes:
1 x 10V AC Adapter
2 x 10K Ohm Linear Potentiometers
1 x DC Power Connector
1 x Face Plate and Case
2 x Rubber knobs
2 x Face Plate screws
Some assembly is required, this is not a plug and play unit
Please note that a multimeter may be required to set the current on your drivers
Before: (lights were only on for a few minutes before this pic was taken, typically the torch is much happier :) )
After: (still playing with color and strength of each string)
Not going to go into detail about how to put paste on the LED and then add 2 screws. For LEDs you just put them in the same way, V+ to V- to V+ to V-. The LEDs are clearly marked on them when you get them. There are so many different variations to list and post, I am just alternating CW then RB. There is one UV on each of the 2 strings.
And done...total time, less then 20 minutes.
Here is the original hood.
Glass removed.
Old wiring to the ballast which is cut and the original power cord is used to power the LEDs. There is a new cord to power the cooling fans though.
LED installed
New wires connected
Completed unit
All back together
I am in no way affiliated with RapidLED or sponsored and am received no compensation for the above information/build. The posted messages express the views of the author, and not necessarily the views of RapidLED.com.
















