My DIY skimmer so far, some input please.

gar732

Valuable Member
View Badges
Joined
Nov 28, 2009
Messages
2,354
Reaction score
364
Location
CT
Rating - 0%
0   0   0
Hello all,

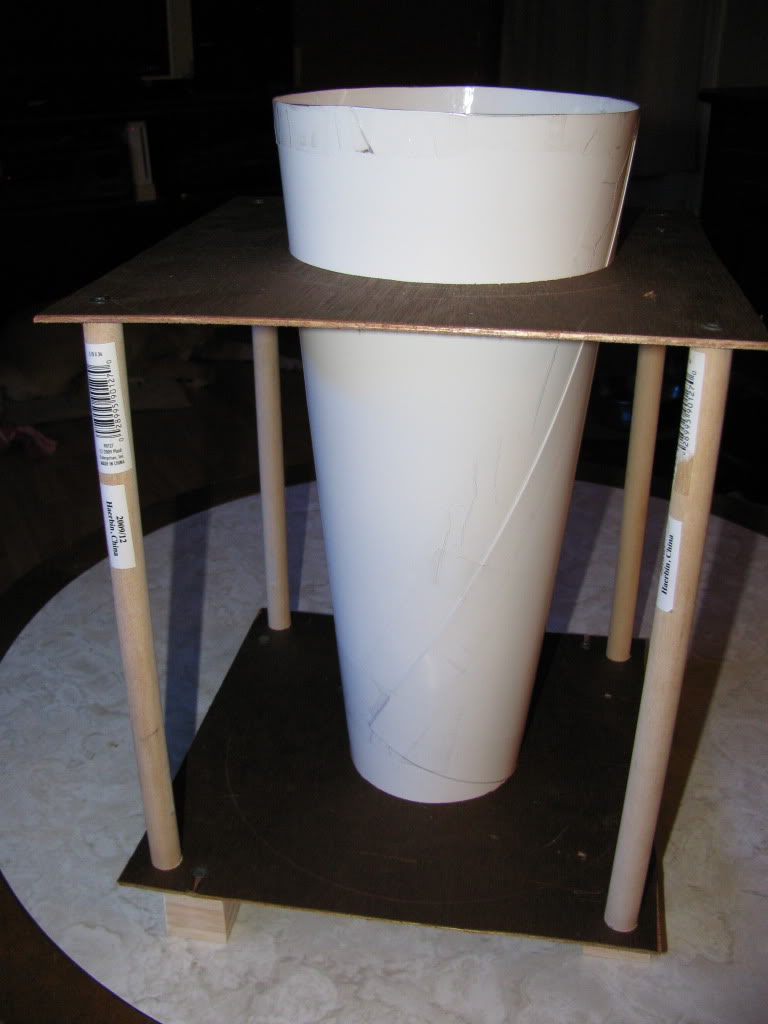
I've been kicking around the idea of a diy skimmer for some time. I was originally going to build a bk mini clone like mojo and troylee built but cutting and shaping the 2.5" acrylic didn't work out all that well. Since I already had a bunch of material that I purchased for the bk clone I thought I'd try to do something. Here is what I came up with. The skimmer will have pretty much the same dimensions as the bk mini. Around 22" high, 6" collection cup with a 4" neck, the base of the body will be 6" and 3" tall on top of that I have made a cone that is 12" tall, 6" at the base and 4" at the top. I will be running a psk2500 with the red demon pin wheel internally just like the bk. I don't know much about skimmers and my plan was just to copy the bk build. Now that that has changed I thought I should get some feedback before I get too carried away. Like I said I'm far from any kind of expert so any and all suggestions would be greatly appreciated.

Here are a couple of pics of how I made the cone. Here is my mold.
IMG_2661.jpg

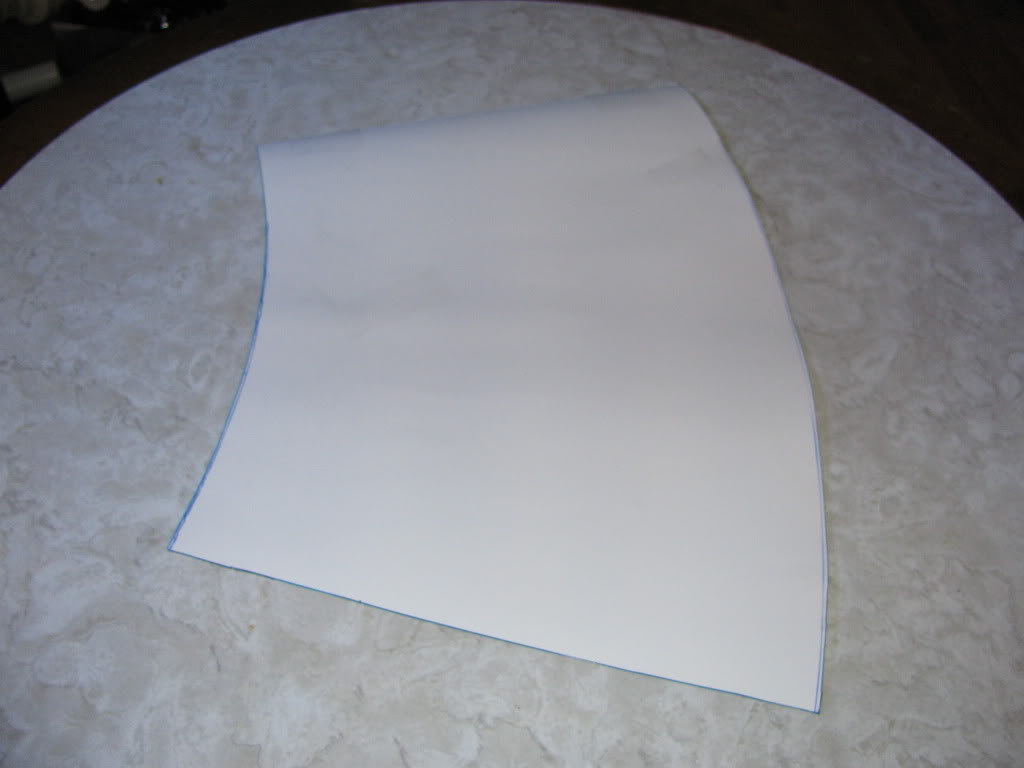
And my template for the acrylic.
IMG_2662.jpg

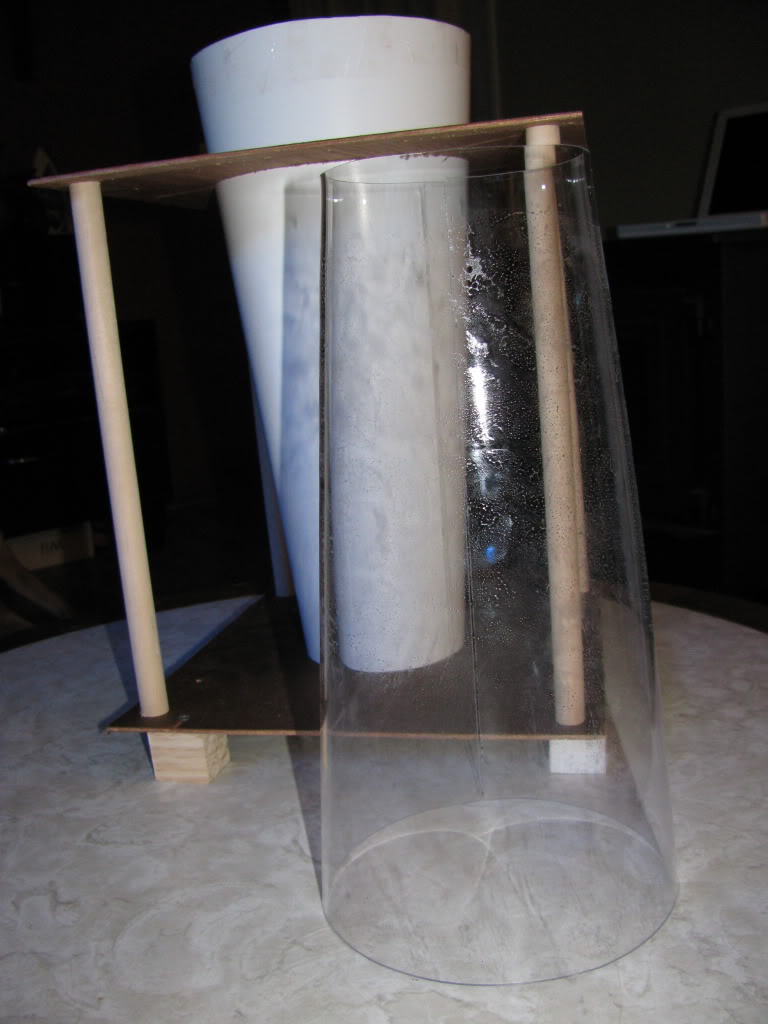
And my cone after it came out. It looks a little weird but its the residue from the wax paper I used while it was in the oven.
IMG_2665.jpg


Please let me know what you think.
 

Antonias1391

Active Member
View Badges
Joined
May 4, 2010
Messages
340
Reaction score
5
Location
Camdenton
Rating - 0%
0   0   0
looks decent! would be nice if u could make the base and neck larger, is it being made for a specific sump size?
 
OP
OP
gar732

gar732

Valuable Member
View Badges
Joined
Nov 28, 2009
Messages
2,354
Reaction score
364
Location
CT
Rating - 0%
0   0   0
Thanks! It will be going in a sump that is a 20gal long. I wanted to try and keep the footpint as small as possible. I was also limited on how big I could make the cone by the size of my oven. I went with a 4" neck because that is what the bk had.
 
OP
OP
gar732

gar732

Valuable Member
View Badges
Joined
Nov 28, 2009
Messages
2,354
Reaction score
364
Location
CT
Rating - 0%
0   0   0
Thanks, now that I've got the cone done I'm hoping it will move along. I should have everything I need now.
 

Antonias1391

Active Member
View Badges
Joined
May 4, 2010
Messages
340
Reaction score
5
Location
Camdenton
Rating - 0%
0   0   0
aaahh ic thats sweet i need to learn how to do that! starting to love doing things with acrylic!!
 
OP
OP
gar732

gar732

Valuable Member
View Badges
Joined
Nov 28, 2009
Messages
2,354
Reaction score
364
Location
CT
Rating - 0%
0   0   0
It actually wasn't that difficult, believe it or not that is my first try. I got the mold idea from troylee, he posted some pics of a couple of his molds on a thread on RC. Hopefully the rest of the build goes as smoothly.
 
OP
OP
gar732

gar732

Valuable Member
View Badges
Joined
Nov 28, 2009
Messages
2,354
Reaction score
364
Location
CT
Rating - 0%
0   0   0
Could you share some more info on shaping the cone? I thought you'd need special equipment for that?

Sure! The mold is what makes it so easy. I just cut a 6" circle on one board and a 4" on the other. I cut the wooden dowels at 12" and screwed it all together. The actual mold for the cone is just some thicker poster board I found. I just curled it up so that it fit tight against the circles I cut out and taped it so it would keep it shape and trimmed the excess. Next I took another piece of poster board and curled it over the first cone I made and trimmed it to the size I needed to used as a template for the acrylic. I used a couple of pieces of scrap to fine tune how long it needed to be in the oven for. I found that 5min @ 300 degrees worked well. My first attempt was 7min and the acrylic started to bubble. I used wax paper to put the acrylic on while it was in the oven but it left a residue on the acrylic. no biggie I just have to clean it off now. When you pull the acrylic out out of the oven you have to move kind of quick to get it in the mold so that it doesn't start to setup on you. I put the template in over the acrylic with the seems opposite of each other to help push it against the walls of the mold. And thats it, just wait for it to cool and you have a cone. I'm pretty impressed with how well it came out. I expected to have to try it a couple times before I got one that was useable.
 

Joost's reef

TEEN REEFER!
View Badges
Joined
Oct 2, 2010
Messages
149
Reaction score
2
Location
San Francisco
Rating - 0%
0   0   0
Thanks!
How do you handle the hot acrylic? oven mittens would seem a pain shaping the acrylic? What acrylic thickness did you use?
 
OP
OP
gar732

gar732

Valuable Member
View Badges
Joined
Nov 28, 2009
Messages
2,354
Reaction score
364
Location
CT
Rating - 0%
0   0   0
No oven mitts, I just grabbed the ends of the wax paper. I did have to grab the acrylic at one point to line up the seem, but I just did it quick. It wasn't too bad. There is not too much shaping involved, gravity does most of the work for you. And like I said before, just to be sure I used the template to help push it against the mold. I used 1/8" acrylic.
 

swannyson7

Moderator/Acro Aficianado
View Badges
Joined
Jan 17, 2010
Messages
6,715
Reaction score
296
Location
Bantam, Connecticut
Rating - 0%
0   0   0
Looks like it came out pretty good! Let me know when you want to get that Sicce, or when you're ready to set up the sump
 

Oiseau Reefer

Well-Known Member
View Badges
Joined
Mar 3, 2010
Messages
574
Reaction score
4
Location
Rexburg, ID
Rating - 0%
0   0   0
I was gonna say that mold looks fimiliar... Lol
Good job for your first shot... I need to delete those pics...lol share them here...;)

Yeah Troy I felt dirty going there to look at your stuff lolyou should just start a diy skimmer section on here
 
OP
OP
gar732

gar732

Valuable Member
View Badges
Joined
Nov 28, 2009
Messages
2,354
Reaction score
364
Location
CT
Rating - 0%
0   0   0
Looks like it came out pretty good! Let me know when you want to get that Sicce, or when you're ready to set up the sump

Thanks man. Let me know if your available this weekend, I'll take a ride up there, I'll bring the beer. I got home later than I wanted to yesterday.

I was gonna say that mold looks fimiliar... Lol
Good job for your first shot... I need to delete those pics...lol share them here...;)

Thanks. I'm glad I found that thread, otherwise I'd still befighting with it.
 
OP
OP
gar732

gar732

Valuable Member
View Badges
Joined
Nov 28, 2009
Messages
2,354
Reaction score
364
Location
CT
Rating - 0%
0   0   0
Ok, I worked on my skimmer a little more today. I got the the flange done, but I still need to cut a grove for the o-ring. I also need to pick up a new o-ring since the one I ordered was bigger than advertised and won't work.

I'm also debating on what I should do under the cone. Its 6" at the base, 4" at the top, and 12" tall. I was originally going to cut a 6" tube 3.5" tall and glue it to the bottom of the cone to get the hight and to get enough room for the pump. Now I'm thinking that I might just build a stand and put the pump under the cone. If anyone has any thoughts on how that might work please feel free to comment. I just think it'll be easier and look neater. I'll post some more pics soon.
 

ImageX

Community Member
View Badges
Joined
Sep 30, 2010
Messages
95
Reaction score
0
Location
Richardson TX
Rating - 0%
0   0   0
hmmm i mite try this with a street cone as a mold... nice job soo far..

as far as drilling into the cone it mite crack it.. especially with 1/8" acrylic... .25" wouldve been easier to drill thru... also the weight of the pump will crack the acrylic too.. i would get thicker acrylic for the base part... and probably taller then 3.5" if your drilling for the intake and outtake holes... cause your outtake is going to need a 1" uniseal... and you mite have added stress on the edges making the 3.5" tall crack... i'm made 2 skimmers but not cones... but i've heard cones are harder to drill thru.. also when making the venturi use bigger hose.. like 5/16 od or bigger... it makes a huge difference... i used airline tubing before and it sucked... If your going to build a stand where are you going to drill for the outtake? i definitely wouldnt suggest drilling in that thin of a cone.. if you made something like a trigger systems box underneath that would work and angle a piece of pvc into the cone coming out from the box and into the cone.. then for the outtake just silicone a gate valve onto it and presto its done... for the collection cup in alot of my skimmers i used plastic mason jars from walmart... but dont think it'll work for a 4" thou... i use them for 2"... but anyways GL with the build... nice job on the cone been wanting to try this myself..

oh also another thing a good pump for smaller sized skimmers like this and are fairly cheap is the genx 2400 with needle wheel... it's about $50 and works wonders... add a mesh mod on it and it's golden..
 
Last edited:
Back
Top