120G in-wall two sided reef tank full build journey!

dollar.reef

Community Member
View Badges
Joined
Nov 8, 2023
Messages
29
Reaction score
79
Location
Vancouver
Rating - 0%
0   0   0
Hi all! New to R2R and thought I'd share my build as part of a big main floor renovation. Fought my wife over whether the dining room needs a coffee bar or a 120G reef tank, and thankfully won :rolling-on-the-floor-laughing:. I've taken my experience keeping a 75G and come up with my dream system in terms of size and functionality.


1699602297726.jpeg


Design features:

- We took out the shower of the main floor bathroom which is never used and created a salt water mixing/storage room out of it. Since it was a shower, it had waterlines to supply the RO/DI.
- Implemented a water transfer pipe that runs from the top of the display tank through the ceiling joists to the salt water mixing room. Panworld pump for pumping RO/DI water into the ATO reservoir as well as salt water for water changes. I've also roughed in a 1/4" tubing line for implementing automatic water changes with a Neptunes DOS in the future.
- Tank is built into the wall to be viewable from both the dining room and the hallway. The dining room side is finished with cabinetry that matches the dining room pantry cabinets.
- Installed a drip pan under the sump with a floor drain, for water changes and accidental spillage.
- Installed a drip pan with a floor drain in the salt water mixing room.

Part 1 - Planning:

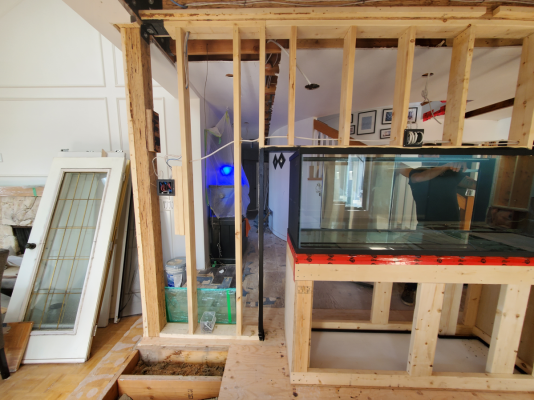
As you can see from the following pictures before and during renovations, I wanted the tank viewable from the hallway and the dining room. I initially wanted it as long as possible with a 2ft height, and even considered the Waterbox Peninsula 7225, but eventually decided on a custom 66" tank which equated to a 120G display tank and a 40G sump from Fiji Cube. This was a compromise on my part because my wife wanted some "non-tank" storage in the dining room flanking the tank, which turned out to be a good call!

IMG_20170108_112635.jpg

Direct view of the tank wall


IMG_20170108_112630.jpg

View of dining room side


IMG_20170108_112640.jpg

View of hallway side


20211215_174104.jpg

Tank visualization


1699594681804.png

Finalized tank drawings


- I chose a Herbie overflow instead of a Bean Animal because I wanted a 1.5" conduit going from display tank to sump so I could drain water from the display directly down to the floor drain in the sump cabinet with a vinyl tube. There weren't enough room in the overflow for more holes.
- To save costs, I chose wood framing instead of metal which unfortunately meant big posts in the middle of the sump cabinet. My thinking was that the hallway side will not be accessible so a metal stand felt kind of wasteful in terms of accessibility. But looking back, I really wish I went with metal.
- I chose a front to back distance of only 21" because I knew I would only have maintenance access from the dining room side, anything deeper and it would be a struggle to reach the sand bed of the hallway side.
- I made sure to put in GFCI plugs both above the display and in the sump cabinet.

With that, I confirmed the tank specs and production! As for the cabinets around the tank, I used the following for the design inspiration and created my cabinetry plan with my cabinet maker, who did an amazing job both with my kitchen and the tank wall.

1699595779355.jpeg

Built-in inspo

1699595877784.png

Cabinet plan for tank wall


Part 2 next!
 
Last edited:
OP
OP
dollar.reef

dollar.reef

Community Member
View Badges
Joined
Nov 8, 2023
Messages
29
Reaction score
79
Location
Vancouver
Rating - 0%
0   0   0
Part 2 - Infrastructure preparations


Because we took out a structural wall between the dining room and the kitchen (seen below) with this renovation, and the tank was sitting parallel to the floor joists, our structural engineer suggested reinforcing the tank wall from the basement below. It all worked together because we also had to open up the basement ceilings below to run plumbing for the sump floor drain. For a tank this size, he calculated that had it been sitting perpendicular to the floor joists and spanning several of them, I would have been fine with no structural modifications.

1699596594725.png

Structural dining room wall removed


1699596917415.png

Dining wall removed and new structural beam installed above, tank wall framing done floor joists can be seen


1699597196844.png

Basement rec room. Yellow highlights new footings. Green highlights new beams put in.


1699597379591.png

Basement ceiling view of sump cabinet floor drain


Another must have for me in this build was a way to effortlessly transfer water from the salt water mixing/storage room, which I accomplished by converting a shower on the main floor powder room into a mixing room, and running plumbing from the tank to it. I chose PEX plumbing with plastic fittings (not brass) as salt water will be running through them. We had to redo the ceilings on this floor anyway to remove popcorn ceilings, but I think it ended up not being too much destruction to the ceiling and if you're thinking to do something like this I'd say it's totally possible to retrofit.

Walk through video of the plumbing run to the mixing room:


1699598477131.png

View of PEX plumbing ceiling channel when it was open


For the salt water mixing station, I had a fabricator make a sturdy aluminum stand that would fit in the mixing room, and sourced two food grade liquid containers with drains at the bottom. Space in the mixing room is very limited as it used to be just a 36" x 60" standard shower. With framing and drywall added, I only had a 30" wide narrow room to work with. With this in mind, I chose box shaped containers and not cylindrical to maximize volume. Each of the containers can store 30 gallons. The mixing/storage build had its own challenges and is probably too much info for this full build summary, if anyone's interested I will elaborate on it later!

1699598936972.png

Mixing/storage containers and metal stand


1699599077081.png

Salt water mixing/storage plumbing design


1699599204720.png

Drip tray and floor drain the entire mixing station sits on.


Part 3 is next!
 
Last edited:
OP
OP
dollar.reef

dollar.reef

Community Member
View Badges
Joined
Nov 8, 2023
Messages
29
Reaction score
79
Location
Vancouver
Rating - 0%
0   0   0
Part 3 - Installing the tank into the wall
Tank and stand production took about a month and were delivered shortly after. The only preparation I did before install was painting the tank wall framing with a black exterior paint where the tank was going to sit under and through, thus it had the possibility of accidental splashes. I didn't want any problems with the framing issues. The framing opening in the wall is bigger than the tank dimensions to allow flexibility with tank positioning when it is in the room.


1699600089690.jpeg

The tank sits under this opening


1699600197784.png

Bringing in the tank


1699600280698.png

The eagle has landed!


1699600388539.png

Tank and stand in final position. I wanted to center the tank (not including overflow) in the dining room, and the tank ended up sitting against the right side of the opening and leaving a gap on the left.


After the tank was delivered and positioned, I placed my Fiji-Cube 36" sump and the custom drip tray in the cabinet and plumbed it up. Thankfully the sump fits like a charm with all high traffic maintenance areas accessible because I ended up having two 2"x6" posts in the stand instead of 1. For the floor drain I used a standard bulkhead fitted into the drainage plumbing in the basement ceiling. For the tank plumbing, I put in two manifolds off the return and regrettably used a ball valve for the main drain. Definitely upgrading to a gate valve in the future!


1699601124599.png

Sump


1699601151339.png

Drip tray and floor drain


1699601212065.png

Plumbing the tank and sump


After the tank was positioned and plumbed, my electricians hooked up the GFCI outlets on top of the display and in the sump cabinet a few days later, and I transferred the 75g to the new tank! I was beyond excited at this point!


1699601489818.png

Filling the tank


1699601545392.png

The aquascape


Next up was drywalling the tank wall. We made sure to use the good-edge of the drywall as a edge reveal for the tank. I didn't like the look of framing the tank with trims, and prefer a more minimal clean look. Because drywall was getting installed to the tank stand itself, we made sure to use mold-resistant drywall, and used whole big pieces instead of smaller cuts. This minimizes drywall joints and prevents cracks in the future.


1699601832800.png

Drywall, hallway side


1699601864937.png

Drywall, hallway side complete


1699601958334.png

Drywall, dining room side


Didn't get any pictures of the drywall taping, mudding, or painting!


Part 4 next!
 

Attachments

  • 1699600395276.png
    1699600395276.png
    1.6 MB · Views: 39
OP
OP
dollar.reef

dollar.reef

Community Member
View Badges
Joined
Nov 8, 2023
Messages
29
Reaction score
79
Location
Vancouver
Rating - 0%
0   0   0
Part 4: Built-ins and finishing


We went with a white and navy blue two toned kitchen so we had a choice of white vs. navy for the tank wall. After much deliberation we chose navy, I think it works a lot better with the blue of the tank. We managed to utilize this wall very well by building in above tank storage while keeping enough clearance for the tank lights under them, and having two 24" wide pantry cabinets on each side of the tank for dining room storage. The overflow is blocked with a fixed gap filler panel, while skinny cabinets of equal width (to the gap filler piece) are used on the left side of the tank for symmetry. These skinny cabinets turned out to be my most used cabinets since they are right next to the tank! I chose magnet mounted doors for the tank stand instead of hinged doors so that I can remove them out of the way during tank maintenance.


1699603558188.jpeg

Cabinet install


1699602988911.png

Upper cabinets allow plenty of clearance for lights and provide lots of surfaces to mount equipment


1699603152647.jpeg

Tank stand doors are removable.


And finally, the build was finished! There were some delays with the tank stand doors and the brass cabinet pulls and knobs, so the tank was the last thing to finish in the renovation. The tank is currently fishless because a nasty ich outbreak wiped out all the fish just before the renovation, I will be stocking it soon and sharing more livestock and display tank content. I'll also update the thread with my day-to-day maintenance experience after getting some pics as that has been a dream come true. This build has been a long labour of love and I'll end with some shots of the finished product!


1699603804203.jpeg

Dining room view


1699664226023.jpeg

Dining room view


1699603244028.png

Kitchen view


1699603824326.jpeg

Hallway view


1699664204121.jpeg

Hallway view


1699664245877.jpeg

Cabinets open for maintenance


Thanks for reading!
 
Last edited:

Gumbies R Us

Another Fish in the Sea
View Badges
Joined
Nov 10, 2022
Messages
9,951
Reaction score
19,192
Location
North Georgia
Rating - 0%
0   0   0
Part 4: Built-ins and finishing


We went with a white and navy blue two toned kitchen so we had a choice of white vs. navy for the tank wall. After much deliberation we chose navy, I think it works a lot better with the blue of the tank. We managed to utilize this wall very well by building in above tank storage while keeping enough clearance for the tank lights under them, and having two 24" wide pantry cabinets on each side of the tank for dining room storage. The overflow is blocked with a fixed gap filler panel, while skinny cabinets of equal width (to the gap filler piece) are used on the left side of the tank for symmetry. These skinny cabinets turned out to be my most used cabinets since they are right next to the tank! I chose magnet mounted doors for the tank stand instead of hinged doors so that I can remove them out of the way during tank maintenance.


1699603558188.jpeg

Cabinet install


1699602988911.png

Upper cabinets allow plenty of clearance for lights and provide lots of surfaces to mount equipment


1699603152647.jpeg

Tank stand doors are removable.


And finally, the build was finished! There were some delays with the tank stand doors and the brass cabinet pulls and knobs, so the tank was the last thing to finish in the renovation. The tank is currently fishless because a nasty ich outbreak wiped out all the fish just before the renovation, I will be stocking it soon and sharing more livestock and display tank content. I'll also update the thread with my day-to-day maintenance experience after getting some pics as that has been a dream come true. This build has been a long labour of love and I'll end with some shots of the finished product!


1699603804203.jpeg

Dining room view


1699603244028.png

Kitchen view


1699603824326.jpeg

Hallway view


Thanks for reading!
Tank is great!
 
OP
OP
dollar.reef

dollar.reef

Community Member
View Badges
Joined
Nov 8, 2023
Messages
29
Reaction score
79
Location
Vancouver
Rating - 0%
0   0   0
Awesome build. Looking great! Saw your post on r/SaltwaterAquariumClub so I thought I would come say hello and help give your thread some traffic. Looking forward to more updates!
Thanks man! I'm very excited with the tank and will update as soon as I get some more pictures!
 
OP
OP
dollar.reef

dollar.reef

Community Member
View Badges
Joined
Nov 8, 2023
Messages
29
Reaction score
79
Location
Vancouver
Rating - 0%
0   0   0
Some pictures of maintenance


1699664361568.png

Into the sump floor drain. Red arrow: drain line from the skimmer collection cup; Blue arrow: drain line from the display tank with a siphon starter


1699664458340.png

Two vinyl tubes going up through the overflow conduit into sump cabinet. Green arrow: supply for ATO reservoir; Blue arrow: drain line of display tank


1699664639566.png

"Ceiling" of sump cabinet showing bottom of the overflow. Green arrow: supply for ATO reservoir; Blue arrow: drain line of display tank. Yellow arrow: 1.5" PVC conduit which starts here and ends above the water line of the overflow in display


1699664815458.png

View of top of overflow. Brown arrow: PEX line coming in from the mixing room, exits the wall just above the overflow. Pink arrow: ball valve controlled line to deliver salt water from mixing room to display for water changes. Green arrow: ball valve controlled line for delivering RODI water down to ATO reservoir through conduit; Blue arrow: drain line of display tank, I usually just tuck the end behind my Inkbird heater control, and stick it in the tank for a water change. Yellow arrow: end of the conduit, sits higher than tank height so water will never get in.


I will do a video of how everything works soon!
 
Last edited:

robertjules1981

Community Member
View Badges
Joined
Oct 21, 2022
Messages
45
Reaction score
50
Location
Prescott
Rating - 0%
0   0   0
Gorgeous build! I love the drain in the sump area, might have to incorporate that when I build my fish room next year!
 

robertjules1981

Community Member
View Badges
Joined
Oct 21, 2022
Messages
45
Reaction score
50
Location
Prescott
Rating - 0%
0   0   0
Thanks Robert! It has been so enjoyable to do water changes and emptying out the skimmer.
For sure! The smell of my skimmer is the only thing my wife has complained about since allowing me to set up my 6 footer in the mudroom and not in the garage lol! We’re building a house next year and she is allowing me a whole fish room! Happy wife, happy life as they say LOL
 
OP
OP
dollar.reef

dollar.reef

Community Member
View Badges
Joined
Nov 8, 2023
Messages
29
Reaction score
79
Location
Vancouver
Rating - 0%
0   0   0
For sure! The smell of my skimmer is the only thing my wife has complained about since allowing me to set up my 6 footer in the mudroom and not in the garage lol! We’re building a house next year and she is allowing me a whole fish room! Happy wife, happy life as they say LOL
Lucky you! That is the one thing I wish I could have done is to have the sump in the fish room instead of just my mixing station. Right now the sump is very crammed and it also isn't easy to implement automatic water changes with my current set up.
 

Reefing threads: Do you wear gear from reef brands?

  • I wear reef gear everywhere.

    Votes: 20 13.8%
  • I wear reef gear primarily at fish events and my LFS.

    Votes: 10 6.9%
  • I wear reef gear primarily for water changes and tank maintenance.

    Votes: 1 0.7%
  • I wear reef gear primarily to relax where I live.

    Votes: 22 15.2%
  • I don’t wear gear from reef brands.

    Votes: 82 56.6%
  • Other.

    Votes: 10 6.9%
Back
Top