150 Gallon SPS Build

OP
OP
R

Ryan Doolittle

Active Member
View Badges
Joined
Aug 4, 2016
Messages
134
Reaction score
102
Location
Alberta, Canada
Rating - 0%
0   0   0
The main power has been installed!! I got everything checked off my list, however I am not happy with where the timer plug boxes are located. I am unsure if I want to move them with the single outlet box or leave them there. I want to put the drivers, and transformer blocks for some of the components (powerheads, led lights etc) in that space. Or I leave the timer plugs where they are and any power cord that wont reach the pump or light I will have to build/buy and extension cable.

20200301_184439.jpg


20200301_184446.jpg


20200301_194426.jpg


Now that the electrical is run I need to redo running the wires. I want to make it so they aren't jumbled up under the ADJ powerbars and figure out some sort of a trim around the power bars as well. I also need to figure out where the drains and returns will be coming through the back wall, then get those holes drilled.

The tank will hopefully be built friday night of I can shake this chest cold I am having. I'm out of breathe and weak quiet quickly so it is tough to get any sort of work done.
 
OP
OP
R

Ryan Doolittle

Active Member
View Badges
Joined
Aug 4, 2016
Messages
134
Reaction score
102
Location
Alberta, Canada
Rating - 0%
0   0   0
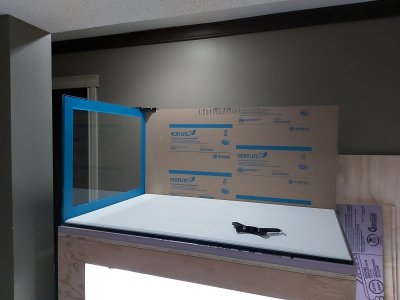
Friday night was assembly night. It was a rocky road but the glass was spotless, seams are full of silicone and have no bubbles. I am happy with how clean the lines are. I'm going to give the silicone 3 or 4 days to dry then go in with a razor to do some clean up. A shout out to my buddy Jeff at Badlands Marine (follow him on Instagram people!) for helping me out getting this tank built. We were up until about 1am putting the last touches on it, so a big thank you for the help.

20200306_215738.jpg

20200306_215733.jpg

20200306_222959.jpg

20200307_003443.jpg


So now it's time to figure the plumbing out. Gate valves are on order, I just need to put a list of fitting together, and cut a hole through the back wall. Bulkheads are also ordered and should be here late this week or early next week. I will also have to track down some Diamond hole saws and assemble the overflow box. Boy there is alot to do this coming week! 20200306_215738.jpg
 
Last edited:

MuffinMonster

Active Member
View Badges
Joined
Sep 30, 2019
Messages
141
Reaction score
105
Location
Indianapolis
Rating - 0%
0   0   0
Dang this is sick, you're like building the whole thing from the ground up lol. Has to be an awesome feeling when its all said and done building your own tank, stand, sump etc... Following along for sure!
 

niQo

Active Member
View Badges
Joined
Dec 14, 2017
Messages
150
Reaction score
103
Rating - 0%
0   0   0
It's looking really good! I'll have to come check it out in person!
 
OP
OP
R

Ryan Doolittle

Active Member
View Badges
Joined
Aug 4, 2016
Messages
134
Reaction score
102
Location
Alberta, Canada
Rating - 0%
0   0   0
Dang this is sick, you're like building the whole thing from the ground up lol. Has to be an awesome feeling when its all said and done building your own tank, stand, sump etc... Following along for sure!

Thanks. It may be my tank but it is taking a group of us to do. There is a growing list in the local community who has lent a helping hand and is still lending as well. I will have to thank them all when the tank is running.
 
OP
OP
R

Ryan Doolittle

Active Member
View Badges
Joined
Aug 4, 2016
Messages
134
Reaction score
102
Location
Alberta, Canada
Rating - 0%
0   0   0
This evenings project was getting the holes for the overflow drilled. A thank you goes out to the LFS for saving my butt. I thought I had hole saws for the 1 inch and 3/4 inch bulkheads, however I was mistaken and new ones were 4-8 weeks away. Kevin @ Tropical Fish Imports stepped in and loaned me a set to use to get this tank going; so thank you Kevin it was very much appreciated. The work started by building a jig to get the holes started, then clamped the glass to a piece of wood to hold it over the sink (while my wife was away at work, a very important piece of info gentlemen). This helped the back side from breaking out when the bit was close to punching through.

Always make sure there is water on the bit, keep the drill slow, and use minimal pressure. I got them all scored tonight and 2 of the holes cut out. Tomorrow I should be able to finish the other 2 and hopefully cut holes in the eurobrace for the returns and power cords.

20200309_200918.jpg
 
OP
OP
R

Ryan Doolittle

Active Member
View Badges
Joined
Aug 4, 2016
Messages
134
Reaction score
102
Location
Alberta, Canada
Rating - 0%
0   0   0
Friday night fun!! Its the snow storm of the year happening out there right now and all hell has broken loose on the streets. I was able to return the glass hole saws Kevin at Tropical Fish Imports was kind enough to borrow to me (thanks again kevin, managed to see Adrian at Site One for some plumbing fittings however I forgot to pick up pipe and 1 inch threaded nipples (dont know how I managed that!), and then fed the fish at a tank I am babysitting for the week; all without an accident. On my way home Ty @ReefPVC sent me a message saying my order was ready so I zipped over there to pick up some colored PVC, glue, and some fittings (more on that soon). Thanks again Ty!

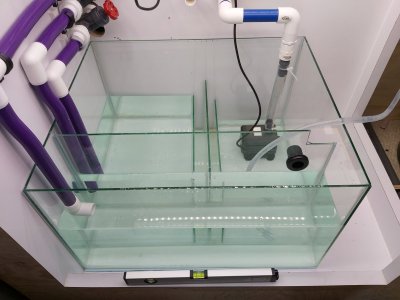
Once I got the little helper to bed I set to building the overflow box. I got all the pieces for the overflow and eurobracing drilled this week. 3 evenings bent over the sink drilling holes, I am so glad that's done!
20200310_205941.jpg


The sump was the most scary part because I couldn't see what the bit was doing. With no flowing water I had to use the dam method and the water gets pretty murky with glass shavings. But it all went off without a hitch and the refugium side is ready for plumbing.
20200310_204006.jpg


20200310_205914.jpg


Now tonight's venture, once I was able to get to it, was to build the external overflow box. The plan is to build it tonight, give the silicone 12 hrs to cure, then silicone it to the tank tomorrow before the eurobrace goes on. One the bracing goes on it makes for a difficult time securing the overflow box while the silicone dries.

Other than the less than satisfactory cuts on the glass both in quality and measurements I got it all put together. One side panel is 1/16 of an inch taller than the other, either the back wall wasnt cut long enough or the floor was cut too long, either way the back wall was short if I spaced the glass 1/16th of an inch on all sides. That's how the tank was built, not sure why the overflow would be done different. Oh well, so much for silicone injection, I did it the old school way and laid a bead then secured it together.

20200313_211742.jpg


20200313_211757.jpg

20200313_211908.jpg


The other side wall showing a proper cut
20200313_212019.jpg


It looks good all put together, just dont look real close.
20200313_213502.jpg


Progress goals for the weekend:
- Attach overflow box to tank
- figure out the best way to white out bottom of sump so you cant see pink foam insulation
- Get sump back into stand

My fiance is working this weekend which wont leave alot of time to work on the tank. I think those goals are pretty achievable in the evenings once the helper goes to bed.
 
OP
OP
R

Ryan Doolittle

Active Member
View Badges
Joined
Aug 4, 2016
Messages
134
Reaction score
102
Location
Alberta, Canada
Rating - 0%
0   0   0
Got 2 things checked off my list this morning, I even found time to pick up a piece of foam to put under the sump. If I have time I may even leak test the sump tonight! Bottom painted white with plastic dip, just waiting for it to dry before I put it in the stand.
20200314_122140.jpg


And I got the overflow box attached, again I found issues. The box is the exact size of the overflow weir when I remember asking for it to be a couple inches larger on each side. It will work fine, just something minor that bothers me.
20200314_114258.jpg
 

niQo

Active Member
View Badges
Joined
Dec 14, 2017
Messages
150
Reaction score
103
Rating - 0%
0   0   0
Not much space to work in that last picture!
 
OP
OP
R

Ryan Doolittle

Active Member
View Badges
Joined
Aug 4, 2016
Messages
134
Reaction score
102
Location
Alberta, Canada
Rating - 0%
0   0   0
Tonight it feels like nothing was accomplished this weekend but when I look back I see I was able to get some things done.

My plan for today was to get the eurobracing on the tank and that didnt happen. Not sure why, probably got distracted by the plumbing.

I was able to paint the bottom of the sump white. This will help show detritus and hide the ugly foam. Already I would like to upgrade to an acrylic sump just for a cleaner white bottom.

After the sump was in I started on the plumbing. I have some issues I need to work out and fix. Hopefully a couple friends with 3D printers will be able to fab something up for me.
20200315_200558.jpg


I also did some experimenting with the pipe. Ty @ ReefPVC was kind enough, and interested enough, to give me a stick of 1 inch blue PVC pipe to see how it would take to bending. I need to do some offsets with the pipe and wanted to bend them in. However I was worried the pipe would discolor or melt. Well long story short the pipe took to bending just fine; no discoloration, no kinking or anything. The trick seems to be to apply low heat very slow, because of the thickness of the walls it takes time for the heat to fully penetrate. Too much heat too quickly and it will burn the pipe, dont allow the heat to fully penetrate or try to bend the pipe too cool and it will discolor the pipe. However if you heat it too much the pipe will deform or kink on you. It's a delicate art that takes time to master, luckily as an electrician I do it at work and have some practice.
So thanks to Ty for providing me the material to do some R&D, it was great to experiment on your dime instead of risking a stick of pipe of my own. By the way I am loving the new purple pipe with white fittings!

Some photos showing the offset bends I put in.
20200314_195013.jpg

20200314_195044.jpg

20200314_195026.jpg

20200314_195037.jpg

20200314_195052.jpg


I guess the other thing that could have distracted me was aquascaping. I pulled out all my rock and started designing. Here is a structure I had at one point. I have modified it since and currently have it set up to look at on a table. Not sure if I am sold on it yet.
#1 things always change how they appear once in the tank
#2 things always change how they appear when the tank is full of water
#3 things always change how they appear when you have the proper lights over it.

I think what is going to happen is the aquascape will get redone when it goes into the tank. The tank will be leak tested with freshwater and at this point the lights will be hung above. If any changes to the rock need to be made this is when it will happen. The tank will then be drained, the rock will be cemented together and that will be the end of it. Really you wont see the rock in a year or 2 anyway.
20200314_204638.jpg

20200314_210739.jpg

20200314_214651.jpg

20200314_214800.jpg


I guess that's all for now. Not sure how much I will get done in the next week or so. With the Covid-19 virus they have closed all schools and daycare facilities here which means the helper will be home alot more and so will I. I think a good goal for the next week will be
- Put eurobracing onto tank
- Finish stand side of plumbing the drains
- Pick up 1" Sch40 and other supplies to finish behind stand plumbing.
- Pick up supplies to plumb the return lines.

I think these are achievable goal for the next 7 days.
 
OP
OP
R

Ryan Doolittle

Active Member
View Badges
Joined
Aug 4, 2016
Messages
134
Reaction score
102
Location
Alberta, Canada
Rating - 0%
0   0   0
We are coming to the end of another week and I am happy to say I got some stuff done. I picked up a couple things to keep progress moving forward but really I just used what I had here. Tomorrow I will pick up everything I need to finish the plumbing.

I got the eurobrace put on this week which was awesome.
20200316_192429.jpg


Then continued on the in the stand plumbing
20200318_205603.jpg


However I wasnt happy with the bottom run semi drilled another hole and made that run go below the Ty Duct. This will open up a ton of space to do whatever I want with the returns. I need to pick up a few more 3D printed straps and the drains will be done in the stand.
20200319_203745.jpg


These pipe cutters sure made life easy, there is a section of the return that is too large for these cutters and I am not looking forward to hand sawing pvc.
20200319_201446.jpg


By the end of the weekend I would really like to have all the drains and returns plumbed in and finished. However I am going to be more realistic and shoot for just having the drains finished.
 
OP
OP
R

Ryan Doolittle

Active Member
View Badges
Joined
Aug 4, 2016
Messages
134
Reaction score
102
Location
Alberta, Canada
Rating - 0%
0   0   0
A weekend of progress. I got all of the plumbing done including the return. As I was walking out the door I decided to change how I was going to do the returns. I ended up with 2x 1 inch pipes coming through the back wall to end up running 2x return pumps. I also added 2 gates right below where the returns enter the tank. For right now it is so I can easily control flow from either pump if I want. In the future I want to use 2 DC pumps which will make the gates pretty useless.

20200320_193913.jpg


Chad came over and gave me a hand leveling the stand. It was out quiet a bit so he ended up cutting some 4 foot long shims to support the stand over the entire length. Got it sitting where we wanted and I sat back to enjoy weeks worth of hard work.

Then a really silly idea entered my head..... let's leak test the sump.

20200322_134048.jpg


When the sump was full another bad idea entered my head. Well we may as well leak test the tank.
20200322_141344.jpg


20200322_152251.jpg


20200322_164615.jpg


It was at the point where water started pouring into the overflow box that things started to go wrong.
1st thing wrong. One of the 4 bulkheads was leaking water something terrible.
2nd thing wrong. A union inside the stand was leaking.

I tightened the bulkhead and the leak got worse. So I unscrewed everything and contemplated whether I wanted to silicone the bulkhead. There is a small shell chip under that bulkhead and I was thinking that was leaking. But I screwed the bulkhead back down, have it a little turn with my slip joint pliers, added enough water to get to the top of all the bulkheads and the leak appeared to stop.

The union was another matter. After the unions there is a 90 fitting to go up to the overflow box, on that union I made the gap too narrow and the 90 sits pretty tight against the stand. This gave me a false tight when I screwed everything together. A little help from the slip joint pliers and the leak stopped. Looking back at this I wish I had pulled the stand away from the wall more, ran all the drains and returns on strut with cobra clamps.

After this was all settled I let the tank run for half hour and when I went to check I noticed some leaks on some of the fittings. I think I was too aggressive when glowing the fittings and may have broken the seal. I turned everything off, dried the drains and smeared glue on the fittings. If this doesnt work I will be draining the tank and sump, pulling the stand away from the wall and redoing all the drains.

I also couldn't resist throwing a light over the tank. This is how it looked before I called it a night.

20200322_205542.jpg


So in the usual fashion, what are the goals to accomplish this week.
Well assuming the plumbing is fixed I will get the drains dialed in. Once that happens I will let the tank run for a few days to be sure the leak issues are cleared up. Once I am sure, then I will drain everything and start aquascaping. Honestly I am worried at this point I dont have enough and will have to drill one out the inch and a half.

If the drains are still leaking then everything will get drained, tank pulled away from the wall, and an overhaul of the plumbing will happen. 20200322_134048.jpg
 
OP
OP
R

Ryan Doolittle

Active Member
View Badges
Joined
Aug 4, 2016
Messages
134
Reaction score
102
Location
Alberta, Canada
Rating - 0%
0   0   0
The rear fittings were leaking, I would get those fixed and the nipples between the bulkheads and unions would leak. I tried to farmer fix it and to be honest I wasnt happy. So out came the screw type bulkheads.
20200325_174228.jpg


In went new Slip style bulkheads and the leaks have gone away. I'm going to leave the tank run overnight, tomorrow if the floor behind the tank is dry then the aquarium will be drained and aquascaping will start!
 
OP
OP
R

Ryan Doolittle

Active Member
View Badges
Joined
Aug 4, 2016
Messages
134
Reaction score
102
Location
Alberta, Canada
Rating - 0%
0   0   0
Aquascaping started over the past few days.
20200326_145504.jpg


I had a setup laid out on my work table downstairs and tried to bring it up stairs with very little success.
20200326_142426.jpg


I tried a few time to recreate the scape and eventually got frustrated and gave up. I snapped a bunch of pictures but obviously not enough. This is what I ended up with and am happy with it, besides it's going to be full of corals in a year or 2 anyway.
20200326_221148.jpg

20200326_221234.jpg


As you come down/up the stairs
20200326_221205.jpg


Then the far side
20200326_221226.jpg


When I first got the scape together I wasnt happy with it. I walked away and came back a few hours later, I liked whatI saw. So I sat on the design for a few days to male sure I was actually happy with it, drained the tank, and started to concrete it all together.
20200328_094332.jpg

20200328_094325.jpg

20200328_094328.jpg


Once that was completed I had to give the Fijicrete a few hours to completely set up and cure. I used the downtime to do more cord management. Here is what it looked like when I started, a total mess!
20200328_095819.jpg


Making some progress
20200328_114603.jpg


Wires all cleaned up.
20200328_115933.jpg


The Ty-Duct and cord channel really finishes that clean up.
20200328_120553.jpg


I also found I needed to label the switches on the power ADJ power bars. This is temporary until I can find a better looking way to label them.
20200328_132258.jpg


Now we wait for the tank to fill. Get the temperature stable, get the salt mixed in, and wait for my Microbacter7 to show up.

In the mean time I will have to start designing the trim for the stand and get that started.
 
OP
OP
R

Ryan Doolittle

Active Member
View Badges
Joined
Aug 4, 2016
Messages
134
Reaction score
102
Location
Alberta, Canada
Rating - 0%
0   0   0
The tank is about a week into the cycle and we have ammonia!
20200406_201022.jpg


The shrimp I added has also be fully engulfed in this bubble of whatever that is. I haven't touched it but it doesnt look too appealing.
20200403_145906.jpg
 

When to mix up fish meal: When was the last time you tried a different brand of food for your reef?

  • I regularly change the food that I feed to the tank.

    Votes: 24 26.7%
  • I occasionally change the food that I feed to the tank.

    Votes: 33 36.7%
  • I rarely change the food that I feed to the tank.

    Votes: 26 28.9%
  • I never change the food that I feed to the tank.

    Votes: 6 6.7%
  • Other.

    Votes: 1 1.1%
Back
Top