




- Joined
- Oct 7, 2025
- Messages
- 11
- Reaction score
- 8
- Location
- Ogden
- What state or country do you live in
- Utah
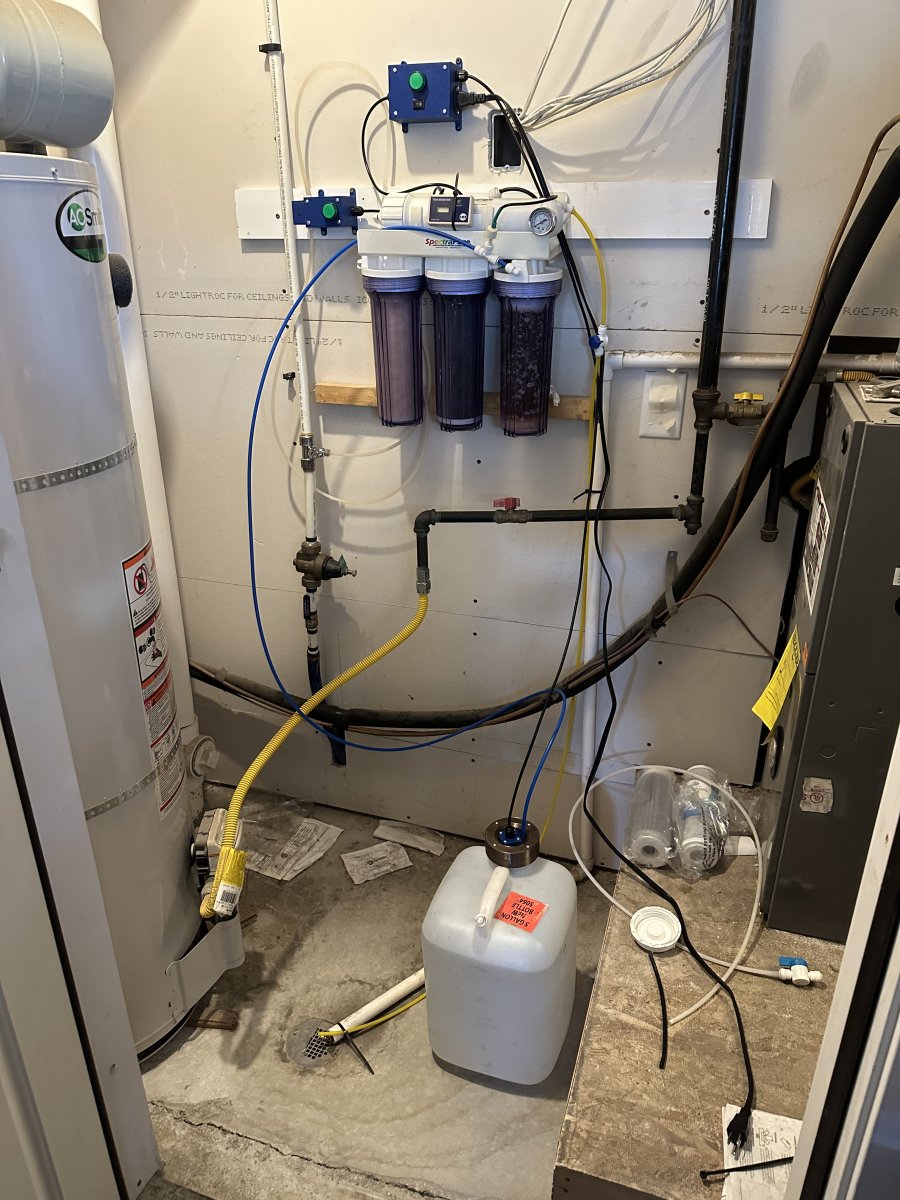
My smaller RODI setup doesn't fit a brute container, so I've been working with 5-gallon jugs that I got locally. The white ones with the handles. Usually I just turn on the RODI then set a timer when to come back. It's worked fine, but have overflowed a couple times due to my inattention. I had some time off work for this Christmas season so I've had a lot of time to spend in Fusion360 and Cura and have had my 3D printer churning out multiple parts for my tank. This is just one of them. I'm pretty stoked with how it came out, and my wife doesn't seem to have the same magnitude of appreciation so hopefully you all will find it cool!
The circuitry is really simple, I have a float switch and power switch powering a 110v solenoid valve and a couple indicator lights for process monitoring. I have it running off of 110vac directly, as I was worried about the amperage that the solenoid would pull exceeding what the float switch was rated for. So a higher voltage, means less current. In hindsight, I'd make it 12v in the future even if that meant adding in a relay. The solenoid seems to chatter a bit while it's energized.
The cap even threads on to the jugs, which is cool and tested my modeling ability however I think it's unnecessary. Could get away with just setting the top into the neck of the jug. The wetted parts are ASA while the non-wetted (blue and brown) are PLA.
I originally wanted it be all in one box, however the box would have been fairly large however I have recently started leaning towards making more small parts instead of one big part. That way if something needs to be changed, I don't have reprint the whole design just the part that needs updating.
Below are the three main components: left is the jug cap with the float sensor, middle is the "control box" with a power on light, and the right is the solenoid box with an indicator for solenoid energized.

Below is my RODI setup, with the device all hooked up.
The bill of materials:
- Float switch (there might be an amazon alternative but this is what I had available)
- AC power in
- Switch
- Indicator lights
- Solenoid Valve
- PG7 Cable Glands
- 2 conductor wire
And obviously 3D print filament as appropriate.
I haven't posted the files anywhere as they're still relatively "beta" and there's a few changes I would make prior to publishing, but if there is interest shoot me a message and I can send them over.
The circuitry is really simple, I have a float switch and power switch powering a 110v solenoid valve and a couple indicator lights for process monitoring. I have it running off of 110vac directly, as I was worried about the amperage that the solenoid would pull exceeding what the float switch was rated for. So a higher voltage, means less current. In hindsight, I'd make it 12v in the future even if that meant adding in a relay. The solenoid seems to chatter a bit while it's energized.
The cap even threads on to the jugs, which is cool and tested my modeling ability however I think it's unnecessary. Could get away with just setting the top into the neck of the jug. The wetted parts are ASA while the non-wetted (blue and brown) are PLA.
I originally wanted it be all in one box, however the box would have been fairly large however I have recently started leaning towards making more small parts instead of one big part. That way if something needs to be changed, I don't have reprint the whole design just the part that needs updating.
Below are the three main components: left is the jug cap with the float sensor, middle is the "control box" with a power on light, and the right is the solenoid box with an indicator for solenoid energized.
Below is my RODI setup, with the device all hooked up.
The bill of materials:
- Float switch (there might be an amazon alternative but this is what I had available)
- AC power in
- Switch
- Indicator lights
- Solenoid Valve
- PG7 Cable Glands
- 2 conductor wire
And obviously 3D print filament as appropriate.
I haven't posted the files anywhere as they're still relatively "beta" and there's a few changes I would make prior to publishing, but if there is interest shoot me a message and I can send them over.












