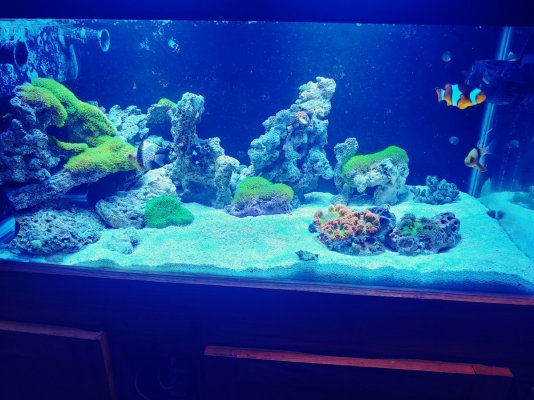
40 gallon breeder build

SALTYMOPAR

Community Member
View Badges
Joined
Apr 21, 2020
Messages
64
Reaction score
46
Rating - 0%
0   0   0
I've been out of the hobby for few years decided the time was right to get back in 40 Gallons was a nice size for me i have a 75 gallon that i was told was to big for the living room so had to compromise and build a new 40 gallon breeder i like the depth/width of the breeder i built a 20 long gallon sump.
20200116_171438.jpg

My start of my design things have changed since this. I set the tank up as a peninsula with a coast to coast on the oneside with a bean animal overflow.
20200327_173511_HDR.jpg

Love the animal she super quiet.
20200408_195151.jpg

My 20 gallon long sump painted 3 sides white and the bottom black installed acrylic baffles which as bitten me in the butt once before but i made sure to leave a decent gap and good amount of silicon.
20200411_152602_HDR.jpg

I tried running my avast pegleg skimmer on this tank that i originally had on my 75. The 40 gallon just didn't have enough volume and took up a bunch of space so i got a bubble magus 5 curve elite i went with the elite only because i want the sicce pump. Shes a beast of a skimmer
20200409_165218.jpg

20200415_195134_HDR.jpg

20200415_195307_HDR.jpg


Lights for this tank i built a diy led light. 2-50watt led cobs with a number of royal blue 3w and a few UV 3w on some aluminum U channel the 50watt cobs i used some intel processor heat sinks
20200217_180209_HDR.jpg

20200229_192718.jpg

Overall im happy with it for now the two cobs are suppose to be 10k but one is a little more blue than the other.
20200327_173534_HDR.jpg

Return pump for this tank i went with what i had on had which was 2 options mag 12 and mag 9 so i went with the mag 9 full blast through 1" pvc i figure head lose and pipe size im running 800gph through two 3/4" 3d print random flow generators.

I've got a bunch more stuff that going on this tank it should be a really awesome build ive been working on my own diy roller filter i hate dealing with filter socks so that coming up here soon.
 

Billldg

My Gem Tang Is Watching You
View Badges
Joined
May 14, 2018
Messages
17,478
Reaction score
121,885
Location
Georgia
Rating - 0%
0   0   0
I am going to enjoy watching this come together. Ton of respect for all the DIY stuff.
 
OP
OP
SALTYMOPAR

SALTYMOPAR

Community Member
View Badges
Joined
Apr 21, 2020
Messages
64
Reaction score
46
Rating - 0%
0   0   0
I've never been a fan of filter socks they work great but the constant washing. I could look at filter floss but that still needs changing out on a regular schedule. Roller mat filter are not a new thing they have been around for a long time just never gained in popularity. There are some nice designs but all of them take up a fair amount of space. Space is one thing that my build is lacking so that leads me to building my own. I hope that this doesn't fail i might have to turn down the flow of my tank to make it work i haven't made it that fair to see so hopefully it not a huge flop. Lol so let's get the the pictures
So i designed the roller filter around kilr 7 i picked that filter roll to use there are number of companies that will cut filler paper to the size you need and down the road i will go that route for cost but to get started i bought kilr 7 roll to start.
20200412_125223.jpg

Water enters in the side falls to the bottom and flows out the sides. Motor that i have in this picture was from my Diy skimmer neck cleaner worked well in that application not so much on this project. I have already got the replacement motor with a gear box tons more torque.
20200417_174135.jpg

New motor 24vdc 10rpm super deep reduction gearing.
20200417_174705.jpg

Could not help but take the cover off to give it a look. The motor runs 24vdc which for most is not a great option a little secret to my tank im using a PLC for a controller which uses 24vdc it a little clunky compared to other reef controllers, but you can do a ton of things with an industry PLC.
20200415_193045.jpg

The roller mat fits into the water box i built has two 1.5"PVC on the right side water flows from the right side to left i have a optic water level sensor that in the middle mounted in a cord grip. I will get more pictures on the sensor shortly i use this sensor everywhere solid state no moving parts pretty robust. When the filter need new material the water will back up into the water box water rise signal the sensor and the motor will advance new filter material. There is a spot where the water can waterfall in emergency giving me sign of trouble.
20200415_193147.jpg
20200415_193141.jpg
20200415_194629.jpg
20200415_193536.jpg
20200415_193532.jpg

As it sits right now i need to change the plumbing on the drains to get it fit in place. Should be real nice once it in place or a huge flop. Only time can tell. Happy reefing folks and thanks for looking.
 
OP
OP
SALTYMOPAR

SALTYMOPAR

Community Member
View Badges
Joined
Apr 21, 2020
Messages
64
Reaction score
46
Rating - 0%
0   0   0
I am going to enjoy watching this come together. Ton of respect for all the DIY stuff.
Thanks i hope you enjoy because i love to build my own stuff I've got a ton of crazy stuff to post that i built for my tanks. It should be a good build i wish i would have snapped more pictures of the start because everyone loves pictures.
 
OP
OP
SALTYMOPAR

SALTYMOPAR

Community Member
View Badges
Joined
Apr 21, 2020
Messages
64
Reaction score
46
Rating - 0%
0   0   0
Well i was able to re plumb the drains and install the roller filter today she's a tight fit but things look good. So the drains on this tank im running a bean animal main and secondary is 1.5" the emergency is a 1" only the main drain has a ball valve to fine tune
20200425_141311.jpg

The emergency drain is a few inches so any problems come up and the emergency drain is needed it make a bunch of noise to give me a audible
20200425_144709.jpg
20200425_181336.jpg
20200425_161347.jpg
20200425_161340.jpg

This is what i use for most of my water level float switch no moving part almost impossible to false read so how it works is it uses two fiber optic cables one sends out a pulsed led light the other is a receiver the fiber optic cables are installed in a 1/2" acrylic rod the end of the rod is beveled at a 45 degree acts as a prism the led light get sent across the prism and back through the receiver as soon as the water touches the tip of the rod. the led light is dispersed into the water which changes the state of the switch so for my water level on ato it switches the ato on when the rod is pulled out of the water. My skimmer chamber is the opposite it allows skimmer to run till the sensor see any skimate in the collection jug at the top. I also use the same sensor on the water level of the drain box. Level get to high the filter roller move new filter material out.
20200425_180000_HDR.jpg

Everything on the tank is controlled with a small PLC i can set all the timers and light schedule i control my temp with it. To go with the PLC i have a HMI Touch screen. That i can turn off and on anything on the tank.
20200425_202647.jpg

i need a PH probe to get my ph reading.
20200425_202659_HDR.jpg
20200425_202709_HDR.jpg

15878653123184268537022741065326.jpg

The temp sensor for the tank on the return line
20200425_175807_HDR.jpg

The fish are ready for dinner even the watchman trolling the top of the tank.
Items im looking at doing Ive got a reactor that i might turn into a chaeto reactor. Ive got a diy kalk stirrer i might throw in the mix or go dosing i haven't decided i have both systems i could use. I think im leaning towards kalk to start.
 
OP
OP
SALTYMOPAR

SALTYMOPAR

Community Member
View Badges
Joined
Apr 21, 2020
Messages
64
Reaction score
46
Rating - 0%
0   0   0
Did a little work on the chaeto reactor picked up 4" pvc pipe with an end cap and coupling. Purchased grow light led strip from Amazon installed the led inside the 4" pipe i didn't want the led to touch the side of the reactor
20200429_184423.jpg
20200429_184431.jpg
20200419_203413.jpg

My reactor i built number of years ago out of 3.5" acrylic tube fits nicely with a small air gap.
My skimmer is black and red figure i would fallow that theme a little more.
20200429_184701.jpg
20200429_184438.jpg
 

Tdoan

Active Member
View Badges
Joined
Apr 12, 2020
Messages
100
Reaction score
51
Rating - 0%
0   0   0
What type of PLC and and HMI are you using? Can you see it remotely?
 
OP
OP
SALTYMOPAR

SALTYMOPAR

Community Member
View Badges
Joined
Apr 21, 2020
Messages
64
Reaction score
46
Rating - 0%
0   0   0
What type of PLC and and HMI are you using? Can you see it remotely?

i'm using an automation direct "Click PLC" when i bought it years ago it was one of their higher end units with analog in and out they didn't have Ethernet port yet. now they have Ethernet units available. the Hmi is a C-more 6inch that was not Ethernet connectable. so currently it not remotely accessible.
 
OP
OP
SALTYMOPAR

SALTYMOPAR

Community Member
View Badges
Joined
Apr 21, 2020
Messages
64
Reaction score
46
Rating - 0%
0   0   0
Been slacking on the updates but not much has been happening in the terms of work. The skimmer and refuge has stripped everything out of the water 0 nirates and 0 phosphates unfortunately i left it like that for to long and guess who came to say hello.
20200430_191433.jpg

20200430_191422.jpg

20200430_191415.jpg

Well that was something i was really hoping to avoid. The first step i covered the tank for a 72 hour blackout. I picked up some potassium nitrate in the form of stump remover two table spoons to a liter of RODI started dosing 8ml to see if i can bring the nitrate up slowly went to LFS picked up Red Sea test kit for Nirates and phosphate along with a reef pro kit. the API kit served me well but it time for something a little better. While at the LFS i picked up a bottle of tigger pods and phyto feast from reef nutrition. Drop the pods in my fuge and started dropping in a few drops of phyto in the fuge and the display. I have been adding nirates and phosphate back into the tank trying to dirty things up hopeful build up a pod colony and hoping to push the dinos backs.
20200506_182226.jpg

After blackout i scrubbed the rock and ive made a good dent in the dinos but i think i still need to keep scrubbing them. But they are not coming back as fast so that's good news atleast.
20200506_202616_HDR.jpg

20200506_202511.jpg
20200506_190528_HDR.jpg
 
OP
OP
SALTYMOPAR

SALTYMOPAR

Community Member
View Badges
Joined
Apr 21, 2020
Messages
64
Reaction score
46
Rating - 0%
0   0   0
Well with the warmer weather my tank has been having high temperature 85 to 87. I purchased 2 120mm fans years ago was planning on using them on an led tank light. I didn't use them so i decided they would work well each fan moves 52cfm so little over 100cfm. That would turn over the air in the stand 6 time a min.
20200516_131527_HDR.jpg

So i decided to make both of them draw air in hopefully get some longer life out of them keep the salty air out of them.
20200517_201625.jpg

So hot air rises so bring in air and push it out the peninsula end of the tank
20200517_201635.jpg

I need to build the grills for both the intake and exhuast. But overall it been working great fans kick on at 81 degrees. Keep the cabinet cool which keeps sump cool.
My fuge lights are led design to fit a H4 halogen bulb socket they make some heat also my led drivers for my main light are under the stand as well
20200516_114913_HDR.jpg
20200516_114923.jpg

20200517_083026_HDR.jpg

my chaeto reactor setup. Getting ready when i want to use that. the kalk stirrer was going ro be put to work but unfortunately my bi color angel has a taste for corals
20200511_180712.jpg

Who me? I put out a *** of zoanthids and some GSP it took him about two weeks to settle in the tank and then one day he mowed zoanthids down as a tasty little treat so im scared to put anything else in the tank so no corals maybe a ton of gsp and some rock anemones for this tank looks like i need to get another tanks set up FOWLR darn the bad luck . Everything else in the tank is looking good i put in a UV green killing machine see if i could clean up the rest of the dinos and it seems to be working.
20200517_194050_HDR.jpg

Stay salty my friends.
 

Rjmul

Well-Known Member
View Badges
Joined
Mar 18, 2020
Messages
519
Reaction score
335
Rating - 0%
0   0   0
Well with the warmer weather my tank has been having high temperature 85 to 87. I purchased 2 120mm fans years ago was planning on using them on an led tank light. I didn't use them so i decided they would work well each fan moves 52cfm so little over 100cfm. That would turn over the air in the stand 6 time a min.
20200516_131527_HDR.jpg

So i decided to make both of them draw air in hopefully get some longer life out of them keep the salty air out of them.
20200517_201625.jpg

So hot air rises so bring in air and push it out the peninsula end of the tank
20200517_201635.jpg

I need to build the grills for both the intake and exhuast. But overall it been working great fans kick on at 81 degrees. Keep the cabinet cool which keeps sump cool.
My fuge lights are led design to fit a H4 halogen bulb socket they make some heat also my led drivers for my main light are under the stand as well
20200516_114913_HDR.jpg
20200516_114923.jpg

20200517_083026_HDR.jpg

my chaeto reactor setup. Getting ready when i want to use that. the kalk stirrer was going ro be put to work but unfortunately my bi color angel has a taste for corals
20200511_180712.jpg

Who me? I put out a *** of zoanthids and some GSP it took him about two weeks to settle in the tank and then one day he mowed zoanthids down as a tasty little treat so im scared to put anything else in the tank so no corals maybe a ton of gsp and some rock anemones for this tank looks like i need to get another tanks set up FOWLR darn the bad luck . Everything else in the tank is looking good i put in a UV green killing machine see if i could clean up the rest of the dinos and it seems to be working.
20200517_194050_HDR.jpg

Stay salty my friends.

Interesting build. Way outside my wheelhouse. I'll tell you what though, that green killing machine is not to be taken lightly. I love when something so cheap works so well. Wiped my dinos out in a matter of days.
 
OP
OP
SALTYMOPAR

SALTYMOPAR

Community Member
View Badges
Joined
Apr 21, 2020
Messages
64
Reaction score
46
Rating - 0%
0   0   0
Interesting build. Way outside my wheelhouse. I'll tell you what though, that green killing machine is not to be taken lightly. I love when something so cheap works so well. Wiped my dinos out in a matter of days.
That's what im hoping for it. looks like it working so far.
 

Rjmul

Well-Known Member
View Badges
Joined
Mar 18, 2020
Messages
519
Reaction score
335
Rating - 0%
0   0   0
That's what im hoping for it. looks like it working so far.
If your dino is the type that enters the water column at night, you'll be right on the money. I also had good results with the dr tims waste away/refresh method
 
OP
OP
SALTYMOPAR

SALTYMOPAR

Community Member
View Badges
Joined
Apr 21, 2020
Messages
64
Reaction score
46
Rating - 0%
0   0   0
Well had a issue with the roller filter last week. A cerith snail made it way to the filter his pointed shell wedged itself in the bottom of the roller. The filter needed to advance the filter paper the motor tried but only broke the waste roller axle. The original waste axle was the one that came with the di-7 roll that im using. The axle was two piece injection molded.
20200525_125153.jpg

I dilled the end and added a set screw to hold the axle to the motor. When the snail wedge him self the motor stripped the set screw
20200525_125146.jpg

Well time for a replacement i looked at what i had on hand. I had a 1" chunk of Acetal plastic rod. Only issue i need it 3/4" well fire up the lathe.
20200525_154158_HDR.jpg

20200526_145505.jpg

Drilled and tapped for 6-32 for setting on D shaft of the gear motor. This should hold up a lot better theirs more material to hold the set screw the factory waste axle was made to be disposable so not much material to work with. My axle will have to be reused but that not a big deal.
20200526_145459.jpg

I have a few more things that need to be done with the roller filter before i put it back into operation like a snail guard. More to come soon.
 
OP
OP
SALTYMOPAR

SALTYMOPAR

Community Member
View Badges
Joined
Apr 21, 2020
Messages
64
Reaction score
46
Rating - 0%
0   0   0
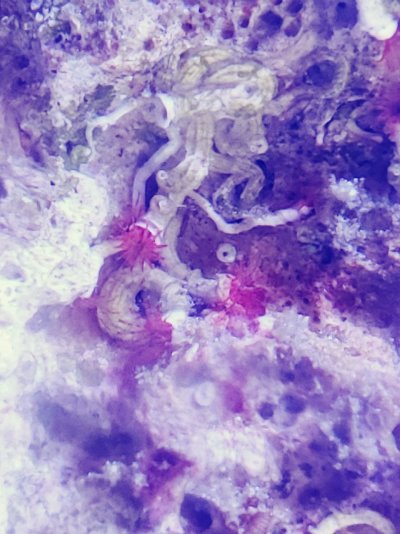
Sorry for taking so long to post but life just has a way of taking you for a ride. I've been fight the tank so much it felt like a bad relationship. It started like a tank would diatoms bloom just after cycle. Then dinos popped up i i feed heavy cyano bloom, then LHA, then Dinos, Cyano bloom x2. It was at this point i told myself something has to change. I've done every i could think of to break this ugly cycle. I decided to replace my entire sand bed. I slowly syphon sand over a few weeks and replaced it with super washed aragonite sand. Im only 4 days in to change the hermits and snails have cleaned the rocks and not a single dino to be seen. The tank has never looked this clean ever. Studying the rock today and noticed all these red dots feather duster had just popped up out of no where. I think the sand bed was my biggest problem from the start. Hopefully regular maintenance and i can keep it clean.
 

Attachments

  • 20220108_141135_HDR.jpg
    20220108_141135_HDR.jpg
    248.7 KB · Views: 40
  • 20220108_134625.jpg
    20220108_134625.jpg
    187.1 KB · Views: 45

Creating a strong bulwark: Did you consider floor support for your reef tank?

  • I put a major focus on floor support.

    Votes: 57 40.7%
  • I put minimal focus on floor support.

    Votes: 29 20.7%
  • I put no focus on floor support.

    Votes: 49 35.0%
  • Other.

    Votes: 5 3.6%
Back
Top