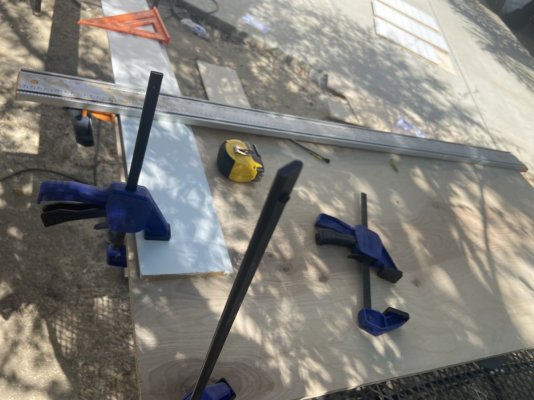
Aquarium stand wood panels

jmichaelh7

2500 Club Member
View Badges
Joined
May 29, 2020
Messages
3,866
Reaction score
1,964
Location
Hanford ca
Rating - 0%
0   1   0
I got quotes for my metal stand and prices seemed steep. I decided to tackle the job myself.

Tools used for this project:

1) 1/2-in x 2-ft x 4-ft Birch Sanded Plywood

2) 19 pieces
5.25-in x 8-ft Painted White MDF Shiplap Wall Plank (Coverage Area: 3.5-sq ft

3) 7 bottles of Liquid Nails Off-white Interior Construction Adhesive (10-fl oz)

4) 1 Craftsman 20 Volt Craftsman Circular Saw

5) Irwin Quickgrip 4 Pack One handed bar clamp

6) 58” Bora Saw Guide Clamp

7) 20’ Measuring Tape

8) Construction pencil

9) 4.5 inch Speed square

10) 1 gallon Thompson Water Sealant

11) 18 70lb Earth Magnets

12) 1/4” Wood Screws


Going this route saved approximately $500. I can now buy more coral.
 
OP
OP
jmichaelh7

jmichaelh7

2500 Club Member
View Badges
Joined
May 29, 2020
Messages
3,866
Reaction score
1,964
Location
Hanford ca
Rating - 0%
0   1   0
IMG_3717.jpeg

This part was tricky I had to measure the panel to correct length. Then measuring the distance from the blade to the side of the saw so I can then measuring that distance on the shiplap to the saw guide so I know where my cut would be.

Before clamping down with hand clamps it was double checked with a square to ensure the angles on the shiplap and saw guide were true.

I’d say triple checked … IMG_3718.jpeg
IMG_3722.jpeg
 
Last edited:
OP
OP
jmichaelh7

jmichaelh7

2500 Club Member
View Badges
Joined
May 29, 2020
Messages
3,866
Reaction score
1,964
Location
Hanford ca
Rating - 0%
0   1   0
IMG_3719.jpeg

I laid the shiplap down on the plywood to estimate how things were looking.

You can see here the edges were not coming out straight because the table saw I was using I had to cut twice to fit them on the stand.

I ended up switching the saw guide and circular saw and replaced those pieces
 
OP
OP
jmichaelh7

jmichaelh7

2500 Club Member
View Badges
Joined
May 29, 2020
Messages
3,866
Reaction score
1,964
Location
Hanford ca
Rating - 0%
0   1   0
IMG_3739.jpeg

Panels were dry and ready for sealant.

Drying process took one day in the 95 degree California heat on the side walk. Typically liquid nails inside your house will take a little longer
 
OP
OP
jmichaelh7

jmichaelh7

2500 Club Member
View Badges
Joined
May 29, 2020
Messages
3,866
Reaction score
1,964
Location
Hanford ca
Rating - 0%
0   1   0
IMG_3740.jpeg

I measured precise lengths and center points. Then drilled the holes , and sealed the wood with 1 coat for now.

I then drilled the magnets in.

I do want to add it is important to lay the panels on something soft. Here I used furniture blankets
 
OP
OP
jmichaelh7

jmichaelh7

2500 Club Member
View Badges
Joined
May 29, 2020
Messages
3,866
Reaction score
1,964
Location
Hanford ca
Rating - 0%
0   1   0
IMG_3741.jpeg

I went with 4 panels on each side of aquarium

1 24” panel on the front as you can see in the picture the panel is significantly bigger. Note I have a peninsula.

This is the sealant drying process

Please excuse the messy backyard , 25% clean as I wait for pool construction to be done for my daughters
 
OP
OP
jmichaelh7

jmichaelh7

2500 Club Member
View Badges
Joined
May 29, 2020
Messages
3,866
Reaction score
1,964
Location
Hanford ca
Rating - 0%
0   1   0
IMG_3745.jpeg

Using one magnet on each panel allows boards that weigh 10lb minimum , to shift causing gaps.

I am going to install another magnet to each board . I would recommend two on each panel anyone who DIY
 

Reefing threads: Do you wear gear from reef brands?

  • I wear reef gear everywhere.

    Votes: 42 16.4%
  • I wear reef gear primarily at fish events and my LFS.

    Votes: 16 6.3%
  • I wear reef gear primarily for water changes and tank maintenance.

    Votes: 1 0.4%
  • I wear reef gear primarily to relax where I live.

    Votes: 30 11.7%
  • I don’t wear gear from reef brands.

    Votes: 148 57.8%
  • Other.

    Votes: 19 7.4%
Back
Top