Build That Cube!!! 40G First Reef Build!

MSOEME2009

Active Member
View Badges
Joined
Feb 5, 2018
Messages
235
Reaction score
209
Location
Knoxville, TN
Rating - 0%
0   0   0
Having kept tanks as a kid (freshwater) and with my sons first word as "fish" my wife and I got hooked (no pun intended :)).

We set my son up with a 8 Gallon HEX tank next to his crib and he loves it (and turning the light on/off/on/off...). This gave me the motivation to try saltwater. We will be moving in a few years and my wife would like a large (160+) tank in the house. Well having 0 experience with a reef tank, I told her it's dumb for me to start with something in front of everyone and so big!

I originally was looking at AIO types, but came across a great Craigslist deal. It was rough, but everything can be cleaned/improved with a little elbow grease. Had tank, stand, light, pumps, ect.

IMG_0048.jpg IMG_0051.jpg

EEEWWW Dirty.... I removed all the equipment, washed each piece in vinegar, and put it back into it's box for safe keeping.

The stand was ugly, so it needed some help. Time for some DIY help!

IMG_0055.jpg IMG_0197.jpg I wanted to trim it out and add a wood accent. Our house has white trim and wood floors everywhere so I wanted it to go with everything.

IMG_0248.jpg
After some paint prior to stain. It took 2 coats of primer and 3 coats of finish to get it to completely cover the black...

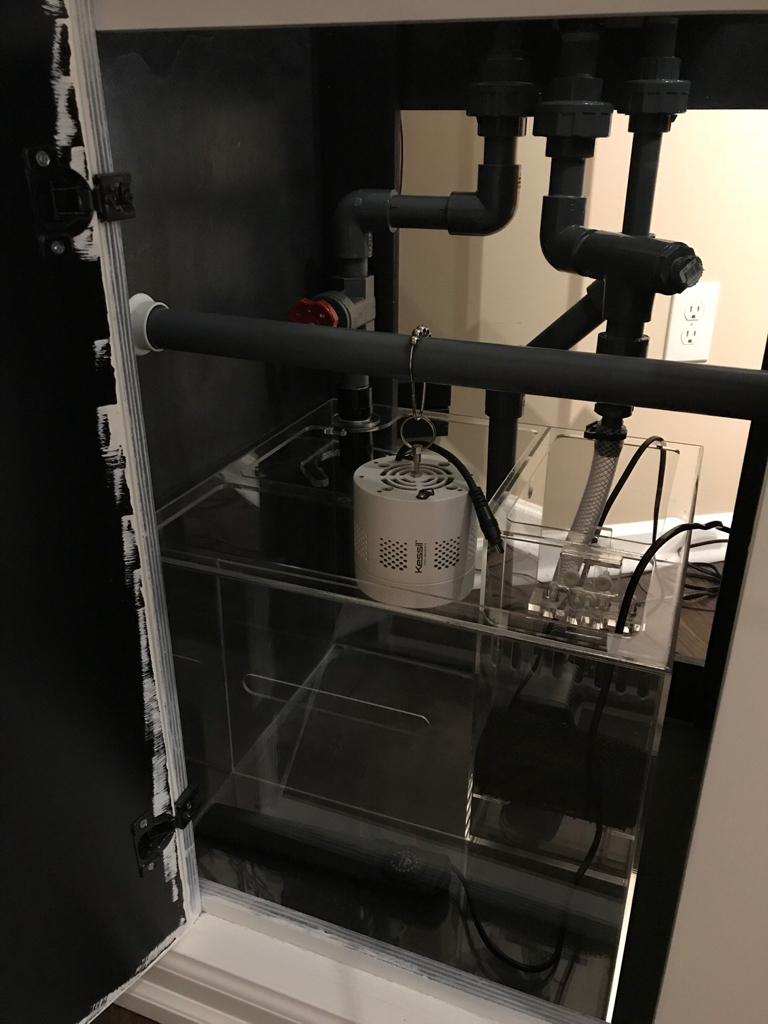
After trying to figure out the sump situation, I really wanted a refugium. The existing sump was a wet/dry, I was going to convert to a wet, but wasn't big enough for what I wanted. So... I bought this...

IMG_0254.jpg

Trigger Crystal Cube! It's beautiful!!!

IMG_0270.jpg
After stain and 3 coats of poly. It's coming together! Pipe next, I went with full SCH.80 pipe, fittings, & a gate valve for the overflow.

The existing tank had a single drain with two returns. I changed it to a dual drain (herbie) with a single return. I first went a standard herbie but the overflow was loud! I also originally had more flex but added a 1/2" connection to allow for a reactor. I converted the overflow to a durso and it's dead silent.

IMG_0281.jpg

Now that the tank was wet tested, playing with some rock. I got 50 lbs from Reef Cleaners. Great rock. Came in HUGE pieces and I broke it up to help fit. I used JB Weld NSF Safe epoxy putty to help hold the rocks together.

IMG_0318.jpg

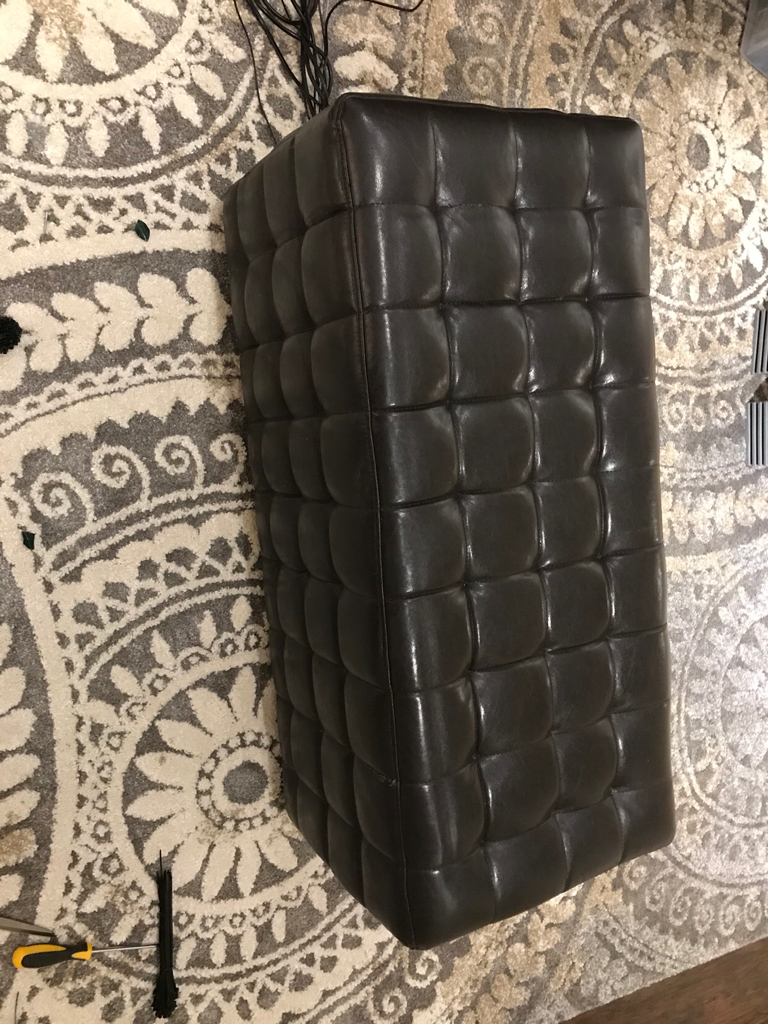
Tank in final location in my office. I have an ottoman next to it which I hollowed out and I built a table to fit under it to completely hide it. I will post pictures when I get my Reefkeeper Lite Plus today and finish the wiring. The ATO container will go left of the tank. I still need to figure out how to hide it; more building...

IMG_0323.jpg

I also built a custom light fixture out of a TV mount for my two A160WEs.

IMG_0324.jpg IMG_0325.jpg

It swivels out of the way for maintenance. Very clean looking. Next I need to run my cord concealment.

Will post more as I progress.

You pretty much saw January through April. I only have limited time with a 15 mo. and balancing time spent with my wife. I generally only work on things after she heads to bed for a few hours.

Still to come:

*Controller + Mounting: Have RKL+
*ATO System: Have Tunze
*Wave Makers: Have 2x MP10WQD
*Wire up Refugium: Mounted Kessil H350 with adjustable slide mount.
*Rock & Sand: Reef Rock + Tropic Eden (30 lbs. Reefflakes)
*RODI: BRS 4 Stage Value +
 

Ruben's Reef

Ruben's Reef
View Badges
Joined
Jun 8, 2017
Messages
6,108
Reaction score
42,234
Location
Tampa
Rating - 0%
0   0   0
Awesome job on the stand. Great idea with the TV mount.
 

Dystinction

Active Member
View Badges
Joined
Oct 5, 2013
Messages
279
Reaction score
910
Location
Colorado Springs
Rating - 0%
0   0   0
Looking really good.
Stand came out really sharp looking, and that Kessil mount is genius!

Good work.

I have the same sump and am in the process of my build. Do you have any specific plan for the refugium section?
If you haven't already got a return pump......double-check your size/measurements. I went with the Sicce 3.5, and it just fits in the return section of this sump.

Keep it up. Look forward to your progress.

Dystinction
 
OP
OP
MSOEME2009

MSOEME2009

Active Member
View Badges
Joined
Feb 5, 2018
Messages
235
Reaction score
209
Location
Knoxville, TN
Rating - 0%
0   0   0
Looking really good.
Stand came out really sharp looking, and that Kessil mount is genius!

Good work.

I have the same sump and am in the process of my build. Do you have any specific plan for the refugium section?
If you haven't already got a return pump......double-check your size/measurements. I went with the Sicce 3.5, and it just fits in the return section of this sump.

Keep it up. Look forward to your progress.

Dystinction

I have the 2.5, fits well and has extra room to move. For the refugium I have an H350 grow light.

I have it mounted with an extra piece of pipe with a closet mount where one end is in the circle and the other is a half circle. I used a shower curtain hanger to let it slide so it’s adjustable. I don’t have a picture handy but will attach so you can see what I mean. I plan on doing chaeto. Being clear I might need to use an extra piece of HDPE I have to block light to prevent algae in my skimmer or unwanted areas.

I went with the trigger over the eshopps version because you can’t clean the eshopps bottom channel and stuff will get stuck in it.
 

Chrisfish

5000 Club Member
View Badges
Joined
Oct 29, 2015
Messages
7,488
Reaction score
26,844
Location
Hatteras
Rating - 0%
0   0   0
Very Nice!!! Love the stand and you’ve done a great job of cleaning everything up. Love how you set up your Kessils as well and really looking forward to seeing more, will be following :)
 
OP
OP
MSOEME2009

MSOEME2009

Active Member
View Badges
Joined
Feb 5, 2018
Messages
235
Reaction score
209
Location
Knoxville, TN
Rating - 0%
0   0   0
Here is that picture of the grow light.

b661f2ea552511c96a86f1204780ca5e.jpg


I have it so it can slide either way. We will see how it works.

Electrical today. Built my mini stand and mounted and wired it up.

72d633cdd452cbf756679997c3c7fbaf.jpg


I am using an extra ottoman we had which I hollowed out to cover it.

Where’d they go!?

0fdb35ebdad457bcc8c6ec0c0b327c2f.jpg


Done for today. Will work on RODI tomorrow probably as time allows.

eea2ebab592aadbe502ffe2f9135d7ae.jpg


Where do you recommend the heater? I have mine in the fuge. Should I put it in the skimmer section or in the overflow above? It’s a neotherm 200W.
 

Tuffyyyyy

2500 Club Member
View Badges
Joined
Aug 16, 2016
Messages
2,606
Reaction score
3,137
Location
BHM
Rating - 0%
0   0   0
1) setup is nothing short of beautiful. Ottoman was a great idea. Can’t waif to see how this progresses.

2) that’s an off collection of college flags you’ve got there
 
OP
OP
MSOEME2009

MSOEME2009

Active Member
View Badges
Joined
Feb 5, 2018
Messages
235
Reaction score
209
Location
Knoxville, TN
Rating - 0%
0   0   0
1) setup is nothing short of beautiful. Ottoman was a great idea. Can’t waif to see how this progresses.

2) that’s an off collection of college flags you’ve got there

Thanks!!

That’s mostly my wife’s fault. She’s got 3 on my 1...
 
OP
OP
MSOEME2009

MSOEME2009

Active Member
View Badges
Joined
Feb 5, 2018
Messages
235
Reaction score
209
Location
Knoxville, TN
Rating - 0%
0   0   0
Got the RODI system up today. Found out that my son is terrified of the screw gun... I didn’t even use the impact driver to lessen the noise lol. Poor little guy...

106bcde4fe0ff7f2c2bec7cb3f66c975.jpg


10d741345ca3eefdee549f126079da77.jpg


House pressure should be good in the upstairs laundry. Made 3 gallons to wash filter socks.

Debating if I should run line from the RODI through the attic and down into my office and use a float on the reservoir. I’d set it in a pan with a float switch to shut down a solenoid if I go that route. Maybe a future update.

Soon...
 

Greybeard

2500 Club Member
View Badges
Joined
Feb 10, 2017
Messages
3,233
Reaction score
8,669
Location
Buffalo, MO
Rating - 0%
0   0   0
Debating if I should run line from the RODI through the attic and down into my office and use a float on the reservoir. I’d set it in a pan with a float switch to shut down a solenoid if I go that route. Maybe a future update.

You can get real fancy on this sort of thing...

I've got a low level sensor, and a high level sensor, tied to a DIY APEX BOB. As water level reaches low, turn on NC solenoid. If water hits high level sensor, turn off solenoid. If solenoid on over 3 hours (normally takes 2.5 or so to fill reservoir) ALARM, and turn off solenoid. Water enters reservoir via a mechanical float valve above normal high level sensor... oh, and there's a water alarm in the floor next to the reservoir.

Complicated? Perhaps... but I don't have to open valves or carry buckets, and I sleep pretty good at night :)
 
OP
OP
MSOEME2009

MSOEME2009

Active Member
View Badges
Joined
Feb 5, 2018
Messages
235
Reaction score
209
Location
Knoxville, TN
Rating - 0%
0   0   0
You can get real fancy on this sort of thing...

I've got a low level sensor, and a high level sensor, tied to a DIY APEX BOB. As water level reaches low, turn on NC solenoid. If water hits high level sensor, turn off solenoid. If solenoid on over 3 hours (normally takes 2.5 or so to fill reservoir) ALARM, and turn off solenoid. Water enters reservoir via a mechanical float valve above normal high level sensor... oh, and there's a water alarm in the floor next to the reservoir.

Complicated? Perhaps... but I don't have to open valves or carry buckets, and I sleep pretty good at night :)

Sounds like a legitimate setup. Houses are not waterproof on the inside ;Nailbiting!
 

Greybeard

2500 Club Member
View Badges
Joined
Feb 10, 2017
Messages
3,233
Reaction score
8,669
Location
Buffalo, MO
Rating - 0%
0   0   0
Sounds like a legitimate setup. Houses are not waterproof on the inside ;Nailbiting!
Not far from the 'barrel tender' product offered by Avast! marine. There's doesn't email an alarm, though :)
 
OP
OP
MSOEME2009

MSOEME2009

Active Member
View Badges
Joined
Feb 5, 2018
Messages
235
Reaction score
209
Location
Knoxville, TN
Rating - 0%
0   0   0
Cleaned tank + added Rock & Sand + programmed the RKL+ w/myreef 2.0; wasn't very straight forward and didn't work for about 30 minutes. Luckily I stumbled on another post on a different forum on how to get it going.

I used the Tropic Eden Tonga Reeflakes to make around a 1.5" bed. I chose the larger size to keep a smaller bed depth and to be able to keep the flow higher. This is dry sand, which I wanted. Quality seems nice, however I did find a few pieces of plastic strips mixed in the bag (just like the real ocean sadly).

IMG_0348.jpg IMG_0349.jpg

Pictures of tank:

IMG_0345.jpg IMG_0346.jpg IMG_0347.jpg

Having 2x light sources really reduces the shadows, but you can see there are still some. I don't know how some people look at their tanks with this deep blue. It burns my eyes.

Here is a picture of the fuge with the blinding light. Made the mistake of looking inside for a minute. Burnt my red cones in my eyes, saw green...

IMG_0342.jpg

Need to work on ATO next.

IMG_0343.jpg
 
OP
OP
MSOEME2009

MSOEME2009

Active Member
View Badges
Joined
Feb 5, 2018
Messages
235
Reaction score
209
Location
Knoxville, TN
Rating - 0%
0   0   0
Not much in terms of progress. Cleaned up wires; I got my ATO wired up now (had to lengthen the Tunze system) and built a cover for the overflow out of polycarbonate.

IMG_0350.JPG


I then used some of my wife’s black window cling from her crafting stock to black it out. I don’t want a critter falling in or algae growing.

IMG_0351.JPG


To cut the poly I used my dremel with the router bit after tracing the shape with a fine sharpie. After I used the sanding bit for the big stuff and used my random orbital for a while to smooth out the edges and get them flush.

Feeling maybe water tomorrow. Need to fix the outlet RODI fitting first though.
 
OP
OP
MSOEME2009

MSOEME2009

Active Member
View Badges
Joined
Feb 5, 2018
Messages
235
Reaction score
209
Location
Knoxville, TN
Rating - 0%
0   0   0
Water's IN!

I actually filled it last week Thursday (or started)... Boy does RODI take a LONG time...

IMG_0353.jpg

It's amazing to see the porosity of the rock though. The water was creeping UP the rock a good inch plus!

IMG_0352.jpg

Shows how much area the bacteria will have to grow.

IMG_0357.jpg

Here's a shot with it full (finally)... Lights will be kept off for quite a few weeks. It's cycling right now with a bottle of Dr. Tims & the ammonia solution at 2 PPM (verified with Red Sea kit and API).

I had to fix my return a little too; the crystal trigger comes with a coupling for feeding the filter sock area. I was pulling in some air into my siphon and was making some noise. I took it apart, and made a gasket out of thread tape by wrapping it 1/2-1/4 down the side of the coupling because I couldn't get thread tape on the male part. Fold it in a little so it covers the top up, re-screw and whalla! Dead silent, 0 bubbles. The gate is now tuned in and the only slight noise I hear is the slight trickle over the overflow and a small whirl of the MP10.

Very happy so far.

Luckily I had ordered a new pH probe from BRS because the one I had was... Dead... I got it all calibrated and was sitting around 8.1; now I'm at around 7.9 after a few days. I used Red Sea blue bucket and am sitting at 1.026 SG. I mixed about 10 GAL / hr directly in the tank using the MP10s. I THOUGHT I had calibrated my refractometer the night before. Well... I overshot the SG and was at 1.028... Siphon out some water, use RODI makeup and dilute back to 1.026...

Sadly on my wallet, I had to order a new wet side for one of the pumps. It seems the previous owner messed it up. It sounded like a jackhammer. I filed it down a little and quieted down a bit to get me through the mixing. @Bulk Reef Supply got it out same day on Friday and will be here today.

I think flow wise I'm going to try to put them both on the back running anti-sync reefcrest mode. This should create a good gyre flow and the cone of flow should be out of the way of the corals.

What do you think, leave the back clear or black it out?

Also, CUC before fish or after??? I ask because I could essentially use the tank as a CUC invert QT right? Just make sure to feed the little guys some nori and a few pellets?

Watching BRS's latest ULM video has put a pause on starting the fuge until I have some load on the tank I think. Looks like they couldn't sustain it without a live source of nutrients for the chaeto. I will also raise up my H350, they cooked the algae.
 
Last edited:

Going off the ledge: Would you be interested in a drop off aquarium?

  • I currently have a drop off style aquarium

    Votes: 2 1.6%
  • I don’t currently have a drop off style aquarium, but I have in the past.

    Votes: 1 0.8%
  • I haven’t had a drop off style aquarium, but I plan to in the future.

    Votes: 20 16.4%
  • I am interested in a drop off style aquarium, but have no plans to add one in the future.

    Votes: 53 43.4%
  • I am not interested in a drop off style aquarium.

    Votes: 43 35.2%
  • Other.

    Votes: 3 2.5%
Back
Top