DIY ATS

Waboss

Valuable Member
View Badges
Joined
Dec 1, 2014
Messages
1,982
Reaction score
1,033
Location
MD, USA
Rating - 100%
7   0   0
So I posted a thread over in the Equipment/Filtration forum that was more of a fun, "guess what this is" kind of thing. But now, it's actually in my tank, running in production, so I thought I'd share.

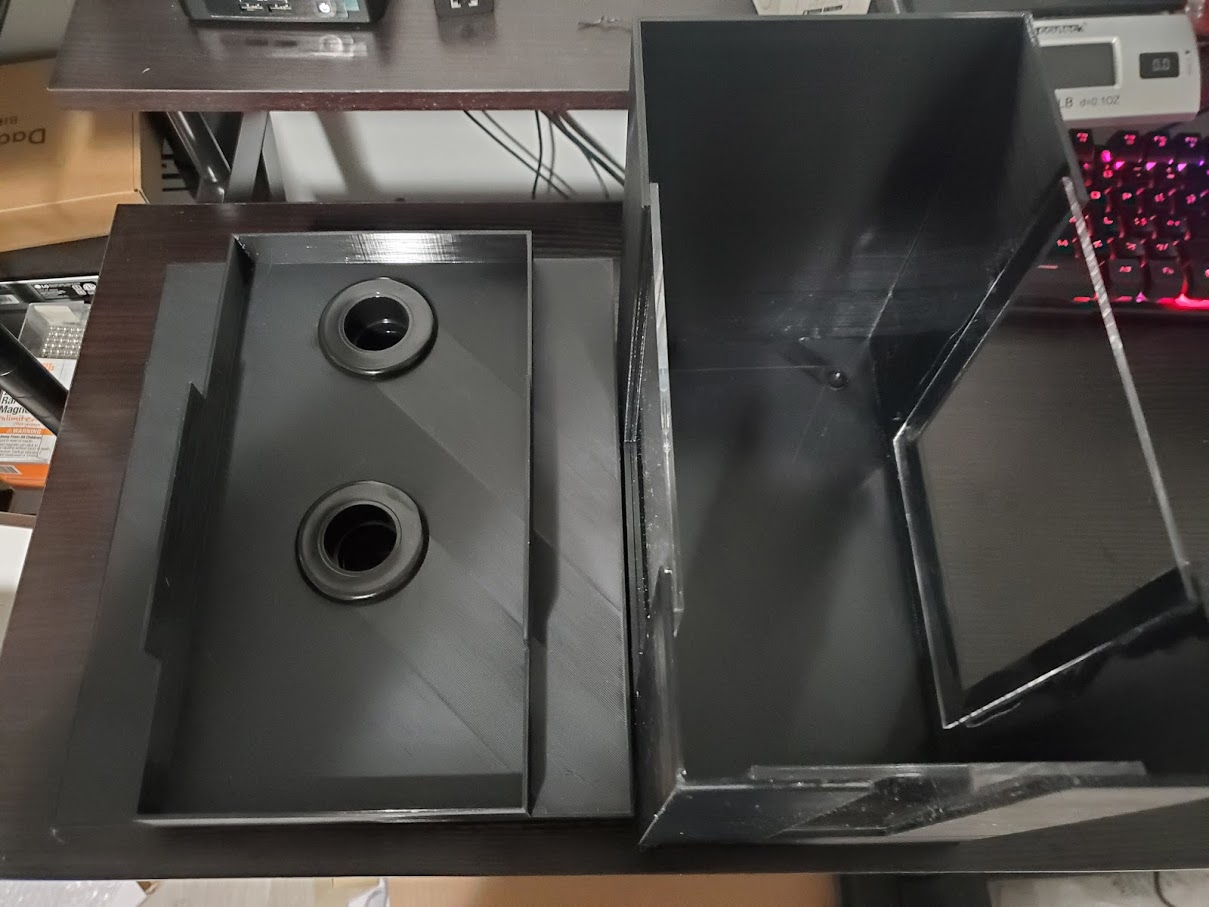
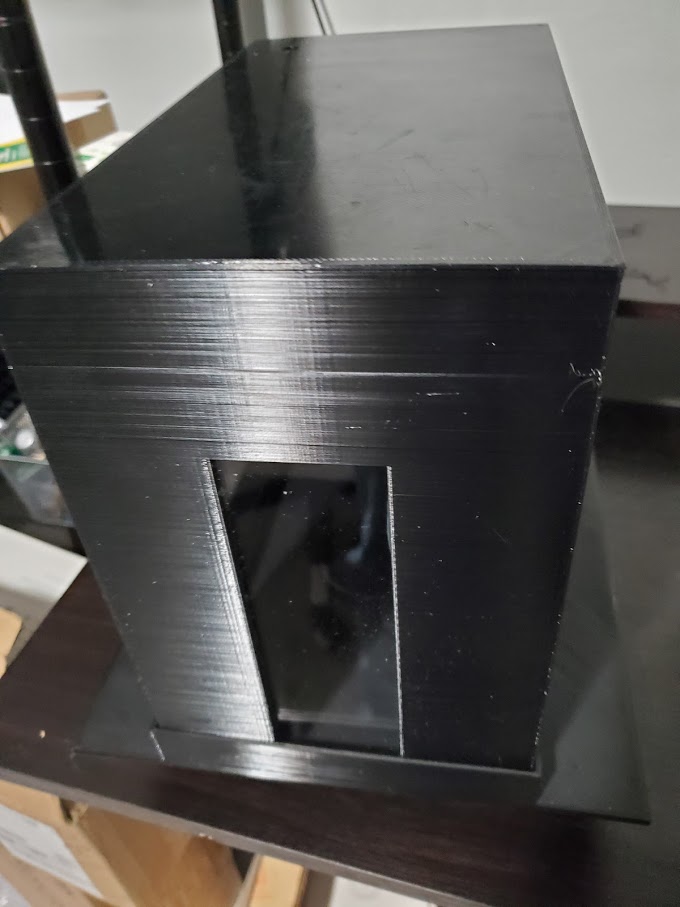
I've had several different turf scrubbers over the years and they all had good and not so good points (for me anyway). Plus I always had to figure out how to mount them by making shelves or supports over the tank and stuff like that. Recently I've gotten into 3D printing, and I decided "why don't I make one that fits exactly like I want it to"?. So that's what I did. This one fits almost perfectly over my 20L sump (I say almost because I really should make it about 3mm longer, so there's less wiggle room).

Some thoughts I had as I built it:
  • I want it to fit my sump, with no extra supports
  • Needs to be easy to open and maintain
  • Would prefer to be able to use "off the shelf" parts to fix or upgrade it
  • Need to be able to see in the ATS to monitor growth and determine when to clean it
  • Would be nice if it was designed so I could easily adjust the dimensions if I needed to
I've already made a few changes from my original design out of necessity or finding things I didn't think of at first. I'll even share a couple of them here. Things I really should have thought about, but didn't:
  • If the drain tube is in, and the lid seals to the base too well, there's going to be a pressure imbalance that will force water over the edges of the base and cause an overflow
  • Might want to find lights that have longer cables, these are a little short and can get in the way if not routed properly
  • The walls on the base need to be a bit taller than I expected as I didn't account for the height of the drain bulkhead with the seal on it
I need to tweak the design again and reprint. I want to bring the "walls" up on the base a little more and also create light "shades" built into the base around the lights, so there's not so much light bleed. Also, I had planned to make a "door" or panel or something like that for the front window to also block light. But overall, I'm pretty happy so far.

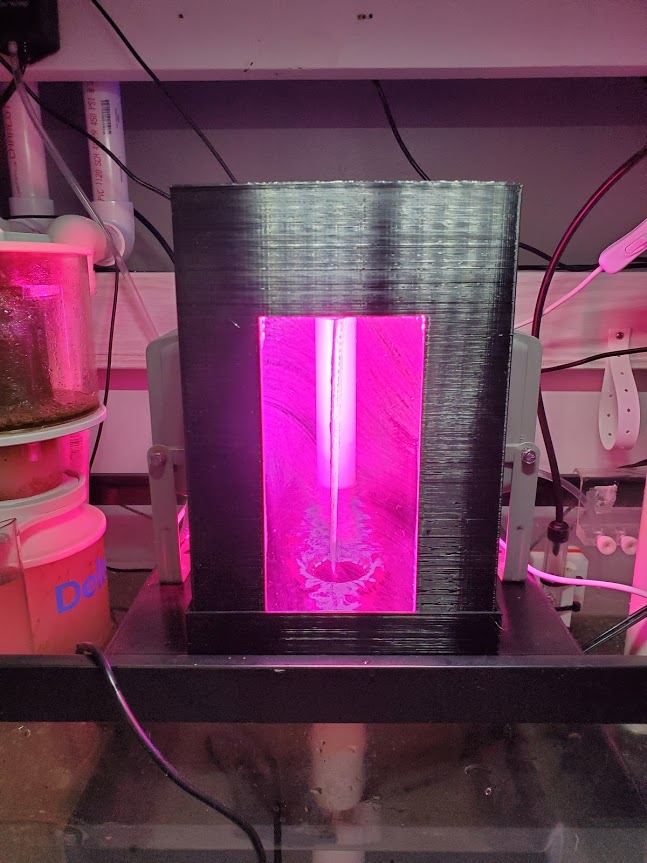
Anyway, this is what I came up with (if the video works):


And a couple of still shots:
CaQ8GumSWK7VikBG62hJ98ubkd03OUDIfU45SDntg20-gIaRFed1GwXVlZL1RAz3PupGF_lBpvM7r4Ur7Ed1UM2Bb-sZZM29PFq3sAUJGdlVc1OfZSm_88wZmkxD8LBMCX17WwFlNemsJVGtXvwKzDKo-tfssU-ob2U5IqZdy9n_a1D1YvZkCJiEoo_L-meU5QlecMRXSBnAZZYwEPiRdp-Ds7gGJy2QgXjyKVxofBLxnNwpqdpCYXOqHS0vrvVuaQj5dolg-QOLY1HtOtav2_DtTQVwEdqPzn2YSz3dp8we-tYhOw2mbHP2b28Qy-NIWV0mmPrkwRqx1GWXZykqKtFPUn-3mZ2uxdBnPvPwZZ52VQWXlaD38ehMrx4zhngGjHPTV1eYgDty55z5oLBvmZI0eGyyf8ZjEQIvQihVH4UNkHJlcT7z6nAwdqtQK9FWa5VwSD_YHMMG4MxCKXhDGHAyLJwsSbUOvTTQin2k7yLhyze3F84eJ-2cyzfbpMaTnx1X7fFWkX235ZeE0LLsXC2aXmPDDTT3ChWC3MD3WiP2UC3N9uAOAkK_-O4BY9nCihMZuBWHM98hJMcL2wTSYyDN7_dY1TI49T49qfNGeHt1Jqf609gqHapo6q3LxqgThB5OUOJwxK51_G5j3MLw3EpyurMRWiRP8-gpbnjT10znT-xmGFTNRDKehlfe7A=w648-h863-no


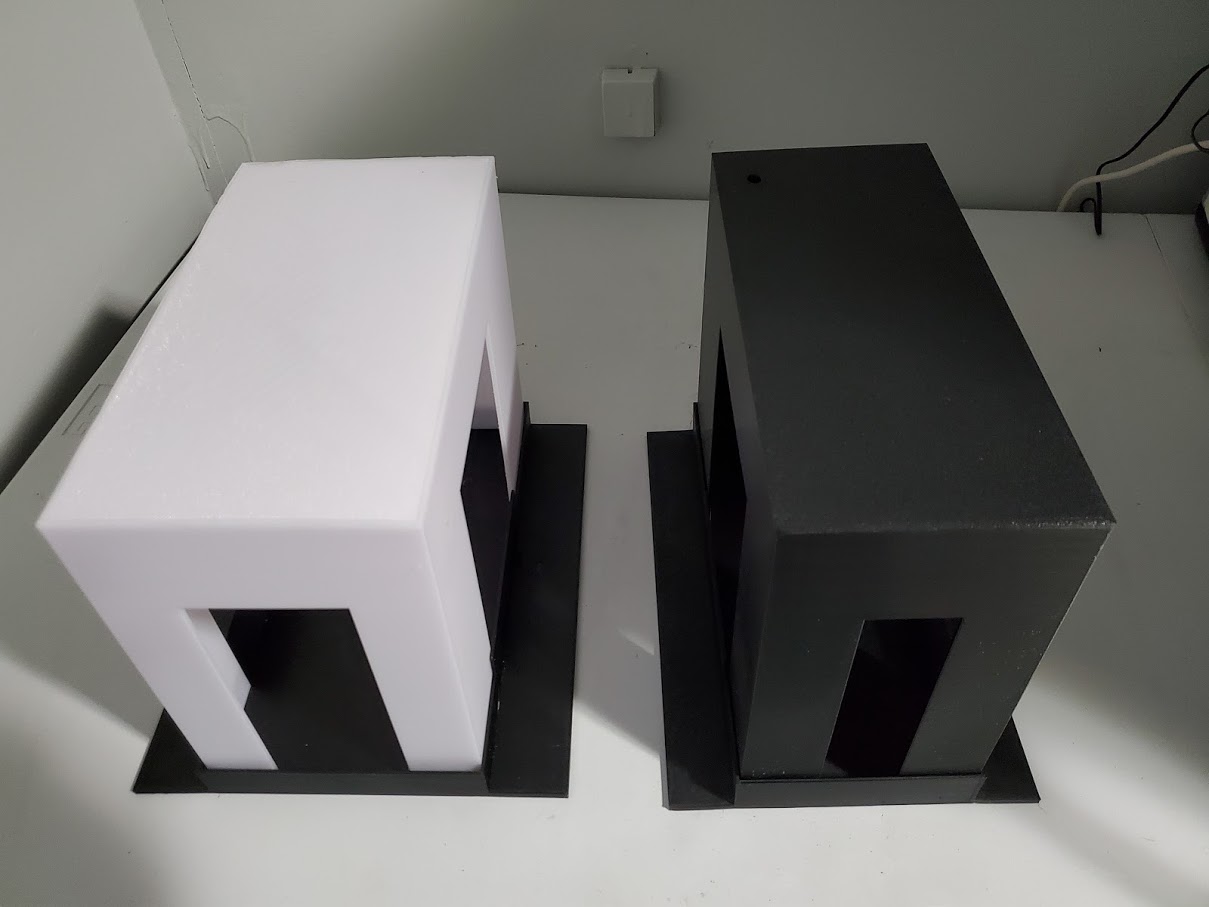
I also made a "top" in white, just in case black wasn't a good color. It still needs some post-production clean up, but it's ok.
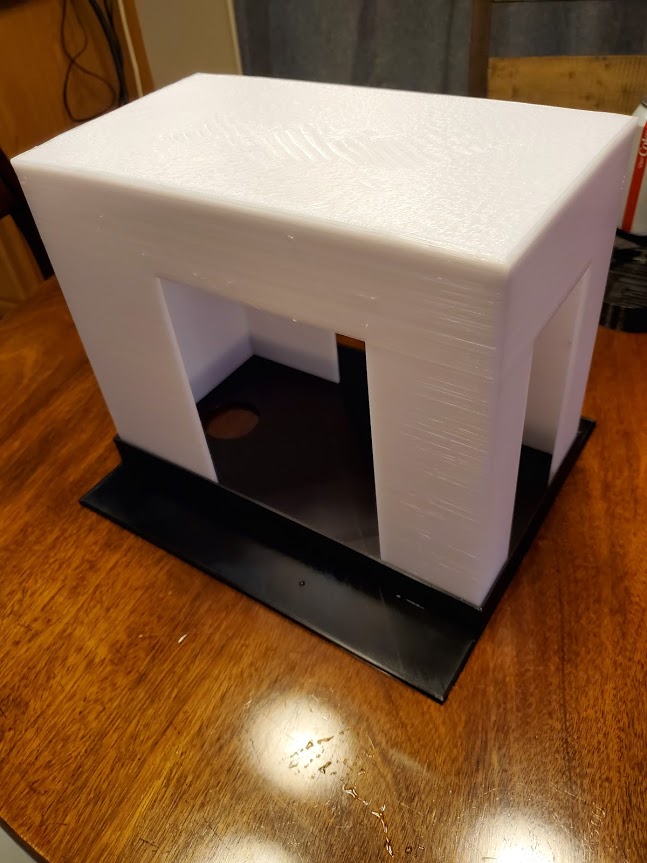
5GvqIHMRIL4HQj3SOLIEyYz_zMPfPdpH9kNoFxRDzlozX1MbMzMd0u-LlzFVZhmgub6NmXGHiSWyLCz0XM6qEJjqUsJB2DHKR2vldU5ENWcfxdBa5yd6_mZt5yvhOLIrm3-GBdBKKCrrFQcNNumcVN0SKmMPTq6P_T72nbKTGbwIH7MDeFUL6EtKyTV_NF_wBJKIr1jlndrVRIOaykPvjPimUAfkO8F2Joyw7Gj8Qi1Lu08Wl8lFGTQtfMIPfrdT1VHWA4StcRIaDiChxoHpkvsK9aDjxIeFQ3IYiP2c9mWOLxr9xnUdeTd4xn109RTzfrN1f_b_0b6XRYxsVHXTMbzv3_ToemuzeH4vTcKY6B44dqqNkV2wlyzP3seTWVQpN9AF1i_lNgYa0sul0P7OnK3jbEysod5aDQRugdID_pgBcZ63cUcl0feFHvPN30Js2v10KvdH0IKzGZBNb0nyBBnXpZ29e40OsvGNlzB1m9xT4ZoXkyr4OqMU_sKaXLZDRuKrgZ-NDyGj97UZ6uRQpIGSyunVlyQpj_Q9F3dXtbg8S8cKw_z6TplUTA7BT1o16jPAYM6vWRfVhcr-g_M-rjzqhTYS5xJzssRTC-2s5_iIaUlwVl3ZUv8inT5Pqu0z2rHOsNdtLFnmHc5itPs96xMvyJlIaZQFmLOIvvfWjjgNeqZrlkCTRod5zTE1GQ=w648-h863-no
 
OP
OP
Waboss

Waboss

Valuable Member
View Badges
Joined
Dec 1, 2014
Messages
1,982
Reaction score
1,033
Location
MD, USA
Rating - 100%
7   0   0
Just a quick update. So far, so good. I've made the changes to the design, but haven't printed them yet. I'm still rolling with the older design, but it works well (I think). I just have to remember to remove the drain tube before putting the top back on.
 
OP
OP
Waboss

Waboss

Valuable Member
View Badges
Joined
Dec 1, 2014
Messages
1,982
Reaction score
1,033
Location
MD, USA
Rating - 100%
7   0   0
I finally got around to connecting both lights to my apex (fancy timer for the purpose! haha). And the growth is doing pretty well. Still in the "slimy algae" stage, but growth is starting to kick in. I'll upload some pics later.
 

code4

Valuable Member
View Badges
Joined
May 3, 2015
Messages
1,458
Reaction score
2,421
Location
wyoming
Rating - 0%
0   0   0
Ok I am beyond impressed. I must know more about your printer and how you "tell it" what to do. I need to be able to do one ASAP!

Shelley
 
OP
OP
Waboss

Waboss

Valuable Member
View Badges
Joined
Dec 1, 2014
Messages
1,982
Reaction score
1,033
Location
MD, USA
Rating - 100%
7   0   0
Figured I'd update this thread with some pics n' such. I do have pics over in my build thread too, but I just finished a "Version 2.0" if you will and figured I'd post a pic of it.

Basically, I just narrowed it a bit so it takes up less room. I still need to silicone in the acrylic "windows", but I hope to have it up and running this weekend or next week.

Here's a shot of the current one
cgrGDIOtO88def--OuG_eR7WKnYA6Cq1FWQhIR2POIIraJUFjrcZ_QoYQF_EGWCfNxP0fUAKTu4En2olRhpnFFAG6kA1wAW3ukniCqlqZNkqpXffrd9k7_HrkqjSS24rU32eeZDNKIW_G8CcI5TC06NaZgmVu2YEMRSP9lgwZXy3-xcizxyWbHJEdJ0ztMLHrHFXqzfP8DyNp_SVDc5fZoLvuhEM-Xl5gSMet5lye_ZDpMufhI_XGayQwtnHd-69FBUSY9mseTb19qiEBI5X9E_fYlNsmPmLMlUdz-DIFe-kjBgv_bLwRplhp1dpj3gPmvbOyK5QMeQ3AoSErmnclaEWUgQHWJhdGiKWLkm0C5cJJkmVWpK9sepWMnL6WLRaOl9oaecLDRG0CDDf6e7BzfL5_XWGPAdWOq1sy40DErGO25DGpBcAPpJe_wBWPo5ZbJw2NGCD61ZtzOc7OsmgMHyaZSpAUOEHVc92GaRMmmvgHR4BQLlmn3jFcGpVtBg3BMWoj_cUUS-3D6R0CL_DjHIJaqFsKFlwD9QByABlwdnHvjmR2iF5Size5LSLBjQwN_BDCzZBmZqsPObnjArNRuZGJWW2Ac5FE-bl7fMHw3KVVp-w9nNyN3G2B8FTUVWex4dNnRORnWvQNc9dpDyVXrwCtMAx1pbh7TSukdosRokR1r6nH5Hvnrfr1PJOs0hcbYWELIak9rwna7EOKJadLIJj=w1210-h907-no

72rKdzfwbGHNoMfft0LoLFHwJ60jr-nBy5cgXlEZ-Tfijp7QEvaf7GdikhRiwfipVuqT_ZxPxymCMKxo9dkxwEfVz4uZiBleODL8Un7aIPQRD9U8eB6uPx1m5Q-4EJjYBnMja4RhoRD92T2c-E1GZY__CvE5l7aBhhi8z397Cl38ScV5U7mSL4uyQey5nWfi4NCC5-MvQgfbRJCPjKLA9qHqQQIKkF7DxaHbjBs6qqdUjAsSDR0WRt9oqcG3UfCD3sqzOHpQ0FrpEHGboa62Oh5mV4f6eHv8GSr0oMtw5bVRVxvj9fGEj4tTkOfwlf0L321rBZPpUzAxkDtHam_Emxv7s_Y3eZ0L8HTs_Dbfs19t5BHe3KttdcFdfmll1bjSWyT1NOJMseuJWR5mu0nOw8ZdPX7-rFRgTYL435yZP3Tq62qPBflQyip7PoCW_T4NdhwsCxfC6KwdwqyQRqellKCNIe0o8VwdtSDCJSxPLckAlsIeQxDdUz2L810ybFRoU6VDD2PRvaFda1NRE8q39xPwFW7ms8h8zAduP_WqtctLiNxIiuNIxKHSGHuZc_tuXHBzzQjCUMsnk8EzxFghYlL95y29PBwxYLKzWLvofv0MnbEdKk8yZD-iFONMsHLbbvlNkt4M-1L6cdhi-TXtzoCqzT6CafL-vIh5gWXwfyFoQTQJ7S2DTVqmuF_x4kIo1JinmHVS7n6frHw58vugQfUp=w681-h907-no


And here's the new one (it's next to the older design to allow for scale comparison). The new one is on the right.

6s5wYMSa44xJzSin9u254UT4jDy2b_EVb-nQXyTElw7d0VnR6ZN-632J8DHH3oKMJiESxLJU3LCERnumyxrBPfC-FYyT5LNYgvaOXX_KllX-OTNrDa3DZ3vVdddKfbwAbdbT-I66GyUZzaDbrbGWbNrw1wmSiFz_gkT8kBLC0avrQjGg9cOpAjb3tUnMNMVKDdTJ3qmvJDslzczA9Cpd1gsMiIwuDh2uCDxreGPDwn9Z3VM5AI1jdm_D5T-ud0wuCj1FG-5JXCXpu4C7mM7un0u-QjbOuWtfwOMv4j6-MGYjBL_WZrwkzx5yGRV-FOImAUBu2qUPMZG9WPtHZ7rEaE6q192OOI_oaJzSOk9O0orkP4b0hMNE2ksPQ4-MFY1QQUdhrN-YMTrotaapwxbmHfbHJJM9gEjIyxDAvStE1C4U7PySMrFsPjJxnDze3XEpYnw2k_tRpoCvbaBh3o2bLdj00MfGaBRx7FZge-TNgNPXtiECSlo0gWNnwoLL817SoQCSNasWHI_JQaPOQgBKPgaZ4CGfnowZYbyAQLsWFn8IKG5ScY11-cWmI4xWmgzleVWOJrnqQBSlJWwrA2dP04vqPJ7bJ7k0Dqwk_K-8E45ChzFnv0B9Es6KO04xtSig1ODzOwoA8ArUhPMje_C98tKwjXdAGH8Eot1vY5AMY4bQbMRniUXoK-UzCBJnDna8mttHDPtjwHbPeISWlOunJVf1=w1210-h907-no


Anyway, I did make some changes, like narrowing it, but also purposely made the "viewing window" in the front smaller, made the rim on the try a bit taller, and added a new vent to the top. Assuming I'm happy with this one once I get it in, I'll make a door/window shade for the front viewing window to help block out some light (but there's still a good bit of spill from the sides, where the lights are positioned.

OH, and I'll try to keep a better eye on this thread so I stop inadvertently ignoring folks!
 
OP
OP
Waboss

Waboss

Valuable Member
View Badges
Joined
Dec 1, 2014
Messages
1,982
Reaction score
1,033
Location
MD, USA
Rating - 100%
7   0   0
Glad you like my tray/dome design. Large walls are hard and lengthy to print though, why not just glue some acrylic or abs sheets together?

Yeah, I've liked the concept since I first saw it back in the early 2000's (granted that was just a fellow reefer who had what looked like a couple of rubbermaid tubs cut for a tray and top with a bulkhead through it! haha!). Yours is definitely more refined, and much more compact!

As for using ABS or acrylic, I'm not great at cutting acrylic and I have a 3D printer sitting here, so I figured why not just use it. The print time isn't that long, only about 2 days for the whole thing, which is not much when compared to my other prints that can be up to 5-6 days long.
 

Creating a strong bulwark: Did you consider floor support for your reef tank?

  • I put a major focus on floor support.

    Votes: 53 40.2%
  • I put minimal focus on floor support.

    Votes: 27 20.5%
  • I put no focus on floor support.

    Votes: 48 36.4%
  • Other.

    Votes: 4 3.0%
Back
Top