- Joined
- Sep 13, 2019
- Messages
- 128
- Reaction score
- 281
So I’m still new to the saltwater game but I love the idea of automation and less worry about certain things. This includes automatically filling with freshwater when evaporation takes place. I don’t have the ability to run anything to the tank so it has to be self sustaining. I also have an issue with the fact that this is a 60g cube and I don’t have any room underneath for anything more than a basic sump. Therefore I needed a reservoir for my ATO. However, I did not want to just put a conspicuous water tank next to the DT stand. Therefore, I embarked on a journey to disguise it. Here we go:
I had a hard time finding an affordable 10 gallon round jug or barrel so I though hard and realized that not only were igloo coolers 10 gallons, my workplace had a bunch lying around not being used. So that’s where i

I planned on using the whole jug at first but then realized that the white liner would work just as good but a lot less bulky so the next two pics are what a little utility knife will get you.


The next thing my workplace had a lot of was plywood disks so I made myself a base that was the same size as the top of the plastic liner.

After that, I knew I would need to keep the top able to be opened to refill the container and so I used a piece of steel flat strap to screw to the inside to give it some stability.

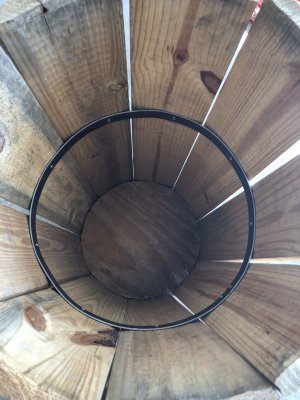
Yet another thing that was free and readily available was curved wood that was originally part of a wood reel that contained some sort of wire. I started to nail the bottom then when fully surrounded, I screwed in the ring to the inside.


A little trim later and the liner was ready to install

Sticking with the frugal mindset, I cut apart the screw top lid so that it would set on top to keep dust and debris out.

After that was done, it was just a matter of plumbing. I used a 1/2 inch bulkhead that had threads on the inside so I could thread in a barbed fitting for the pump.


The last step which I haven’t decided is what to it on top. I originally planned some fake houseplant but I may change my mind. However, I think you can agree it looks a lot better than a blue water jug sitting next to it.

Let me know what you think!!!
I had a hard time finding an affordable 10 gallon round jug or barrel so I though hard and realized that not only were igloo coolers 10 gallons, my workplace had a bunch lying around not being used. So that’s where i
I planned on using the whole jug at first but then realized that the white liner would work just as good but a lot less bulky so the next two pics are what a little utility knife will get you.
The next thing my workplace had a lot of was plywood disks so I made myself a base that was the same size as the top of the plastic liner.
After that, I knew I would need to keep the top able to be opened to refill the container and so I used a piece of steel flat strap to screw to the inside to give it some stability.
Yet another thing that was free and readily available was curved wood that was originally part of a wood reel that contained some sort of wire. I started to nail the bottom then when fully surrounded, I screwed in the ring to the inside.
A little trim later and the liner was ready to install
Sticking with the frugal mindset, I cut apart the screw top lid so that it would set on top to keep dust and debris out.
After that was done, it was just a matter of plumbing. I used a 1/2 inch bulkhead that had threads on the inside so I could thread in a barbed fitting for the pump.
The last step which I haven’t decided is what to it on top. I originally planned some fake houseplant but I may change my mind. However, I think you can agree it looks a lot better than a blue water jug sitting next to it.
Let me know what you think!!!


