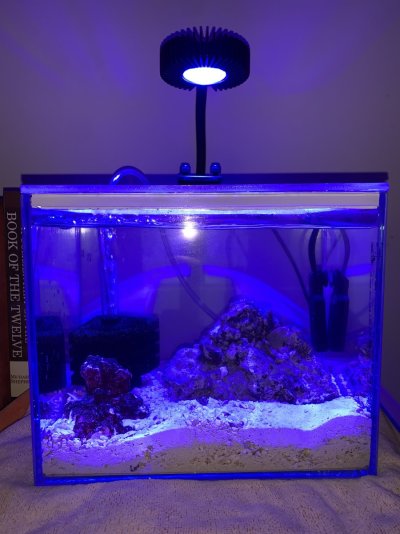
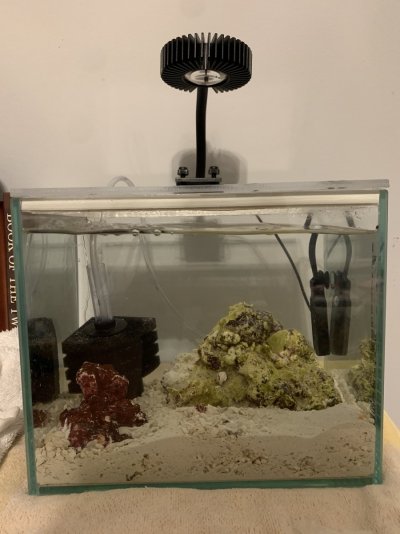
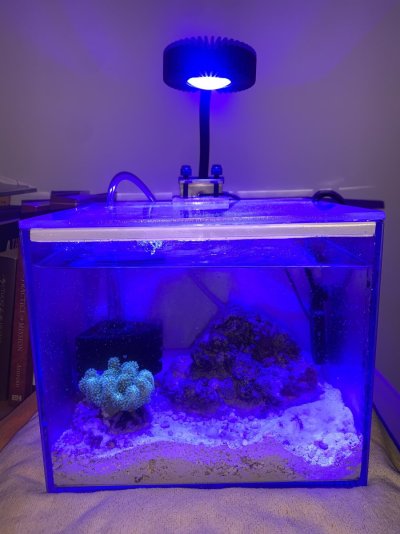
A guy on a Facebook group I am in was getting rid of a rectangle 2-3 gallon tank for free a few weeks ago. I decided to get it and try to make a pico reef out of it. After consulting some people on here, I knew I would want to make a tightly sealed lid to avoid evaporation as much as possible. It was suggested to me that I go with a circular tank because that would circulate water more readily than a rectangular tank, but alas this was what I was given. It also seems much easier to seal a circular tank/bowl/vase. I have decided to make the best of it and try to make a DIY pico reef for the summer before I move. And, this tank will be super easy to take with me wherever I go.
I'm going to list all my steps with pictures in order if anyone likes my idea and wants to copy it.
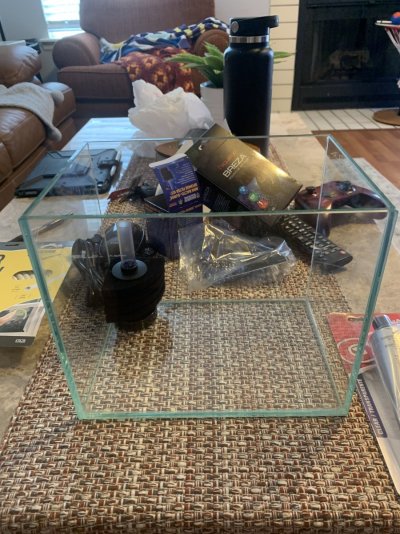
1. I cleaned the tank out with soap and water. It had been in the guy's garage for a few years and was pretty gross. Here's the tank. Sorry for the messiness of my workspace on my coffee table.

2. Next, I looked up some options for making a lid and sealing it. I decided to go with a thick acrylic lid, even with the slight off chance it warps. Ideally, I would've done glass, but I was worried about cutting it to the right size and having the tools to be able to. I went with window rubber seal tubing and some clear plumbing glue. I also got an acrylic cutting tool. Got all of it at Lowe's for around 50 bucks. The acrylic was the most expensive part at like 35 or so.
 .
.
 .
.
 .
.

3. I purchased a small corner sponge filter and an air pump with the suggestion of my LFS owner. She seemed to think that would be the easiest to make the seal and create some water movement, and it was easy to fit into my lid design.
4. I cut the acrylic to the size of my tank top with an extra lip on the back for mounting a light with an arm. The cutting was the hardest part because I had to use that tool to cut lines over and over in the same spot of the acrylic until it was halfway through, and I could break it. I then cut thin pieces to create a rim on the underside of the lid for attaching the rubber seal to that would press up against the tank walls. Cutting those pieces and getting them to break apart took hours because I had no leverage to break them off. I ended up being able to use a pocket knife to break them apart by putting it into my cut lines and wedging the pieces apart.
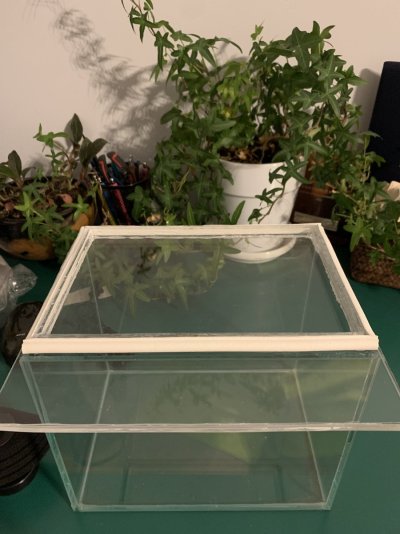
5. Next, I glued those thin pieces together so that they would lay within the walls of the tank with a small enough space between them and the walls to squeeze the rubber seal in. The glue took a few hours to completely solidify, and I let it sit for a whole day just to make sure it was good to go.
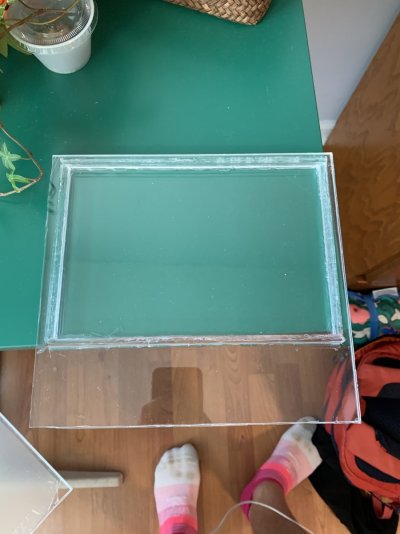
6. I cut lines of the rubber seal equivalent to the length of the inside walls of my tank with two being slightly shorter to allow the overlap from the others. I'll show the picture, so you see what I mean. The seal had an adhesive on the back, so all I had to do was peel off the wax and put it on my inlaid rim (not sure if that's the right word).
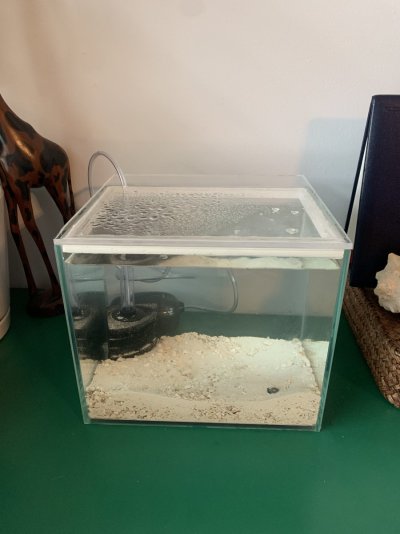
7. I got some air tubing from my LFS because my sponge filter did not come with any. I drilled a hole into the back left corner of my tank lid and fed the air tubing through it. I attached the filter to the tubing inside the tank and the pump to the outside. I filled the tank with sand on the bottom and some saltwater to see how it worked, and so far so good. Seems to be working well after a day.
 .
.
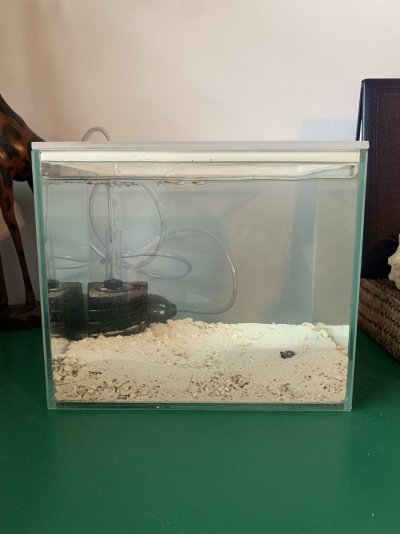
After running for a day, the evaporation seems to be minimal if at all. I know there is probably at least some, but it is unnoticeable. The hardest part will be feeding because every time I pull up the lid, the filter gets pulled up, too. I'm going to use some live rock from my current tank to see this one once I get a small heater into it. Still trying to figure out how I will go about that with the power cord and everything.
I'm hoping to get a light soon to mount on the back lip of the lid. I have been thinking something like a Kessil a80 tuna blue or a Reef Breeders Pico LED light. Something that will not overpower this little tank. Let me know if anyone has suggestions. I'm also wondering if my light will be affected by the water splatter on the lid and if I will need to lower the water line to reduce splashing from my filter bubbles.
Livestock:
A small goby - probably a yasha (RIP my previous Yasha who didn't make it through the move from Ohio to South Carolina) or some kind of small shrimp goby
Pistol shrimp - hoping to find a candy cane pistol shrimp, but they are hard to find at the store
Zoas
Mushrooms
Leathers
I'm going to go with all softies for now because I feel like that will be the easiest to maintain and the hardest to kill. Let me know what you guys think of my tank! This was a fun little project for me to do, and anyone could replicate it at home. It was pretty easy, just took most of my day last Saturday. Hope you enjoyed my build up to the point. Updates to come!
I'm going to list all my steps with pictures in order if anyone likes my idea and wants to copy it.
1. I cleaned the tank out with soap and water. It had been in the guy's garage for a few years and was pretty gross. Here's the tank. Sorry for the messiness of my workspace on my coffee table.
2. Next, I looked up some options for making a lid and sealing it. I decided to go with a thick acrylic lid, even with the slight off chance it warps. Ideally, I would've done glass, but I was worried about cutting it to the right size and having the tools to be able to. I went with window rubber seal tubing and some clear plumbing glue. I also got an acrylic cutting tool. Got all of it at Lowe's for around 50 bucks. The acrylic was the most expensive part at like 35 or so.
3. I purchased a small corner sponge filter and an air pump with the suggestion of my LFS owner. She seemed to think that would be the easiest to make the seal and create some water movement, and it was easy to fit into my lid design.
4. I cut the acrylic to the size of my tank top with an extra lip on the back for mounting a light with an arm. The cutting was the hardest part because I had to use that tool to cut lines over and over in the same spot of the acrylic until it was halfway through, and I could break it. I then cut thin pieces to create a rim on the underside of the lid for attaching the rubber seal to that would press up against the tank walls. Cutting those pieces and getting them to break apart took hours because I had no leverage to break them off. I ended up being able to use a pocket knife to break them apart by putting it into my cut lines and wedging the pieces apart.
5. Next, I glued those thin pieces together so that they would lay within the walls of the tank with a small enough space between them and the walls to squeeze the rubber seal in. The glue took a few hours to completely solidify, and I let it sit for a whole day just to make sure it was good to go.

6. I cut lines of the rubber seal equivalent to the length of the inside walls of my tank with two being slightly shorter to allow the overlap from the others. I'll show the picture, so you see what I mean. The seal had an adhesive on the back, so all I had to do was peel off the wax and put it on my inlaid rim (not sure if that's the right word).

7. I got some air tubing from my LFS because my sponge filter did not come with any. I drilled a hole into the back left corner of my tank lid and fed the air tubing through it. I attached the filter to the tubing inside the tank and the pump to the outside. I filled the tank with sand on the bottom and some saltwater to see how it worked, and so far so good. Seems to be working well after a day.
 .
.

After running for a day, the evaporation seems to be minimal if at all. I know there is probably at least some, but it is unnoticeable. The hardest part will be feeding because every time I pull up the lid, the filter gets pulled up, too. I'm going to use some live rock from my current tank to see this one once I get a small heater into it. Still trying to figure out how I will go about that with the power cord and everything.
I'm hoping to get a light soon to mount on the back lip of the lid. I have been thinking something like a Kessil a80 tuna blue or a Reef Breeders Pico LED light. Something that will not overpower this little tank. Let me know if anyone has suggestions. I'm also wondering if my light will be affected by the water splatter on the lid and if I will need to lower the water line to reduce splashing from my filter bubbles.
Livestock:
A small goby - probably a yasha (RIP my previous Yasha who didn't make it through the move from Ohio to South Carolina) or some kind of small shrimp goby
Pistol shrimp - hoping to find a candy cane pistol shrimp, but they are hard to find at the store
Zoas
Mushrooms
Leathers
I'm going to go with all softies for now because I feel like that will be the easiest to maintain and the hardest to kill. Let me know what you guys think of my tank! This was a fun little project for me to do, and anyone could replicate it at home. It was pretty easy, just took most of my day last Saturday. Hope you enjoyed my build up to the point. Updates to come!


