Glb's 40g upgrade!

OP
OP
glb

glb

7500 Club Member
View Badges
Joined
May 12, 2013
Messages
8,129
Reaction score
3,361
Location
Miami
Rating - 0%
0   0   0
I’ve also been battling a lot of detritus on the rocks. Part of it is probably flow. The 1k gyre tends to blow junk into the smaller rock build on the left side of the tank. I started with Brightwell Microbactor 7 to help break some of it down. I used 5ml for the first dose and left the skimmer off overnight. Hopefully that will clean up the rocks a little.

On top of this, cyano took hold. It was covering the rocks daily and consuming all the po4 in the tank. I treated with Chemiclean last week and after a 10g water change, things look a lot better!
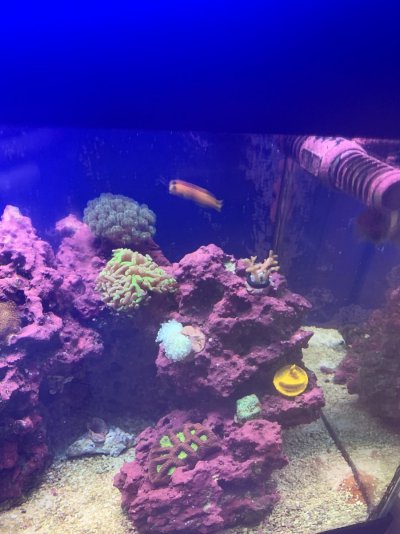
Here’s some pics of the rocks now (with a guest appearance by Benny the Blenny). You can still see the detritus buildup that I’m hoping the Microbactor will help with.

714CB0CD-825E-456C-B486-B17174BC3CBF.jpeg
97F4C21A-85F8-41AD-AE98-874119F04589.jpeg
E3CEAC91-56EF-411F-89F9-17E335DE7A92.jpeg
 

tsav87

Well-Known Member
View Badges
Joined
Feb 28, 2016
Messages
688
Reaction score
791
Location
Louisiana
Rating - 0%
0   0   0
Here’s the latest. I added a co2 scrubber to help with the low ph. I used an old TLF 150 gfo reactor to save some money. It’s getting the ph up to 8.2 now during the day and the corals seem to like it. I have more alk and ca uptake. I drilled a small hole in the skimmer cup for the air line that goes to the scrubber. This feeds humid air to the scrubber and helps the media last longer. Here’s a pic:
F949E87A-7582-4D75-86A3-ECF068D6F3DB.jpeg

So far the media is lasting and I’m very happy with the results. For a tank this size, the scrubber media is affordable.

This looks pretty lit. Nice work!
 
OP
OP
glb

glb

7500 Club Member
View Badges
Joined
May 12, 2013
Messages
8,129
Reaction score
3,361
Location
Miami
Rating - 0%
0   0   0
New corals from the Frag Swap in Weston today. I scored 3 acans, two zoa colonies, a rock anemone, and a yuma mushroom.
E89201B8-2F60-4D57-B678-FF0066DE7699.jpeg
1D724E04-A379-4BC0-9CFF-B216B5C445D0.jpeg
C53F8C74-C024-420F-8901-435AEB420EF4.jpeg
 
OP
OP
glb

glb

7500 Club Member
View Badges
Joined
May 12, 2013
Messages
8,129
Reaction score
3,361
Location
Miami
Rating - 0%
0   0   0
It’s been a while since my last update, but I’ve done a lot lately and wanted to share. The first upgrade was to a BRS 150gpd Water Saver Value Plus RODI system with an Aquatec Booster pump
DC375DA0-9FB5-4F42-B717-13021A3AF297.jpeg

I am so happy with its performance, especially with how fast it is! It used to take me hours to make 10g/week, with lots of waste water that I was constantly having to dump out. Now I’m able to make 10g in about an hour, and my waste water has decreased probably by 70-80%. With the built in flush valve, pressure gauge, and TDS meter, I love this thing! More updates to come!
 
Last edited:
OP
OP
glb

glb

7500 Club Member
View Badges
Joined
May 12, 2013
Messages
8,129
Reaction score
3,361
Location
Miami
Rating - 0%
0   0   0
The next update was finally setting up an AWC system, because I hate water changes as much as I used to hate making RODI water! I bought a Neptune DOS and am thrilled with it.
EF3EB751-037A-4394-9B3F-3850D0DDB724.jpeg

When I set it up, the AWC feature has one of the pumps running in reverse, which was confusing to me. What I did in the programming was have both pumps with an “add” function and I moved the tubing around to make it work. So one of the pumps adds to the waste water bucket and one adds to the tank. I found this setup to be more intuitive, and both pumps run clockwise. Thanks to the R2R people who helped me with this! Next up is my water storage cabinet....
 
OP
OP
glb

glb

7500 Club Member
View Badges
Joined
May 12, 2013
Messages
8,129
Reaction score
3,361
Location
Miami
Rating - 0%
0   0   0
I didn’t like having the water storage buckets visible next to my tank, so I built a little cabinet to hide them:
447DDC09-6F19-4958-8478-C8F80F533756.jpeg

I used mainly scrap wood from other projects and some 1/4” thick wood for the front and top. The sides are not skinned because I didn’t want a humidity problem in the cabinet. I put wheels on it so I could slide it out when I need to add fresh saltwater. The lid is on a hinge so I can get to the waste water daily and dump it. The waste water is the smaller bucket:
A8835B7E-0CBA-42D6-B355-3134464FEB76.jpeg

You can see the frame of the cabinet in this pic. The buckets sit on the floor, and there isn’t a frame piece on the lower back of the cabinet, so I can roll the whole piece out easily.
I also used silicone caulk to put a 1/2” piece of PVC in the fresh saltwater bucket to keep the tubing secured at the bottom of the bucket:
C265EAE4-CC0C-4AF6-8A3B-7AC1D79C67B5.jpeg

It works like a charm!

I’m so happy with how it turned out and wanted to share it with all of you!
 
OP
OP
glb

glb

7500 Club Member
View Badges
Joined
May 12, 2013
Messages
8,129
Reaction score
3,361
Location
Miami
Rating - 0%
0   0   0
Finally, I got around to starting the front of the stand. I used 1x6” spruce for the frame and added neodymium magnets to hold it in place. I’m still finishing up on the paint, but am very happy with how it turned out. I used a foerstner 1 1/2” bit to drill holes for the magnets. I destroyed the bit by hitting a few screws, so be careful! Here’s some pics:
3A675D8F-F380-4F29-A359-C81CCD26092B.jpeg

Here’s the frame with a curtain behind it until I can finish the front.
222EFA8E-833A-4ED3-814F-3A799CA74A23.jpeg

This is one of the fender washers I used on the front. I still need to add a few more coats of kilz primer to protect them.
B801B6E3-C313-4D43-BFE8-8CDF8E2B238F.jpeg

Here’s one of the neodymium magnets in the stand. I’m going to give it a few more coats of paint too. One word of caution, they are very strong! These are 1 1/4” and you don’t want to get your fingers between two of them! (I have the pinch marks to prove it). What I love about this setup is that I can take the entire front off, which makes it super easy to access the sump.
 
OP
OP
glb

glb

7500 Club Member
View Badges
Joined
May 12, 2013
Messages
8,129
Reaction score
3,361
Location
Miami
Rating - 0%
0   0   0
It’s been a while since I updated my tank thread, but a lot of good things have been happening! I’ll post a pic of all my new corals when the lights come on. The last 6 months, the tank has been very stable due to auto water changes and auto Alk and Ca dosing. The corals are growing like crazy, and I haven’t had any problems with cyano or other algae outbreak. The NO3 is around 3-5ppm (not doing anything specific, but that’s where it sits) and the PO4 is a bit higher (0.08-.11pm). I’m not sure why the PO4 is higher but think it may be due to feeding my harlequin shrimp Quin a starfish every 2-3 weeks. This morning the PO4 was .13 so I threw a bag of 1/4 cup GFO in the sump to bring it down a bit. That’s way less than recommended but I’ve found that GFO strips the water of PO4 fast, and my corals are happy. I’ll probably pull it out next week.

I started labeling my dosing pumps with their current daily amounts so I know at a glance what the current programming is if I need to change the dose. It really helps! When I got them, I calculated what they actually dosed in a minute and that’s on each pump too. More pics to come!
image.jpg
 
OP
OP
glb

glb

7500 Club Member
View Badges
Joined
May 12, 2013
Messages
8,129
Reaction score
3,361
Location
Miami
Rating - 0%
0   0   0
Here’s the latest! My tank has really stabilized at the almost 5 year mark. Auto dosing and AWC’s have made all the difference and my corals are growing like crazy. Here’s some pics:

My acan garden:
43F3B4C5-613A-4F8F-A1B9-1C3BA98CC46B.jpeg


Duncans, trumpet, mushrooms, Kenya tree, zoas, and rock flower nems:
A09F448B-DC43-4267-8D1E-3A851CA71AFC.jpeg

A310378C-38C4-458A-BFC6-D85BDFAC99D0.jpeg

Birdsnest, torch, hammer, acans, and stylophora
B6FD23F7-4546-4319-86ED-073EB34F15F0.jpeg

I’m so happy with the way the tank is filling out. For those of you just getting started, hang in there! I made every mistake in the book and am so happy with my tank now!
B883B2BD-6E63-4ED3-8DEE-B68D4F090B47.jpeg
B6FD23F7-4546-4319-86ED-073EB34F15F0.jpeg
 
Last edited:

SteveMac84

Active Member
View Badges
Joined
Oct 25, 2021
Messages
221
Reaction score
282
Location
Clarkston WA
Rating - 0%
0   0   0
Here’s the latest! My tank has really stabilized at the almost 5 year mark. Auto dosing and AWC’s have made all the difference and my corals are growing like crazy. Here’s some pics:

My acan garden:
43F3B4C5-613A-4F8F-A1B9-1C3BA98CC46B.jpeg


Duncans, trumpet, mushrooms, Kenya tree, zoas, and rock flower nems:
A09F448B-DC43-4267-8D1E-3A851CA71AFC.jpeg

A310378C-38C4-458A-BFC6-D85BDFAC99D0.jpeg

Birdsnest, torch, hammer, acans, and stylophora
B6FD23F7-4546-4319-86ED-073EB34F15F0.jpeg

I’m so happy with the way the tank is filling out. For those of you just getting started, hang in there! I made every mistake in the book and am so happy with my tank now!
B883B2BD-6E63-4ED3-8DEE-B68D4F090B47.jpeg
B6FD23F7-4546-4319-86ED-073EB34F15F0.jpeg
Awesome
 
OP
OP
glb

glb

7500 Club Member
View Badges
Joined
May 12, 2013
Messages
8,129
Reaction score
3,361
Location
Miami
Rating - 0%
0   0   0
It’s been awhile, but here’s the latest on my tank. I just installed an Aqua UV 8w sterilizer by plumbing it into my return line. I mounted it on a 1/2” plastic cutting board I trimmed to fit over the sump and initially used vinyl tubing to plumb it. The vinyl was really stiff so I ordered some silicone tubing to replace it. The screw to barb fittings have a tiny leak so I ordered a plasto-joint stix for the screw side of the fitting. Everything is over the sump but I still want to fix the leaks. After I installed it I was running the unit 24hrs/day and the water started to heat up to almost 81f. Once I realized it was continuing to go up I programmed the uv to run at night and turn off if the tank reaches 80f. The water has been crystal clear since I installed it. I mainly got it to help with algae in the water column. The next project will be a Neptune FMK with a 1” fitting on the return line so I can program the uv unit to turn off if the return pump ever goes out.

My tank has been up for 5 years now and I’m so happy with how it looks. I don’t plan on upgrading to a larger tank because I don’t have room so I want my 40g to be a showcase. Thanks to everyone for all your help and here’s a pic of the uv:
306698BC-9396-4996-A70E-86BA18215DB0.jpeg
 
OP
OP
glb

glb

7500 Club Member
View Badges
Joined
May 12, 2013
Messages
8,129
Reaction score
3,361
Location
Miami
Rating - 0%
0   0   0
Success! I was able to fix the leaks in the screw/barb fitting with the Plasto-Joint. I also changed out the tubing to silicone, which is much more flexible and easy to use. I’ll post some tank pics when the lights come on this afternoon.
 
OP
OP
glb

glb

7500 Club Member
View Badges
Joined
May 12, 2013
Messages
8,129
Reaction score
3,361
Location
Miami
Rating - 0%
0   0   0
Now my issue is heat management. I can’t run the UV 24/7 because the tank temp kept getting higher and higher. I’ve been fiddling with running it at night and I think a 9 hour cycle is working, with programming to turn it off if the temp gets to 80. I have a few areas that tend to get cyano but it I stir the sand daily, the uv unit seems to be helping. I’m wondering if I could program the carbon reactor to turn off if the temp rises without affecting the water quality. Nitrates and Phospates never cause me any problems.

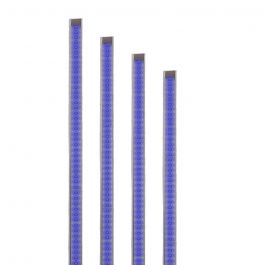
Also, I want to add a Reefbrite unit to see more pop. I don’t think that would add much heat but I have to watch things. I’d rather not add a fan unless I have to so I’m not adding RODI water more frequently due to evaporation. Here’s the fixture I’m looking at:
 
OP
OP
glb

glb

7500 Club Member
View Badges
Joined
May 12, 2013
Messages
8,129
Reaction score
3,361
Location
Miami
Rating - 0%
0   0   0
I just got this little usb fan for my sump to help bring the temp down. I programmed it as a chiller on my apex to turn on at 79.5 and off at 79. My new uv unit has raised the tank temp and I’ve already reduced the amount of time that it runs. I hope this does the trick!
B84C8924-5692-4E57-979C-450048AEF96E.jpeg
 
OP
OP
glb

glb

7500 Club Member
View Badges
Joined
May 12, 2013
Messages
8,129
Reaction score
3,361
Location
Miami
Rating - 0%
0   0   0
Today I changed out the usb fan for this small vornado. The USB had a rechargeable battery so it didn’t turn off when the outlet turned off. So far having a fan has lowered the temp at least .5 degrees. Since this one has three speeds I can adjust as needed. More water evaporation for sure but it’s worth it!
21DC898B-88C7-4DAF-A4E4-15C56C207189.jpeg
 

Being sticky and staying connected: Have you used any reef-safe glue?

  • I have used reef safe glue.

    Votes: 99 87.6%
  • I haven’t used reef safe glue, but plan to in the future.

    Votes: 6 5.3%
  • I have no interest in using reef safe glue.

    Votes: 5 4.4%
  • Other.

    Votes: 3 2.7%
Back
Top