Is my KH director missing a part?

Users Who Are Viewing This Thread (Total: 1, Members: 0, Guests: 1)

billygalaxy

Active Member
View Badges
Joined
Sep 12, 2013
Messages
123
Reaction score
62
Location
Portland, Oregon
Rating - 0%
0   0   0
Trying to get KH director set up and got to the insert probe part and cannot for the life of me figure out how to tighten it. Looking online it appears that every one that I can find a photo of has a black piece that goes here. Nothing like this was included in my newly purchased KH director. Am I missing a part, or just and idiot?

Also, were the KH director and/or Doser 2.2 supposed to include a PAB cable among their contents? Instructions seem to indicate so, I did not have one with either product and had to find my own...


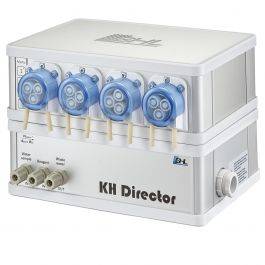
ghlmissingpart.jpg
 

Lasse

10K Club member
View Badges
Joined
Mar 20, 2016
Messages
10,887
Reaction score
29,892
Location
Källarliden 14 D Bohus, Sweden
Rating - 0%
0   0   0
Hello,

The "black piece" is a pH sensor.

Gaël
Yes - but some KH- directors have a black pH sensor fitting - this model seems to have a white fitting. It should probably be used the same way as the instructions for the black fitting - IMO.

In the KH director - Doser 2.2 sets the PAB cable is included but if you bought the separately - no PAB cabel is included - if I remember right.

Sincerely Lasse
 

Gaël

Well-Known Member
View Badges
Joined
Sep 27, 2014
Messages
612
Reaction score
355
Location
France
Rating - 0%
0   0   0
Ah ok, yes no matter.
Otherwise, there's also a black rubber inside:

khd rubber.png
 

Vinny@GHLUSA

Valuable Member
View Badges
Joined
Jul 27, 2016
Messages
1,149
Reaction score
1,509
Rating - 0%
0   0   0
This is the same locking nut used for the IOND sensor. Turning the nut will be enough to lock the probe inside the housing.
 
OP
OP
billygalaxy

billygalaxy

Active Member
View Badges
Joined
Sep 12, 2013
Messages
123
Reaction score
62
Location
Portland, Oregon
Rating - 0%
0   0   0
This is the same locking nut used for the IOND sensor. Turning the nut will be enough to lock the probe inside the housing.
I do not seem to be able to tighten the nut to lock the probe. I'll spend more time investigating after work
 
Last edited:

Gaël

Well-Known Member
View Badges
Joined
Sep 27, 2014
Messages
612
Reaction score
355
Location
France
Rating - 0%
0   0   0
No, it's the right part.
As indicated, GHL now use the same part for both KHD and IOND.
You just need to turn the nut to tighten the gland on the pH sensor.

The PAB cable is only included with KHD SETs, and even then there's only one PAB cable included, must buy another if you want to use it with a ProfiLux.
 
Last edited:

oreo54

5000 Club Member
View Badges
Joined
Sep 18, 2017
Messages
5,603
Reaction score
3,449
Rating - 0%
0   0   0
I do not seem to be able to tighten the nut to lock the probe. I'll spend more time investigating after work
odd..black on the left.. white on the right
khdir.JPG
 

Gaël

Well-Known Member
View Badges
Joined
Sep 27, 2014
Messages
612
Reaction score
355
Location
France
Rating - 0%
0   0   0
odd..black on the left.. white on the right
khdir.JPG
As written: the black gland was the old version.
The white gland is the latest revision since the end of 2023.
 

Lasse

10K Club member
View Badges
Joined
Mar 20, 2016
Messages
10,887
Reaction score
29,892
Location
Källarliden 14 D Bohus, Sweden
Rating - 0%
0   0   0
Last edited:

PascuaReef

New Member
View Badges
Joined
Feb 4, 2024
Messages
4
Reaction score
0
Location
Brazil
Rating - 0%
0   0   0
I installed my KHD today and had the exact same question. I wasn't sure how tight I should make it. In my case, I did what you can see in the video attached. I'm not sure if it's the correct way, but when I screwed it a little more, the probe felt kind of tight. @billygalaxy , the only difference I noticed in comparison to your last image is that, in my case, the metal washer was placed before the rubber (between the rubber and the plastic screw). It seems like in your case they are inverted. It would be great if someone could help us understand the correct order and confirm if everything is properly installed.

Thanks,

Fernando
 

Attachments

  • WhatsApp Video 2024-02-05 at 21.05.49.mp4
    4.8 MB
OP
OP
billygalaxy

billygalaxy

Active Member
View Badges
Joined
Sep 12, 2013
Messages
123
Reaction score
62
Location
Portland, Oregon
Rating - 0%
0   0   0
I installed my KHD today and had the exact same question. I wasn't sure how tight I should make it. In my case, I did what you can see in the video attached. I'm not sure if it's the correct way, but when I screwed it a little more, the probe felt kind of tight. @billygalaxy , the only difference I noticed in comparison to your last image is that, in my case, the metal washer was placed before the rubber (between the rubber and the plastic screw). It seems like in your case they are inverted. It would be great if someone could help us understand the correct order and confirm if everything is properly installed.

Thanks,

Fernando
I wish that I could offer assistance, but I am still trying to get mine sorted out.
Sent it back to GHL for them to take a look at and am waiting to hear from them.
I'll let you know if I learn anything that may be useful to you.
 

Lasse

10K Club member
View Badges
Joined
Mar 20, 2016
Messages
10,887
Reaction score
29,892
Location
Källarliden 14 D Bohus, Sweden
Rating - 0%
0   0   0
IMO - the metal washer should be placed between the rubber and the plastic screw. The new version looks like a plastic version of a A2 cable gland - the general idea is that the rubber part should be compressed and and thus expand towards the inside of the screw connection and the outside of the electrode.

Without loosing the cap screw completely - insert the electrode as far as it will go - you will notice when it stop. I prefer to have the text facing up like in my image below. Note that I have the old type of cable gland

1707221022645.png


You should tight the screw cap as much as you can - much more than in your video. Tight by hand until you can't bear to tighten any more. From the instruction for ION Director - it have the same gland as the new version of KH Director.

1707220221733.png

IMO - If you are very strong in your hands (and also if you use a tool) remember that it is plastic and the gangs do not last as much as when they are made of metal. Be careful - the trick is to tight as much as possible without damage the gangs. When the mount is finished - You should not be able to move the electrode. During the first measurements - check for leaks around the electrode. If it leaks - tight a little bit more. With this (the new type) The more it is tightened - the more it seals.

Sincerely Lasse
 

PascuaReef

New Member
View Badges
Joined
Feb 4, 2024
Messages
4
Reaction score
0
Location
Brazil
Rating - 0%
0   0   0
IMO - the metal washer should be placed between the rubber and the plastic screw. The new version looks like a plastic version of a A2 cable gland - the general idea is that the rubber part should be compressed and and thus expand towards the inside of the screw connection and the outside of the electrode.

Without loosing the cap screw completely - insert the electrode as far as it will go - you will notice when it stop. I prefer to have the text facing up like in my image below. Note that I have the old type of cable gland

1707221022645.png


You should tight the screw cap as much as you can - much more than in your video. Tight by hand until you can't bear to tighten any more. From the instruction for ION Director - it have the same gland as the new version of KH Director.

1707220221733.png

IMO - If you are very strong in your hands (and also if you use a tool) remember that it is plastic and the gangs do not last as much as when they are made of metal. Be careful - the trick is to tight as much as possible without damage the gangs. When the mount is finished - You should not be able to move the electrode. During the first measurements - check for leaks around the electrode. If it leaks - tight a little bit more. With this (the new type) The more it is tightened - the more it seals.

Sincerely Lasse
Thank you very much, @Lasse. Regarding the position of the metal washer, I agree, and it was set up that way by default, so I didn't change it.

I followed your advice and tightened it as much as I could. Just as you mentioned, I was a little worried and didn't want to overtighten it and risk breaking something. Honestly, I had the feeling that the old way was better than the new one. It seems like there's a missing piece with the new method.

Thank you for your support, @Lasse.
 

BeanAnimal

2500 Club Member
View Badges
Joined
Jul 16, 2009
Messages
3,184
Reaction score
4,821
Rating - 0%
0   0   0
I think the "old way" is a proper compression gland where the design actually compresses the rubber grommet conically toward the probe (or cable or whatever passes through it. The "new" way is DIY and the compression is linear, but likely still enough to seal? What I don't like is that PVC pipe threads are not machined. They are cast and and often very poorly match and will often freeze or stick.

I assume this is parts availability/cost decision. If it works, it works but it still prefer the "old way" if I had a choice.

The "washer" - I assume (hope) it is stainless and is likely meant to go between the "nut" (the theaded bushing) and the grommet so that the nut spins on it and not the grommet.

I would use a bit of silicone grease on the grommet and the threads to help ensure a seal and smooth operation of the threads.
 

Reefing threads: Do you wear gear from reef brands?

  • I wear reef gear everywhere.

    Votes: 20 14.3%
  • I wear reef gear primarily at fish events and my LFS.

    Votes: 10 7.1%
  • I wear reef gear primarily for water changes and tank maintenance.

    Votes: 1 0.7%
  • I wear reef gear primarily to relax where I live.

    Votes: 22 15.7%
  • I don’t wear gear from reef brands.

    Votes: 78 55.7%
  • Other.

    Votes: 9 6.4%
Back
Top