Jared’s sca 50g reef and other tanks

Ef4life

Well-Known Member
View Badges
Joined
Apr 19, 2020
Messages
975
Reaction score
1,714
Location
Phoenix
Rating - 0%
0   0   0
hello, my name is Jared, I live in Phoenix Az and I’d like to share my newest aquarium setup. Initial start date of this aquarium was 5/17/23 so just under 6 months now, but it replaced a biocube I have had running for 10years, the contents of the biocube went right into this tank day 1.

Tank - sca 50g rimless 24x24x20
Sump - 10g aqueon
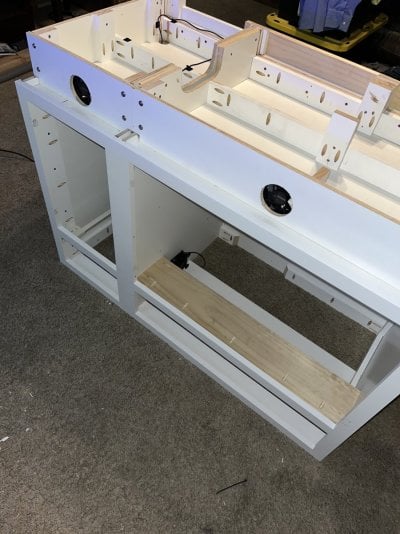
Stand - diy stand made of solid wood kitchen cabinets, quartz top
Return - Jebao mdp-5000 dc
Flow - Jebao mow 10 (2x)
Light - orphek atlantik v4
Dosing - kalkwasser kamoer x1
Control - not much need imo, but it has an old apex that pretty much is only used to control the heater.
Skimmer - none at this time

Here it is now 11/3/23

IMG_2082.jpeg
IMG_2086.jpeg
IMG_2085.jpeg
IMG_2084.jpeg
IMG_2083.jpeg


I prefer a whiter light, orphek is great for that. I wanted tank that would remain pretty clean so I opted to go bare bottom. I do not regret it, although it has kept the no3/po4 to near 0 levels, algae growth has been non existent since the start, dead center of the tank is a dead acropora skeleton, its bone white still and has been for about 2 months. No ugly phase here. The majority of my rocks were started dry - 10 years ago- so they have plenty of bacteria to keep the tank fairly stable. I added a small container of sand to the sump, it’s definitely improved the system in a short few weeks. Less bacterial/dino slime. And I’m getting my first bits of coralline on the bottom glass.

I’ll detail the build process I took, and showcase the stand in the following posts.
 
OP
OP
Ef4life

Ef4life

Well-Known Member
View Badges
Joined
Apr 19, 2020
Messages
975
Reaction score
1,714
Location
Phoenix
Rating - 0%
0   0   0
Here is the biocube at its absolute peak of awesome, and towards after
I had some bacterial thing start that eventually caused 99% of the mushrooms to release from the rocks except for the green ones, I always hated the biocube design and was glad to finally replace it when it started leaking. Also the last few years I can no longer find quality mh bulbs for the 70w fixture, the cheap amazons that are available just don’t have the right look, nothing really would grow. I actually pulled the sandbed out months before the final tear down, but it never helped the growth, or health of the system, something was just off in the tank towards the end and into the beginning of the new tank. Literally the water in the cube smelled rotten, no matter what I would do which was why I pulled the sandbed out.
IMG_0129.jpeg
IMG_2684.jpeg
 
OP
OP
Ef4life

Ef4life

Well-Known Member
View Badges
Joined
Apr 19, 2020
Messages
975
Reaction score
1,714
Location
Phoenix
Rating - 0%
0   0   0
I originally ordered a slightly smaller tank but sca discontinued that model and gave me a larger size at the same cost, so that actually screwed up my plans. I had the biocube as sort of a room dividing peninsula, the wall it was on was only 35” wide, so I couldn’t just stick a 40b there, I searched a while until I could find an affordable cabinet made of solid plywood (no particle boards here) that was 33”, which would fit perfect in the planned space. But the new tank dimensions being 24” deep means it would stick out too far and become more of a pain to walk around and risk bumping the glass. So we had to change location.

The problem with the new location was lack of enough electrical power. I ended up having to adding a sub panel in the closet wall next to the tank with 2 dedicated circuits for the reef tank. This was a blessing as it also gave me the panel to run a 50amp into the garage for a welder. Here you can see the square hole where the new wires to connect to the stand will come through. I also cut back the carpet so it’s on hard solid slab.

IMG_0721.jpeg

IMG_0724.jpeg


So since I ended up changing the tank location, I was no longer limited by the size of the wall for the stand, I already had the 33” cabinet and return wasn’t really an option. I bought another cabinet that was 15” for a total stand width of 48” that way I can go up to a 120g tank on this stand, and yeah it’s strong enough.
IMG_0632.jpeg

The cabinets were flat shipped and I assembled them, I glued all the joints, and added a ton of wood to add more strength and structural support. Do to the cabinets only being 24” deep, I had to build out the cabinet from the wall about 2.5” for clearance behind the tank to run wires into the stand. The stand is also divided into the larger wet side, and the dry electrical side. Things I needed to add to the stand - lighting underneath, cooling fans, electric outlets and a panel for equipment mounting. Also a control panel for the pump and apex control heads. Ethernet cable. Waterproof the wet side.

Here the bottom of the stand beefed up to support any weight on the cabinet bottoms, notice the channel between
The 2 cabinets, it has plywood to add structure and secure the cabinets together with an air channel in the middle, this channel is going to vent the stand.
IMG_0654.jpeg


I also added structural support to the back of the stand to build it out from the wall a few inches to fit the 24” tank. The holes are for conduits to run cables through into the stand behind the tank

IMG_0717.jpeg
IMG_0704.jpeg
 
OP
OP
Ef4life

Ef4life

Well-Known Member
View Badges
Joined
Apr 19, 2020
Messages
975
Reaction score
1,714
Location
Phoenix
Rating - 0%
0   0   0
So I want this stand to last a long time, so humidity and moisture are killers of wood stands. I added Built in ventilation with usb computer fans. 2 fans are mounted on the bottom of the stand in the toe kick that pull air out of the stand and push it into the room. Up top hidden from normal view is one fan on the wet, 1 on the dry side. These fans push air into that channel from inside the stand and down underneath to be pulled out by the other 2 fans. Very cheap, very simple, very effective. And silent. And having a toe kick is great for a stand. Although you can lose internal height for things like a skimmer. The toe kick is removable for fan maintenance or if I have a major spill I can dry out or just clean underneath the stand. The large hole is just a wire pass through from wet to dry sides.
IMG_0665.jpeg
IMG_0666.jpeg
IMG_0664.jpeg
IMG_0667.jpeg
 

Attachments

  • IMG_0663.jpeg
    IMG_0663.jpeg
    205.2 KB · Views: 34
OP
OP
Ef4life

Ef4life

Well-Known Member
View Badges
Joined
Apr 19, 2020
Messages
975
Reaction score
1,714
Location
Phoenix
Rating - 0%
0   0   0
everyone knows that over time your going to change stuff on the reef, so it all needs to be accessible for maintenance and swapping stuff out and upgrades etc. so the electrical was a job. Between keeping a fairly clean look, safety, modularity, and a place to mount everything.

So here is the removable panel, 2 dedicated circuits on gfcis, and a Ethernet port to hard wire the old pre wifi apex which I still never bother to hook up. Above is the slides for the drawer. I made the panel from the shelf the cabinet came with, perfect width
IMG_0694.jpeg


here you can see the top view of the panel and the space behind.
IMG_0696.jpeg


Here you can start to see the control panel that’s above the sump and a led light installed behind it, it’s sealed off from the wet side. I ran power up for another switched receptacle and to power the light. You can also see a lot of the extra supporting wood structure and the pocket holes to attached the plywood top very securely.
IMG_0697.jpeg


The switches - one turns on the led light for working in the stand, the other is a switched receptacle with easy access to turn a maintenance pump on/off for
Water changes or other temporary equipment. Again this had to be somewhat modular and removable for future maintenance. This panel will hold all the control heads for the pumps and apex
IMG_0695.jpeg


Another view showing the led light.
IMG_0698.jpeg
 
OP
OP
Ef4life

Ef4life

Well-Known Member
View Badges
Joined
Apr 19, 2020
Messages
975
Reaction score
1,714
Location
Phoenix
Rating - 0%
0   0   0
Fitting the top, working on the electrical
IMG_0725.jpeg


IMG_0726.jpeg


I don’t have a picture before I set it in place but the green paint you can see is actually underneath is actually waterproofing. I didn’t want the bare wood sitting on the concrete absorbing moisture from the slab or spills. This ensures the wood stays perfect long term. The extra supports under are to make sure whatever sump I go with it’s fully supported and won’t sag
IMG_0727.jpeg

Here you can see under the toe kick with the fan attached, and you can see all the composite shims I used to level the stand,
No wood shims to potentially degrade over time. The Stand is perfectly level I spend a lot of time getting it perfect for long term success.
IMG_0730.jpeg
 
OP
OP
Ef4life

Ef4life

Well-Known Member
View Badges
Joined
Apr 19, 2020
Messages
975
Reaction score
1,714
Location
Phoenix
Rating - 0%
0   0   0
Cutting the slab was the hardest part, ok it was easy to cut, but the measurements were the hard part a so measure 10x, pray, and cut once.


so this slab of quartz was an old kitchen island of a customer’s house we remodeled and put in new stone countertops. It just so happened to be the absolute perfect size I needed and the edges were already finished so I didn’t need to sent it to the granite fabricator.
IMG_0739.jpeg


Here you can see my lines to cut to size. And the foam pad for tank placement reference
IMG_0740.jpeg


And the final cuts, diamond hole saws Are used to drill the wire holes and the area for the drain lines to the sump.
IMG_0743.jpeg


There were multiple test fits, and that was heavy carrying in and out multiple times. But final fit is just perfect. I actually had to
Trim the underside of the bullnose to fit, this piece had no room For error in my cuts.
IMG_0744.jpeg


Showing how the tank will fit and transfered the drain hole cutout onto the plywood and cut it out. Plenty of room bulkhead access
IMG_0747.jpeg
 
OP
OP
Ef4life

Ef4life

Well-Known Member
View Badges
Joined
Apr 19, 2020
Messages
975
Reaction score
1,714
Location
Phoenix
Rating - 0%
0   0   0
Here’s the inside of the stand, I added a full panel of 3/4” plywood to the left inside of the cabinet to add strength in case I go bigger. This stand will fit a 120 sca with no problem and the plumbing will (should) be the same spacing. Even though this stand also attached to the wall it’s “easily” removable in case I decide to move or something happens.

IMG_0753.jpeg

Since the stand is wood, that’s not kosher for me and the wet side, I decided to line the cabinet with frp panel, like what you find in a commercial Kitchen. (And im
So glad I did it 6 months in) there has been a couple spills.
IMG_0754.jpeg


IMG_0781.jpeg

IMG_0784.jpeg


Before the frp was glued in I painted all the bare wood and caulked all the seams, I had enough frp to but a piece on the bottom of the dry side too. The cabinet was pre painted, so I had Home Depot match it, it’s like 95% close. Not close enough to use as touch up paint for the exterior though, but the inside stuff it looks fine. The wire conduits were painted white too and caulked in so they are permanent and won’t move or leak water into or behind the stand. There is potential for the one conduit on the right side to Flush water into the dry side but everything wired is gfci protected and has a drip loop.
IMG_0783.jpeg
IMG_0782.jpeg
IMG_0780.jpeg
 
OP
OP
Ef4life

Ef4life

Well-Known Member
View Badges
Joined
Apr 19, 2020
Messages
975
Reaction score
1,714
Location
Phoenix
Rating - 0%
0   0   0
Out with the old and in with the new paint. The green had to go, it’s the color the house came with 10+ years ago. Patched some holes first. You can also see so wire sticking out of the wall above the stand, that will power the lights.
IMG_0791.jpeg


New paint is a shade of grey, it’s better than it was. We added some wood blocking to support hanging a larger tv, we also had to move the tv left a foot or 2 for more clearance for the stand. Messy construction zone - eventually the carpet is going, but lots of work to do on the house before that happens unfortunately.
IMG_0793.jpeg
 
OP
OP
Ef4life

Ef4life

Well-Known Member
View Badges
Joined
Apr 19, 2020
Messages
975
Reaction score
1,714
Location
Phoenix
Rating - 0%
0   0   0
Next up was the upper shelf, hanging the light from the vaulted ceiling was an option, but then I wouldn’t have a space for the led driver and wires. I built this hollow shelf out of mdf and 2x4s - I’m not worried about water leaking above the tank so mdf is fine, and it has the smooth surface for easy painting.

Here you can see the bones of the shelf,
Holes are wire chases through the compartments. This shelf like everything else is build to last and be strong. The orphek weight like 17lbs, and if you noticed, I like lego, so this will also display some sets up top eventually. And lego gets quite heavy.
IMG_0797.jpeg


Here it’s mounted to the wall, anchored with heavy duty 6” screws into the studs, and heavy duty drywall anchors that held it initially and gave me enough wiggle to get it perfectly level side to side. Its angled back towards the wall 1-2* so nothing will roll off the shelf accidentally
IMG_0800.jpeg


And here it is mounted, I still need to do
All the wiring up top.
IMG_0799.jpeg


I used another piece of mdf for the top pieces. Cut to 3 seperate openings. And a hole for lifting them out, and to run cables into the shelf. Also notice the slight lip around the top of the shelf, again I don’t want anything to accidentally roll off the shelf
IMG_0834.jpeg


And that was a pain to wire. Again we have the 2 dedicated reef circuits and plenty of outlets and all the wires have been hidden behind a wood conduit, Which is also removable to be able to remove the shelf from the wall if I ever need too.
IMG_0835.jpeg
 
OP
OP
Ef4life

Ef4life

Well-Known Member
View Badges
Joined
Apr 19, 2020
Messages
975
Reaction score
1,714
Location
Phoenix
Rating - 0%
0   0   0
And the tank makes its first appearance. This is also the last photo of the biocube running that I have. It’s been a 10 year journey with that tank. Hopefully this will last way longer before it leaks. Pay no Mind to the messy desk lol.

IMG_0837.jpeg


And the first placement on the stand. At this point the stand is fully installed, top is secured, electric is all done. And you can see the black panel that will hold the control heads. 10g sump just chilling.
IMG_0839.jpeg


Everything is painted in the stand, no bare wood anywhere. Getting ready to Start the plumbing IMG_0842.jpeg
 
OP
OP
Ef4life

Ef4life

Well-Known Member
View Badges
Joined
Apr 19, 2020
Messages
975
Reaction score
1,714
Location
Phoenix
Rating - 0%
0   0   0
Plumbing time, so far this build is about 1.5 months, the biocube has been leaking that entire time. Slowly getting worse. Time is running out before this needs to be done.

Left is the emergency drain, right is the main drain that gets the gate valve. Center pipe is the return line. I’m not one for adding a bunch of unions and all that bs. It’s really unnecessary in the first build. Add unions if you ever need to change the plumbing. Brs makes money off them that’s why they try and sell you on all that, you don’t need them necessarily. I’m going for almost totally hidden plumbing here, so the pipes are running tight too the top of the stand, and to give a future skimmer as much room as possible.
IMG_0845.jpeg


I decided to turn the sump, the return pump just fit better that way. 1 1/4” fitting on the pump, and - 1 1/4 in barb fitting at the bulkhead. 1” silicone tube stretched to fit over them. There is no reduction in flow with the larger barb fittings and the silicone can easily handle that little bit of stretching. The tank was plumb with 1” pvc. You can see the 1 1/4 barb on the left on the bottom of the stand, it has a 1” reducer glued in to reduce down to 1” pipe at the bulkhead.
IMG_0848.jpeg


I know I just said you don’t necessarily need unions, but here I felt I needed one on the return. I wanted to be able to adjust the angle of the 45* fitting as needed to prevent kinking of the silicone tube. Also that quick disconnect allows removal of the plumbing to change it out, or run a tubing brush through the pipes for that deep cleaning action. I also needed the union to get more access to the bulkheads if the ever leak (which they did at first)
IMG_0849.jpeg


If you noticed the sump light is on, nice and bright work area. Here I’m planning on where the gate valve will go. Needs to be accessible but out of the way.
IMG_0850.jpeg
 
OP
OP
Ef4life

Ef4life

Well-Known Member
View Badges
Joined
Apr 19, 2020
Messages
975
Reaction score
1,714
Location
Phoenix
Rating - 0%
0   0   0
And here is the plumbing. High and tight. Very clean look. The pipe hangers came from Amazon, I can provide a link if anyone is interested.
IMG_0879.jpeg


I opted to not use the 45 on the return and go straight in. It suck out too far with the barb fitting. Pipes below the rim of the sump are removable to remove the sump and those are just temporary pipes too I cut some new ones so They are equal length. I glued everything with clear oatey fusion, no primer. It’s technically not needed with that glue. And this isn’t under pressure so it’s really fine and never leaked. They do sell clear primer but it’s not available at my Home Depot. The gate valve isn’t cheap, and I didn’t use any unions - why? Because it has enough pipe on both ends to cut it out and reuse it anywhere with some unions.

And if you never saw reefbums video on pvc pipe removal your in for a treat - it’s amazing.

IMG_0882.jpeg


And the clean look I was going for
IMG_0905.jpeg
 
OP
OP
Ef4life

Ef4life

Well-Known Member
View Badges
Joined
Apr 19, 2020
Messages
975
Reaction score
1,714
Location
Phoenix
Rating - 0%
0   0   0
The day is finally may 17th 2023, the biocube is leaking worse then ever I don’t have more than a day or too before this thing is a goner. It’s literally been just under 10’years since I set up the cube - 5/28/2013.
IMG_0851.jpeg


Drained out, end of an era.
IMG_0908.jpeg


I basically added the same exact aquascape as the biocube had, but had to
Slightly change it up as the new tanks way bigger. I also added a new dry rock section that I had glued together using the sand and superglue technique. The scape is 3 seperate pieces, so it will be easy to remove sections as needed for maintenance. I designed the scape to have minimal rocks shading other rocks. That way as the coral grows out, it will do the shading.
IMG_0912.jpeg


Since this is a transfer and I’m rushing , wires are a mess. The wave pumps came straight out of the biocube, 5g bucket is the ato/kalk reservoir. Mounting the apex

IMG_0913.jpeg


Sump is running, it’s silent after a quick few turns of the gate valve. Control panel is still a work in progress. Notice no pump or heater wires or any wires are visible on the wet side. The kamoer x1 is hidden too, I run no ato, just a set dose every day to control evaporation. Every few weeks as needed I will adjust the kamoer up or down depending on the sump level if it’s dropping or rising. I do plan on getting a larger sump and reservoir made eventually that will fit the space better, but this works for now and is super cheap. I’m a very simple reef kind of guy, no unnecessary gear here at all. No sump baffles either for now. No skimmer no real need. The apex temp probe was relocated to the overflow Box up top, it wasn’t heating the tank properly being so close to the heater

IMG_0914.jpeg
 
Last edited:
OP
OP
Ef4life

Ef4life

Well-Known Member
View Badges
Joined
Apr 19, 2020
Messages
975
Reaction score
1,714
Location
Phoenix
Rating - 0%
0   0   0
Well I still have more of the build to go over, but we can come to the present day for now, Like 20minutes ago I get home and the orphek that’s only been in use for a few days now is off and unresponsive, it just had a brand new circuit board installed and was working perfect. Not sure what’s up. So I need to take it apart and figure it out. I will say that I love my orpheks, but I’m not happy. So I had to pull the orphek down and rig up the old mh again, this light was on there since this tank started and I’m so Over it. It just looks so gross compared to the orphek
IMG_2115.jpeg
 
OP
OP
Ef4life

Ef4life

Well-Known Member
View Badges
Joined
Apr 19, 2020
Messages
975
Reaction score
1,714
Location
Phoenix
Rating - 0%
0   0   0
I haven’t messed with the orphek yet, but we can head back to the past.

The original scape I set up, I did change it a little bit over time, but it’s basically a bare bottom tank, and I wanted minimal shading of the rock. There is still little caves and fish hiding spots, and that will increase with coral growth. The old rock was quite green coralline had mostly died off, not really healthy.

IMG_0918.jpeg
IMG_0916.jpeg


Since I didn’t have the new light at the time, and I didn’t want to hang the mh from the shelf and have the holes in the wrong spot for the upgrade. I made a temporary hanger. I’m glad that thing is gone. At least with the broken orphek, I have the wires hanging kit installed, so I no longer need the wood monstrosity.
IMG_0923.jpeg


Wiring is cleaned up quite a bit. All drip looped and safe. I mounted the control heads on the panel.

IMG_0967.jpeg


IMG_0968.jpeg
 
OP
OP
Ef4life

Ef4life

Well-Known Member
View Badges
Joined
Apr 19, 2020
Messages
975
Reaction score
1,714
Location
Phoenix
Rating - 0%
0   0   0
It’s June and the coral farmers market rolled through, so grabbed a few frags. Used an orange filter on the phone. I didn’t take many photos early on. These are the first decent photos showing the scape which is now less green, the rock is getting healthier. I added some the candy canes and hammer coral from my other aquarium. The stuff from the cfm is all on the bright white rocks, no frag plugs allowed.


The green mushies are from the cube
The green and blue candy canes and green hammer are from my 40g.
I picked up an echinata, purplish candy cane with green center, a few favias, and 4 different blasto frags.

IMG_1008.jpeg
IMG_1009.jpeg

IMG_1007.jpeg


I haven put the doors on, just letting the system run and work out any bugs .
IMG_1011.jpeg


We all live in a yellow submarine
IMG_1021.jpeg
 
OP
OP
Ef4life

Ef4life

Well-Known Member
View Badges
Joined
Apr 19, 2020
Messages
975
Reaction score
1,714
Location
Phoenix
Rating - 0%
0   0   0
So back to the present day, when I ran the wires for the mh and reefbrite strips back into the stand Sunday night, i accidentally pulled the feed line off the kamoer x1, so I wasn’t adding any kalk for the last 2 days. I topped off the sump with about a gallon of rodi. Daily kalk dose currently is about 2100ml - dosed at night when the lights are off.
 

Reefing threads: Do you wear gear from reef brands?

  • I wear reef gear everywhere.

    Votes: 20 13.8%
  • I wear reef gear primarily at fish events and my LFS.

    Votes: 10 6.9%
  • I wear reef gear primarily for water changes and tank maintenance.

    Votes: 1 0.7%
  • I wear reef gear primarily to relax where I live.

    Votes: 22 15.2%
  • I don’t wear gear from reef brands.

    Votes: 82 56.6%
  • Other.

    Votes: 10 6.9%
Back
Top