My tank has been going for about 3 months now; I did a few posts in the Meet & Greet forum but I figured it was time to start working on the build thread. I don't do very much social media/Internet posting stuff, but I have been reading posts on R2R for the last couple of years. I've thoroughly enjoyed the information, the dialogue, and the personalities as I've read through the forums, so when I started my new tank I figured that would be a good opportunity to jump into the community and join in the fun!

Navigation
Install the app
How to install the app on iOS
Follow along with the video below to see how to install our site as a web app on your home screen.
Note: This feature may not be available in some browsers.
More options
You are using an out of date browser. It may not display this or other websites correctly.
You should upgrade or use an alternative browser.
You should upgrade or use an alternative browser.
JDog's 270 gallon in-wall reef tank
- Build Thread
- Thread starter jdogclif
- Start date
- Tagged users None
revhtree
Owner Administrator
View Badges
Staff member
Super Moderator
Reef Squad
Partner Member 2024
Excellence Award
RGB
Photo of the Month
Article Contributor
R2R TV Featured
Hospitality Award
Article Administrator
Black Friday Sponsor
Partner Sponsor 2023
Industry Professional
My Aquarium Showcase
- Joined
- May 8, 2006
- Messages
- 47,814
- Reaction score
- 87,535
Yay and looking good!
I have been keeping fish tanks since I was a kid. My dad and I set up a 55 gallon freshwater with an undergravel filter. I remember how bad that thing smelled when we would clean the tank... Since then I have kept plenty of freshwater tanks, including some planted tanks. About 10 years ago my brother gave me a 2 gallon saltwater tank with a little blenny in it and a tiny piece of live rock. I had always heard about how hard and expensive SW was compared to FW, but the second I saw that little fish I was hooked. I started researching everything I could about setting up a reef. I spent sleepless hours lying in bed, staring at the ceiling while I designed and redesigned the sump, plumbing, and rockwork in my head...
Finally I got a 38 gallon reef tank set up from an online listing. I promptly drilled holes in it and set up the sump. It was glorious! Mostly tan-colored soft coral with T5 (normal output) lighting. But it was mine!
Then a couple weeks later it sprung a leak. Not where I drilled it but along the bottom seam. My wife called me at work: "Save the fish! Save the corals!!" Luckily I only worked 5 minutes away a the time. No worries: upgrade time! I got a 46 gallon bowfront with a 250W metal halide. And new carpet...

Things were going along fine, I still had mostly softies, but the family was young and I started neglecting the tank more and more. Finally I decided that the responsible thing was to take a break from reefing for a while, at least until the kids got a little older.
So that lasted not quite a year... I was back in bed staring at my ceiling, trying to come up with the perfect smallish, low-maintenance tank. I decided to build a shallow tank just for coral and a fish or two. I did it all from scratch, 24" x 24" footprint and 10" tall, with a hidden central overflow. I made my own rock and seeded with live rock. I still kept to mostly softies, and by that time LED was coming along so I tried some of those. It was a great little tank. I can't find any pictures of it right now but I know they're around somewhere. Maybe I can squeeze them in later...
Eventually we decided it was time for us to move. We lived in a rural town with a population of about 5,000, and the bigger city was just under 30 minutes away. My wife and kids were heading there almost every day for sports, dance, shopping, etc. so we decided to plant roots in the Big City (it's still not that big...). Our plan was to build, but we weren't quite ready, so we got a rental house. So, no tanks for a couple years...
Just kidding! I set up a little 20 gallon planted tank, and had a betta tank on the side while in the rental. I guess I just need boxes of water in my life...
Finally the time came to design the house. I joked (kinda) about an in-wall tank to my wife, and to my great delight she was very enthusiastic about the idea. So into the blueprints it went!

Finally I got a 38 gallon reef tank set up from an online listing. I promptly drilled holes in it and set up the sump. It was glorious! Mostly tan-colored soft coral with T5 (normal output) lighting. But it was mine!
Then a couple weeks later it sprung a leak. Not where I drilled it but along the bottom seam. My wife called me at work: "Save the fish! Save the corals!!" Luckily I only worked 5 minutes away a the time. No worries: upgrade time! I got a 46 gallon bowfront with a 250W metal halide. And new carpet...
Things were going along fine, I still had mostly softies, but the family was young and I started neglecting the tank more and more. Finally I decided that the responsible thing was to take a break from reefing for a while, at least until the kids got a little older.
So that lasted not quite a year... I was back in bed staring at my ceiling, trying to come up with the perfect smallish, low-maintenance tank. I decided to build a shallow tank just for coral and a fish or two. I did it all from scratch, 24" x 24" footprint and 10" tall, with a hidden central overflow. I made my own rock and seeded with live rock. I still kept to mostly softies, and by that time LED was coming along so I tried some of those. It was a great little tank. I can't find any pictures of it right now but I know they're around somewhere. Maybe I can squeeze them in later...
Eventually we decided it was time for us to move. We lived in a rural town with a population of about 5,000, and the bigger city was just under 30 minutes away. My wife and kids were heading there almost every day for sports, dance, shopping, etc. so we decided to plant roots in the Big City (it's still not that big...). Our plan was to build, but we weren't quite ready, so we got a rental house. So, no tanks for a couple years...
Just kidding! I set up a little 20 gallon planted tank, and had a betta tank on the side while in the rental. I guess I just need boxes of water in my life...
Finally the time came to design the house. I joked (kinda) about an in-wall tank to my wife, and to my great delight she was very enthusiastic about the idea. So into the blueprints it went!
So nothing keeps you staring at the ceiling at night like planning a 270 gallon reef with a fish room! The first step was obviously the display tank. I went back and forth on acrylic vs. glass, read all the equally opposing information on the internet, flipped a coin and went for glass. I was pleased to find a great company here in the NW that does custom glass aquariums, Crystal Reef Aquatics. Julian helped me out with great phone and email communication and got me just what I wanted.

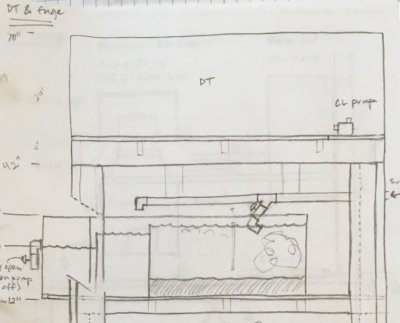
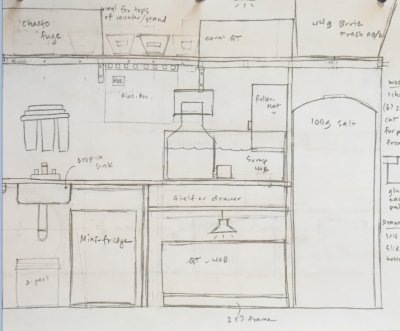
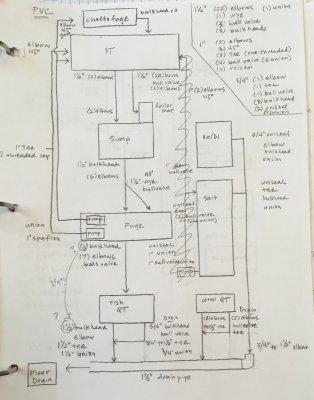
Then I planned out the plumbing and filtration. I wanted to have separate tanks for the protein skimmer and for the refugium. I originally thought I would have the protein skimmer in the first tank, and then the fuge, and then the return. I wouldn't spend too much time trying to figure these sketches out since I ended up changing a lot of it eventually. I just didn't want to do a post with no pictures since I know that is greatly frowned upon...


Plumbing is mostly 1 1/2" PVC: The display drains through the overflow, with two pipes going to the 40 gallon breeder on the opposite wall. I have decided to make this a Triton tank, so this will hold the algae. One pipe handles most of the flow with a gate valve to create a full siphon in the overflow. A third pipe from the overflow is the emergency drain that goes straight to the sump under the DT. When I want to clean out the algae tank, I can bypass it by pulling the PVC riser out of the emergency drain spot in the overflow and switch it to the main drain spot. This diverts the flow to the emergency drain into the sump. It works pretty slick: I can empty the 40B completely but keep the rest of the system running.
From the 40B algae tank, two pipes drain down to the sump. Those are the pipes you see heading down the wall diagonally in the last post. There is no overflow box in the 40B; just two holes drilled in the side toward the top. One has a PVC elbow and the other has a strainer. The strainer side has the gate valve you see in the previous post to create a full siphon. The PVC elbow is the emergency drain. You can kind of see them toward the bottom of the pic here:

From the 40B algae tank, two pipes drain down to the sump. Those are the pipes you see heading down the wall diagonally in the last post. There is no overflow box in the 40B; just two holes drilled in the side toward the top. One has a PVC elbow and the other has a strainer. The strainer side has the gate valve you see in the previous post to create a full siphon. The PVC elbow is the emergency drain. You can kind of see them toward the bottom of the pic here:
In the sump there is a spot for the protein skimmer, a Reef Octopus 3000-INT. I was amazed at how big it was when I opened the box! Of course, I was amazed at how big the display tank was when it arrived. I think I actually got a little bit scared for a second... But I'm over it now! After the skimmer are the two return pumps, Sicce 5.0. They do the job nicely, although they don't produce the flow through the refugium that Triton recommends. We'll see how it goes for a while and address them if needed...

The final bit of plumbing was for the closed loops. I had read about a "reef wash" concept where a guy basically did a closed loop spray bar under the rock work, keeping detritus from settling. I did two closed loops, each with just two outlets: one pointing up, and one pointing down. I set up two main rock piles on cutting boards, one for each closed loop, and the water jets straight down and hoses off the cutting board constantly. The one pointing up kind of flows through the rock structure. You can kind of get a peek at the outlets through the rock from the back:


The pumps are a pair of Vectra L1. The one on the left was leaky when I got it, but awesome Ecotech replaced it lickety-split. The tube between the closed loop pipes is the drain for the protein skimmer:

The pumps are a pair of Vectra L1. The one on the left was leaky when I got it, but awesome Ecotech replaced it lickety-split. The tube between the closed loop pipes is the drain for the protein skimmer:
Looks good! Like the school of blue chromis!
Yeah, they are awesome. We call them The Minions. I kept reading that they end up killing each other off, so I got a big group assuming that there would be some attrition. So far, they are all still alive! I have a cleaner shrimp and they all line up at night and the shrimp gives them each a rub down. It's pretty funny.
Yay and looking good!
Thank you! I know the tank is still a baby but so far so good...
Lights are Chinese LEDs sold by my tank manufacturer. The price was right so I thought I'd give them a try. They were a little tricky to figure out because of the minimal/poorly translated instructions, but they seem to be doing the trick. Coraline is growing, coral polyps are out, and there has been definite growth in the last couple months.

I made a box to hang all the electrical stuff on and tucked the wires inside. I'm using a ReefKeeper Lite just for heater control. The fish room has two circuits, so I have one return and CL pump on each one.

For RO/DI water, I have a 44-gallon Brute with the water line going in toward the top. There is a float valve inside, but I usually turn of the RO/DI unit after it fills up. I installed the clear PVC to see the water level. The white PVC is the emergency drain for if the float valve fails. The water supplies top off for sump and the QT via float valves. Underneath the Brute is a 100-gallon tank for salt water.

So when I set up the tank, I used dry rock from BRS. I soaked it for several weeks in trash cans in the back yard. After rinsing them off a final time I stacked the rock on cutting boards in the tank, and added salt water. The water was pretty cloudy, until I added live sand and rock from Tampa Bay Saltwater. I had to go pick it up from the airport. That stuff was so cool! I opened the boxes and it smelled like the ocean. The tank went from cloudy to clear in a matter of hours.


The TBS live rock and sand had lots of life: snails, polyps, feather dusters, sponges, even an LPS-looking coral (I'm still bad at coral ID). Maybe a brain coral of sorts? It is fluorescent green; as usual the iPhone doesn't do it justice. Also 4 gorilla crabs and counting (although I think they're all out now).


revhtree
Owner Administrator
View Badges
Staff member
Super Moderator
Reef Squad
Partner Member 2024
Excellence Award
RGB
Photo of the Month
Article Contributor
R2R TV Featured
Hospitality Award
Article Administrator
Black Friday Sponsor
Partner Sponsor 2023
Industry Professional
My Aquarium Showcase
- Joined
- May 8, 2006
- Messages
- 47,814
- Reaction score
- 87,535
In the sump there is a spot for the protein skimmer, a Reef Octopus 3000-INT. I was amazed at how big it was when I opened the box! Of course, I was amazed at how big the display tank was when it arrived. I think I actually got a little bit scared for a second... But I'm over it now! After the skimmer are the two return pumps, Sicce 5.0. They do the job nicely, although they don't produce the flow through the refugium that Triton recommends. We'll see how it goes for a while and address them if needed...

Bro..lol..I felt the exact same way with my new tank. I was actually a little scared once it arrived! Oh and I also LOVE my Reef Octopus 300int! Best skimmer I've ever used!
Bro..lol..I felt the exact same way with my new tank. I was actually a little scared once it arrived! Oh and I also LOVE my Reef Octopus 300int! Best skimmer I've ever used!
I know, all I could think about were the tank disasters that I've read about and what 200+ gallons of water would look like on our nice new floor! But now I love the size, it is perfect. Well, 96" would be more perfect, but I am content...
For the back, I had originally thought of doing a shadowbox background, but ended up not doing it, partially because I am limited on space, and partially because I needed to slow down on the projects for now. So I researched different options and decided on window black-out film. I purchased the stuff but never got around to applying it. All the while the fuge light was running at night time and was visible through the tank (and into the living room), so one night I grabbed a piece of 1/4" hardboard that I had, cut it to size, and slapped in on the back. It worked so nice, and was so easy to remove for maintenance, that it remains to this day.


Similar threads
- Replies
- 2
- Views
- 81
- Replies
- 1
- Views
- 98
New Posts
-
-
Nebraska Live Goods SPONSOR Fresh Live 10 Species Phytoplankton Blend
- Latest: Reef By Steele
-


