My first reef tank - Red Sea Reefer 425 g2

Mark-Stover

Community Member
View Badges
Joined
Aug 1, 2017
Messages
88
Reaction score
93
Location
Evergreen Colorado
Rating - 0%
0   0   0
l‘m now 2 weeks into my cycle and things are looking great so I decided to start a build thread. I’ve been wanting to have A saltwater tank since college but never had the guts (or money, or funds) to take the leap. Seven years ago I started doing research in earnest. The first picture I saw of a sump scared the crap out of me however that just got me more interested. I fortunately found BRS’s 52 weeks of reefing and realized that if I was going to go down this path that a reef tank was what I wanted not just a FOWLR (now that I understood what they were). I must give Ryan at BRS a huge thanks for what I consider to be a college course in reefing. I‘ve watched just about all of their other videos as well and have been reading everything I could get my hands on. Two years ago I decided to start buying equipment for my build. It‘s a great way to not go broke when getting into reefing, but I did run into one piece of equipment that was end of life by the time I got it out of the box. None the less, it all worked.

So, I decided to get a tank as big as would fit in my house without having to build in additional support. I debated a lot but finally went with RedSea after seeing the modifications they put into the g2. I ran into a problem right away with delivery as I have a steep 100’ driveway and they would only deliver to the bottom. I was fortunate to find a new local fish store who I could buy through who would deliver directly to my house. MC Aquatics was fantastic! They brought it directly to my living room. This allowed me to line up the hole in the tank with the hole I needed to make in the wall to run lines to the basement. Here is a picture of that. I’ll add more to this later. I don’t want to bore you with it all just yet. Thanks to all that have provided advice and counsel over the past few years. It’s much appreciated!
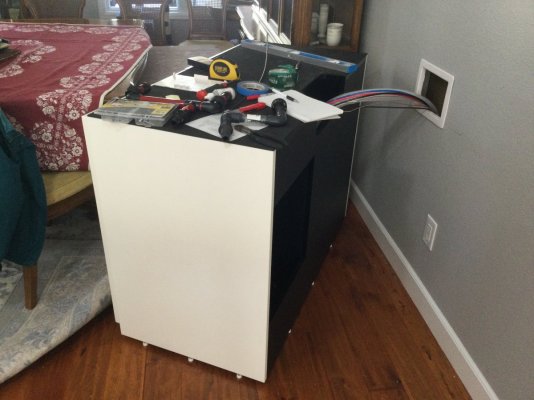
28F0B533-6B10-48E8-8923-5E781CF90E89.jpeg
 
OP
OP
Mark-Stover

Mark-Stover

Community Member
View Badges
Joined
Aug 1, 2017
Messages
88
Reaction score
93
Location
Evergreen Colorado
Rating - 0%
0   0   0
Next update, Aquascape. As Ryan calls it...HNSA. Here is the beginning of day 2 of the mess. I bought about 100 pounds of rock to start with.

IMG_3828.jpg


Here is how it turned out. I'm pleased with the way it looks. There are lots of places for the fish to hide as well as room to still swim. I think I truly made a fish "habitat" as opposed to a wall of rock. Thanks to using the cardboard I was able to build it to still fit it inside the tank with plenty of room on all sides so I could still use my flipper on the glass. I took someones advice from R2R and used pool noodles on the top of the glass so that it was a little safer when putting the rock in place. It really did help with the nerves on putting both pieces in.

IMG_3929.jpg


In my first update I showed that I was running hoses down to the basement. There are two 3/4" hoses for my UV sterilizer (down and back up) as well another 3/4" for using to fill the tank directly from my mixing bin. I also ran RO tubing for RODI, fresh saltwater, draining saltwater, fresh air, as well as kalk. I also ran a USB cable down to connect to my Neptune DOS as I wanted to run it from the basement. I also ran a 2 conductor wire down to connect to my Avast pump that I'm using as part of my Tunze Osomolator ATO. I thought I would make it look great with a cover on the hole. Here is a picture of how it looked but in the end I had to remove that cover as it just held the 3/4" hoses too tight and I ended up kinking them.

IMG_3898.jpg


I then built out my light hanger using t-slot aluminum. It has sliders on the bottom of the overhang so that I can push the lights back out of the way to allow me to work on the tank.

IMG_3905.jpg


The next problem I ran into was the sand. I used Ocean Direct live sand. I had read that it was dusty, but had also read that by not rinsing it you get the benefits of the bacteria in the live sand, so I put it in and added the water. Here you can see me filling the tank from the basement mixing bin and you can see the mess. I added the little packets of clarifier but it didn't do too much. I added some filter material to the sump and let it run for a day....still cloudy. The next day I thought it may help to turn on my gyre pumps...WOW was that a mistake. You see one of the pumps was running backwards and blew directly into the sand and caused it to get fully back to cloudy.

IMG_3941.jpg


Finally, I realized I had a 6" carbon reactor and pump. I pulled out the carbon cartridge and cut a 12" 5 micron sediment filter in half and put that inside it then threw that in the sump. I also added in my reefmat. Between the two, they worked like a charm. Within 24 hours it was looking much better. Here it is after most of the rest settled out.

70312345945__FBEBEF98-28CD-4C69-9173-C83003745481.jpg


On my next update I'll try to show the details on how I set up the basement RODI system, mixing station and QT tanks. I'll also try to put together a video so I can show more of the aquascape. This is an amazing hobby that I'm thoroughly enjoying. I know I won't do everything right, but I love to learn, and that is the great thing about this hobby....there is always more to learn with great people willing to teach.
 

Petcrazyson

5000 Club Member
View Badges
Joined
Apr 21, 2022
Messages
5,613
Reaction score
19,458
Location
Clermont, FL
Rating - 0%
0   0   0
RS 425 one of the best tanks IMO (got great depth), got one myself. Nice scape, I can never really decide on one, but yours looks great. Hope all goes well with the tank! Don’t forget to get your Build Thread Badge.
 

Gumbies R Us

Another Fish in the Sea
View Badges
Joined
Nov 10, 2022
Messages
9,951
Reaction score
19,195
Location
North Georgia
Rating - 0%
0   0   0
Next update, Aquascape. As Ryan calls it...HNSA. Here is the beginning of day 2 of the mess. I bought about 100 pounds of rock to start with.

IMG_3828.jpg


Here is how it turned out. I'm pleased with the way it looks. There are lots of places for the fish to hide as well as room to still swim. I think I truly made a fish "habitat" as opposed to a wall of rock. Thanks to using the cardboard I was able to build it to still fit it inside the tank with plenty of room on all sides so I could still use my flipper on the glass. I took someones advice from R2R and used pool noodles on the top of the glass so that it was a little safer when putting the rock in place. It really did help with the nerves on putting both pieces in.

IMG_3929.jpg


In my first update I showed that I was running hoses down to the basement. There are two 3/4" hoses for my UV sterilizer (down and back up) as well another 3/4" for using to fill the tank directly from my mixing bin. I also ran RO tubing for RODI, fresh saltwater, draining saltwater, fresh air, as well as kalk. I also ran a USB cable down to connect to my Neptune DOS as I wanted to run it from the basement. I also ran a 2 conductor wire down to connect to my Avast pump that I'm using as part of my Tunze Osomolator ATO. I thought I would make it look great with a cover on the hole. Here is a picture of how it looked but in the end I had to remove that cover as it just held the 3/4" hoses too tight and I ended up kinking them.

IMG_3898.jpg


I then built out my light hanger using t-slot aluminum. It has sliders on the bottom of the overhang so that I can push the lights back out of the way to allow me to work on the tank.

IMG_3905.jpg


The next problem I ran into was the sand. I used Ocean Direct live sand. I had read that it was dusty, but had also read that by not rinsing it you get the benefits of the bacteria in the live sand, so I put it in and added the water. Here you can see me filling the tank from the basement mixing bin and you can see the mess. I added the little packets of clarifier but it didn't do too much. I added some filter material to the sump and let it run for a day....still cloudy. The next day I thought it may help to turn on my gyre pumps...WOW was that a mistake. You see one of the pumps was running backwards and blew directly into the sand and caused it to get fully back to cloudy.

IMG_3941.jpg


Finally, I realized I had a 6" carbon reactor and pump. I pulled out the carbon cartridge and cut a 12" 5 micron sediment filter in half and put that inside it then threw that in the sump. I also added in my reefmat. Between the two, they worked like a charm. Within 24 hours it was looking much better. Here it is after most of the rest settled out.

70312345945__FBEBEF98-28CD-4C69-9173-C83003745481.jpg


On my next update I'll try to show the details on how I set up the basement RODI system, mixing station and QT tanks. I'll also try to put together a video so I can show more of the aquascape. This is an amazing hobby that I'm thoroughly enjoying. I know I won't do everything right, but I love to learn, and that is the great thing about this hobby....there is always more to learn with great people willing to teach.
Love the aquascape design!!
 

Reefing threads: Do you wear gear from reef brands?

  • I wear reef gear everywhere.

    Votes: 37 15.6%
  • I wear reef gear primarily at fish events and my LFS.

    Votes: 14 5.9%
  • I wear reef gear primarily for water changes and tank maintenance.

    Votes: 1 0.4%
  • I wear reef gear primarily to relax where I live.

    Votes: 30 12.7%
  • I don’t wear gear from reef brands.

    Votes: 138 58.2%
  • Other.

    Votes: 17 7.2%
Back
Top