My life aquatic with Fiji 76g EXT

Zissou Intern

New Member
View Badges
Joined
Nov 15, 2023
Messages
20
Reaction score
16
Location
Northeastern PA
Rating - 0%
0   0   0
I found after 12 years of decreasing tank sizes (33g, 24g, 10g) that my interest was decreasing as well. My last/current tank has been somewhat difficult to maintain due to its small size, no sump, and because it has a bare glass bottom. I was thinking about getting out of the hobby. But then I remembered how much I enjoyed my first tank, so I decided to upgrade instead.

I knew that I wanted a larger lagoon-style tank and I spent most of December looking at options. I was looking for something close to 4’x2’ but less than 20” high. I would have bought a WaterBox except they were out of the size/color I wanted and they didn’t expect new stock until at least February (according to my LFS). Planet Aquarium seemed like a solid option, but multiple stores ignored my pricing requests (even in person and by phone). I generally like Innovative Marine products, but their tank was a bit higher than I wanted, and I don’t love the look of their stands (although I appreciate that they are very strong). I even considered UNS because the clean modern design of these aquascaping tanks matches my own design sense. I’ve drilled a few tanks in the past, so I wasn’t opposed to that. Ultimately, what pushed me away from this option was the fact that the 120u tanks are a little higher than I wanted (similar to IM).

So that left Fiji Cube. While I was initially drawn to what seemed like pretty good value, I was also quite apprehensive given some of the negative reviews I have seen. But I found that the pre-sale support was really good. They responded fast, they were able to answer all of my questions, and they were willing to make changes to the package I was considering. One thing I was nervous about was the finish of the stand because I read a review saying that it was basically just spray painted wood. When I emailed support, the person went out to the warehouse and sent photos of the finish under real-world lighting conditions. In general, they seemed to care about their work, which gave me more confidence. But even after I ordered, I was still quite worried that I might have made a bad decision. Let’s just say it was a long three weeks where I had to keep reminding myself that lots of times people neglect to share good news.

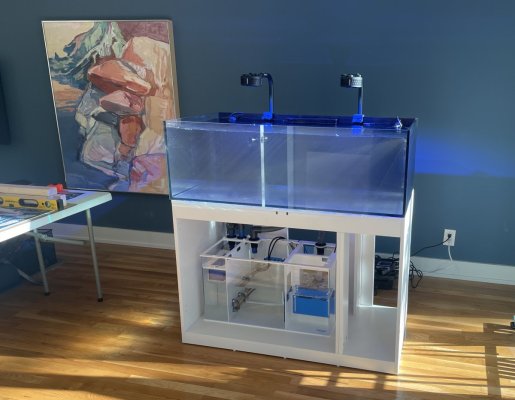
It arrived maybe two weeks ago, and I was pleasantly surprised. First, it was really well packed. The stand was much nicer than I expected, both in stability and finish. There was a missing part, but Fiji sent it by Fedex with no hassle at all. Of course this is cam bolt furniture, not fine furniture, but it is solid plywood and seems sturdy enough. The tank seams are not what I would call beautiful, but they are not bad either, certainly no obvious errors catch my eye. I still need to get the plumbing setup (probably a future post), but as long as it holds water, I’ll be a happy customer. Here are a few pics:

IMG_9289.jpeg
IMG_9293.jpeg
IMG_9298.jpeg
IMG_9304.jpeg
IMG_9324.jpeg
IMG_9329.jpeg

IMG_9332.jpeg
IMG_9320.jpeg


I still have a lot of work to do, but I’m looking forward to all of the fun sub-projects along the way: plumbing, aquascaping, curing dry rock, cable management, etc. In fact, projects like these may be part of what I have missed the past few years. Aesthetics matter a lot to me, so I’ll go out of my way to keep things clean and organized. I’ll post updates here as I go.
 
OP
OP
Zissou Intern

Zissou Intern

New Member
View Badges
Joined
Nov 15, 2023
Messages
20
Reaction score
16
Location
Northeastern PA
Rating - 0%
0   0   0
Does the display tank overhang the front of the top of the cabinet or does it sit flush with the top of the stand?
Well, yes and no, depending on if the cabinet doors are open. When closed, the front of the tank is flush with the closed stand. When the doors are open, there is an approximately 3/4" overhang. Let me know if that isn't clear and I can take a photo later.
 
OP
OP
Zissou Intern

Zissou Intern

New Member
View Badges
Joined
Nov 15, 2023
Messages
20
Reaction score
16
Location
Northeastern PA
Rating - 0%
0   0   0
Here is the equipment I have gathered so far:
  • Fiji Cube 30" sump (upgraded from their 24” model)
  • Ecotech Vectra M2 return pump
  • 2x Maxspect XF330 circ pumps
  • 2x Kessil A360x lights with WiFi dongle and mounting arms
  • 2x BRS 300w titanium heaters (it gets cold here, and I run the furnace low)
  • Innovative Marine Helio temperature controller
  • Reef Octopus Classic 110SSS from a previous tank (may need to upgrade later)
  • AutoAqua ATO from older build (thinking about replacing with AWC Duo since I eventually hope to automate water changes)
Still need to decide if I will run an Apex controller. Seems less necessary now that wifi power strips are available. Really need to think through my automated water change plans before deciding.
equipment.jpg
 

jumboshrimp25

New Member
View Badges
Joined
Feb 4, 2024
Messages
3
Reaction score
1
Location
USA
Rating - 0%
0   0   0
I found after 12 years of decreasing tank sizes (33g, 24g, 10g) that my interest was decreasing as well. My last/current tank has been somewhat difficult to maintain due to its small size, no sump, and because it has a bare glass bottom. I was thinking about getting out of the hobby. But then I remembered how much I enjoyed my first tank, so I decided to upgrade instead.

I knew that I wanted a larger lagoon-style tank and I spent most of December looking at options. I was looking for something close to 4’x2’ but less than 20” high. I would have bought a WaterBox except they were out of the size/color I wanted and they didn’t expect new stock until at least February (according to my LFS). Planet Aquarium seemed like a solid option, but multiple stores ignored my pricing requests (even in person and by phone). I generally like Innovative Marine products, but their tank was a bit higher than I wanted, and I don’t love the look of their stands (although I appreciate that they are very strong). I even considered UNS because the clean modern design of these aquascaping tanks matches my own design sense. I’ve drilled a few tanks in the past, so I wasn’t opposed to that. Ultimately, what pushed me away from this option was the fact that the 120u tanks are a little higher than I wanted (similar to IM).

So that left Fiji Cube. While I was initially drawn to what seemed like pretty good value, I was also quite apprehensive given some of the negative reviews I have seen. But I found that the pre-sale support was really good. They responded fast, they were able to answer all of my questions, and they were willing to make changes to the package I was considering. One thing I was nervous about was the finish of the stand because I read a review saying that it was basically just spray painted wood. When I emailed support, the person went out to the warehouse and sent photos of the finish under real-world lighting conditions. In general, they seemed to care about their work, which gave me more confidence. But even after I ordered, I was still quite worried that I might have made a bad decision. Let’s just say it was a long three weeks where I had to keep reminding myself that lots of times people neglect to share good news.

It arrived maybe two weeks ago, and I was pleasantly surprised. First, it was really well packed. The stand was much nicer than I expected, both in stability and finish. There was a missing part, but Fiji sent it by Fedex with no hassle at all. Of course this is cam bolt furniture, not fine furniture, but it is solid plywood and seems sturdy enough. The tank seams are not what I would call beautiful, but they are not bad either, certainly no obvious errors catch my eye. I still need to get the plumbing setup (probably a future post), but as long as it holds water, I’ll be a happy customer. Here are a few pics:

IMG_9289.jpeg
IMG_9293.jpeg
IMG_9298.jpeg
IMG_9304.jpeg
IMG_9324.jpeg
IMG_9329.jpeg

IMG_9332.jpeg
IMG_9320.jpeg


I still have a lot of work to do, but I’m looking forward to all of the fun sub-projects along the way: plumbing, aquascaping, curing dry rock, cable management, etc. In fact, projects like these may be part of what I have missed the past few years. Aesthetics matter a lot to me, so I’ll go out of my way to keep things clean and organized. I’ll post updates here as I go.


Awesome build! I just recently bought Fiji's 76 gal INT shallow tank. My question to you... how did you remove it from the shipping container? Did you break down the crate or vertically lift out?

And what stand are you using? Was it also from Fiji?
 
OP
OP
Zissou Intern

Zissou Intern

New Member
View Badges
Joined
Nov 15, 2023
Messages
20
Reaction score
16
Location
Northeastern PA
Rating - 0%
0   0   0
I wanted to save the box just in case but I ended up breaking it down. Once the top was removed I realized that there wasn't much space between the walls of the tank and the box. It seemed like it would be difficult to reach in and lift the tank straight up. So I tried unscrewing one of the long sides, not realizing that there were some additional screws coming up from the pallet below. This made it almost impossible to remove the side without damaging the box wall, which was made from sort of compressed cardboard.

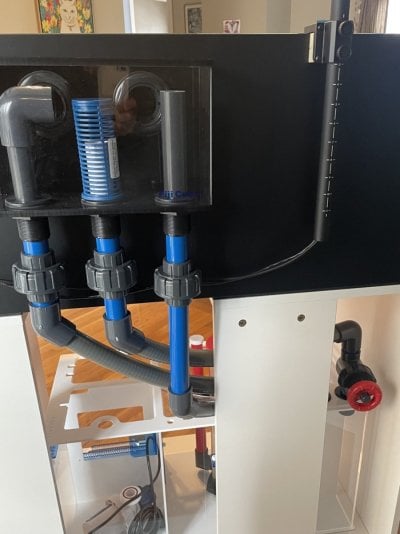
I purchased the stand from Fiji as well. The box was stamped with "v2" and it is a slightly different design than what is pictured on their website. Instead of four large cutouts on the back panel, there are now three full-height vertical openings (see above). I had hoped to use flex PVC to eliminate right angle turns but the placement of the stand openings will make that difficult. I just started working on the plumbing so I should have an updated in the next week or two.
 

jumboshrimp25

New Member
View Badges
Joined
Feb 4, 2024
Messages
3
Reaction score
1
Location
USA
Rating - 0%
0   0   0
I wanted to save the box just in case but I ended up breaking it down. Once the top was removed I realized that there wasn't much space between the walls of the tank and the box. It seemed like it would be difficult to reach in and lift the tank straight up. So I tried unscrewing one of the long sides, not realizing that there were some additional screws coming up from the pallet below. This made it almost impossible to remove the side without damaging the box wall, which was made from sort of compressed cardboard.

I purchased the stand from Fiji as well. The box was stamped with "v2" and it is a slightly different design than what is pictured on their website. Instead of four large cutouts on the back panel, there are now three full-height vertical openings (see above). I had hoped to use flex PVC to eliminate right angle turns but the placement of the stand openings will make that difficult. I just started working on the plumbing so I should have an updated in the next week or two.
Did you use a crowbar or any specific tool to breakdown the box? I'm in fear of damaging the tank. Thank you in advance!
 
OP
OP
Zissou Intern

Zissou Intern

New Member
View Badges
Joined
Nov 15, 2023
Messages
20
Reaction score
16
Location
Northeastern PA
Rating - 0%
0   0   0
Did you use a crowbar or any specific tool to breakdown the box? I'm in fear of damaging the tank. Thank you in advance!

I removed all of the brackets and screws I could see on the panel I intended to remove. There were still a few screws coming up from the pallet that I could not access. But the panel is made from compressed cardboard, so I was able to just bend/pull it from the screws that were left. I then knocked them loose with a hammer to avoid any possible scratches. Good luck!
 
OP
OP
Zissou Intern

Zissou Intern

New Member
View Badges
Joined
Nov 15, 2023
Messages
20
Reaction score
16
Location
Northeastern PA
Rating - 0%
0   0   0
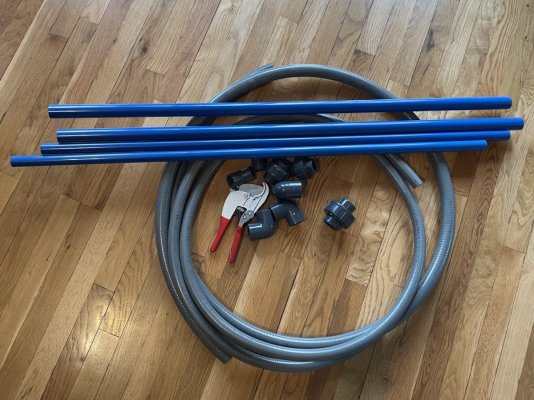
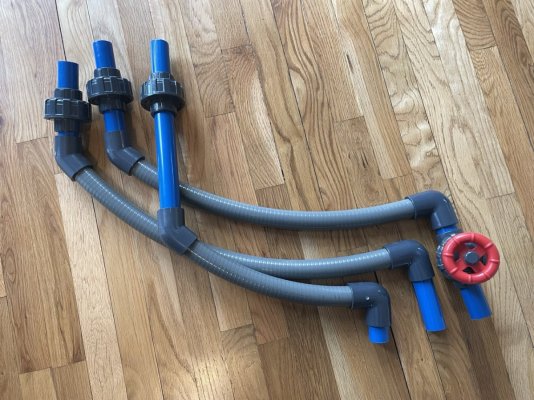
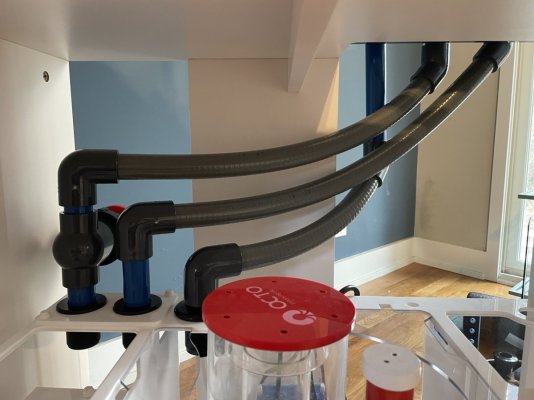
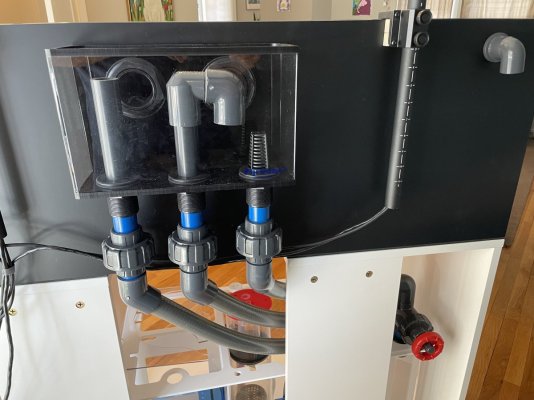
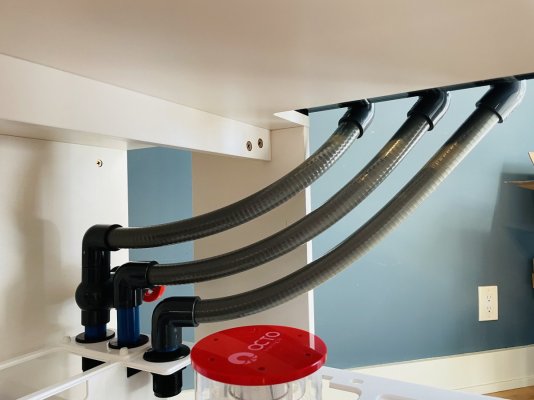
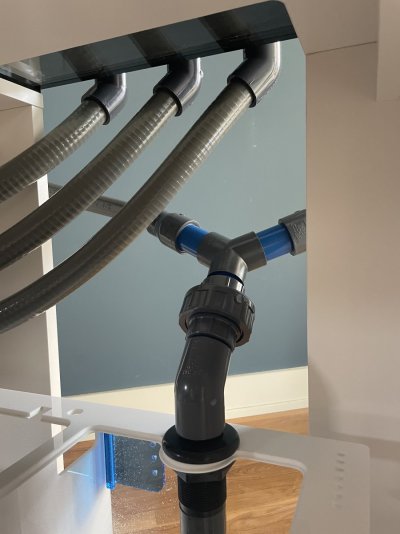
I did a dry fit of my overflow plumbing this afternoon. My goal was to minimize the number of 90 degree turns to improve efficiency. For each line I ended up using one 90, one 45, and some flex PVC for the diagonal run. I was able to find the flex PVC in gray to match my schedule 80 fittings. As this is a shallow lagoon tank, there is less vertical distance between the overflow box and the sump which made it impossible to line up rigid PVC between two 45 degree elbows. Even with the flex PVC, two 45 elbows created a bit too much lateral tension on the overflow box. So I'll have to settle for one 90 and one 45. This design will allow me to remove either drain line by unscrewing the upper union and the lower bulkhead. I ended up rotating the gate valve to face the back because that provides extra space in case I ever want to run a fleece roller.

Will the gate valve be quite enough in this location? I might be able to switch the lines around in such a way as to make space for it on the longer rigid run coming down from the overflow box, but I think that will create more more lateral stress on box because I'll need to make that tight turn around the wooden support piece.

Comments and suggestions gratefully accepted.

01-plumbing.jpeg 02-plumbing.jpeg 03-plumbing.jpeg 04-plumbing.jpeg
 
Last edited:
OP
OP
Zissou Intern

Zissou Intern

New Member
View Badges
Joined
Nov 15, 2023
Messages
20
Reaction score
16
Location
Northeastern PA
Rating - 0%
0   0   0
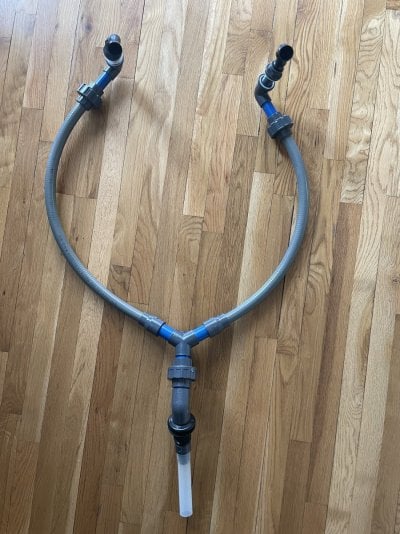
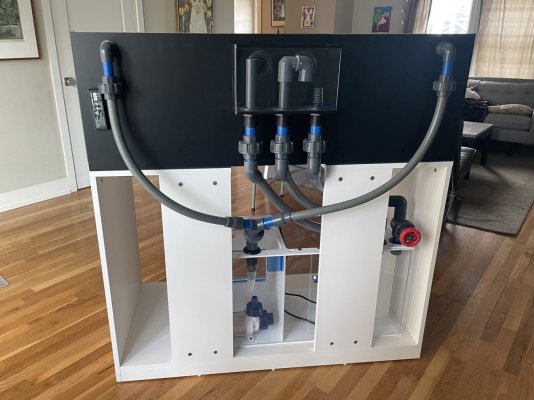
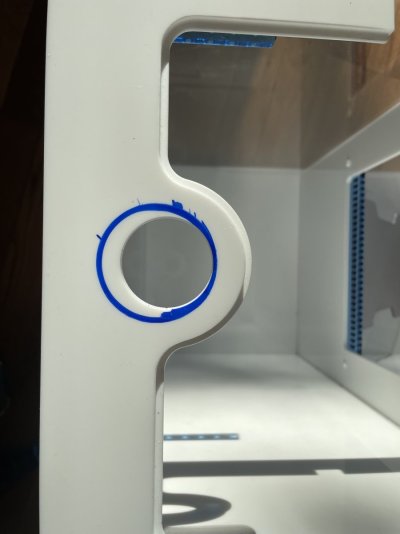
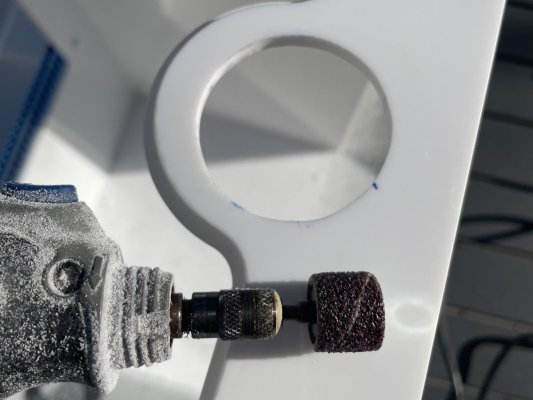
I test fit the return plumbing during the week and glued it up today. My return pump outlet is 1” so I decided to dremel the 3/4” sump bulkhead hole to accommodate the larger pipe size. That ended up being much easier than I expected. I traced the new size on my sump and went around the acrylic using a 1/2” drum sander bit. Only took a few minutes. Including a pic of the bit in case anyone else ends needs to do the same.

That allowed me to maintain the 1” pipe past the 3-way equal wye, after which I reduced to 3/4”. The wye was only available in sch-40 so I painted it grey to match everything else. As with the overflow plumbing, I kept the number of return fittings to a minimum. I’m eager to see how hard I have to push the Vectra m2 pump to match the overflow speed.

Hoping to wet test it tomorrow once the glue has dried overnight.

IMG_9645.jpeg IMG_9640.jpeg IMG_9642.jpeg IMG_9597.jpeg IMG_9646.jpeg
 
OP
OP
Zissou Intern

Zissou Intern

New Member
View Badges
Joined
Nov 15, 2023
Messages
20
Reaction score
16
Location
Northeastern PA
Rating - 0%
0   0   0
No leaks! At least not in the first hour. Will keep an eye on it overnight.

It is a bit loud. Seems to be coming from where the overflow pipes enter the sump. This is my first bean animal overflow. Will have to investigate tuning via the overflow pipe heights, depth where they enter the sump (currently 4”), and the gate valve (fully open at the moment).

But no leaks!! Did I mention that? It is great the see it with water after 2.5 months.

IMG_9654.jpeg
 
OP
OP
Zissou Intern

Zissou Intern

New Member
View Badges
Joined
Nov 15, 2023
Messages
20
Reaction score
16
Location
Northeastern PA
Rating - 0%
0   0   0
Thanks! After a 24h water test I filled it with RO then added salt and live sand. I didn’t rinse the sand. After reading conflicting opinions on whether I should, I decided to err on the side of keeping as much beneficial bacteria as possible. It has finally started to clear after 2 days. So far so good.
 

Reefing threads: Do you wear gear from reef brands?

  • I wear reef gear everywhere.

    Votes: 20 13.7%
  • I wear reef gear primarily at fish events and my LFS.

    Votes: 10 6.8%
  • I wear reef gear primarily for water changes and tank maintenance.

    Votes: 1 0.7%
  • I wear reef gear primarily to relax where I live.

    Votes: 22 15.1%
  • I don’t wear gear from reef brands.

    Votes: 83 56.8%
  • Other.

    Votes: 10 6.8%
Back
Top