Newbie question - First time filling up tank

OP
OP
Ryan777

Ryan777

Community Member
View Badges
Joined
Jan 10, 2023
Messages
54
Reaction score
17
Location
Southern CA
Rating - 0%
0   0   0
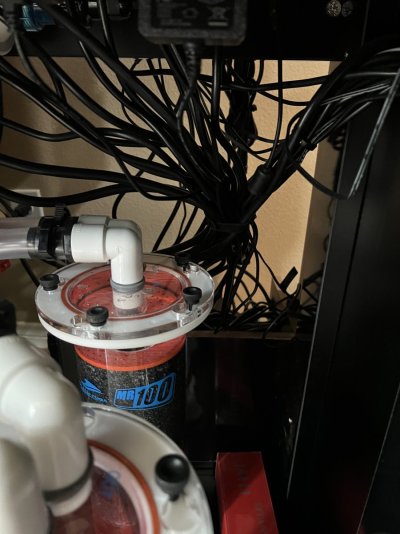
Also if anyone has recommendations on how to support the two reactors without use of the plastic lines he used that would be great.

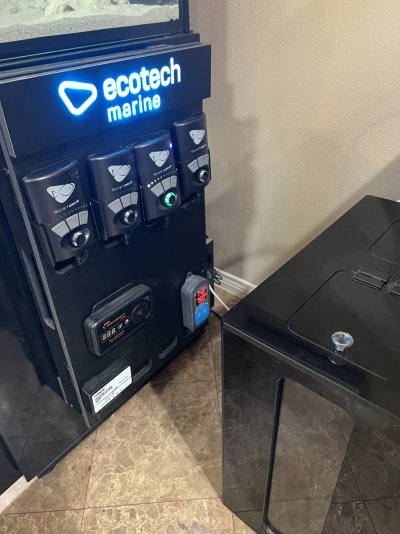
I may have to redo his manifold which doesn’t make sense to me because he impacted the second ball valve flow rate because it has a previous ball valve it has to go through rather than straight from the pipe.

I believe it may be time for me to move from aquarium purchaser to maintenance man. I think a proper manifold is needed and I want to get rid of those reinforcement twisty things he used. I asked him for better cable management but he said he couldn’t do based on the side control panel being on the right and the cords bot
 

Attachments

  • EE0B67E2-5FFE-4912-8CDD-DEB8CE830826.jpeg
    EE0B67E2-5FFE-4912-8CDD-DEB8CE830826.jpeg
    152.3 KB · Views: 19
  • E917B5D0-79D7-4016-9C23-B340F06146E0.jpeg
    E917B5D0-79D7-4016-9C23-B340F06146E0.jpeg
    183.3 KB · Views: 18

PotatoPig

Well-Known Member
View Badges
Joined
Jan 7, 2023
Messages
842
Reaction score
810
Location
USA
Rating - 0%
0   0   0
There is space in the sump, but to be safe I am keeping them pointed straight but just below water level until the sand storm settles, then I will point them down a bit. But since the left side is barely a trickle at my slow speed it will mostly be one sided.
Good idea on having them go fairly flat and shallow.

I recommend testing the siphon while you’re watching it though - an inch out the tank can fill a sump up 3-4 inches depending on size, if the ends are 2” below the water line you could easily see the sump fill 6”!!

Turn the pump off, watch the sump fill up, have your finger on the switch ready to turn the pump right back on if it’s gonna overflow.

Had this happen to me from these jets, fortunately I had the sump in a waterproofed “basin” in the bottom of the stand that had an additional ~15 gallons capacity, of which I apparently needed 14… close call.
 
OP
OP
Ryan777

Ryan777

Community Member
View Badges
Joined
Jan 10, 2023
Messages
54
Reaction score
17
Location
Southern CA
Rating - 0%
0   0   0
Good idea on having them go fairly flat and shallow.

I recommend testing the siphon while you’re watching it though - an inch out the tank can fill a sump up 3-4 inches depending on size, if the ends are 2” below the water line you could easily see the sump fill 6”!!

Turn the pump off, watch the sump fill up, have your finger on the switch ready to turn the pump right back on if it’s gonna overflow.

Had this happen to me from these jets, fortunately I had the sump in a waterproofed “basin” in the bottom of the stand that had an additional ~15 gallons capacity, of which I apparently needed 14… close call.
I wish I would of thought of the waterproof basin. I like backup systems. Thanks for the explanation on how to test it. I will do that now.
 

vetteguy53081

Well known Member and monster tank lover
View Badges
Joined
Aug 11, 2013
Messages
91,872
Reaction score
202,900
Location
Wisconsin -
Rating - 100%
13   0   0
Hi Vetteguy - So the installer used ball valves for the two reactors. The one in the back is the carbon. Should I put in gate valves instead?

I know the sump area looks crazy and it didn’t come out like I wanted, but for my first tank I just want to get things going. I am trying to correct or fix the plumbing before things are brought in.

I also noticed my top left return nozzle on the backside of the aquarium has a tiny leak (the black fitting) and I tried to put silicon on it, but it is a hard area to get to. I am going to ask my eight year old if he can do it.

I attached a couple of pics of the ball valves and the updated tank clarity.
I use the same valves- theyre fine.
As for silicone, dry the area well, clean with rubbing alchol and then apply bead of tank sealant if possible versus silicone. Silicone otherwise should work. A popsicle stick is often a good substitute to little hands
 
OP
OP
Ryan777

Ryan777

Community Member
View Badges
Joined
Jan 10, 2023
Messages
54
Reaction score
17
Location
Southern CA
Rating - 0%
0   0   0
I use the same valves- theyre fine.
As for silicone, dry the area well, clean with rubbing alchol and then apply bead of tank sealant if possible versus silicone. Silicone otherwise should work. A popsicle stick is often a good substitute to little hands
I tried using Christys red hot blue but I still have a bead of water that is forming. Is there another tank sealant to use?

I slopped it on as I cannot get under that area and was working blind.
I can feel where the water bead forms.

I almost want to just stick a little towel there and live with the drip. I can’t seem to get it to stop. I am 2 coats in and I am not sure letting the tank sit for 24 hours without water running is a good thing.
The tank only has saltwater and rock in it at the moment, no bacteria seeding.
 

vetteguy53081

Well known Member and monster tank lover
View Badges
Joined
Aug 11, 2013
Messages
91,872
Reaction score
202,900
Location
Wisconsin -
Rating - 100%
13   0   0
I tried using Christys red hot blue but I still have a bead of water that is forming. Is there another tank sealant to use?

I slopped it on as I cannot get under that area and was working blind.
I can feel where the water bead forms.

I almost want to just stick a little towel there and live with the drip. I can’t seem to get it to stop. I am 2 coats in and I am not sure letting the tank sit for 24 hours without water running is a good thing.
The tank only has saltwater and rock in it at the moment, no bacteria seeding.
I use tank sealant only. Either Aqueon or Marineland brand
 

Creating a strong bulwark: Did you consider floor support for your reef tank?

  • I put a major focus on floor support.

    Votes: 53 40.2%
  • I put minimal focus on floor support.

    Votes: 27 20.5%
  • I put no focus on floor support.

    Votes: 48 36.4%
  • Other.

    Votes: 4 3.0%
Back
Top