RFBF's 90 Gallon Déjà vu All Over Again

OP
OP
redfishbluefish

redfishbluefish

Stay Positive, Stay Productive
View Badges
Joined
Mar 22, 2012
Messages
11,710
Reaction score
25,748
Location
Sayreville, NJ
Rating - 0%
0   0   0
Well that was quick….my new light will be here today…..only three days.

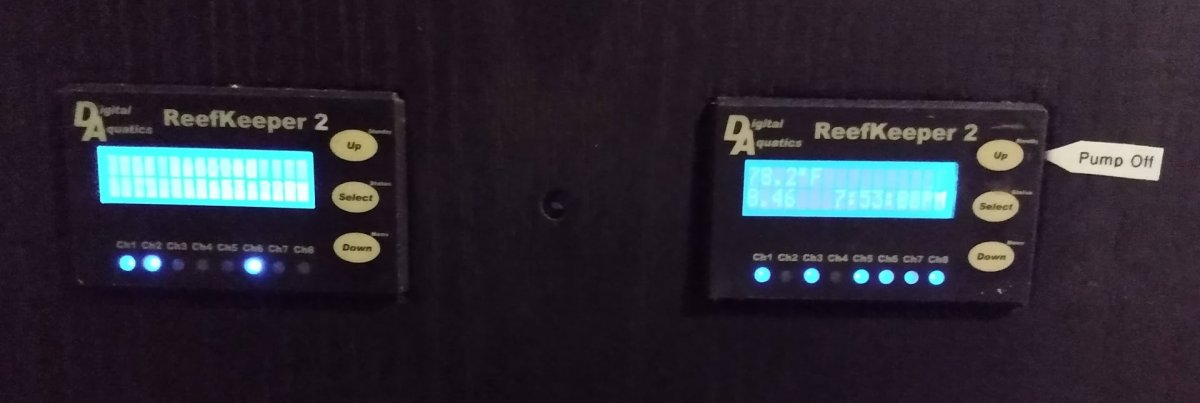
In anticipation of getting the light, I need to run a dedicated power source to the top of the stand. The reason is that my current lights are the old style black boxes with two power cords per fixture….one for the “white” channel, and one for the “blue” channel. These are plugged into power strips that are controlled by an old ReefKeeper II controller, turning on and off the power strips at set times. You can see the power strips in the upper right corner, with that third power strip for the moon lights.

Upper Cabinet.jpg


The new light (ViparSpectra) has a single cord and its own timer, so it needs a constant power source, which isn’t available in this upper portion of the control cabinet. Also located in this section of the cabinet are the power supplies for most of the powerheads. They are plugged into that old tan power strip that is also controlled by the ReefKeeper….to turn them on and off for feeding. To supply a constant source of power I simply made an approximate 3 foot extension cord and ran it to the top of the cabinet.

Short Extension Cord LIGHT.jpg


Now just waiting for UPS to show up. :beaming-face-with-smiling-eyes:
 
OP
OP
redfishbluefish

redfishbluefish

Stay Positive, Stay Productive
View Badges
Joined
Mar 22, 2012
Messages
11,710
Reaction score
25,748
Location
Sayreville, NJ
Rating - 0%
0   0   0
Light arrived late yesterday but the one thing I didn’t give much thought to was hanging the light. Required a trip to both Lowe’s and HD. Vipar lights come with cable hangers that screw into bolt ends on the fixture. The old light had eyelets that were bolted to offset aluminum angle that I custom made to fix the fixture. The issue I now had was using this offset angle and somehow attaching this to the bolt ends. The solution was picking up a length of ¾ inch aluminum angle, cutting to one inch lengths and aligning the bolts on the fixtures and the holes on the offset angle, and clearing the plug connection while assuring each offset is exactly 6 ½ inches appart. If anyone is interested, the bolt ends on ViparSpectra fixtures are M6 x 1.0, and I used stainless steel nuts to attach the angle.

ViparSpectra with handing hardware.jpg


This was then attached to the light bar with the other two fixtures:

Vipar Attached to the Rack.jpg


And here it is; the middle one is the ViparSpectra. I’ve started out with it set at 30% and 70%, white and blue, respectively. And to the eye, it’s brighter than the other two SBReef fixtures.

Canopy Open 11 2023.jpg
 
OP
OP
redfishbluefish

redfishbluefish

Stay Positive, Stay Productive
View Badges
Joined
Mar 22, 2012
Messages
11,710
Reaction score
25,748
Location
Sayreville, NJ
Rating - 0%
0   0   0
My Free Remote Control Holder

The ViparSpectra light comes with a remote controller. Now, what do I do with it so that it doesn’t end up in the junk drawer of unknown remotes? I'll make a small holder….and better yet, with supplies that are free.

Vipar Controller Holder 02.jpg


I’m using an extra slat from window blinds that I recently installed….and had to be shortened, and a free paint stirring stick from HD.

This was an easy one….a couple cuts, a little rasping, a little fast setting epoxy, sanding, and a shot of spray paint, and I’m done.

Vipar Controller Holder 01.jpg


I put this on the side wall of the control cabinet.

Vipar Controller Holder 03.jpg


And it holds the remote perfectly.

Vipar Controller Holder 04.jpg
 
Last edited:
OP
OP
redfishbluefish

redfishbluefish

Stay Positive, Stay Productive
View Badges
Joined
Mar 22, 2012
Messages
11,710
Reaction score
25,748
Location
Sayreville, NJ
Rating - 0%
0   0   0
TURNING IT DOWN

I've got the new light down to 50% Blue, 10% White, and it looks pretty good. I've also turned the SBReef Blue channel up to 80. When Blue's only are on, the Vipar is visually a bit brighter than the SBReef, but I think that's from it having more brighter blues than the SBReef. I know photo's of LED's are hard to see, but here's the SB on the left and the Vipar on the right.

SBReef VS ViparSpectra.jpg
 
OP
OP
redfishbluefish

redfishbluefish

Stay Positive, Stay Productive
View Badges
Joined
Mar 22, 2012
Messages
11,710
Reaction score
25,748
Location
Sayreville, NJ
Rating - 0%
0   0   0
An Almost DOH!
DOH.png


I’m a Black Box user for my lights and they are the old style that had separate cords for the white and blue channels. These were separately controlled by a controller for the times they came on and off. When one of the lights died (most likely because the fans died and it overheated), I couldn’t find these old style lights. So it was replaced with a ViparSpectra that had one cord and its own timer. This doesn’t need a controller….just constant voltage. So when I put it in, the one place I knew I had constant voltage was with the skimmer outlet, and that’s where it went…..done….so I thought. The skimmer outlet is the standard outlet with the white cover plate.

1701718865713.png


And here comes the DOH! I was recently asked about wiring a DIY float switch with two floats, and the example I ended up showing was the one I built for my skimmate container. If the container is full, it will turn off the skimmer, and protect the container from overflowing and making a mess…..and there’s my DOH! I’m recording it as an almost DOH since I caught my mistake before the skimmate container turned off the light.

Now having to move the plug, it also allowed me to see what happens in a power failure with this new light. It appears that it retains the times the two channels come on and off and the percent of each channel, but it loses actual time. So now the constant voltage is in the upper controller in plug number 5….always ON.
 
OP
OP
redfishbluefish

redfishbluefish

Stay Positive, Stay Productive
View Badges
Joined
Mar 22, 2012
Messages
11,710
Reaction score
25,748
Location
Sayreville, NJ
Rating - 0%
0   0   0
Haven't done a FTS since pulling out the massive Hollywood Stunner Chalice....so here it is with a crappy phone:

Full Tank Shot c Tang.jpg
 
OP
OP
redfishbluefish

redfishbluefish

Stay Positive, Stay Productive
View Badges
Joined
Mar 22, 2012
Messages
11,710
Reaction score
25,748
Location
Sayreville, NJ
Rating - 0%
0   0   0
Instant Ocean Salt - SALE

Took advantage of Chewy's buy 2, get one for free sale and purchased 3, 200 gallon boxes of salt, free delivery. The cost ended up equaling $38/box before tax. Can't complain about that. Prior to this purchase, I had to drive into Pennsylvania to an LFS to pay $35/box. My New Jersey LFS upped their prices, so no more $35/box in NJ.
 
OP
OP
redfishbluefish

redfishbluefish

Stay Positive, Stay Productive
View Badges
Joined
Mar 22, 2012
Messages
11,710
Reaction score
25,748
Location
Sayreville, NJ
Rating - 0%
0   0   0
We had a brief power outage early this morning and so I thought it was a good time to write up instructions for our tank sitter the next time we're on vacation:

AFTER A POWER FAILURE - Resetting the Clocks

After a power failure the clocks on the tank restart to either 12 midnight or 12 noon. There are four clocks that need to be reset.

  1. Two ReefKeeper Controllers - Located on the front of the equipment cabinet.
xcIgdOSnN-9MbHWq_Pc9cbLsdl9UZXTJw1nCjzx9hsxQ-d82QT9wPIAiC-vQTibkw7VX6X7-tEOFBxia739AiZBnitp91gMUkLagMzW9A_rQL75utHQfwm44d9hZiAuqG80vFNVQE97lD2Jb_OO4o18
  1. Center main light in the canopy - using the remote control found in the equipment cabinet.
Z1UIXkllwPmMlpHV7z8saELlrNE8qCk6ITI05A46Hf_Oh6-N50z8sdaJ7iSrVfz_o8rRHxC1Wks7_UKhSVKxHgaSb91xHLTVmI4zJx650wg75KZYaZSqMZFqjm63R976c3ADx1513-hRbUcIoNMa9Xs
  1. Sump light - using the Fathom controller located in the right side of the stand....side door.
XCfjX2pgprYEbv0jzB8UwBC5g61g_MGcOEc82gQgZjo7FCxeCZ7RTMgro9SLIxyVf7swItn19qwPEtEJmC9Gv_RkcM2pHLGts-3gVDymXsZrPLbFaAS6Y6j-Q4bO8WesDILbvlRUAy6ua696_pv4pmo

The following are the instructions to reset the four clocks to the right time.


CENTER MAIN LIGHT - ViparSpectra Fixture

I’m going to begin with this light because it’s the easiest and the only one that restarts to 12 noon, and so you’ll probably find that the lights are ON when they shouldn’t be.
  1. Using the remote control found in the equipment cabinet, open the canopy door.
  2. Pointing the remote controller at the center ViparSpectra light fixture, push the “Clock” button on the controller until the hour is blinking….usually requires two pushes.
  3. Use the up or down buttons to set the hour…..and push “OK”. The minutes will now be flashing and again, set minutes with up and down buttons and press “OK.”
  4. Set AM or PM the same way, and now you're done.

REEFKEEPER CONTROLLERS

There are two of these side by side.
  1. Press the DOWN button to enter the program menu. Note that the left controller has a DOWN button that you have to push hard while moving your finger to find the right spot.
  2. Use the DOWN button to go to SET TIME - it will be blinking.
  3. Press SELECT button.
  4. Use the UP/DOWN buttons to set hour/minutes and the SELECT button to verify your choice. Note that you need to make sure you’re in AM or PM time.
  5. Once set, after 10 seconds it will return to the standard screen.

SUMP LIGHT - Fathom
  1. Press the PWR - Power on button.
  2. For all below settings, press OK for entering, and ESC for exiting.
  3. Press the MODE button for more than 3 seconds to enter the settings menu.
  4. Press OK to enter time set.
  5. Set time and date using the LUM+ and LUM- buttons. NOTE that the date is day/month/year and time is military 24 hour clock (i.e. 1:00 PM is 13:00).
  6. Once you have finished with date and time, press ESC button and make sure it’s in “Auto Mode”, and if not, use the MODE button to change to auto mode.
 
OP
OP
redfishbluefish

redfishbluefish

Stay Positive, Stay Productive
View Badges
Joined
Mar 22, 2012
Messages
11,710
Reaction score
25,748
Location
Sayreville, NJ
Rating - 0%
0   0   0
A local reefer stopped by and brought me a little gift....a purple / blue stylophora.

Purple Blue Stylophora.jpg
 
OP
OP
redfishbluefish

redfishbluefish

Stay Positive, Stay Productive
View Badges
Joined
Mar 22, 2012
Messages
11,710
Reaction score
25,748
Location
Sayreville, NJ
Rating - 0%
0   0   0
Long Tool Storage

For the longest time I never knew what to do with the long tools I have.....sand rake, long baster and glass scraper. For years they were in the closet in the fish room really not fitting well on a shelf in there. More recently they've been left between the Euro bracing on the top of the tank, but that really bugged me. Well today I figured in out....the back wall of the canopy.

Simply made J holders out of 1/2 inch PVC pipe using a heat gun and screwed them to the back wall of the canopy. Still need to make two more to hold the glass scraper:

long tools.jpg
 
OP
OP
redfishbluefish

redfishbluefish

Stay Positive, Stay Productive
View Badges
Joined
Mar 22, 2012
Messages
11,710
Reaction score
25,748
Location
Sayreville, NJ
Rating - 0%
0   0   0
It's the PCB board!

Since I have time waiting for the new light, I delved further into the cause of the blackout. I discovered that the power supplies work just fine. Testing the PCB board, that's were I found the problem. The "white" channel was cooked. Too busy to look into this further, but after Thanksgiving I might see if I can resurrect this board (and put in two new fans) so that I have another backup. It might just need a new LED bead that cost pennies.

PCB Board Testing:

Having purchased a new Multimeter with that new-fangled LED testing function, I finally got around to testing the PCB board. My old multimeter (which we called a VOM....Voltage, Ohm Meter) was an antique with an analog (needle) reading function. I'm really liking the digital readout as well as this new function.....I think I've entered the 21st Century! Anyway, here's the layout of the board:
1704052359472.png


And here's the board showing the "blown" LED's as the ones missing their lenses.

PCB Board with Blown LEDs.jpg


Here's the summary of what's blown:

5 - 420nm beads
2 - 395nm beads
1 - 520nm beads

The question still remains, is it worth fixing this thing....8 LED beads and two fans? Waving my hands around while making up a number.......I'm thinking $25 - $30. Although I've noticed the LED bead sources are not as plentiful as in years past, and those I've found are more costly.....who knows!
 
OP
OP
redfishbluefish

redfishbluefish

Stay Positive, Stay Productive
View Badges
Joined
Mar 22, 2012
Messages
11,710
Reaction score
25,748
Location
Sayreville, NJ
Rating - 0%
0   0   0
Well, I guess I'm fixing this thing....I just placed an order from eBay seller, panpan-supermarket, for the LED's. Had to order 10 each, and with shipping and tax, came to $10.48. Luckily I'm not in a rush because it's coming from China.....a couple of weeks.

EBay LEDs.png
 
OP
OP
redfishbluefish

redfishbluefish

Stay Positive, Stay Productive
View Badges
Joined
Mar 22, 2012
Messages
11,710
Reaction score
25,748
Location
Sayreville, NJ
Rating - 0%
0   0   0
And five 120mm fans, also from ebay HERE, with tax, $21.31 for five fans.

While I wait I can sand and paint the rusted up parts of the case:

Rusty Black Box case.jpg
 
OP
OP
redfishbluefish

redfishbluefish

Stay Positive, Stay Productive
View Badges
Joined
Mar 22, 2012
Messages
11,710
Reaction score
25,748
Location
Sayreville, NJ
Rating - 0%
0   0   0
All sanded and painted just waiting for the fans and replacement LED's showing up.

Sanded and Painted Mars Aqua.jpg
 
OP
OP
redfishbluefish

redfishbluefish

Stay Positive, Stay Productive
View Badges
Joined
Mar 22, 2012
Messages
11,710
Reaction score
25,748
Location
Sayreville, NJ
Rating - 0%
0   0   0
Lighting Schedule

As a black box user, my lighting schedule is composed of three components; Two IceCap Moonlights are for sunrise and sunset while channel 1 (blues) and channel 2 (whites) are for the rest of the day. For the longest time I used the following light schedule, with mid-day comprising 4 hours.

Sunrise (Moonlights) ----------- 1 hr --- 10AM-11AM
Morning (Blues only) ----------- 3 hr --- On at 11AM
Mid-day (Blues and Whites) -- 4 hr ---- 2PM - 6PM
Afternoon (Blues) ---------------3 hr ---- Off at 9PM
Sunset (Moonlights) -------------1 hr --- 9PM-10PM

A year or so ago, I don’t know why, I increased mid-day to 4 ½ hours.

Sunrise (Moonlights) ----------- 1 hr --- 10AM-11AM
Morning (Blues only) ----------- 2 ½ hr --- On at 11AM
Mid-day (Blues and Whites) -- 4 ½ hr ---- 1:30PM - 6PM
Afternoon (Blues) ---------------3 hr ---- Off at 9PM
Sunset (Moonlights) -------------1 hr --- 9PM-10PM

With recently replacing one of my lights with a Viparspectra, I started reading posts and watching videos on how others have them set up. One of the videos I watched had a graph of the natural daylight versus the light temperature.

Daylight Photoperiod.png


What they did was break this 12 hours of daylight into three components,,,,,Sunrise, Daylight and Sunset.

Daylight Graph 01.png


Now this is similar to what I’m doing with my light schedule except my mid-day is only 4 ½ hours while this schedule has an 8 hour mid-day, with the early and late parts of the day are 2 hours each. With my three component system, I’m changing my light schedule to this 8 hour mid-day:

Sunrise (Moonlights) ----------- 1/2 hr --- 10AM-10:35AM
Morning (Blues only) ----------- 1 1/2 hr --- On at 10:30AM
Mid-day (Blues and Whites) -- 8 hr -- -- 12PM - 8PM
Afternoon (Blues) ---------------1 1/2 hr ---- Off at 9:30PM
Sunset (Moonlights) -------------1/2 hr --- 9:25PM-10PM

(The above graphs came from THIS VIDEO)
 

Reefdiculous22

Active Member
View Badges
Joined
May 4, 2022
Messages
357
Reaction score
193
Location
Lake preston
Rating - 0%
0   0   0
Awesome thread! I came upon it when I was researching building a canopy for my tank.

I really like what you did with yours, I was just curious as to how you open it to do maintenance? I zoomed in and couldn’t see any hinges or anything. Got any advice?

And thanks for sharing your knowledge, learned a lot of stuff on your thread!
 
OP
OP
redfishbluefish

redfishbluefish

Stay Positive, Stay Productive
View Badges
Joined
Mar 22, 2012
Messages
11,710
Reaction score
25,748
Location
Sayreville, NJ
Rating - 0%
0   0   0
Thank you for the kind words. With my canopy, my interest was to make it as light as I could, knowing that the lights would add considerable weight. I'm not even sure what pictures I've included in this thread, but the original build of my canopy was included in my first build thread HERE. After looking at that, let me know if you have any questions. And to directly answer your question about opening, the whole front of the canopy is the door and swings up using four hinges.

Canopy Hinges.jpg
 
OP
OP
redfishbluefish

redfishbluefish

Stay Positive, Stay Productive
View Badges
Joined
Mar 22, 2012
Messages
11,710
Reaction score
25,748
Location
Sayreville, NJ
Rating - 0%
0   0   0
Power Failure

We just came out of a 5 hour power failure. No problem for the tank because I pulled out the generator and all was well for the tank. However, instead of just sitting around doing nothing, I decided to enlarge the hole in the back of my equipment cabinet to access the outlet....since the plugs are not plugged in at the moment.

Here's the back of the cabinet right after it was installed. You can see the two plugs through the hole.

1704591080986.png


The 3 1/2 inch hole in the back is there to access the outlet. The issue is that my fat hand has a hard time getting in there to plug and unplug the two plugs. So since they are pulled out right now while plugged into the generator, I opened up the hole.

Equipment Cabinet Outlet Enlarged.jpg


Power is back on, so saw dust vacuumed up and all plugged back in! And the best part, I can get my fat little hands through that hole.

Equipment Cabinet Outlet Plugged In.jpg
 
OP
OP
redfishbluefish

redfishbluefish

Stay Positive, Stay Productive
View Badges
Joined
Mar 22, 2012
Messages
11,710
Reaction score
25,748
Location
Sayreville, NJ
Rating - 0%
0   0   0
Power Failure II

We very rarely have power failures and if we do they typically last seconds....to the point that you stand up to go find a flashlight and the lights come back on. Well we just came out of our second power failure within three days. The good thing is that this one only lasted about an hour and fifteen minutes. Now we are in a pretty good storm with high winds, so my guess is a tree downing power lines. Still got the generator out and running, and just finished putting it away. I'm drenched!
 

Bubbles, bubbles, and more bubbles: Do you keep bubble-like corals in your reef?

  • I currently have bubble-like corals in my reef.

    Votes: 19 35.2%
  • I don’t currently have bubble-like corals in my reef, but I have in the past.

    Votes: 7 13.0%
  • I don’t currently have bubble-like corals in my reef, but I plan to in the future.

    Votes: 17 31.5%
  • I don’t currently have bubble-like corals in my reef and have no plans to in the future.

    Votes: 10 18.5%
  • Other.

    Votes: 1 1.9%
Back
Top