OP
OP

Follow along with the video below to see how to install our site as a web app on your home screen.
Note: This feature may not be available in some browsers.


tslot confuses me so muchDisclaimer: I have never worked with t slot. In fact I saw it and touched it for the first time when my new stand arrived a few days ago.
I'm designing a light mount to go over a new build. I'm thinking 15 series T slot but am open to suggestions. I want to attach 2 vertical pieces to wall studs behind the tank. I think I should be able to drill the T slot to attach it? Then I want 2 horizontal pieces to extend over the tank. I want to be able to raise and lower the horizontal pieces to adjust the height as needed. Then I want 2 horizontal pieces under the first 2 to support the lights. I want these pieces to be able slide for and aft as needed. What I need help with is what fasteners I need to assemble all of this. I struggled with legos so all the different fasters and terminology at 80/20dot net has me lost. I've attached a crude drawing with some notes and would greatly appreciate anyone who can tell me what hardware I need to assemble this.

Okay, got some ideas rattling around in my head, but being Super Bowl Sunday, you really don't want me to be thinking about these considering the state I'm sure I'll be in later today.
But before I go I'll ask @kdx7214 some of the same basic questions I always ask.
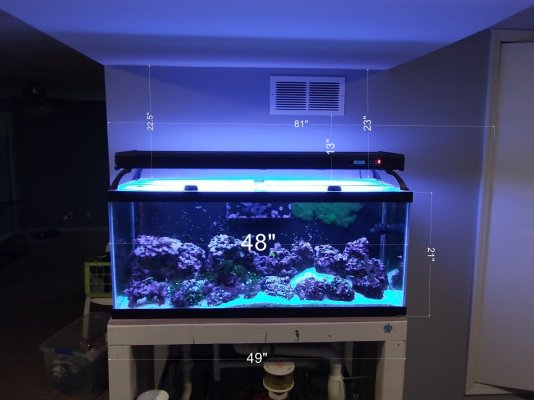
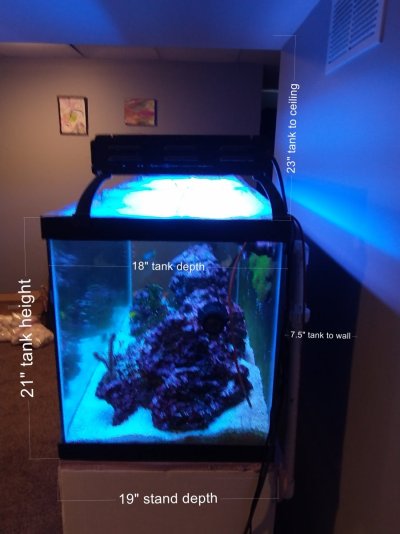
Exact tank brand, dimensions and thickness?
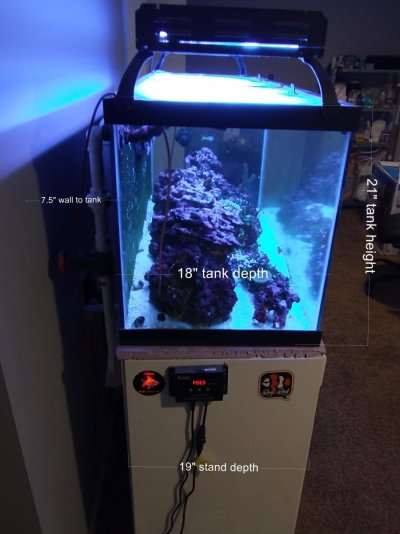
Exact stand dimensions and material?
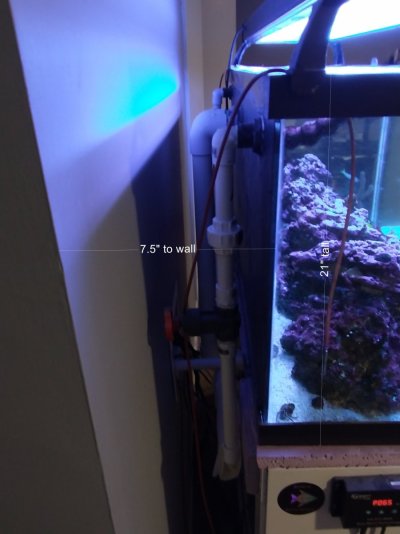
How far away from the walls (back and side) is it?
Any external overflow box to be taken into consideration?
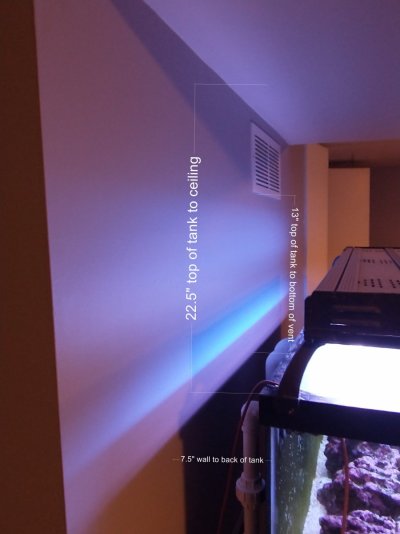
Clearance from the top of the stand to the ceiling?
The more measurements the better.
Are you okay with drilling and tapping threads?
I usually ask about which lights and how many but you already answered that. I'm currently running the same so that's an easy one. (PS. The older K7s come with their own controllers which are kind of a PIA with the Chineglish translation. The new app based ones rock.)
What is to the right of the tank? (Pic if possible)
Any idea of how you want the lights to be able to move? Up, down, side to side, swing away?
Have you ever used SketchUp? I use it for my renderings and dimensions for ordering parts. If a picture is worth a thousand words, how much is a 3D rendering worth. It is great for finding almost all of the unexpectedproblems"opportunities for improvement" before a single cent is spent.
These are just the beginning of the questions.
AND if anyone else has any ideas, I'm sure we would all love to hear about them, so feel free to join in please. I've seen lots of great 3D printed stuff that could be very useful.
Okay, got some ideas rattling around in my head, but being Super Bowl Sunday, you really don't want me to be thinking about these considering the state I'm sure I'll be in later today.
But before I go I'll ask @kdx7214 some of the same basic questions I always ask.
Exact tank brand, dimensions and thickness?
Exact stand dimensions and material?
How far away from the walls (back and side) is it?
Any external overflow box to be taken into consideration?
Clearance from the top of the stand to the ceiling?
The more measurements the better.
Are you okay with drilling and tapping threads?
I usually ask about which lights and how many but you already answered that. I'm currently running the same so that's an easy one. (PS. The older K7s come with their own controllers which are kind of a PIA with the Chineglish translation. The new app based ones rock.)
What is to the right of the tank? (Pic if possible)
Any idea of how you want the lights to be able to move? Up, down, side to side, swing away?
Have you ever used SketchUp? I use it for my renderings and dimensions for ordering parts. If a picture is worth a thousand words, how much is a 3D rendering worth. It is great for finding almost all of the unexpectedproblems"opportunities for improvement" before a single cent is spent.
These are just the beginning of the questions.
AND if anyone else has any ideas, I'm sure we would all love to hear about them, so feel free to join in please. I've seen lots of great 3D printed stuff that could be very useful.
Instead, I used iPhotoDraw to markup some photos I took of the tank and surroundings. Text description follows:
Good morning/afternoon/evening/day/night... whatever it is @kdx7214,
I just sent over a rough draft for @exnisstech and I could modify this for your needs.
(Cut and pasted)
"Basic rough draft, shown with it mounted to the back of the stand. If you would prefer it mounted to the wall, that is simple enough to do, your choice.
Lights up and down...

Backside showing L bracket connections...

Top view of hinges...

Using the L brackets, you can mount it directly to the stand without having to drill anything. You would be able to adjust the height by moving the vertical pieces up or down on the L bracket.
Mounting the lights is easy. I've done it three different ways but we'll touch on that later.
Let me know your thoughts and anything you would like to change."
I know your stand is wood but it's easy enough to modify. Also available are linear bearings if you plan on adjusting the entire light fixture up and down a lot. If you're just going to set the height one time, it's cheaper to just use brackets.
Let me know if this is close to something you're looking for.
That looks great! Sorry if I'm a bit slow to respond for a few days. I had surgery yesterday and will be feeling it for a bitHi @kdx7214 , the low ceiling was just too close for a simple modification so I dusted off the old brain cells for a new revision. How about something like this with the lights rotating to the sides?
Lights in place and swung away,

close up,

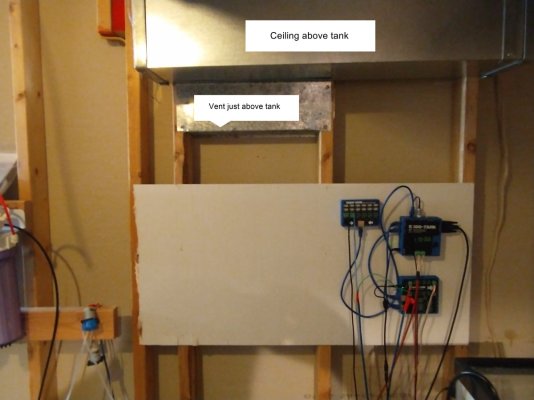
You will need to add some more fireblock pieces on the other side of the wall to mount to, but that should be easy since it's open.

(I'm sure these framing dimensions are way off but you get the idea.)
Anything you'd like to change?

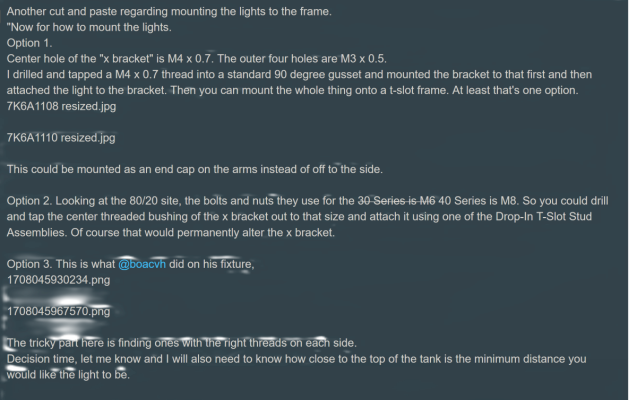
Another cut and paste regarding mounting the lights to the frame.
"Now for how to mount the lights.
Option 1.
Center hole of the "x bracket" is M4 x 0.7. The outer four holes are M3 x 0.5.
I drilled and tapped a M4 x 0.7 thread into a standard 90 degree gusset and mounted the bracket to that first and then attached the light to the bracket. Then you can mount the whole thing onto a t-slot frame. At least that's one option.


This could be mounted as an end cap on the arms instead of off to the side.
Option 2. Looking at the 80/20 site, the bolts and nuts they use for the30 Series is M640 Series is M8. So you could drill and tap the center threaded bushing of the x bracket out to that size and attach it using one of the Drop-In T-Slot Stud Assemblies. Of course that would permanently alter the x bracket.
Option 3. This is what @boacvh did on his fixture,


The tricky part here is finding ones with the right threads on each side.
Decision time, let me know and I will also need to know how close to the top of the tank is the minimum distance you would like the light to be.
Images showing up on all posts for me on android using chromecan anyone else see them?

Yeah, "recovery hell", been there done that way too many times, so lets take your mind off the "slight discomfort".Sorry for the delays, still in recovery hell. I've got an upload of what I can see with the pics missing. It just shows the filenames. No clue why.
I like the looks of that pic you posted. To be honest, I'm easy on how they connect. I just need something to hold them and let me move them out of the way. I'm not picky.
Yeah, "recovery hell", been there done that way too many times, so lets take your mind off the "slight discomfort".
Are you using a computer or a phone to see the images? I'll try reposting them as PNG instead of JPG, not that I know if that will make any difference.
I think you will be okay with this plan so I will finalize the drawing and give you a build list for parts.


Well that sucks, hope it's nothing too serious. Don't worry about this. I had a few minutes free earlier today and finalized the mock up. Just going to make you a quick build list and then you can go comparison shopping.