How to: Building an aquarium stand

Berlibee

.Wen Game.
View Badges
Joined
Nov 20, 2015
Messages
1,852
Reaction score
2,894
Location
USA
Rating - 0%
0   0   0
Awesome! Can you tell me please, what was the total cost for all materials ?
I've just finished a stand as well and total cost is $350. Thanks again!
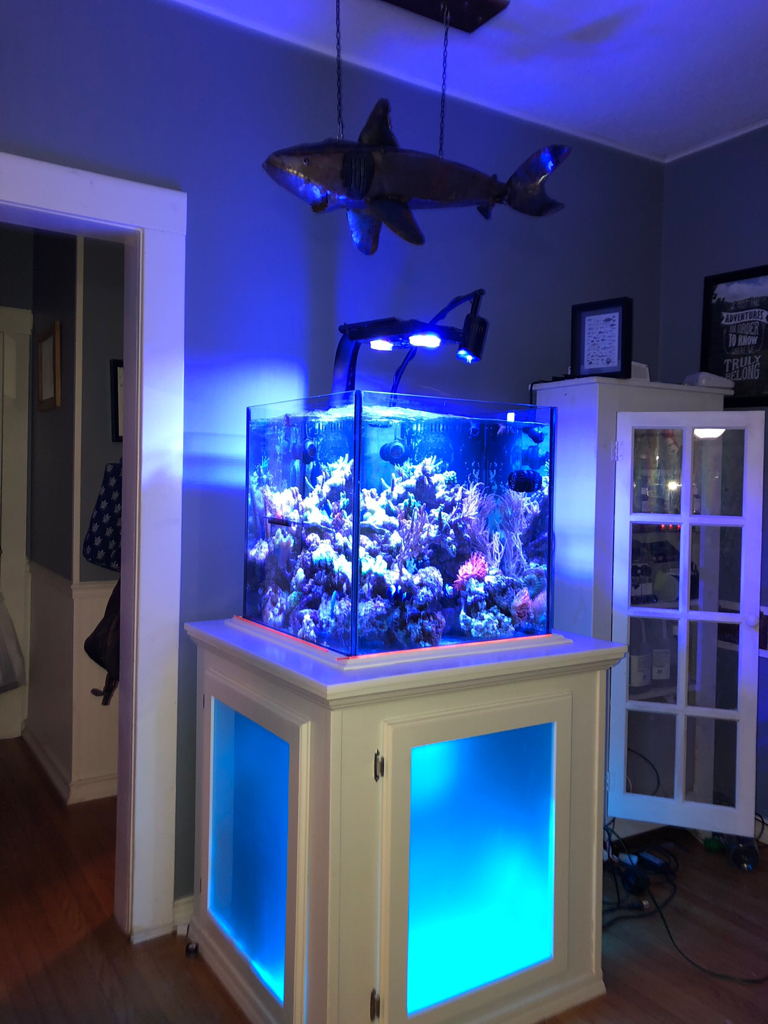
Size: 30"x30"x34".

Color: White.

Paint Inside: Rust-Oleum - Appliance Epoxy.

Paint Outside: 1. Kilz primer + 2. Rust-Oleum Enamel.

Silicone: GE White Paintable Silicone.

Removable sides on magnets.

Leftside: White LED decoration.

Fun: Corsair Air Series SP120 Quiet Edition.

Dust reduction: Silverstone Tek 120mm Ultra Fine Fan Filter with Magnet Cooling.

Stand_001.jpg


Stand_002.jpg


Stand_003.jpg
 

s2nhle

Valuable Member
View Badges
Joined
Mar 12, 2013
Messages
1,413
Reaction score
317
Location
VA
Rating - 0%
0   0   0
Wow, very detail. Thank you very much for sharing.
 

boscom77

New Member
View Badges
Joined
Mar 2, 2016
Messages
23
Reaction score
14
Rating - 0%
0   0   0
Thanx for the write up!
Used your design to make my own version for my 60 gallon cube...
Turned out perfect!
20160302_234128-1.jpg
 

Steve Elb

Active Member
View Badges
Joined
Dec 5, 2018
Messages
135
Reaction score
230
Location
Santa Cruz Ca
Rating - 0%
0   0   0
How to: Building an aquarium stand

When starting my new cabinet build I noticed that there is a lot of threads to show off aquarium stands but very few showing the building process in any detail. I decided to document my recent cabinet build to hopefully inspire a few people to build their own who might not think they possess the carpentry skills. I am definitely no carpenter and I've build a few decent cabinets now. There is nothing better than a guest in you're home commenting on how nice your aquarium cabinet is before they know you built it yourself!

Finished Product


Materials used
spf 2x4's
1x6 Poplar lumber (frame)
1x3 poplar lumber (doors)
3/4" plywood (oak used here but most 3/4 ply will do. Ideally marine grade if money is not an issue)
1" Poplar corner moulding
Pine base moulding
Pine crown moulding
Poplar trim moulding
zinzer 123 primer
Benjamin Moore Advanced paint (natural ivory)


Tools used
Kreg pocket hole jig
Mitre saw
Table saw
Drill
Jigsaw (for cutting out hole for plumbing)
Brad nail gun
Router (For profiling doors)
Orbital sander
Lots of 120 and 150 grit sand paper
Various clamps
Wood glue
2 1/2" course threaded kreg screws (For 2x4's)
1 1/4" fine threaded kreg screws (For 1x hardwood)
1 1/2" deck screws (For fastening plywood)
Lots of caulk and wood filler
6" High density foam paint rollers
Decent quality paint brush for moulding


Building the frame
The frame should be the simplest part of the entire build but it never ends up being that way for me. Getting the frame as square as possible is crucial for stability; it also makes the rest of the build go much smoother when it comes to fitting everything.
I started this build by cutting all the framing 2x4's to size using a mitre saw. cutting them all prior to assembly allowed me to ensure they were all the exact same length to help keep things stayed square. I then ripped all 2x4's down to exactly 3" wide on the table saw. This wasn't necessary but I find them easier to work with when they are square instead of having the rounded corners. Ripping 1/4" off each side of the 2x4's gives a nice square 3"x1 1/2" board.


I also ripped four 2x4's down to 1 1/2" to be used as half of the "L" shaped legs making them exactly 3"x3"


Next I assembled the top and bottom frames. Building the frames by clamping two of the boards to the corner edge of a table saw helps to keep them square. I found it easier than using a carpenders square. I used a kreg pocket hole jig and 2 1/2" course thread kreg screws to assemble the entire frame. It makes things extremely simple. When adding the middle braces be mindful of where your drain and return plumbing need to go.


Next I assembled the legs I previously cut to length. I used plenty of wood glue and a counter sunk 1 1/2" deck screw every couple inches.


Next I attached the legs to one of the frames again using pocket screws and wood glue. I used a carpender square to ensure the legs were at a right angle with the frame.


I then attached the other end of the legs to the top frame in the same way.


Next I primed the entire frame with 2 coats of zinzer 1,2,3. I only used this because I already had it. From what I've read kilz oil based primer seems to be prefered.


Next I cut and installed 3/4" plywood on the top and bottom platforms of the cabinet using 1 1/2" wood screws. I used a quick square to mark where the legs would be on the bottom shelf and cut them out using an orbital saw.


I then filled all of the screw holes with wood filler and sanded both pieces of plywood with an orbital sander.


I then cut another Piece of 3/4" plywood for the back of the cabinet since this cabinet is going againt a wall. I also cut a hole in the top piece of plywood where my plumbing needed to come through the stand.


Skinning the frame
The majority of the people I see building stands use plywood to skin their frame, cutting a hole out in the middle where the doors should go. I find it much easier and better looking to use 1x lumber, especially if the stand is going to be stained and not painted. For this cabinet I used 1x6 poplar lumber. I simply cut two vertical boards the height of the frame, and two horizontal boards the width of the frame minus the width of the vertical boards. I quickly drilled pocket holes using the kreg jig, clamped them together and glued and screwed them with 1 1/4" fine threaded kreg screws. After the first frame is together and you know what you're doing it goes quick.


I find that the easiest way to attach the faces to the frame is by using wood screws where the moulding will be so that none of them show. I also use plenty of wood glue and clamp them till dried.


All 4 faces attached.


Next I built a top frame to go around the tank so that the aquarium sits down in the stand.


Normally I would just screw the top face down to the top of the stand and then brad nail crown moulding around it permanently attaching it to the cabinet. However, Being that this is a cube stand and already measured 30"x30" I needed to be able to remove the top face and moulding in order to fit through standard doorways. Do overcome this I attached the crown moulding directly to the top cabinet face using brad nails and wood glue. The whole assembly just slips right over the aquarium and fits snug around the cabinet so that it can be removed at any time. I also added trim moulding around where the tank will sit which you can't see in this photo but is clearly seen in the finished product photos.
Nicely done. I'm building one myself
 

Steve Elb

Active Member
View Badges
Joined
Dec 5, 2018
Messages
135
Reaction score
230
Location
Santa Cruz Ca
Rating - 0%
0   0   0
20180822_163429.jpg
Next I attached 1x1 pine corner moulding and pine base moulding around the cabinet.


Next I build the doors using 1x3 poplar. I simply cut two vertical boards and two horizontal boards the correct length to give me a 1/2" overlap around the hole in the face frame. I then attached them again using wood glue and 1 1/4" fine thread pocket screws.


Once together I used a router and the proper bit to cut a ledge into the back of the door where my glass panels will sit.


I then used a router and profiling bit to make a pattern around the edges of the door.


Next I caulked around the inside of the cabinet, primed it with two coats of Zinzer 123, and painted with 2 coats of gloss white appliance epoxy. this gives a very hard smooth finish similar to a dry erase board.


Finally I primed the entire cabinet with two coats of Zinzer using a high density foam roller and sanding with 150 grit after each coat.
I then painted the cabinet using Benjamin Moore Advanced semi-gloss in "Natural ivory". This paint is fairly expensive but worth it in my opinion. It is a waterborne alkyd paint which lays out smooth like an oil paint and dries very hard, while at the same time has low VOC levels and cleans up with water. I sanded with 220 grit after the first coat of paint.


Wrapping things up I attached the doors to the cabinet. I will be adding frosted glass panels to the doors in the near future and will update this thread at that time.


If you have any questions or comments please leave a comment, or share a photo of a stand you built yourself!
 
OP
OP
kevantheman35

kevantheman35

Active Member
View Badges
Joined
Feb 9, 2010
Messages
463
Reaction score
88
Location
indiana
Rating - 0%
0   0   0
72e54dc0915e17832c59e9bb4e52ad50.jpg

Glad to see you guys are getting some use out of my plans. This tanks been setup a long time now. I just recently swapped out the glass for actual frosted panels as the spray didn’t hold up well to saltwater. I also added this cheap WiFi color changing light that switches colors every 45 seconds or so.
 

truetricia

Active Member
View Badges
Joined
Jul 23, 2014
Messages
402
Reaction score
424
Rating - 0%
0   0   0
72e54dc0915e17832c59e9bb4e52ad50.jpg

Glad to see you guys are getting some use out of my plans. This tanks been setup a long time now. I just recently swapped out the glass for actual frosted panels as the spray didn’t hold up well to saltwater. I also added this cheap WiFi color changing light that switches colors every 45 seconds or so.
Love this thread. I'm getting ready to build my stand, and this is very helpful.
 

Mrod

Active Member
View Badges
Joined
Feb 17, 2018
Messages
238
Reaction score
147
Location
Levittown
Rating - 0%
0   0   0
Height on the stand is 36” with the dimensions I used here. Can be modified to any height you want obviously.
Great stand Kevin!!

Mind sharing how many hours it took if you recall? Also approximate cost of all materials?
Wondering what kind of cost and time one Might expect if trying to duplicate something like you did- great work
 

Ross Petersen

Well-Known Member
View Badges
Joined
May 25, 2019
Messages
543
Reaction score
311
Location
Vancouver BC
Rating - 0%
0   0   0
Hey all. I'm about to paint 3/4'' plywood that I have under my tank and sump. I want it to be super water-resistant. There's a cocktail of different ideas in this read, some with several different coats suggested. What do you recommend for plywood that a 100-gallon tank will be sitting on, and plywood that a 40 galloon sump will be sitting on? I'm aiming for simple and effective. Cheers, Ross
 

Bleatzy

New Member
View Badges
Joined
Apr 5, 2020
Messages
1
Reaction score
0
Rating - 0%
0   0   0
Height on the stand is 36” with the dimensions I used here. Can be modified to any height you want obviously.

Thank you Kevan! Your project is awesome and I am trying to build the same but I cannot find the molding and baseboard trim, can you point me to which one did you exactly use? Thank you!
 

Just grow it: Have you ever added CO2 to your reef tank?

  • I currently use a CO2 with my reef tank.

    Votes: 4 5.6%
  • I don’t currently use CO2 with my reef tank, but I have in the past.

    Votes: 3 4.2%
  • I have never used CO2 with my reef tank, but I plan to in the future.

    Votes: 5 7.0%
  • I have never used CO2 with my reef tank and have no plans to in the future.

    Votes: 55 77.5%
  • Other.

    Votes: 4 5.6%
Back
Top