
Navigation
Install the app
How to install the app on iOS
Follow along with the video below to see how to install our site as a web app on your home screen.
Note: This feature may not be available in some browsers.
More options
You are using an out of date browser. It may not display this or other websites correctly.
You should upgrade or use an alternative browser.
You should upgrade or use an alternative browser.
Latest updates

Filters
Show only:
Loading…
I guess I’m supposed to be using this thread to add updates, not the other one, so I’ll try this.
My plan has been to try and respond to problems as they arise, but I realized that I was setting myself up for hassles with only relying on a tiny refugium and some filter floss to handle nutrient export. It might be OK now while there’s little in the tank, but since I want to do water changes less often I realized something more was probably needed. I purchased a used Bubble Magus MiniQ protein skimmer and will set it up once it arrives. I was originally planning to run it occasionally (and still may), but then I read an article which indicated that they only capture about 35% of wastes, so that still leaves plenty left over for healthy bacteria, corals, and other tank critters.
I just installed one of the new, to me at least, Nature Dimensions N-Clear Fleece Roller filters. I was happy to see that they have an option to make it fit on a UNS Dual AIO, which my Landed 35C fits. At least the filter socks fit, so I assumed that it would fit with the adapter. It fits great. No more worrying about filter socks when I have to travel for work!
Up next, getting the Hydros collective all installed as well as the Fish of Hex CO2 scrubber!
Few FTS and Top Down shots from the last couple of weeks.
New Zoa's in the frag tank growing out at the moment, all the SPS is going great.
Attachments
-
 2025-05-13 19.01.23.jpg84.5 KB · Views: 19
 -
 2025-05-13 19.02.11-1.jpg90.8 KB · Views: 14
 -
 2025-05-15 16.59.17.jpg183.7 KB · Views: 17
 -
 2025-05-15 16.59.30.jpg182.6 KB · Views: 17
 -
 2025-05-15 16.59.45.jpg128.9 KB · Views: 21
 -
 2025-05-15 17.38.41.jpg354.6 KB · Views: 19
 -
 2025-05-15 17.38.59-1.jpg286.4 KB · Views: 16
 -
 2025-05-18 16.06.53.jpg181.8 KB · Views: 17
 -
 2025-05-18 16.19.20.png1,006.3 KB · Views: 22
Kenya tree dropped it first buds today while I was scraping the glass and dosing with coral snow.
Attachments


Please see attached, more to follow soon!
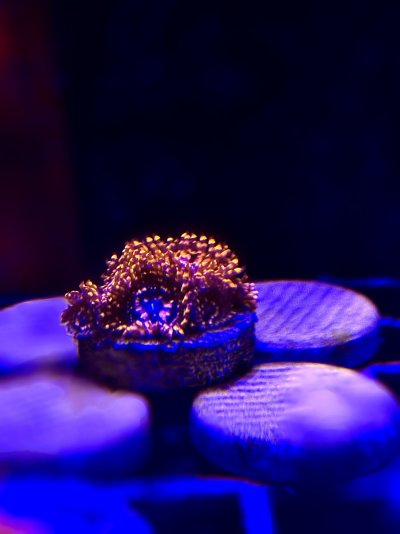
added a nice new purple torch to the tank yesterday and it's settling in quite nicely. here's a semi-decent photo of it
Added more rose bubble tip anemones. I realized I didn’t have new pictures so here they are!
Attachments
-
 IMG_1055.jpeg264.9 KB · Views: 25
 -
 IMG_1057.jpeg253.6 KB · Views: 24
 -
 IMG_1060.jpeg288.1 KB · Views: 18
 -
 IMG_1059.jpeg288 KB · Views: 17
 -
 IMG_1061.jpeg281.1 KB · Views: 18
 -
 IMG_1062.jpeg249.6 KB · Views: 16
 -
 IMG_1066.jpeg262.1 KB · Views: 18
 -
 IMG_1064.jpeg260.5 KB · Views: 20
 -
 IMG_1065.jpeg262.3 KB · Views: 25
Clear sch.40 standpipes, return, and electrical conduit are in, and test fit! Loc-Line, valves, and RFGs are working fantastic!
The vision is coming together, and I’m quite pleased with everything, short of my rockwork…
flow-wise, I’m still looking at pulling this off without the need for any form of Wavemakers! — between RFGs and a few eductors I plan to print up, I expect to be able to hit 30-40x hourly DT mixing, with under 10x sump turnover, and a sump designed to optimize that turnover rate!
Here’s a more detailed photo of the fun visual effect I get from a clear center overflow/plumbing, and a three tier cascade!

Last edited:
Added a Kenya tree last month and it’s already getting ready to drop a baby!
Attachments

Things are going smoothly!
I’ve got around 20lbs of rock in the DT now, another 20-30lbs in the sump! — The DT still needs a decoration revision before being picture-worthy…
I stuck an old Simplicity 120DC skimmer in the sump on a 3.5” temporary shelf while I decide on my static sump water height(s)… Also, a custom algae scrubber design is underway…
Still waiting on a 18” length of clear 1” sch40 pipe to serve as my secondary drain standpipe… (the original was both out of round, and physically undersized! — the seller send out a replacement!)
Big news of the day is the shipment from @Vivid Creative Aquatics ! Antonio was nice enough to take the time to walk through his available products with me! In addition to discussing my future flow goals for my system, he was prompt and thoughtful in every response! (Also, they had great prices on extremely difficult to source black colored 1/4” Loc-Line parts!)
Current layout is 3x 1/4” flex series RFGs, with the other three return outlets valved off… so far, so good! But, I want more flow!! I think I’ll be drilling and bulkheading my 20g long sump for an external pressure rated 600gph pump I have laying around!
Attached are photos of the improved return plumbing!


Last edited:
Rec’d today from Modular Marine ( great little company)
Goodbye home depot bucket

Attachments

Eliminated almost all my palythoa, except a few. Also added a Lobo that was desperately in need of a new home and a rock flower as well as a new wall hammer.
Attachments

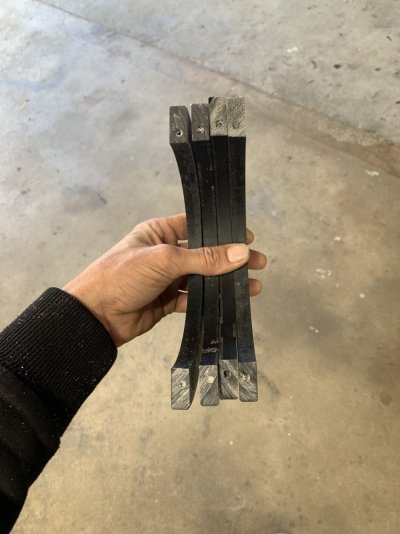
Well, the acrylic clamp rings are finished!
I spent some time yesterday brushing off my knowledge of machining!
I started by making a hilariously simple router jig to bevel all sharp OD corners… Plus, setting up my Delta drill press to do way more machining operations than it was ever designed to, with the help of an X/Y vise!


Simply put; the two 8” OD, 6” ID, 1/2” thick acrylic rings were both milled to have a pair of symmetrical flats in one half of their diameter. These flat areas allowed me to stand the rings on edge and run a 13/64” drill bit (for 1/4”-20 tap) through the thickness of each side of the hoop of the rings.
The rings were bisected using a circular saw/plastics finish blade, then one half of each had it’s holes tapped to 1/4”-20. The other half had its holes drilled out to 1/4”, then counter sunk an inch or so deep to 3/8” diameter. The nylon fasteners were chucked in a cordless drill, and ground down on a bench grinder, from 1/2” head diameter, to <3/8” head diameter; allowing counter-sink clearance…
Everything fits together well enough for my purposes, though I was around 1/16”-1/32” off from perfect fitment, which I’ll constantly be noticing when I view them installed… oh well!
I’ll see about trying to carve out some time this evening to get the relevant rockwork shelf ring installed, and continue building up the rocks!


Attachments
Last edited:
Long story short; I made a difficult to decorate tank even more of a challenge!
I don’t mind, I knew I was getting myself into this situation, and have a few tricks up my sleeve to get myself out of it!
For example: The previously 16” X 5.5” tank top opening obviously now has a 6” pipe welded in the center of it, so I now have two small opening instead! — this means small and medium rocks are all that will fit into the tank… in addition, the pipe in the center of the tank makes rock placement for a central island and six viewing faces quite challenging…
So, I plan to use my wet cut tile saw to bisect a few larger rocks strategically, allowing me to sneak the halves into the tank openings, before dowel pinning them back together with 3/8” acrylic rod segments!
Furthermore, I have two spare 1/2” thick acrylic “locking collars” the local plastics shop CNC cut for me as spares for the pipe welding project in this tank. These collars/rings are perfectly circular, 6” ID, 8” OD.

Hindsight being 20/20; I could have friction fit both of these collars around the 6” central pipe, Allowing me to slide them up and down on it, serving as “shelves” which could have acrylic plates welded to them for coral propagation!
I quickly realized that I can still just bisect these two acrylic collars/rings, drilling, tapping and counter-sinking each side of each one to accommodate a nylon screw!
This will yield a pair of collar clamps, which I can simply clamp around my central 6” acrylic tube.
My current plan is to clamp one around 7-9” up from the bottom of the tank to serve as a “shelf” to be hidden inside the rockwork as I build it up taller… the other ring will be saved if it isn’t needed for rock structure to serve as an adjustable height coral prop shelf down the road!
I also plan to route bevels on the OD of the rings as necessary; similar to the disc shown, which is actually part of my routing jig, with that bevel being for jig hardware clearance!
I’ve got a busy weekend ahead of me, but will update once I’ve got these acrylic collars/rings machined and installed!
Update my tank under sunlight


