135G SPS Cube - Designing for long term stability.

Wiskey

Well-Known Member
View Badges
Joined
Sep 7, 2017
Messages
734
Reaction score
916
Rating - 0%
0   0   0
Hello All!

This is going to be a catchup thread in the beginning. I've been in this hobby a long time and I've lost a few SPS tanks. Every time I've had a failure it seems to relate to one of the following:

Alk stability issues (including dosing issues)
Power Issues
Maintenance Lapses that cause parameters to drift and go unnoticed.
Minor failure that goes unnoticed, or parts are not available.
Topoff Failure

This time I want to do things different, my goal is to address common issues by incorporating the following into my design:

Generator
Trident testing - This will alert me early of dosing problems.
DOS with Triton - this is most likely to fail off (not overdose), and will alert me when solutions are low.
Dedicated sump room, with sump in open air - This is to easily see and maintain everything and know more easily if something is wrong.
Topoff redundancy - Pump that barely keeps up (incase stuck on), Air Pressure Sensor for normal level, Optical for over/underfull, and backup float.
Multiple of EVERYTHING possible - Two Flow pumps, Two return pumps, 4 Hydra 32's and 4 T5's (instead of just 4 52's), backup of critical things (even if they are old crummy ones like an old skimmer)
Apex for monitoring and alerting, including things like flow sensors and water spill alerting.

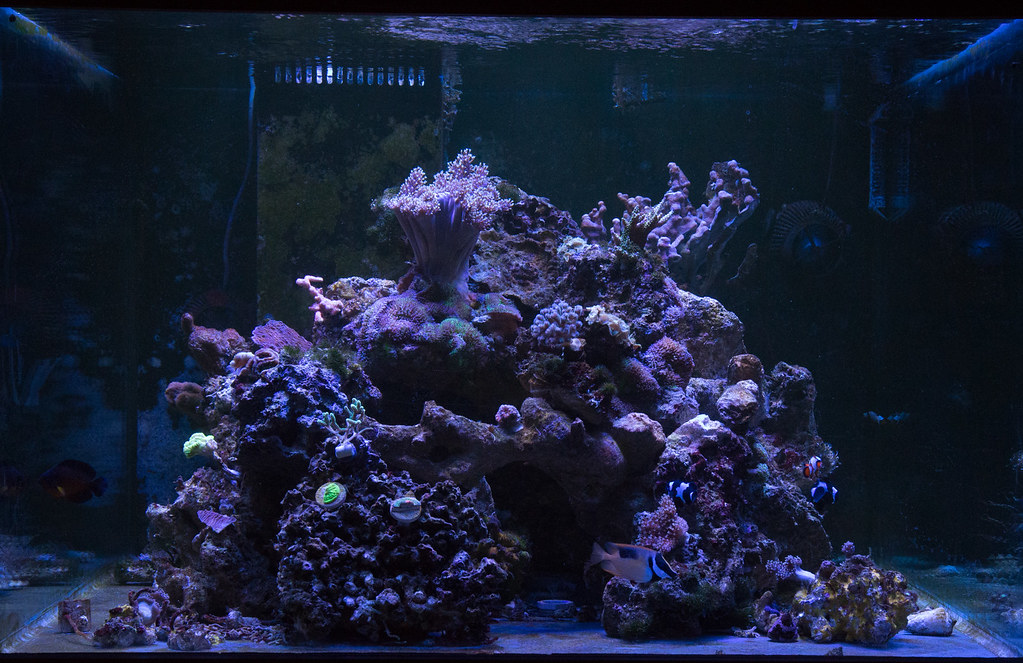
Here's where I started. I got this 135G for a very good deal. It was a softie tank, and I got some great equipment with it:
Moving Day by Wiskey2727, on Flickr

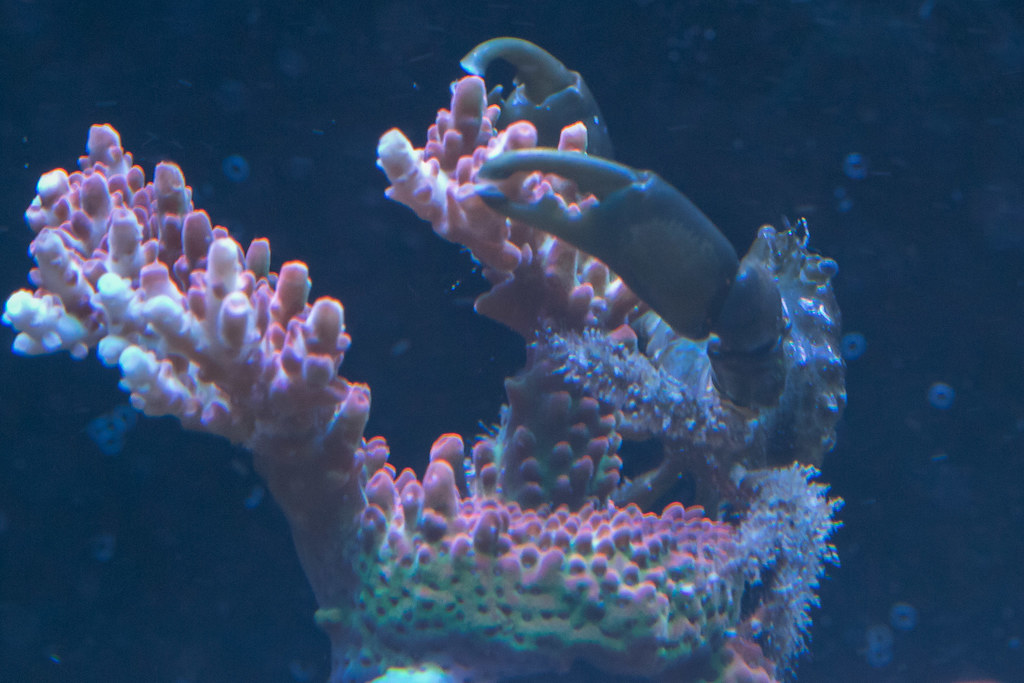
This was a little while later after it cleared up a bit and I put a couple SPS in:
IMG_2066 by Wiskey2727, on Flickr

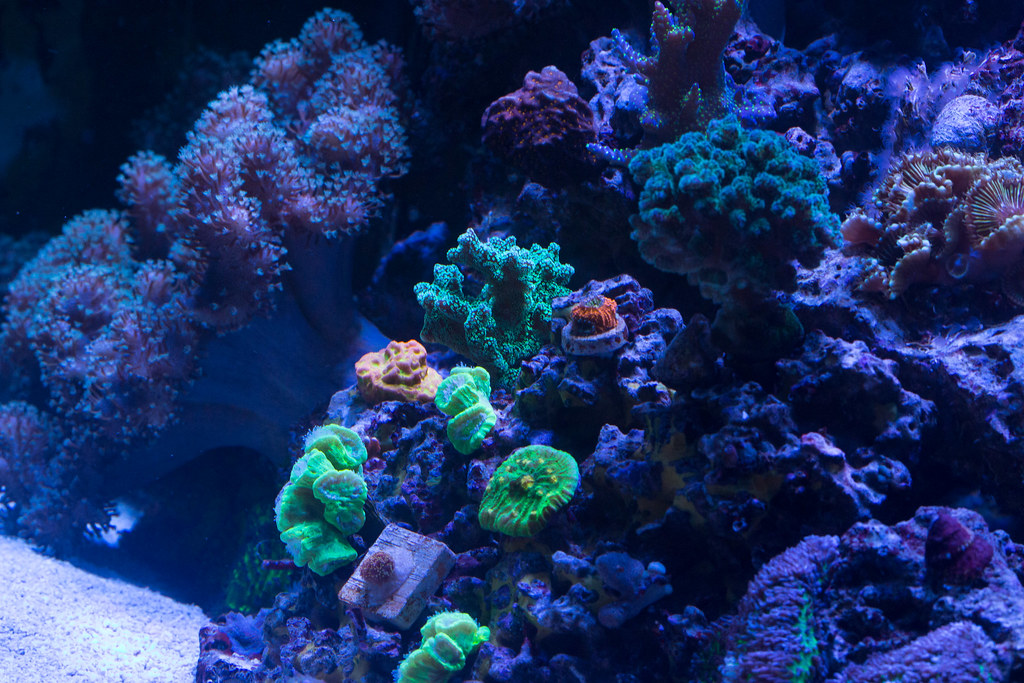
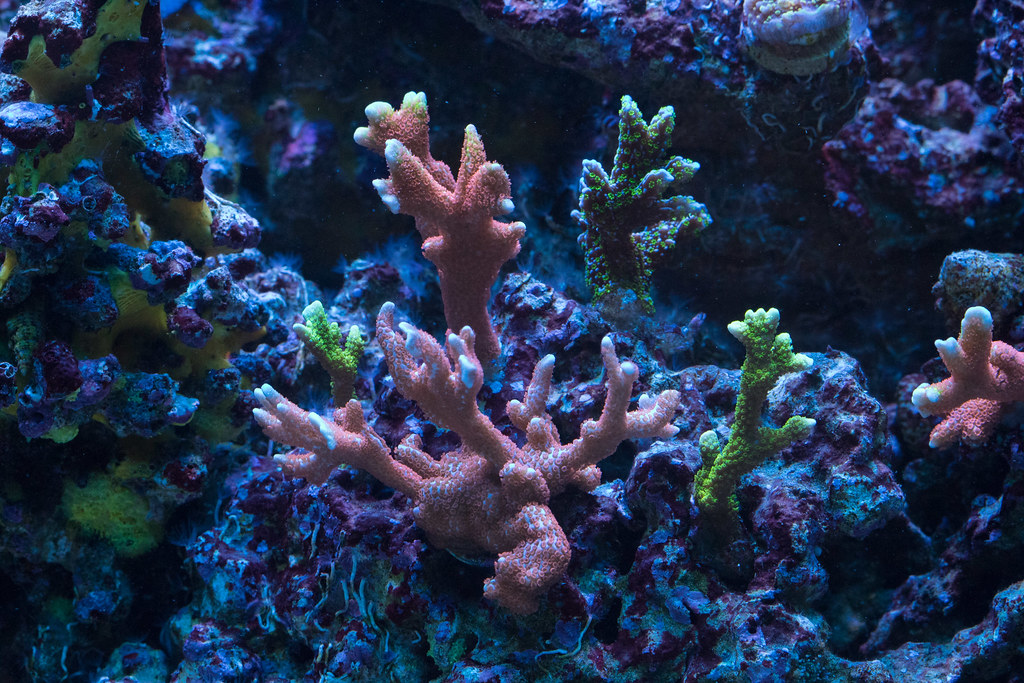
This is a fairly recent picture:
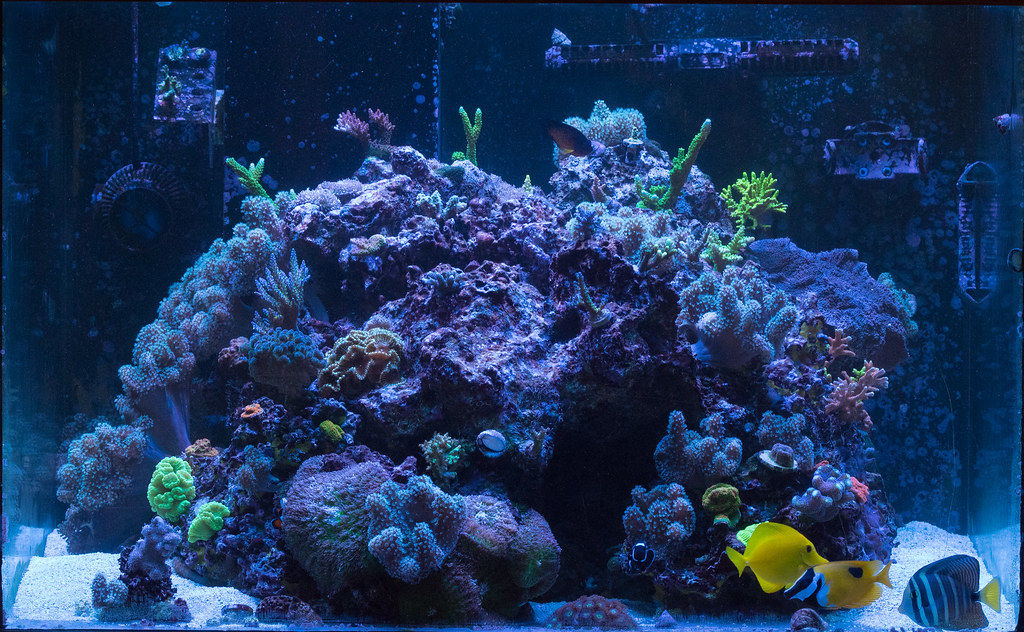
IMG_3996 by Wiskey2727, on Flickr

And just for fun, this is the pad I poured for my generator. The house is wired for it, and the generator runs on natural gas.
Concrete Pad by Wiskey2727, on Flickr

This is the water change station in my Fish Room. Everything in the fish room will be fairly industrial. I'm not going for a look in there, just function:
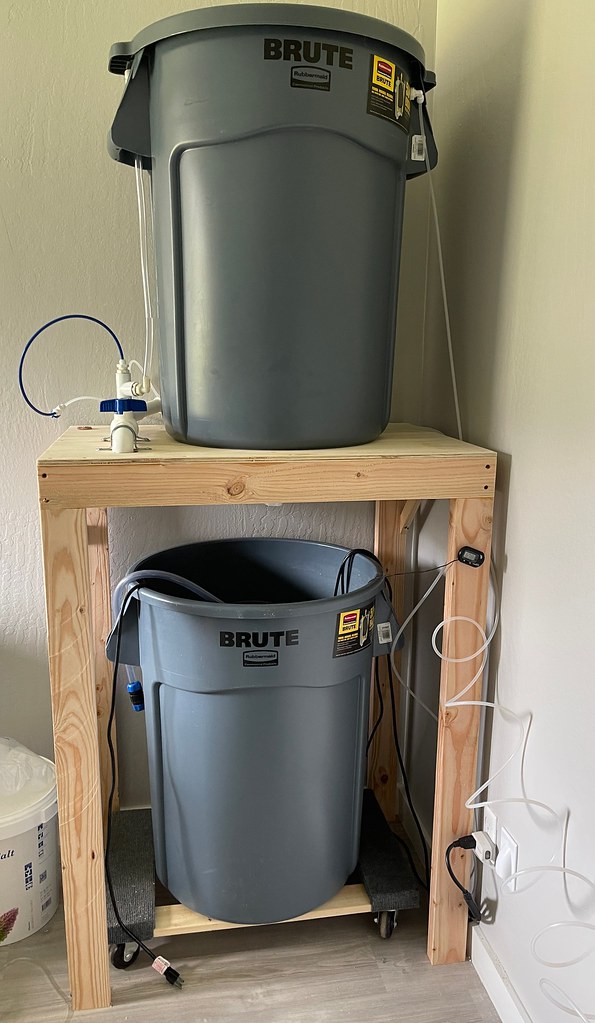
IMG_4689 by Wiskey2727, on Flickr

More to come, right now I'm building a custom canopy to match my kitchen. I want this tank to look like a cohesive part of the home.
Whiskey
 
OP
OP
Wiskey

Wiskey

Well-Known Member
View Badges
Joined
Sep 7, 2017
Messages
734
Reaction score
916
Rating - 0%
0   0   0
I mentioned the custom canopy. Right now I only have access to the front of the tank, but the goal with this canopy is to fit the style of the house, and have as much access as possible.

In this canopy the doors will pop off with the push of a button, the lighting is modular and lifts out without tools, and the doors are huge giving easy access.

Speaking of light, here's the final product. 4 Hydra 32 HD's, and 4 39W T5's. The goal was to get between 200 and 350 Par throughout the tank, and this nailed it. I can easily push that to 450 by cranking the lights, but right now they are running around half power which is good for reliability.
IMG_6097.JPG


The goal for my Canopy is to match my kitchen, this is what that looks like:
IMG_6101.JPG


Here are the doors I've built. They are done out of Popular and Baltic Birch Ply:
IMG_6100.JPG


This is where I am with the Carcass:
IMG_6098.JPG


The next step is to do the edge beading, and install the crown molding. Then it's into sanding and paint!

Whiskey
 
OP
OP
Wiskey

Wiskey

Well-Known Member
View Badges
Joined
Sep 7, 2017
Messages
734
Reaction score
916
Rating - 0%
0   0   0
Here is my canopy with the routing for the fans and such done, edge beading on, and crown molding. It has one coat of primer as well.


IMG_6158.JPG


Whiskey
 
OP
OP
Wiskey

Wiskey

Well-Known Member
View Badges
Joined
Sep 7, 2017
Messages
734
Reaction score
916
Rating - 0%
0   0   0
The new canopy is going up today!!! I can't tell you how excited I am to have access to the sides of this tank:
IMG_6245.JPG

The door pulls are delayed, but the doors come off with a button so it will be easy to add them later this week when they come in.

Whiskey
 
OP
OP
Wiskey

Wiskey

Well-Known Member
View Badges
Joined
Sep 7, 2017
Messages
734
Reaction score
916
Rating - 0%
0   0   0
This ended up being a larger job than I thought because now that I'm getting this into it's final state I wanted to rewire things to clean up some big coral spiral messes that I dealt with before because it wasn't the final hood. Now I was able to cut all my wires and clean things up.

Old hood with access only to the front, and small access at that:
IMG_6268.JPG


New hood with access to all sides:
IMG_6272.JPG


IMG_6274.JPG


IMG_6273.JPG


Sorry for the poor photos, it was a long day and I'm too tired to use the DSLR.

Whiskey
 
OP
OP
Wiskey

Wiskey

Well-Known Member
View Badges
Joined
Sep 7, 2017
Messages
734
Reaction score
916
Rating - 0%
0   0   0
Looks great! That's a TON of light for that cube. :)
Thank you! You're not wrong about the light,.. but this was all about coverage and spectrum not really power. Here's how it happened:

First I got the tank with two of those Ocean Revive T-247 or whatever lights that were hung a couple inches from the water. They provided plenty of light, but the coverage wasn't there, and they had a bad disco effect in this installation. 4 of them up high probably would have been fine but I wanted to go a different route.

First I did Par Measurements on 2 hydra 52's up high. Although I could get plenty of light in the center, the edges were bad, and the shading was terrible. Light from one angle like that didn't work.

Next I got 4 Hydra 32's and positioned them for an even blanket of light and suspended them way up. This was good for shadowing with light coming from so many more angles, but not perfect. Then I tuned them for the light spectrum I wanted and found my Par was only at about 225 at the highest. Fine for many corals, not great for an SPS tank like I'm going for.

Finally I added on the T5's, and I think this is perfect. The light can hit all angles of the coral, there is no spotlighting, and I turned my Hydra 32's down a touch and I'm right at about 350 Par in the highest light areas, and a solid 250 on the sand. Once my SPS grow in the LPS will be in more of their preferred range of ~100 ish.

Also keep in mind the light is 18" up in a gloss white canopy, so light is bouncing off the canopy sides and back into the tank as well. Without the canopy the light spill would be out of control and I'm sure my par numbers would be bad.

This setup not only makes very even lighting, but it allows me to easily work on the tank, and get nice top down photos.

Whiskey
 

dantimdad

7500 Club Member
View Badges
Joined
Jun 24, 2009
Messages
9,577
Reaction score
41,635
Location
Hartselle Alabama
Rating - 0%
0   0   0
Thank you! You're not wrong about the light,.. but this was all about coverage and spectrum not really power. Here's how it happened:

First I got the tank with two of those Ocean Revive T-247 or whatever lights that were hung a couple inches from the water. They provided plenty of light, but the coverage wasn't there, and they had a bad disco effect in this installation. 4 of them up high probably would have been fine but I wanted to go a different route.

First I did Par Measurements on 2 hydra 52's up high. Although I could get plenty of light in the center, the edges were bad, and the shading was terrible. Light from one angle like that didn't work.

Next I got 4 Hydra 32's and positioned them for an even blanket of light and suspended them way up. This was good for shadowing with light coming from so many more angles, but not perfect. Then I tuned them for the light spectrum I wanted and found my Par was only at about 225 at the highest. Fine for many corals, not great for an SPS tank like I'm going for.

Finally I added on the T5's, and I think this is perfect. The light can hit all angles of the coral, there is no spotlighting, and I turned my Hydra 32's down a touch and I'm right at about 350 Par in the highest light areas, and a solid 250 on the sand. Once my SPS grow in the LPS will be in more of their preferred range of ~100 ish.

Also keep in mind the light is 18" up in a gloss white canopy, so light is bouncing off the canopy sides and back into the tank as well. Without the canopy the light spill would be out of control and I'm sure my par numbers would be bad.

This setup not only makes very even lighting, but it allows me to easily work on the tank, and get nice top down photos.

Whiskey
Ecellent explaination! Sounds like you spent considerable amounts of time and money figuring it out.
 
OP
OP
Wiskey

Wiskey

Well-Known Member
View Badges
Joined
Sep 7, 2017
Messages
734
Reaction score
916
Rating - 0%
0   0   0
Ecellent explaination! Sounds like you spent considerable amounts of time and money figuring it out.
Thank you!
It wasn't the easiest tank to light, that is for sure, but I'm super happy with how it turned out. Something that had measurements that are in multiples of 24 inches would have been cheaper.

Whiskey
 

Daniel@R2R

Living the Reef Life
View Badges
Joined
Nov 18, 2012
Messages
37,474
Reaction score
63,857
Location
Fontana, California
Rating - 100%
1   0   0
Looking great!!
 
OP
OP
Wiskey

Wiskey

Well-Known Member
View Badges
Joined
Sep 7, 2017
Messages
734
Reaction score
916
Rating - 0%
0   0   0
With all this hurricane stuff going on I decided I needed to cut my house over to generator power and continue the break in process. You aren't supposed to run it for more than an hour at a time until it has been run for 6 hours and you've done an oil change.

So! This post is totally off the grid!

In other news, the pulls for my doors came in:
IMG_6308.JPG


The tank is under Atinic in that pic because it's from sunrise this morning (or rather about noon).

Whiskey
 

dantimdad

7500 Club Member
View Badges
Joined
Jun 24, 2009
Messages
9,577
Reaction score
41,635
Location
Hartselle Alabama
Rating - 0%
0   0   0
With all this hurricane stuff going on I decided I needed to cut my house over to generator power and continue the break in process. You aren't supposed to run it for more than an hour at a time until it has been run for 6 hours and you've done an oil change.

So! This post is totally off the grid!

In other news, the pulls for my doors came in:
IMG_6308.JPG


The tank is under Atinic in that pic because it's from sunrise this morning (or rather about noon).

Whiskey

You should be very proud of that!
 

Fusion in reefing: How do you feel about grafted corals?

  • I strongly prefer grafted corals and I seek them out to put in my tank.

    Votes: 1 5.9%
  • I find grafted corals appealing and would be open to having them in my tank.

    Votes: 13 76.5%
  • I am indifferent about grafted corals and am not enthusiastic about having them in my tank.

    Votes: 3 17.6%
  • I have reservations about grafted corals and would generally avoid having them in my tank.

    Votes: 0 0.0%
  • I have a negative perception and would avoid having grafted corals in my tank.

    Votes: 0 0.0%
Back
Top