225g CDA SPS dream build construction background

AaronFReef

Well-Known Member
View Badges
Joined
Oct 11, 2018
Messages
745
Reaction score
603
Location
Monterey, California
Rating - 0%
0   0   0
This is the background thread of my dream 225 gallon Crystal Dynamic Aquarium SPS build https://www.reef2reef.com/threads/225g-cda-sps-dream-build.888411. Read on for more info on what it took to prepare for my dream and how I got to this point, which at the time of this writing is sprawled up on a lazy boy with a sprained ankle in the air. I guess that’s what it takes to make me take the time to write this :p There will be description and pics of the construction and planning for the new tank and the obligatory but skippable personal background.

Current system for read-on-bait https://www.reef2reef.com/threads/reef-rehabilitation-29g-cube-and-equipment-room-build.519795/
52B3E7AC-BA68-4C24-911D-801746EEF348.jpeg

02D5457C-859D-4B61-9DC7-22BBBD1BDFCA.jpeg

My background: skip this paragraph for those of you who tire of the personal background as I usually do. But here we go. I’ve been in the hobby since my dad, himself a marine biologist through education, though not practice, got us all started with South American freshwater tanks and (statute of limitations expired :p) temporary homes for tide pool collected Monterey, California specimens where we live. Don’t do that. Do as I say, not as I do and all that. We had tanks until my brother left me with his South American cichlids tank to take care of when he went to college. It was his tank so for me it was just a chore. I neglected the fish until the last one died sadly, and then shut down the tank. The next week I had trouble sleeping and it occurred to me I missed the sound of the bubbling water. This drove me to research setting up my own tank. But I have a personality problem with always wanting to push hard on the things I endeavor to do and decided I wasn’t doing anything the easy way. I was going to set up a reef aquarium with no money and, at first, no job as a teenager. Reef aquariums and unemployment are hard bed fellows so I started working in pet stores to afford my new addiction. I had reef aquariums of various sizes and bred African cichlids in up to 11 aquariums in my mom’s garage until I went to college and decided to only bring a 29g African shelldweller cichlid tank. It stayed with African cichlids until three years ago when I developed MS and decided it’s now or never on the dream of growing a successful SPS tank I could never previously afford. That was a bit of panic dealing with my new diagnosis, but fear not, modern medicine is amazing and MS can be put in remission. This SPS lagoon of 24g has been successful in my opinion though there’s always much improvement in husbandry to be made, at least for me. The build thread for that can be seen here: https://www.reef2reef.com/threads/reef-rehabilitation-29g-cube-and-equipment-room-build.519795/. That tank was hand built by myself and a friend and I only planned to run it for a year but now three years later, it’s still my primary system. Soon to be replaced. So let’s get to that. Next post!
 
Last edited:

Billldg

My Gem Tang Is Watching You
View Badges
Joined
May 14, 2018
Messages
17,478
Reaction score
121,885
Location
Georgia
Rating - 0%
0   0   0
Great looking existing tank. Can't wait to see what you do with the next one.
 
OP
OP
AaronFReef

AaronFReef

Well-Known Member
View Badges
Joined
Oct 11, 2018
Messages
745
Reaction score
603
Location
Monterey, California
Rating - 0%
0   0   0
Great looking existing tank. Can't wait to see what you do with the next one.
Thanks Bill! Learned lots watching your 225 CDA build and am still doing so. Hopefully 10x the water volume will allow me to grow some naturally shaped colonies when I move these funky little stone shrubs over ;Playful

My house is what you’d call…. a fixer upper… it has old knob and tube wiring throughout that runs parallel to some 1970s aluminum braid shielded romex with no grounds run to most places. I’ve been doing my best from an untrained DIY background to bring it into at least last century in my copious free time as a parent of two little ones :D. In fact, plans for a dream reef were part of my motivations to push to own a home in an area that’s darn hard for a millennial to enter with the central coast of California. I couldn’t tear up an apartment, so a-home shopping we went looking for a house with a big uninterrupted wall next to an area we could do an equipment room. This house fit the bill, but I was far too naive about remodel costs to convert a laundry room with an electrical sub panel in the wall I’d use plus there was nowhere to move the laundry to.

That left me with another wall that was a little less optimal in some ways (proximity to a cast iron gas stove that may rust) but access to a wall that was exterior with the possibility of a full equipment room behind it. I did countless hours of Google SketchUp and time with a tape measure to make an accurate model of my room and patio where the fish room would extend off of.
5203E992-15F2-4E75-8304-224F908859BF.jpeg


It didn’t make sense to build myself a fancy fish room and leave the ratty old bamboo curtain-framed patio with cracked and mismatched slabs connecting it to the house so I first had to build my wife and family a nice patio outdoor kitchen.

1C489D5F-8B6A-4196-ADB2-06F6A65C8BF7.jpeg
76D90849-7620-47E4-88C1-90FE28A80442.jpeg


I couldn’t imagine affording a dream tank in addition to the guesstimated costs to build a fish room attached to my house and a new patio kitchen so I began talking to contractor friends and getting some guidance on building a form to pour concrete and took it upon myself to prep the conduit and plumbing for the sink, hose bibs, and a spot to pour a big fish room slab with slop sink. When I had done all that I had a crew pour the slab and a mason frame out a cement block kitchen.
0B62ACDC-0600-4814-AA12-C8519017FBA7.jpeg
C28C2B46-C5A9-4CF4-BB18-D62A506E5F14.jpeg
EAFBA719-9BF7-486F-8931-20648EF388C1.jpeg

C14EEA7E-AD1E-49C0-BAB5-3CF84791E960.jpeg
A3C9F918-18C6-4679-853C-03CEEE5088AF.jpeg


This hurt my budget a good deal so like this it sat for a year until I could get a contractor to build out the cement block cabinetry frame and put a stone veneer and slab and sink up. That contractor overran his estimate by 4x which I stupidly didn’t sign a price for and instead did hourly since he was a friend of a friend and into reef tanks himself so I figured he’d be good to me. Don’t do this. He did build me a nice kitchen (mostly until I cut him off and finished it myself….)
AA594654-6A9B-4703-B1D9-EAFC0B00E2EB.jpeg

48AFC019-F4C8-4E46-B222-C95798DEC9A4.jpeg
CF2D8CE2-2A2B-471A-9D7E-C8220D600E5C.jpeg

Now my budget for a fish room was gone. Kids were getting older and costing more and we were vacationing more so I couldn’t stomach a full fish room. Estimates for the framing alone of the slab I had poured were $12k. I was going to do all the interior work after sheathing and roofing.

That left me to deciding I should just build a custom lean-to shed on this south facing wall on the slab right behind the planned tank location.

The wall behind the fish tank location had balsam wool insulation which is fire resistant wood shavings in batts. The wall was cedar tongue and groove with a single pane window facing south right over the tanks planned location. It had one outlet about midway up the wall oddly high and another outlet on that same ungrounded circuit. Work was needed. So in September we began to remove the window with plans to reframe the inside of the window to close it off by the end of the night. As soon as the pane came out, my oldest started throwing up and work was done for the weekend as I lost my better half to nurse duties. Poor kid and all…. But somehow they know what they’re doing….;Playful

2746AE3F-692E-4A5E-844B-EE2361B8F5D6.jpeg
 
Last edited:
OP
OP
AaronFReef

AaronFReef

Well-Known Member
View Badges
Joined
Oct 11, 2018
Messages
745
Reaction score
603
Location
Monterey, California
Rating - 0%
0   0   0
With the window re-framed, custom battens made to the odd thickness of my old house with a planer and some oak trim, and redwood siding closing the window back up, I could move forward inside.
3644E8D1-F07F-49D9-9E32-2444D4C76C6A.jpeg
 
OP
OP
AaronFReef

AaronFReef

Well-Known Member
View Badges
Joined
Oct 11, 2018
Messages
745
Reaction score
603
Location
Monterey, California
Rating - 0%
0   0   0
I started ripping out the cedar tongue and groove to access the wiring and reinsulate this south facing wall in an area that regularly hits 100, sometimes hitting 90 in the house… don’t worry I added AC now for those scorcher days.
EE4492D8-C272-4C4E-9A55-CD9A42B65162.jpeg


Once it was all out, I was able to start wiring new outlets. I neglected to mention that simultaneous to the patio work I was doing a solar panel and backup battery install with my step-father. One of these outlets is on the battery backup and the other two circuits are not. I feel like this or a generator is highly necessary.
E7C5EA45-7B05-4629-ADF6-63C06686C93F.jpeg
70A026F6-0534-4DFD-96A3-0CE736BBF503.jpeg
 
OP
OP
AaronFReef

AaronFReef

Well-Known Member
View Badges
Joined
Oct 11, 2018
Messages
745
Reaction score
603
Location
Monterey, California
Rating - 0%
0   0   0
I also ran CAT-5e Ethernet cable so that I’d have a wired line to my apex and reduce dropout. Additionally I cut a hole for 1-1/2” PVC that I can run many things through such as auto water changer lines, skimmer air lines, ATO feed as I plan to have my ATO outside in the shed, and aquabus cable for an EB8 or 4 in the shed. It’s large enough I might be able to pass a vinyl hose through to use for manual water changes though a python will work fine wrapping around through the door. When this is all finalized I will spray Great Foam into it and close off the air gap. Today it’s got plastic wrap and a rubber band at both ends to my wife’s delight. Sorry hun!

She would like me to mention that she has been part of all the construction :p that is especially true with the insulation and drywalling which is what came next.
4C8C88C9-1B5C-4735-BE6F-2B44A9601289.jpeg

1775A618-8656-4CD0-B91A-04DBF134D570.jpeg
5ADCEDD0-4B01-45E0-BDC4-55A9FB9330F4.jpeg


The wall is plain compared to our previous milk painted cedar tongue and groove but that’s actually what we wanted so that the tank pops against a blank slate. More importantly, we could do it ourselves versus more complex options.
 
OP
OP
AaronFReef

AaronFReef

Well-Known Member
View Badges
Joined
Oct 11, 2018
Messages
745
Reaction score
603
Location
Monterey, California
Rating - 0%
0   0   0
I neglected to mention that the wall was just finished to the point you see in the last picture this week. my wife and I suddenly hustled on it when I asked CDA for an update thinking we were months away and they said they’re starting to build my tank!

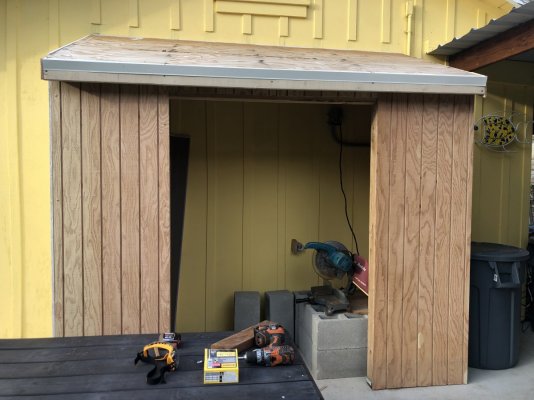
Simultaneous to the wall going up we have been working on the lean-to shed outside as I wanted a clear idea of where to cut the hole for the passthrough. Here’s me and my munchkins as we finished the first part of framing. My wife and my first time using a nailgun so I am happy it not only stood up but no visits to the ER!
9B958E6E-C235-45EC-9C80-B12AF77FB9CC.jpeg


Framing the roof
8988BE1E-4298-47F0-B4DF-323A8D41E29B.jpeg
659D99B5-8CAC-4051-A2BB-9C5A7D1D2B9C.jpeg


First side up and using it as a wood shed until we resume construction some day post ankle injury!
75C2065D-6177-428F-B967-3FE584344F6B.jpeg


This is where we stand with the construction right now.
 
OP
OP
AaronFReef

AaronFReef

Well-Known Member
View Badges
Joined
Oct 11, 2018
Messages
745
Reaction score
603
Location
Monterey, California
Rating - 0%
0   0   0
In my main thread you can see we’ve had tank delays slowing down the arrival of the tank but hopefully it’s nearly done and here. Supposedly within two weeks. Planning to go visit it at the shop in San Diego and check it out before they ship to make sure I’m happy with all the work. Short flight from here and k have a credit for a day on rentals cars so why not.

Finally beginning to work as my ankle nears normal again. Wife and I did an hour or so of work on the shed today beginning to build the water mixing stations platform. It’s overbuilt since I have lots of cement blocks excess from our patio work that will be both helpful and solve a storage problem.
C73AE2E5-06B9-463E-BEA7-84D55EE0E5FE.jpeg
E40B1310-FE4D-410A-9327-7384F0BD04E7.jpeg
 
OP
OP
AaronFReef

AaronFReef

Well-Known Member
View Badges
Joined
Oct 11, 2018
Messages
745
Reaction score
603
Location
Monterey, California
Rating - 0%
0   0   0
Made some good progress on the shed this weekend finally. Got the electrical wired in and put the siding on the front except for the door. Have a good ways to go and it’s a rush now because the tank is shipping!!!
 

Attachments

  • D00A12FE-CA62-48DD-B93E-64C868CFEAF2.jpeg
    D00A12FE-CA62-48DD-B93E-64C868CFEAF2.jpeg
    172.2 KB · Views: 34
OP
OP
AaronFReef

AaronFReef

Well-Known Member
View Badges
Joined
Oct 11, 2018
Messages
745
Reaction score
603
Location
Monterey, California
Rating - 0%
0   0   0
The tank arrived four days ago. It was a real interesting day. The tank came on a 28 foot trailer pulled by a full on tractor trailer. The guy said “I should NOT have come down your driveway” when he pulled in lol. I convinced him to give a go of backing up into my backyard with the beast for a tip and he was willing and gave it his best but he couldn’t manage in my lawn which now sports some nice rototilling hahaha. Worth the effort though because he had to drop the crates just below our slab which meant maneuvering 1000lb of dry weight tank and stand over dirt and up onto the slab. We managed it with a pallet Jack, many sheets of plywood, eight suction cups, and lots of helpers and manpower.
The pallet Jack was $45 from a local tool rental which also provided eight suction cups at $12 each so it wasn’t bad.
E8628A40-EA2D-47FE-8412-395F11A38740.jpeg

0C6A98B7-E5A9-49BD-8E0F-E82E2104A4DB.jpeg
F8E4160B-C322-48E6-9070-CB8E9439ED6B.jpeg
3864C47F-CC55-4FBF-B504-EB9CACF5C25B.jpeg

15CDC583-2980-413F-AA99-AB316F4310CC.jpeg
8AE1CD4E-6F69-4489-BFC9-5245B77907C2.jpeg
E32D073E-8421-4EBD-BEA5-C9D6EF35C136.jpeg
E8BC4C69-9DF1-4247-AC43-E5A079A9062F.jpeg


To get the tank in the house we used some heavy duty dollies and then once it was in the house, we put felt pads on the leveling feet of the stand so it could slide easily and then put it facing backwards so we could slide the tank on from the back of the stand. To do that we used a Harbor Freight lift table and jacked the tank up to 34” which was 6” short of the stand and we used the suction cups to muscle it up to the stand. Don’t forget to place your suction cups higher than the height of the trim unlike we did or else you will get them stuck

68EDB530-0F62-4318-9146-EDC33A28C433.jpeg
B73D0564-5B41-4377-A1F6-DAFC5DAD6C99.jpeg


So the tank is in place and yesterday it was back to shed construction so I can move forward on that. I shingled the roof which we felted last weekend and I built door frames which I hope to skin today around all the Mother’s Day activities if I can sneak away for my selfish hobby when no one notices …lol. Fat chance of that but I’ll try to move forward this week on evenings as well. I want this built!
AA1F5278-E383-46ED-95BD-7433A86C2AE9.jpeg
40909146-1281-4074-938C-09B940C6DAAE.jpeg
 

Daniel@R2R

Living the Reef Life
View Badges
Joined
Nov 18, 2012
Messages
37,501
Reaction score
63,940
Location
Fontana, California
Rating - 100%
1   0   0
Looking fantastic!!
 
OP
OP
AaronFReef

AaronFReef

Well-Known Member
View Badges
Joined
Oct 11, 2018
Messages
745
Reaction score
603
Location
Monterey, California
Rating - 0%
0   0   0
It’s been a minute since I updated (or really worked on) the shed but yesterday I went to work until the pvc cement fumes had me higher than a kite and the light was gone. I got the inside of the shed insulated.
66553515-6C95-4FE8-BD4E-ACA11844CCAC.jpeg

only picture I have is mid process but I got this stuff in to help stabilize the temps. After that I put the tanks in on their cinderblock platforms and started attempting to plumb the mixing pipes.
84DFEC23-77F0-41FA-88CB-BB31C0629343.jpeg

003B07E9-ABD0-4CA5-9E69-B0668C04E629.jpeg

By the end of the night this is what we had which has me most of the way there. Just need to plumb the other side of the tee to a true Union ball valve and down facing elbow to fill buckets and run the return line with a slight bend to correct the weird 40 degree angle coming off my Iwaki RXT I was unaware they had. I plan to bend the PVC using a heat gun to accomplish five degrees and use a 45 to accommodate the rest. Meanwhile the tank got filled last night and I’m mixing salt in it so we’re off to the races!
 
OP
OP
AaronFReef

AaronFReef

Well-Known Member
View Badges
Joined
Oct 11, 2018
Messages
745
Reaction score
603
Location
Monterey, California
Rating - 0%
0   0   0
Alright well! The mixing station is plumbed! Just finished wiring the Iwaki pump (didn’t know you needed to solder your own plug. Yuck. I suck at soldering) and tested it out. It really moves some water even with just an Iwaki 40 RXT. Also of note is the 40 RXT has a 45 degree output which is funky and needs to be accounted for with a 45. Hadn’t seen that anywhere in the descriptions but could have missed it. The system is plumbed so that I can pump from one to the other and can pump out a quick disconnect hose connection (no hose or barb attached to the male adapter shown). I can also drain the either tank out the 90 degree elbows with their own ball valves.
9A5CD389-2996-4AFF-B15E-F392BBA20B4E.jpeg


Now I need to run the lights, and begin mounting my electrical and RODI board. I will be making a CO2 degassing chamber too since my well water destroys my anion resin in 50 gallons.
 

Creating a strong bulwark: Did you consider floor support for your reef tank?

  • I put a major focus on floor support.

    Votes: 35 42.2%
  • I put minimal focus on floor support.

    Votes: 20 24.1%
  • I put no focus on floor support.

    Votes: 26 31.3%
  • Other.

    Votes: 2 2.4%
Back
Top