Cool getting started is always fun. I'm now wishing for 1$ gallon sale at petco. lol
Navigation
Install the app
How to install the app on iOS
Follow along with the video below to see how to install our site as a web app on your home screen.
Note: This feature may not be available in some browsers.
More options
You are using an out of date browser. It may not display this or other websites correctly.
You should upgrade or use an alternative browser.
You should upgrade or use an alternative browser.
40 Breeder stand- Now a Build Thread
- Build Thread
- Thread starter Lingwendil
- Start date
- Tagged users None
Got the bottom frame screwed and glued, then ended up having to help a buddy out on his truck, followed by the movies with the kids. Hopefully I can get the uprights trued up in the next few days, then start working upwards 
Lol.. Well I sure you get it done "eventually" 
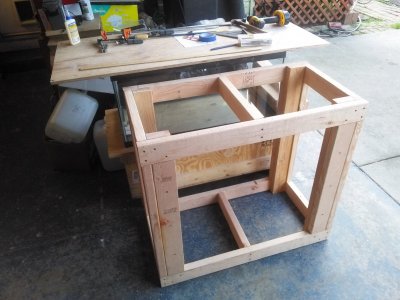
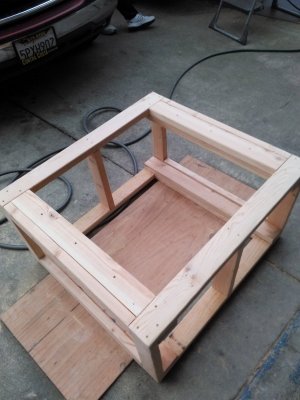
Ugh. Finally got it together. Plywood and shelves are up next, I've got a pile of either 5/8" or 3/4" plywood on hand, so I need to do the bottom platform, two shelves, and the top. Still thinking of how I want to do the shelves.
It took 74 or 76 screws to build, I forget which
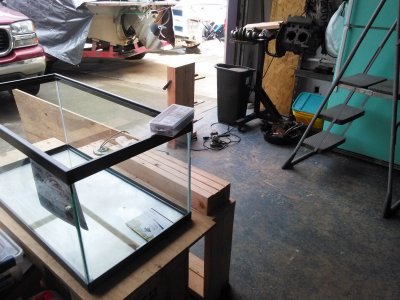
Dollar per gallon sale is going, so I grabbed the tank today too.
Last edited:
Oh cool that looks great. I like to see what your shelves are going to look like too.
I didn't realize 1$ per gallon is on again already. I guess that's good if I screw up my drilling and need a redo lol.
I didn't realize 1$ per gallon is on again already. I guess that's good if I screw up my drilling and need a redo lol.
For anybody that is considering building one of these, the single biggest piece of advice that I can give, is use very good screws! The amount of pain/fuss it will save you cannot be stressed enough. I decided to go ahead and follow the advice I was given regarding using these GRK screws, and they are sold specifically with the recommendation that they do not require predrilling or countersinking. They work as advertised for sure- the only issue I had with them was due to me putting one right next to a knot that I hadn't noticed, and subsequently splitting the piece... I simply glued and clamped the piece and it was easily repaired, due to it being a very small split. I was using kiln-dried douglas fir- if you were to use a harder and/or denser wood you may still wish to predrill for added insurance against splitting, especially in the areas where you are drilling into the endgrain of the boards. No matter what you do, apply lots of glue between pieces, and clamp them well during assembly to ensure they are nice and tight during screw-up.
These are the screws I used-
https://www.homedepot.com/p/GRK-Fas...i-Purpose-Screw-100-per-Pack-103101/203525228
For the top I think I'm going to use 2" #6 or #8 to attach the plywood to the frame, depending on what I find that looks like it will work.
These are the screws I used-
https://www.homedepot.com/p/GRK-Fas...i-Purpose-Screw-100-per-Pack-103101/203525228
For the top I think I'm going to use 2" #6 or #8 to attach the plywood to the frame, depending on what I find that looks like it will work.
Last edited:
I guess I used #10s GRKs hopefully that doesn't make a big difference. Then I used GRK framing screws (Trim-Fin) to put up the plywood facade.
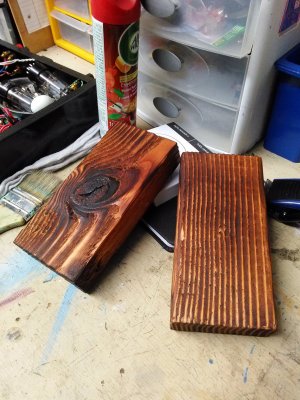
Just thought I would give an update on the proposed finish- this is the look that the wood gets after a coat of boiled linseed oil, lay it on thick so it soaks up as much as it can, and then whip of any left behind after twenty minutes or so. Keep in mind this is without any stain at all.
Lightly toasted-
Charred and scrubbed-
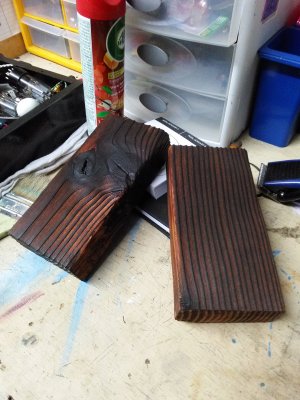
I really like the lightly toasted version. The charred version is nice, but a bit too "aggressive" looking, and a tad too dark. I'd love to do some outdoor furniture or shelving in that style though. I'm thinking that rounding over all the hard edges, finish sanding everything, wetting the wood to raise the grain, another sanding, and then toasting with the torch. After that, scrubbing down the soot and a few coats of oil might do the trick nicely.
Lightly toasted-

Charred and scrubbed-

I really like the lightly toasted version. The charred version is nice, but a bit too "aggressive" looking, and a tad too dark. I'd love to do some outdoor furniture or shelving in that style though. I'm thinking that rounding over all the hard edges, finish sanding everything, wetting the wood to raise the grain, another sanding, and then toasting with the torch. After that, scrubbing down the soot and a few coats of oil might do the trick nicely.
pretty neat I like to see how it looks when its done.
Man, this is a lot of fun.
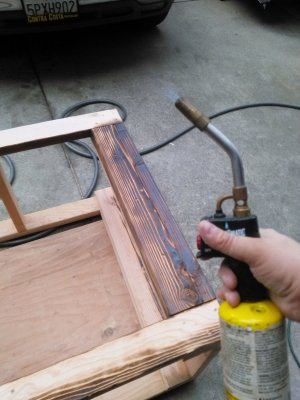
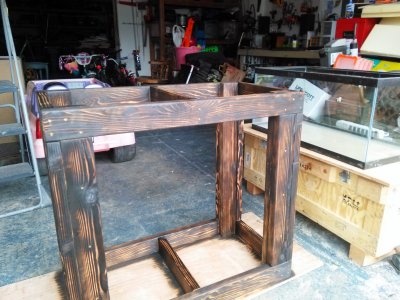
Still need to give it a scrub, not sure if I want to go with a scotchbrite or a wire brush- but I'm thinking a brush may be better. Then I'll do a few coats of oil. I'll start on the shelving and platform next, likely going with a dark stain on them for contrast, and will use bookshelf/pillaster strips I'm thinking, but I'm not sure if I'll get too much sag on the shelves without some sort of reinforcing strips. Still working out the best solution there.


Still need to give it a scrub, not sure if I want to go with a scotchbrite or a wire brush- but I'm thinking a brush may be better. Then I'll do a few coats of oil. I'll start on the shelving and platform next, likely going with a dark stain on them for contrast, and will use bookshelf/pillaster strips I'm thinking, but I'm not sure if I'll get too much sag on the shelves without some sort of reinforcing strips. Still working out the best solution there.
I would have never thought of burning the wood. Makes a nice touch.
Well, here's what it looks like with the tank on it- pretty nice if I do say so myself.
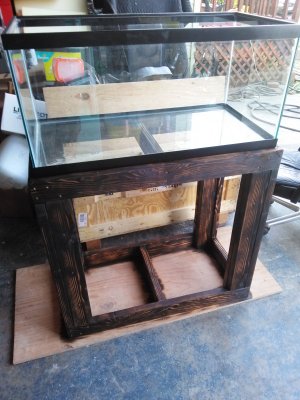
Here's what it looks like after a heavy brushing and scrubbing with a scotchbrite pad. It lightened up a good bit, but it's necessary to scrub it all down otherwise you will have loose soot/char at the darker spots. It'll darken up again once it's oiled up and given time to age a bit.
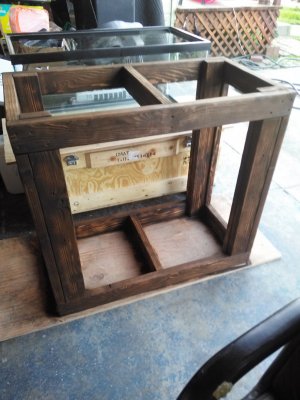
I don't know if I still intend to do plywood on top- I think after I do a little adjustment to get it all level up top (its a smidge off after sitting for a few days after assembly) I may just leave it as it is, as I really like the look of it setting directly on the stand. I'm not sure how plywood would react to the burning technique. I need to do a piece for the bottom anyway, so maybe I'll just see how that goes first.

Here's what it looks like after a heavy brushing and scrubbing with a scotchbrite pad. It lightened up a good bit, but it's necessary to scrub it all down otherwise you will have loose soot/char at the darker spots. It'll darken up again once it's oiled up and given time to age a bit.

I don't know if I still intend to do plywood on top- I think after I do a little adjustment to get it all level up top (its a smidge off after sitting for a few days after assembly) I may just leave it as it is, as I really like the look of it setting directly on the stand. I'm not sure how plywood would react to the burning technique. I need to do a piece for the bottom anyway, so maybe I'll just see how that goes first.
Check out @Greybeard build thread, I believe he did a fantastic stand with bookshelves.
wow pretty fascinating how scrubbing it makes it almost look like it stained in a way. Anyways, I did plywood on top but I ended up with some very small gaps at it sets on top. They are like 1/16" (if that) which I'm not sure if is a really big issue or not. If I put light pressure on it then it sets down on the stand. I'm thinking maybe put that wood epoxy on the top and then sand it flatter after that maybe?
I forgot to ask as well did you say you had some idea for putting a light holder on the stand? I was wondering what you had in mind as I need to do something like that.
I'll post more info on the light holder setup soon, it's basically EMT conduit with a bend to act as a hanger, with U straps attaching it to the rear of the stand, it's cheap and pretty slick 
Here's a link to the post where I show the temporary hanging setup until the stand is built- it'll be attached to the rear and painted for final install...
https://www.reef2reef.com/threads/general-diy-led-thread.534238/page-13#post-5714089


Here's a link to the post where I show the temporary hanging setup until the stand is built- it'll be attached to the rear and painted for final install...
https://www.reef2reef.com/threads/general-diy-led-thread.534238/page-13#post-5714089
Forgot to respond to you earlier.. That looks pretty simple and slick.. You have an idea how much weight those EMT pipes can hold by chance?
Just scored a sizable lot of dry rock and maybe 20# of sand from a guy on facebook, picking it up tomorrow  Should work out well, I have a pretty horrible caulerpa infestation on my current rock and have wanted to start fresh anyways, as well as needing more. I'll be making up some PVC supports/frames to keep it up off the sand a bit more to prevent detritus buildup from becoming an issue, and to have some nice open caves for my Royal Gramma and an eventual shrimp or two. Build is looking to be pretty frugal so far
That's cool to pick up things for free or cheap is great thing.  Also they might be able to move your thread to the member tanks if you want to. Maybe ask a moderator.
Which reminds me of a question if I may ask here. I have a bunch of rock from my last tank that I was planning on re-using. It's been sitting for months dry. So I thought someone on the forum said it was pretty much sterilized if you let it sit dry for a while or is that not true? Could I just soak it in some light solution of bleach or vinegar if not?
Which reminds me of a question if I may ask here. I have a bunch of rock from my last tank that I was planning on re-using. It's been sitting for months dry. So I thought someone on the forum said it was pretty much sterilized if you let it sit dry for a while or is that not true? Could I just soak it in some light solution of bleach or vinegar if not?
I've always been in the habit of giving it a good scrub, rinse, and maybe a soak in case you're unsure of the origins. I'll probably give mine a soak for a week in freshwater just to draw out any crud that may have been left behind, followed by another scrub and rinse.
Similar threads
- Replies
- 17
- Views
- 207
- Replies
- 11
- Views
- 138


